Do you want to sew a beautiful and comfortable envelope for a newborn? You can use the ideas from the article.
The envelope is essentially the first clothing of a newborn baby. In it, the baby is taken from the maternity hospital and taken for its first walks. By wrapping the body like a cocoon, the envelope creates coziness similar to that of the baby when he was still in his mother’s tummy.
Despite the fact that there are ready-made envelopes for newborns on sale, more and more mothers are deciding to sew this product with their own hands, and they have reasons for this. Thanks to patterns and step-by-step master classes, even a woman who has never sewed before will be able to create a discharge, summer and winter envelope.
Safety is the first criterion for evaluating an envelope
The complete helplessness of the baby makes us care first of all about his safety. Possible risks:
- slippery fabric. If it is inside the envelope, the child may fall out of it; if it is outside, you risk losing the package from your hands;
- synthetic materials. Direct contact of a newborn's skin with synthetics is undesirable. Artificial fabric creates a “greenhouse” effect, can cause irritation, and increases the risk of developing allergies;
- ill-conceived design in which the envelope can unfold/unzip;
- poor quality of fittings and materials in general - for example, fading fabric or fluff coming out of the lining.
Note! Before purchasing a product, it is important to inspect it, taking into account the above criteria. If you plan to sew an envelope for discharge and for future use, then you should pay maximum attention to the selection of materials and patterns and read reviews about certain models.
This is interesting: Pattern Sets for babies (sizes 0-18 months)
Fabric selection
An envelope for discharge from maternity hospital is a product designed to protect the baby from wind and cold. A few decades ago, a regular baby blanket was used instead, which was rolled up and tied with a satin ribbon. When making an envelope for a child, you need to take into account the following points:
- at what time of year the discharge will take place;
- gender of the baby.
The main criterion that must be taken into account when choosing a material is that it must be hypoallergenic and safe. It is best to give preference to natural fabrics. It is especially important to adhere to this rule when choosing material for lining the product. A light summer envelope for a baby can be single-layer or with a lining.
Most often the following materials are used for manufacturing:
- cotton fabric – does not cause allergies and does not interfere with air circulation;
- satin - a smooth fabric woven from 3 threads, has increased strength;
- calico is a strong material that allows air to pass through;
- poplin is a natural fabric that is hard to the touch.
If desired, each of these materials can be used to sew an envelope, since they are safe for newborns and are guaranteed not to cause an allergic reaction upon contact with delicate baby skin.
Since summer is not always hot, it is recommended to make a lining in advance in case of cool weather. It is best to use holophane, which is an analogue of isosoft, as insulation. If desired, you can add a second layer of calico, which will prevent blowing.
Winter envelopes consist of two parts - an outer part and an inner part with a lining. The top layer of the product is sewn from warm, dense material. The following fabrics are most suitable:
- plush;
- fleece;
- grass;
- artificial fur.
Also, some mothers use satin to sew the outer part. For the inner layer, it is best to choose flannel - a safe hypoallergenic fabric. It is recommended to take as insulation:
- padding polyester;
- fluff;
- holofiber;
- sheepskin;
- bamboo fiber.
Each material has its own advantages and disadvantages. You need to choose fabric according to individual preferences and financial capabilities. To give the envelope a festive look, use ruffles, frills, and ribbons. Also, such a product must be equipped with special fittings: zippers, rivets, Velcro. If desired, you can tie the envelope with a regular satin ribbon.
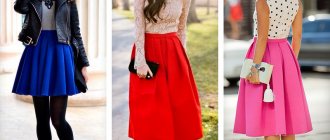
As for color design, the most common shades for children's envelopes are pink, blue, white, lilac, and gold. The last three options are universal. They are suitable for both boys and girls. The only thing that is not recommended for sewing a discharge envelope for a newborn is fabrics with complex patterns and colorful prints.
CalicoPlushPoplin
Satin
Fleece
Cotton
Hood
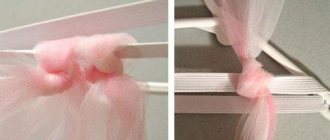
We make a hood. We connect the side parts of the hood with the middle one, grind them down, and do the same with the lining. We cut the insulation close to the stitching and stitch along the top of the hood. Next, I wanted to make an edge: I measured the length along the hood around the face and cut out a rectangle about 6 cm wide. I placed the edge with the wrong side on the front side of the upper hood. At a distance of 3 cm from the bottom edge of the hood, over the edge, we punch eyelets on both sides in order to insert the drawstring. Next, we connect the hood with the lining, placing it face to face, and lay a stitch, cut the insulation close to the stitch, and turn it inside out. The outer edge of the edge was bent 1 cm and stitched. The hood is ready.
Locks
Sew the side front pieces to the middle front piece from the neckline to the bottom. We pin the facings face to face and sew the frame from the wrong side.
Next, we rip the seam, not reaching about 2 cm from the bottom edge of the frame, and cut it to the corners. We cut off the insulation close to the stitching, turn the facing inside out and lay a stitch, removing 1 mm from the edge.
We pin the lock to the wrong side of the frame, having previously made fabric stops at the bottom.
We sew down the windproof strips, cut off the seam allowances close to the stitching, turn them inside out and stitch along the edges.
We pin the bar under the lock. For reliability, we baste the lock and the bar and only then sew along the line of the frame.
We do the same with the second lock.
We connect the parts of the back and the shelves of the upper part of the bag, placing them right sides together, and cut off the insulation close to the stitching.
Lining
We sew the side parts with the middle part of the shelf from the mark to the bottom. Next, we connect the back and the shelf face to face and sew with one line, from one shoulder to the other, leaving about 20 cm unstitched at the bottom so that you can turn the bag inside out.
Next, we baste the hood to the top of the bag: we chop off the middle of the hood and the back face to face, and fasten the edges of the hood with threads flush with the locks.
Now the difficult task is to beautifully connect the lining to the base along the line of the locks. Turn the lining inside out and put this “carcass” on the top of the bag, connecting at the locks and neck. We baste and then stitch using a lock foot with a stitch close to the one used to sew the locks. We cut off the insulation on the lining close to the line.
Then the hood was between the upper part and the lining, and a basting is visible, we pin it, or better yet, we baste the lining along the neck and lay a stitch, cutting the insulation close to the stitching. When you start doing it, everything will become clear. Turn it inside out through the bottom hole in the lining.
We still have small holes about 2 cm from the bottom of the zippers - I sewed them up by hand, and manually sewed up the bottom hole in the lining; these stitches are not visible at all on the fleece.
This is interesting: Pattern Envelope for a newborn
Required Tools
To make the work of sewing an envelope for discharge with your own hands as easy as possible, you need to stock up in advance with all the equipment that you will need during the work. To make summer and winter versions, you need the same tools:
- graph paper;
- sharp scissors;
- several needles;
- pins with colored heads;
- chalk for outlining;
- threads matching the tone of the material;
- sewing machine.
The expectant mother is recommended to print out the patterns in advance, which will be used to sew the product. Working with them is much more convenient than with electronic layouts. In addition to tools, for sewing you will need the material itself, accessories (zippers, buttons, Velcro or ribbons), as well as decor. With minimal experience, you can sew a blanket for discharge in a day. If the simplest option is chosen, the work will only take a few hours.
What will you need?
Before sewing the envelope with your own hands, we will select the appropriate fabric. In contact with the baby's delicate skin, it should be hypoallergenic and safe. Preference is given to products made from natural textile fibers. However, some modern fabrics made from synthetic polymers are not inferior in quality to their natural counterparts. We will need three types of material: two for outer layers and one for insulation.
The following selection will help you understand this issue.
Material for lining - inner layer
Cotton is a fabric of plant origin, has high wear resistance, strength and excellent absorption capacity. Things made from it are comfortable to wear, heat-resistant, and soft to the touch.
Satin is a type of cotton, but differs from the previous fabric in the way it is weaved. Satin fabrics are very beautiful, have a shiny surface and do not wrinkle at all.
Poplin is a cotton fabric made by intersecting threads alternately. Longitudinal thick threads alternate with thin vertical ones.
Calico is an inexpensive variety of cotton. It is environmentally friendly, durable, easy to iron, and keeps its shape after washing.
Flannel - suitable for children's clothes. It has a fleecy surface, soft and pleasant to the touch. It is used to make diapers and clothes for newborns. The ideal solution for a handmade blanket for discharge.
Fleece - its characteristics are comparable to flannel, but a little stronger. Perfectly absorbs excess moisture and dries quickly.
Velsoft is a new generation of synthetics. It has a soft surface with a small pile. It has antibacterial properties and tolerates frequent washing well.
Velor is very durable, retains heat well, holds its shape, and has an excellent appearance.
Plush is a beautiful material with a small pile. It is very warm and soft to the touch, giving a feeling of comfort. Minky plush is now in great demand; this new invention has a beautiful appearance and retains it for a long time even after repeated washings.
Fleece is soft, light and pleasant to wear. It has good hygroscopicity and allows air to pass through. Durable and easy to maintain.
Faux fur is a synthetic material that imitates animal fur. May have long or short pile.
Insulation
Sintepon is an excellent insulation material with insulating properties. It is light, harmless, and breathable. Caring for it is not difficult.
Alpolux is environmentally friendly, made from a mixture of artificial fibers and wool. Very warm, does not deform, does not create a greenhouse effect, suitable for frosty winters.
Sheet holofiber is synthetic and does not cause allergies. It is lightweight and can withstand a huge number of washes.
Holofan is an analogue of holofiber, it retains heat well and evaporates moisture.
Isosoft is a modern insulation material that will save heat in any weather.
Outer material for envelope
Denim is a rough, dense material based on natural fibers. Keeps its shape perfectly, is wear-resistant and provides good air exchange.
Raincoat fabric - the fabric is impregnated with a water-repellent composition, protects against getting wet and removes excess moisture well. Ideal as an outer layer for envelopes that will be used in rainy weather.
As the outer layer for a DIY discharge blanket, you can use any other material recommended for the lining.
Also during the work you will need the following devices:
- scissors;
- long ruler;
- threads to match the fabric;
- pattern for rounding edges;
- tailor's pins;
- buttons, Velcro or zippers 50-60 cm long;
- lace, ribbons for decoration;
- soap or chalk.
How to sew an envelope for a newborn: materials and tools
When going to the maternity hospital, every mother makes sure that her baby looks beautiful on the day of discharge. The best way to decorate a photo shoot, even in the summer, is a special envelope in blue, pink or any other neutral color. A craftsman can sew such a product to order, but if a mother wants to do something with her own hands, she can make the envelope herself. This process will not take much time.
If the gender of the child remains unknown, you can use material of a neutral color, for example: mint, gray, brown PHOTO: images.ru.prom.st
To sew a winter envelope for discharge with your own hands, you need to adhere to the following rules:
- convenience - since it is scary to pick up a newborn baby, you need to make sure that the envelope unfolds as much as possible and has ribbons and Velcro;
- naturalness – it is necessary to select hypoallergenic but natural fabrics;
- seasonality - depending on the time of year, filler is added to the product or removed;
- safety – it is important that decorative elements do not create discomfort for the baby.
The material is selected individually, according to personal preferences. You can use chintz, satin, cotton and satin for the outer layer. To get started, you will also need sewing supplies: machine, thread, tailor's yardstick and pencil, pattern, ruler and tape.
Round transformable crib for newborns : design features and main types, additional accessories; materials used for manufacturing; main sizes, popular manufacturers, model ratings, selection criteria, reviews from real consumers.
How to sew an envelope for discharge
The first thing you need to do is determine the correct size of the blanket for the newborn at discharge. Since it is impossible to know exactly how much the baby will weigh before the baby is born, approximate figures are used.
You can sew a transformable blanket for a newborn with your own hands according to the instructions.
| Illustration | Description of action |
| Take your favorite soft material of any color, white cotton velor and filler - a sheet of holofiber | |
| Cut out squares measuring 83x83 cm², fasten with pins | |
| We apply markings for quilting soft material. First, select the corners of 21 cm, and then, moving from the resulting line, retreat 30 cm to the next mark | |
| We sew the workpiece in the shape of diamonds | |
| We sew the entire workpiece around the perimeter | |
| We apply the main material to the front side, and also stitch around the perimeter of the product | |
| We sew a plastic zipper on one side. At the same time, we retreat 1.5 cm from the bottom side | |
| Sew on an additional side zipper | |
| When sewing the sidewall, make sure that the seam is not too close to the teeth | |
| Additionally, we cut out a pocket 42x26 cm. We use two pieces of fabric that are folded right sides together | |
| We attach an elastic band to both sides of the pocket so that it stretches. We turn the workpiece inside out. | |
| Sew on the pocket | |
| We connect the front and inner parts of the product, stitch and process all the seams |
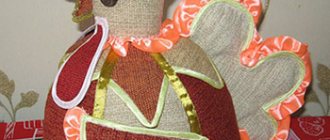
For a girl, you can choose a light fabric, or decorate the product with beautiful frills.
DIY transformable blanket for a newborn - master class
In anticipation of the long-awaited meeting with the baby, the expectant mother tries to prepare as much as possible and choose not only beautiful things, but also high-quality ones. Thanks to the modern assortment, choosing a beautiful cap, romper, diaper and envelope will not be difficult.
But I really want the main attribute for discharging a baby from the maternity hospital to be not only unique and exclusive, but also to serve in the future. We suggest you make a transformable blanket for a newborn with your own hands - you will find a master class in the form of detailed step-by-step instructions in this article.
You can make this rather multifunctional item even without minimal cutting and sewing skills.
Required materials and tools
When starting to make a transformable blanket for a newborn with your own hands, you need to prepare the following materials, tools and accessories:
- Insulation, for example, alpolux;
Important! In addition to Alpolux, you can also use synthetic winterizer or isosoft for insulation. It should be chosen based on what time of year the blanket is designed for.
- Material for external finishing;
Important! The most commonly used is velor, as it is soft and stretches well. In the absence of one, you can use denser fabrics for sewing children's clothing - cotton, raincoat fabric and flannel are suitable.
- Soft knitwear for interior decoration;
- A small piece of fabric for a pocket;
Important! Try to choose natural and environmentally friendly fabrics. This will eliminate the possibility of various allergic reactions and rashes on your baby’s body.
- Linen elastic;
- Threads in color;
- 2 detachable zippers;
- Overlock;
- Scissors;
- Sewing machine;
- Ruler;
- Needle;
- Tailor's Marker;
- Tailor's pins;
- Glue for working with fabric.
How to sew a transformable blanket with your own hands?
After all the materials have been prepared, you should calculate the size of the future product. The standard size of such blankets is considered to be 75x75 centimeters, taking into account the fact that most children are born with a height of 45-60 centimeters.
Important! In order for such an envelope to last for at least three months, it is best to cut a blanket measuring 80x80 centimeters.
Why is it worth sewing your own envelope?
- Ready-made options may not fit in size;
- The quality of materials may be inferior to practicality;
- Indeed, a good envelope can be quite expensive;
- For a DIY envelope, moms use fabrics and finishes they chose;
- With the help of a pattern and step-by-step instructions with photos, any mother can figure out how to sew an envelope;
- A self-sewn envelope will stand out for its uniqueness, especially at the time of discharge from the maternity hospital.
Bottom line
Now children's stores offer a wide selection of blankets for discharge, trimmed with lace, ribbons and other decorative details. However, it is best if you sew the blanket yourself. This way you will not only save money, but you will also know the materials from which the product was made, i.e. you will control all stages of creation.
Be sure that a DIY blanket for a newborn will last a long time and will leave good memories in the children’s memory.
Step-by-step sewing instructions
Several options for DIY winter envelopes for a newborn.
Option 1
Fabrics are selected for three layers (inner, insulation and outer). You will need a rectangle of fabric 130x60 cm. All layers are sewn together. The rectangle needs to be folded in half, 20 cm away from the top, and zippers must be sewn on both sides. The top part is folded over, formed into a hood and sewn at the sides.
Option 2
For the main fabric you will need 90x85 cm of fabric, a regular zipper up to 25 cm, a detachable zipper up to 55 cm, for a pocket you need a piece of fabric 45x25 cm. Insulation can be placed in the pocket. It needs to be sharpened from the front side of the lower part of the main fabric in the center. A detachable zipper is sewn on the bottom sides, a regular zipper is sewn on the top center for the hood.
Option 3
Cotton 100x100 cm is used for the outside of the envelope, fleece for the inside, and padding polyester for the insulation. Depending on the layers of insulation, the size of the fabric increases proportionally. Additional materials you need to take include binding, detachable fastener, elastic band, zipper, buttons, chalk, scissors, thread. We mark the envelope on the main canvas in the form of 25x25 cm squares.
Collecting the envelope:
- 1 layer - fleece;
- 2nd layer - padding polyester;
- 3rd layer - cotton.
We sew all the layers together using a sewing machine, basting the fabrics in advance so that they do not diverge. Sew a 5 cm wide binding along the contour of the envelope, turn it inside out, and baste on all sides. Sew a strip of fabric with holes for buttons along the edges in the center of the envelope, sew on buttons.
Option 4
For an envelope in the form of a sleeping bag 100x60 cm, you will need a piece of fur fabric 110x130 cm and a zipper of the appropriate size, which will be sewn on the side. Fold the fabric in half with the fur facing out. We process the outer seams, bending the fur 2 cm and sewing the zipper from the bottom up. Process the bottom of the envelope and hem it in several layers from the inside out. We make a semicircular cutout for the face. We process the corners and edges, bending the fur by 2 cm. If you insert a lace into the fold, you can make something like a tightening hood.
Option 5
If you sew the zipper from the fourth option with the clasp facing up, you can make an envelope with a zipper in the middle. Turn the fabric inside out, place the zipper in the center and, focusing on it, make a semicircular cutout for the face. Sew the bottom of the envelope, turning the fabric fur side inside. Finish all edges by 2 cm and insert a cord to form a hood.
The decoration of your warm baby envelope may include embroidery, applique or ruffles.
Is it possible to make this with your own hands?
Every mother can sew a transformable blanket for a baby; it’s not difficult. It is enough to know how to use a sewing machine and have basic cutting and sewing skills. Below are detailed step-by-step instructions, but for now you need to prepare the materials for making the envelope.
Patterns and sizes
The sizes depend on the characteristics of the child. For babies up to 3 months old, folding blankets with a size of 80x80 cm are sewn. Up to 75 centimeters in height, a transformer measuring 90x90 cm is recommended. Universal dimensions are 90x85. The pocket is cut out in the shape of a trapezoid 25 cm high, the side for the elastic is 50–55 cm, the bottom side is no more than 45 cm.
It’s easy to find ready-made patterns in the public domain or make them yourself, taking into account the height and fullness of the baby.
Necessary equipment for production
In addition to tailoring tools and fabric, you will need
- zippers, one detachable, 55 cm long, the other short, 15–20 cm for the hood;
- elastic band, it will be useful when tightening the edge of the leg pocket;
- bias binding, it is selected to match the main color or a contrasting color.
For sewing, choose hypoallergenic materials that dry quickly and can be washed without problems. For demi-season options, variegated colors are desirable, on which random dirt is not visible.
The main fabric can be dense, the lining can be pleasant to the touch and soft. For winter and demi-season options, fleece, flannel, and knitwear are recommended. Velvet, plush, raincoat fabric, drape, cashmere are sewn on top.
Important! For decoration, it is better to choose removable brooches, sew-on accessories or bright ready-made patches. Ruffles and bows quickly get dirty and look untidy.
Selection of filler and sealant
Any materials are more suitable for insulation:
- Wool is made in several layers. You can use the edges of an old blanket. It is difficult to do stuffing by hand. Factory-made options with wool have a long service life and are passed on to other babies.
- Natural fur can be sewn onto winter models instead of lining. Sheepskin, mink, chinchilla are recommended.
- Down is another traditional filler, but this is a factory-made option.
- Sintepon is the best choice. An affordable and lightweight insulation material, it can be laid in several layers if necessary.
Step-by-step sewing instructions
When mothers make a transformer on their own, it is important to correctly follow the sequence of operations:
- When cutting fabric, all the details are cut out at once: top, lining, insulation. For convenience, it is better to immediately lay the layers on top of each other. Pin around the edges, then cut out with tailor's scissors. The pocket is cut out in the same way. Both sides are made of lining fabric.
- First, we attach the insulation to the outer shell along the entire perimeter. It is advisable to strengthen the edges and stitch the corners several times.
- We sew the pocket parts along the long edge. Turn inside out and iron if necessary. Fleece and flannel do not need such treatment.
- We stitch the drawstring 2–3 mm wider than the prepared elastic band to ensure a good fit.
- When the trapezoid is pulled up to a square, the pocket is secured to the lining. The edges are folded inwards and the excess is immediately cut off. They make a double seam so that there are no raw edges inside.
- Sew the side edges of the lining to the finished outer layer. Turn it inside out, carefully fold the bottom edge, and stitch.
- First we sew on the top one-piece zipper for the hood. To do this, you need to unfasten it. We carefully process the top of the zipper and strengthen the ends.
- We begin to sew the detachable zipper from the bottom, on both sides.
- We trim the edge with bias tape.
Note! It is important that the zipper is on the outside when unfolding the transformer. Then the zipper teeth will not interfere with the baby during sleep, when he has to use the unfolded transformable blanket.
Models and patterns
The first criterion by which extract envelopes differ is seasonality. Such products are not only summer and winter, but also inter-seasonal. It is important to remember that the thermoregulation system in newborns is not formed, so clothing must be chosen correctly. Also, a children's summer or winter envelope for a newborn differs in shape.
There are several types of envelopes:
- Blanket. The most standard option. By folding the fabric you can get a warm envelope for the baby and then tie it with ribbons. Satin products are most often chosen, but cotton blankets are considered more practical because they do not slip.
- Bag. The device is similar to the previous version and also does not have sleeves. The only difference is that with this design a zipper is sewn into the side. A bag envelope is more practical because it eliminates the possibility of cold wind.
- Cocoon. It looks like a bag with a hood, but it has places for handles. The legs remain completely covered. The advantage of such a product is that the new mother does not have to turn up corners and tie ribbons.
- Transformer. Such a product visually looks like an ordinary jumpsuit, on which many zippers or rivets are sewn. If you zip them up, you get a warm, windproof envelope. As the baby grows, the transformer for a newborn can be used as outerwear. All that is required is to unfasten the buttons, resulting in a model with arms and legs. This is the most practical option, since the child can wear it all season.
In the absence of experience, novice craftswomen are advised to focus on simple models, such as a blanket envelope or a bag. Each of these options is universal, suitable for both summer and winter discharge. When sewing, it is worth considering that the sizes of such products differ from each other and directly depend on the weight and height of the child. In order not to make a bad choice, it is recommended to make an envelope of a standard size - 75 x 42 cm.
Most modern manufacturers produce products not according to height, but taking into account the weight of the baby. Conventionally, there are 3 sizes of envelopes for discharge: intended for children weighing from 2.8 to 3.3 kg, from 3.3 to 3.5, from 3.5 to 5 kg.
Cocoon
Bag
Blanket
Transformer
Characteristics and advantages of a transformable blanket
The blanket envelope performs several functions at once.
- In the unfolded state: you can use it in an open stroller, sled when the baby grows up; cover the baby in the crib when the room is cold; lay out on the floor for crawling.
- When folded, you can quickly prepare your baby for a walk.
The transformer has a simple design, the baby will be protected from wind and cold. The hood covers the eyes from the sun. The baby is less capricious when going outside or to the clinic. A blanket in a baby's wardrobe replaces overalls; many babies do not like restrictions on freedom of movement. Manufacturers offer several transformer options: with zippers, buttons, ribbons or buttons, and additional pockets on the outside.
The envelope protects the child from both cold and sun.
Important! The models are very practical and are used until the child reaches two years of age, sometimes longer. They are convenient to take with you on the road when the baby no longer needs a carrying bag. You can cover your child in a car seat.
Step-by-step sewing master class
To cope with the task, you need not only to know how to sew an envelope, but also to find a good pattern. It is important to remember that if discharge occurs during the winter months, the product must be insulated. When the baby is taken home in May, June or July, a light option is sufficient.
Summer blanket blanket
It is considered most suitable for beginners; with minimal experience, sewing will only take a few hours. The model is cut from 2 layers of fabric. It is recommended to use jacquard or satin for the outer layer, and thick cotton for the inner one.
To sew a product using this algorithm, you need 2 pieces of fabric measuring 135 x 80 cm. The envelope pattern must first be transferred to graph paper. After this you can start sewing.
- Attach the paper model with pins to the fabric and outline it. In this case, it is necessary to leave allowances for the seams.
- Next you need to cut the workpiece.
- Machine sew the outer and inner layers.
- Now you need to make beautiful frills from lace and sew them to the top of the envelope.
- Next, finish the edges with an overlocker. If desired, they can also be decorated with lace.
All that remains to be done is to sew the ribbons to the envelope. Alternatively, you can attach buttons instead. Making such a model will not cause any difficulties. Its only drawback is its minimal functionality.
Winter with hood
If the child was born in cold weather, the envelope should not only be warm, but also windproof. As the outer material, you can use denim, plush or raincoat fabric, which will not get wet. The middle layer is made of holofiber. The lining is made of flannel. Also, to make such a model you will need an elastic band, 3 buttons and 2 zippers. The envelope is sewn according to the following algorithm.
- First you need to print out the pattern. Next, attach it to the fabric and prepare the necessary parts, not forgetting to leave seam allowance.
- Now sew the outer layer, insulation and lining together using a machine.
- Next, insert the zipper on the sides.
- Then fix 3 buttons on one side at the top and make 3 elastic loops on the other. When they are fastened, a hood will form.
Finally, the envelope can be decorated with bows or frills. It will be very warm and guaranteed to protect the baby from the wind. For the first few months you can walk in it.
How to make a bow
The most common way to decorate a blanket for a newborn is with a bow. In this case, you can use a ready-made bow (flower), or make it yourself.
For the bow, take a wide strip of fabric, measure the middle and bend the edges to it.
So, a DIY bow:
- Cut two strips of 12 cm wide from satin fabric.
- We fold the two parts right sides to each other and stitch along the edges. Then turn it face out.
- For the bow itself, take a wide strip of fabric, measure the middle and bend the edges to the middle.
- We sew from the top and bottom, and then turn it inside out and fill it with holofiber.
- To make the “belt” functional, insert an elastic band into the resulting ribbon and sew on a voluminous bow with holofiber. The “bridge” for the bow can be made from any ribbon or braid. The lace trim looks very impressive.
For decoration, you can sew a large bow or a flower made of ribbons on top. The decor made from lace sewn onto the top side of the lettering square looks beautiful.
Elegant decor
When choosing decor, you need to be guided not only by your preferences, but also take into account the gender of the child. It is better to decorate an envelope for a girl with flowers or animal figures. For a boy, it is recommended to choose cars or geometric patterns. The most common options are:
- laying out figures from multi-layered lace;
- creating flowers and bows from satin ribbons;
- decoration with glass or plastic beads;
- fixing decorative fur pompoms;
- beadwork.
If desired, you can simply sew a colored 3D applique onto the top layer. When attaching decorations, it is important to place them in a place that the child will not come into contact with. It is also advisable that the decor is not too voluminous, as this may make the envelope inconvenient to use.
Differences between summer and winter options
The baby has not yet developed thermoregulation, so it is very important to choose the right envelope option. When choosing a form, we focus on what average seasonal temperature prevails in the region. This parameter should be taken into account when choosing insulation. If for the summer version you can use padding polyester, the density of which is 150-200 grams per square meter, then for a winter blanket or for a DIY version for the fall, use the same insulation, folded in half.
A transformable blanket for the cold season should have more insulation inside than for the summer.
There is no need to make the envelope too warm so that the child does not sweat. The main thing is to provide him with comfort so that he grows up healthy and calm.
Materials and cutting
Materials (purchased/consumed):
- Raincoat (1 m/0.75 m).
- Fleece lining (1 m / 0.7 m).
- Alpolux insulation 200 g and 100 g approximately 0.7 m each.
- Lock 50 cm - 2 pcs.
- Eyelets - 2 pcs.
- Clamps - 2 pcs.
The pattern was made on the basis of model 4 from the magazine Ottobre 2004 No. 4, but I did not make the legs and arms, I rounded these places.
We cut out the upper (from raincoat fabric) taking into account an allowance of 1.5 cm and the lower (from fleece) parts taking into account an allowance of 0.5 cm (since the lining fleece on a knitted base is very stretchy):
- Back - 1 child.
- The middle part of the shelf is 1 child. with a fold.
- Side parts of the shelf - 2 children.
- Side part of the hood - 2 parts.
- The middle part of the hood is 1 piece.
- Front strap - 1 piece + 1 piece. (there are two of them in the pattern, probably to choose the length, I chose the shorter one).
- Edge - 1 child. (you can do without it).
- Locking facing in frame - 2 pieces. (we cut it out, applying the side part of the front, draw a line from the neck to the line, just below the mark, then from this line we put 3 cm in one direction or the other, we get a curved strip).
- Windproof strip - 1 piece. + 1 child. (we cut it out by applying the central part of the front and circle it on one side to the mark, draw the upper part arbitrarily).
We cut out parts from insulation. Place the top parts on 200 g of insulation and cut without allowances. Then place the lower parts on insulation 100 (except for the hood) and also cut them without allowances. Next, baste the insulation to the parts along the edges so that it does not move (you can sew it on a machine).
Quantity of material
Before calculating the amount of fabric, we will decide on the type of pattern, that is, we will designate its width and length at the most protruding points.
Another parameter that the craftswoman should take into account is the width of the rolled fabric available for sale. For ease of placement of patterns and cost-effectiveness of cutting, choose fabric with the optimal roll width. Today, there are products whose width ranges from 90-150 cm. Lightweight fabrics made from natural threads are usually produced in rolls 75-100 cm wide. For a square blanket for discharge, for example, it is better to choose a fabric 1 meter wide, cutting off 1 meter as well . A roll 1.5 meters wide is suitable for sewing a bag; a piece of 0.5-0.6 meters will be enough to complete the work.
Do I need to sew the envelope myself?
Many people believe that such an envelope helps protect against the evil eye and curses, especially if made by hand. In ancient times, mothers spoke kind words to the envelopes and blankets in which they wrapped their children. This helped them grow, develop, not get sick and not die at an early age.
Advantages of “hand-made”
Today, the envelope is used as a convenient device for moving a child around the house and on the street. The fabric chosen is delicate and soft, or cool and light, depending on the time of year. The pattern of an envelope for a newborn is quite easy, so even a beginner can sew it.
Photos of the most popular models of warm envelopes autumn winter
The abundance of colors and styles of ready-made autumn and winter options for envelopes for newborns makes it possible to choose a truly beautiful, and not just practical, model.
Envelopes in the form of sleeping bags with a drawable hood look original. You can choose options with rivets and a zipper (side and central), depending on what parents find more convenient. Options for the youngest children born in early or mid-winter. This envelope secures the arms, so there is no need to worry that the child will unwrap himself.
Warm envelopes for children born in early or mid-winter
Options for winter envelopes for children born in autumn. Fully opening models can be used as a stroller mattress or a warm blanket.
Winter envelopes made of natural fur for children born in autumn
Functional envelope made of natural fur for babies who spend a lot of time in a stroller in winter
Choosing an envelope depending on the gender of the child
Envelope for children - the pattern is selected not only according to the time of year, material, but also according to the gender of the child. If you believe the signs, then an envelope that is correctly selected for a boy and a girl will help them develop faster and get on the right path. Otherwise, the boy will be feminine and the girl will be masculine.
For girl
The fabric should be either white or in warm, light, pastel colors. It can be peach, soft pink, caramel, purple, lilac, coral, yellow and so on. It is fashionable to decorate with lace, sparkles, and rhinestones. At the bottom of the envelope, as a rule, they tie it with two pink ribbons, so that it is immediately clear that it is a girl. You can also decorate with different stickers and bows.
Beautiful - for my dear baby
This season there is a fashion for children's envelopes with stickers and sewn-on designs. For a girl it can be angels, the sun, flowers, butterflies, princesses, hearts.
Stores sell craft kits and decorations. The master can suggest how best to decorate this particular envelope.
You might be interested in this. Pattern of a children's and adult's hat: sewing order
For boy
The boy is the future man, the head of the family. He must be strong, courageous, resilient, smart and rich. His envelope should be in cool colors, mainly blue, light blue, dark purple or white, a standard color. You can decorate it with different designs in the form of cars, boats, tanks, balls and so on.
To ensure that everything is always good financially in a child’s life, relatives or parents put money in the hood.
For a boy
There is also a tradition that a seal cut from the extract is placed in an envelope created for a boy or a girl. You can also put a tag that indicates the date, name, height, weight and everything else.
Product for baby according to time of year
The time of year when the child was born is also worth considering when choosing an envelope. If it is winter, you need to insulate the transformable blanket, and you can decorate it with natural or decorative fur. If it’s summer, then you need to buy light but natural material, and you can decorate with anything.
DIY summer envelope for baby
Sewing a blanket for discharge is not very difficult. It is enough to have a template, necessary materials and desire with you. Below are instructions on how to sew an envelope for discharge with your own hands using a pattern.
Summer
Materials:
- needle;
- thread;
- textile;
- scissors;
- buttons (optional);
- decorations.
First you need to cut out the parts. You need two square meters per meter.
Important! You can combine colors and make squares from different fabrics. Then the envelope will be different on each side, which is very interesting and sometimes convenient.
You might be interested in everything about electric and mechanical hand sewing machines
Next, the parts are sewn together. A pattern is taken and measurements are taken of where the fabric needs to be cut. You should be careful, as you need to leave 3-5 centimeters when trimming. This is necessary for sewing the envelope.
Pattern
After trimming, you need to completely sew up the fabric at the bottom. You will get the bottom where the child will rest his feet. Only the top and side parts remain. Depending on the pattern, the side part may close differently. In any case, you can sew buttons on one side and make holes on the other. This way the envelope will be closed.
Now you can work on the hood. It remained in the form of a small triangle. It can be trimmed with lace or folded in half and sewn to the back of the envelope. After that you can start decorating and that's it. The envelope for the warm season is ready.
Fur envelope for baby
You can sew an envelope with fur in the same way as the summer version. The only difference is that you need to decorate the hood with fur, and put a thin layer of synthetic padding between the two fabrics. This option is suitable for autumn and early spring.
With ties or zipper
The third main question that parents have is: which blanket to choose? With a zipper or ties? The time of year also plays a role here.
The zipper completely covers the baby's body, preventing wind from passing through the edges. However, if handled carelessly, the parts can damage the baby's delicate skin.
Ties are more suitable for the summer season, when the warm breeze is not dangerous for colds. The ties will not harm the baby, but it is important to ensure that children's fingers do not get caught between the parts of the knots.