How to sew a blouse with a peplum: option No. 1
As a basis - the upper part of the blouse, the author of MK, presented below, suggests taking the pattern of a T-shirt with raglan sleeves, you can download it below. Or you can use the pattern of a sheath dress or this pattern of a maxi dress as a basis; you can also look at ready-made templates in the article about a dress with a detachable skirt.
Blouse with tank
Raglan T-shirt pattern for the top of the blouse (size L) ⇓
The length of the upper part, whatever you choose, should be up to the waist level, because it is from the waist that the peplum should go.
You can do it even simpler - copy the pattern from your favorite T-shirt - fold it in half, trace it on the folded fabric, and also copy the sleeves.
Sew the top part of the blouse
Cut out the parts and start assembling. Sew the shoulder seams first. Then sew in the sleeves, sew the side seams and sleeves with a single seam. Process the neck. We are not touching the bottom cut of the product yet. You can view this process in detail using the example of a children's sweatshirt.
We measure the radius: divide the circumference of the lower cut by 3.14 and subtract 1.7 cm. We also measure the desired length of the peplum.
Now let's start creating the peplum. To do this, we need to measure the radius on the fabric folded in half. In the photo from MK the measurements are in inches, I will convert them to centimeters. To calculate the radius, measure the width of the front and back of the bottom cut of the blouse (circumference) that you sewed a little earlier. This value must be divided by Pi and subtracted 1.7 cm.
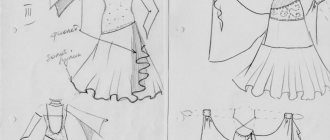
The top picture is a peplum unfolded, the bottom picture is a peplum folded in half.
So, if the circumference of the bottom cut of the blouse is 84 cm, then dividing this value by 3.14 (PI number) and subtracting 1.7 cm, we get approximately 25 cm. This is exactly how much we need to set aside from the upper corner of the fabric and draw a semicircle.
Then we will retreat the desired length of the peplum from this circle, let’s say our peplum will be 25 cm, mark this value from the semicircle (or 50 cm from the top corner) and draw a second semicircle.
We attach the peplum to the blouse of the faces. sides and sew
Cut out the peplum and fold it in half, fit it to the bottom edge of the blouse, they should match in width.
The blouse is almost ready, all that remains is to process the open edges
Sew the side seam on the peplum. Attach the raw cut of the peplum to the cut of the dress, process it on an overlocker or sew it on a machine with a special seam (zigzag or overlock stitch). Process the bottom edge of the tank and the blouse is ready!
Blouse in a different color and with 3/4 sleeves
DIY sun peplum dress pattern
With the help of a peplum, an ordinary sheath dress can be turned into an elegant, beautiful dress that is suitable for both everyday wear and corporate events.
To make a dress pattern with a peplum, you need to use a regular basic dress pattern. You can find such a pattern on the Internet or make it yourself, according to your measurements.
Dress
Constructing a pattern
There is a lot of information on how to do this correctly, but in any case you should follow some recommendations. The pattern of the back and front parts must be cut in half. Then you need to move on to modeling the upper part of the dress and the frills themselves.
On the front and back workpieces there is a waist level and 3 cm is laid upward from it. The resulting workpiece must be cut out and stitched along the dart line.
Next, the front darts need to be moved. Using a pattern, mark the relief of the back and front. After cutting out the resulting pattern, cut the front dart and close it.
Gathered dress
Basque modeling
To cut out a fringe, the first step is to calculate the radius of the cut. It is calculated using the formula: subtract one centimeter from 1/6 of the waist circumference. Based on that girth, you need to build a semicircle, set aside the length of the part from it, and draw the second half of the circle.
Sewing a dress
To make the product, dense dress materials are suitable; they will hold their shape well. You can use gabardine or crepe, or mixed types of material.
What does a peplum dress pattern look like?
To calculate the amount of material, you need to add two peplum lengths to the length of the dress and add another 50 cm.
From the prepared knitwear you need to prepare the following:
- cuttings of the middle part of the back bodice (2 pieces);
- cuttings of the side part of the back bodice (2 pieces);
- fabric from the middle fold of the bodice;
- fabric of the side part of the shelf bodice (2 pieces);
- a piece of stitched back belt (2 pieces);
- a section with a fold in the front panel of the skirt;
- a piece of back skirt fabric (2 pieces);
- fringe blanks (2 pieces).
You might be interested in How to make your own beautiful toy bear from felt and other fabric
Before you begin, you need to work out the internal allowances. They need to be overcast, and then all seams should be ironed well.
The first step is to start stitching the raised seams on the back bodice and front. Then sew darts on the skirt fabric.
Next, sew the side seams on the skirt and bodice. Now you need to overcast, fold and sew with a blind seam. Having folded the product and the assembly with the right sides, baste along the waistline from the back side. Now the bodice can be basted to the skirt.
Then trim the armholes and neckline with one-piece facings.
Varieties
Basques are divided into:
- one-piece;
- cutting;
- removable.
When creating patterns - into complex and simple ones.
Simple ones include frills and ruffles that do not require drawing a pattern on paper.
Calculating their length is simple: seam allowances are added to 3 lengths of the cut to which the part will be sewn.
Peplums from the waistline in adjacent products are built and modeled according to the principle of skirts. The construction of the shuttlecock is simple: “half sun”, flared, “sun” and double “sun”. They can be built directly on fabric.
Designs that require drawing and modeling include undercuts, molds, yokes, and parts created on their basis and requiring precise expansion. For example, these could be ruffles with folds or yokes with drapery. You can’t do without a drawing when building a one-piece basque.
Forming coattails
When thinking about how to sew a blouse with a peplum, you need to decide on the pomp of its lower part. The coattails fit best in products cut on the bias. This is taken into account during construction and cutting. The example of skirts shows options for forming tails depending on the location of the lobe.
“Tubularity” along the edge of flounces of the “sun” cut and its analogues, as well as the mold, is achieved by placing it “on the edge” - stretching the internal cut using the natural capabilities of the material.
When cutting from elastic fabrics, this property is taken into account at the stage of pattern construction. That is, a negative increase is applied to the girth of the product PrOiz - 0.7-1.5 cm. It is sewn with a slight stretch of the cut.
In dry, hard ones, the cut is stretched before sewing, holding the part suspended.
How to sew a basque
An important aspect when sewing a peplum is that the made part should be tried on first. To make it easier to determine exactly where to sew and what length and width the peplum will be. In addition, the peplum can be positioned so that it gives the figure some graceful features or, conversely, hides flaws.
You might be interested in: Features of paint for denim products
Stitching
It is best to cut on the bias. However, there are situations when this is impossible to do, for example, in the case of lower cuts. To give the decorative element a shape, you can sew fishing line along the edges of the parts.
You need to work with fringe when all the darts have been stitched.
Construction of the bodice
The bodice and hem are the two components of a peplum blouse. The pattern is built on the basis of a basic design or by modeling a ready-made drawing of a suitable model. Depending on the style, the looseness of the fit is adjusted and the darts are transferred.
For cut-off peplums, a connection line to the bodice is drawn. After which the peplum modeling begins.
Progress
- By analogy with a flared skirt, flounces are built.
- In the drawing, due to the spreading of the part to a given amount of flare - a yoke.
- For one-piece peplums, modeling is done directly on the drawing. Then the details are transferred to paper and seam allowances are added.
- To achieve flaring of a one-piece peplum, a number of “procedures” are carried out.
- Firstly, they increase the number of raised seams and move the cuts away from the waist to the sides by the same amount (up to 90 degrees). This ensures that the coattails are evenly distributed.
- Add flare along the side sections.
- Add wedges with a given extension at the bottom.
This is interesting: Pattern Blouse with a cowl collar
Pattern and sewing of a jacket with a peplum
Jacquard and suit fabrics, gabardine, boucle, suede, corduroy and some natural materials are perfect for sewing a jacket. Which fabric to choose depends on what season the jacket is being sewn for.
You will need material measuring 1.5*1.5. The fastener, preferably a zipper, should be selected based on the size of the jacket. In addition, you may need non-woven fabric to seal the sides and stand-up collar of the jacket.
Pattern of a jacket with a peplum
The finished pattern is transferred to the fabric and sewing begins. When sewing a jacket, special attention should be paid to such a part as the peplum belt; its pattern is also not difficult. The inner part of the belt should be made of a softer material. This will help the elastic band inside work optimally. The size of the belt is calculated according to individual measurements. You should also remember that you need to take measurements well, the jacket should not constrain your shoulders and arms.
You might be interested in Sewing sweaters and simple blouses with and without patterns
Attention! The sewing process itself can be found on the Internet by viewing various master classes.
What does a blouse with a peplum pattern look like?
Basque shuttlecock construction
In the “sun” silhouette, the peplum is a circle with a round slit in the middle.
Progress
- Since the fabric will be folded in four layers when cutting, a right angle is constructed with the vertex at point O.
- The perimeter of the inner circle must be equal to the length of the cut of the product (Oiz) to which the part will be sewn. To find the stitching line, the internal radius is calculated using the formula: R = (Oiz + Pr.sh) x k, k is the curvature coefficient of the upper cut of the skirt. For the “sun” cut, k is equal to 0.16, and Pr.sh is the seam allowance.
- A circle is drawn with its center at point O.
- At the intersections with the horizontal and vertical lines, points T and T1 are placed.
- The width of the basque (Shb) is calculated from them. The ends of the segment are designated H and H1.
- Through H and H1 a circle is constructed with the center at point O.
You should take into account how many seams there will be in the “sun”. Sometimes it is cut into two parts along the grain thread, checking the sizes of the peplum cuts with the values along the back and front of the product.
If the blouse has a fastener, it is taken into account at the creation stage, making additions to the drawing that completely coincide with the construction of this unit on the front or back.
vykroika.kiev.ua
What is Basque
One of the finishing options for the product is basque. It is usually used to trim a skirt, dress, jacket and blouse. It needs to be sewn along the waistline in the form of a flounce or frill. Basques are distinguished by shape and size. It can be long or short, one-piece or cut out as a separate piece. It can also have different edges. Asymmetric and smooth edges are distinguished. If you show your imagination, you can give any product an amazing look using a peplum. If a jacket is chosen correctly for the skirt, the outfit will be elegant and fashionable.
What does a peplum look like?
How to cut a peplum
Experienced craftsmen make peplum patterns in three ways:
- half sun and sun;
- gathers and folds;
- options where individual imagination is shown.
Option with gathers and folds
In the first case, the option is considered classic, and can be presented in the form of a mini skirt, sun or half-sun. The principle of constructing a part is the same as that of a skirt pattern. The only difference is the length, it needs to be made a little shorter.
In the second case, the sewing process is much easier than in the first. To cut out this part, you need to prepare a rectangular shaped fabric. When choosing the length of the rectangle, you should take into account the desired fullness of the folds, and you need to measure the fabric twice as much as the waist circumference.
Half sun option
The third option is the most unpredictable. It is not limited to any one template. Here everything is built on the imagination of the master. This type of trim can be placed on the side or back. In a word, everything that the master’s imagination is enough for.
With a peplum on your shoulders
If you choose the right size of the dress and sew it not along the waistline, but with a straight silhouette, then this outfit is perfect for overweight women.
The next version of the dress with a peplum on the shoulders can be sewn literally in one evening.
Here is the dress pattern:
We cut out four rectangles from the fabric, two for the dress and two for the flounce. We sew two large parts along the side seams and process the edges. Then we assemble and sew the peplum on top. The last step is to sew on the peplum and the dress is ready.
Basque pattern for a skirt or blouse
How to make a peplum pattern? The peplum is an amazing piece of clothing that can “straighten” a woman’s figure.
It can add a little volume to very thin figures and make the figure more feminine and attractive.
And for figures with some excess volume it will help to hide them. The only restriction for full figures is that the bottom of the peplum should not end at the widest point of your hips. It is better that the bottom line of the peplum is 3-5 cm above or below the hip line. And the waistline can be raised a little, just a little.
Absolutely any shape and length of peplum is suitable for slender girls. There are no restrictions for slim girls.
Clothing with a peplum can be worn by all women, regardless of figure, build and age. Despite all its splendor, this element of clothing harmoniously coexists with both a strict style, everyday and with an elegant holiday option. The peplum looks especially impressive on evening dresses of any length.
But be careful! The peplum is a very active element that takes a lot of attention. Therefore, you need to wisely select the bottom (if it is a blouse or jacket) and accessories. To avoid overkill. That very case when it is better not to under- than over-...
Peplums can be sewn into the product along the waistline, or can be removable. A removable version is usually made for strictly cut products (a tight-fitting blouse without a front fastener, a sheath dress, a pencil skirt). It is convenient because you can wear the product in two versions, with or without a peplum. Moreover, Basques can also be different. Different shapes, different colors, different fabrics. There are a lot of options!
Basques can be made from any material. From crepes, lace, natural or artificial leather, silk, chiffon and so on. There are no restrictions on fabrics and materials. The same goes for the cut options.
The cut can be as simple as a long straight piece, which is gathered along one long side and stitched along the waistline. This option is most often used for very thin materials (chiffon and thin lace).
We won’t tell you how to do it. It's all very simple. There is no difficulty in gathering and stitching a strip of fabric.
And yet, the most beautiful and interesting versions of the peplum are obtained based on the half-sun, sun, double-sun and even triple cut!
The configuration of the bottom of the peplum can also be very different.
The bottom may be asymmetrical. Moreover, there are countless options for asymmetry!
Whatever the shape of the sun-based peplum, the principle of constructing a pattern for it is the same. Let's see how you can make a peplum pattern quickly and easily, even if you're new to clothing design.
Basque model for smell based on the “sun”
The points of the depth of the smell are marked, from which perpendiculars are drawn equal to the length of the cut of each part. Then a soft bottom line emerges. The wraparound peplum can consist of 2 or 3 parts (1 back + 2 shelf parts). They are copied from the main drawing.
Top with peplum: option two
This product can rather be classified as a top; below you can download a file with pattern drawings with calculations for each size. The assembly of the top parts is identical to the blouse from the first option, with the exception of the sleeves - they simply are not there.
Peplum top
Download patterns for top with peplum ⇓
LiveInternetLiveInternet
Quote from lin44ik message
Read in full In your quotation book or community!
Modeling an original peplum top
The elegance of the bodice largely depends on the shape and location of the darts. Lining improves shape and fit.
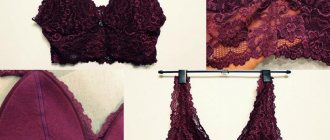
Let's model the pattern of the tight-fitting top model shown in the photo (in the center of the back there is a lace fastener and darts at the waist). As a basis, we will take a proven basic pattern, built with minimal allowances for a loose fit.
Converting the top dart into a dart along the waistline can be recommended for women with average bust size. The center of the tuck solution is usually located in the area of the most protruding point of the mammary gland.
If the bodice is supposed to be “skinny”, in the future we will consider this particular option, then the center of the waist dart may coincide with the most protruding point of the breast gland. If some freedom of fit is included in the base pattern, the dart should be 2-3 cm shorter.
Moving the dart.
- Cut out both darts of the base pattern and close the top one. The dart along the waistline will increase by the amount of the opening of the upper dart.
- Let's divide the main dart into two, less deep ones. To construct them, we will draw two straight parallel lines in the middle of the front.
One - from the beginning of the dart (T). The second is from the point that divides the distance from the dart to the side cut in half (B).Let's determine the top (center) of the dart. The first dart will have the length of the main one, obtained by “rotation”. The second is 2-3 cm shorter. From the drawn straight lines, set half of the main dart solution to the right along the waist line and connect the resulting point with the top of the dart.
Construction of the peplum: A slight shift of the long dart relative to the center of the chest makes it possible to model the peplum “steeper” without tilting it down, as will be described below. The problem has another solution: replace the second (short) dart with a hem.
The peplum flounce on the front shelf and back is modeled in the same way. It is supposed to be one-piece in the center of the bodice (between two darts) and will have seams on the sides and in the center of the back.
- From the base of the dart (T) we draw an arc (center - at point A; radius = AT). On the arc, plot the length of the waist from point T to the side cut, with the exception of the dart solutions (top line of the peplum).
- If the top line of the peplum crosses the waist line, it must be tilted down so that there is a distance of 1 cm between the waist line and the drawn arc.
- The width of the peplum is 10-12 cm. We build the bottom line, putting down the width of the peplum from the constructed top line of the peplum. The short cut of the peplum should be at right angles to the top and bottom lines of the peplum.
- It is possible to build a “cooler” version of the peplum.
In this case, you need to lengthen the lower cut of the peplum, deviating the side cut of the peplum by approximately 15 degrees. If the top has several peplum flounces (see photo of the model), the rest need to be cut according to the peplum pattern. They will be sewn to the bodice lining with an offset of 1.5 cm relative to each other. - https://www.season.ru