Products knitted with knitting needles will always be in fashion, because, in fact, they are unique and inimitable masterpieces created by needlewomen. Each craftswoman spends a lot of time and effort to create an exclusive knitted item that will attract the glances of passers-by and evoke envious sighs.
When looking at wonderful knitted items, few people think about how much effort was spent on their creation. But in order to create a beautiful thing, you need not only to learn how to hold knitting needles in your hands, but also to know exactly how to calculate the number of loops, decipher the symbols used in knitting, find out the appropriate density, and also “read” the pattern. In order to make a knitted item you need a pattern. After all, it is on it that the order of actions is indicated.
The meaning of schemes
All diagrams use special symbols. That is, small graphic symbols, deciphering which the needlewoman can knit a finished product or a small part of the fabric according to the pattern.
There are a huge number of different schemes and it is quite difficult to understand them. This is why common icons called symbols were developed. These conventional symbols help you quickly decipher the pattern and knit a beautiful, exclusive item using knitting needles. Any diagram consists of individual cells. Each cell equals one loop.
The patterns have front and back rows. The front rows are deciphered from right to left, and the back rows - from left to right.
In addition to symbols, you can also see generally accepted abbreviations in the diagrams. In order not to learn all existing symbols by heart, you can remember only the most basic ones and have a convenient table of tips at hand.
Some symbols are very similar to each other, so in order not to get confused while knitting, it is better to use this table to decipher the patterns. This will allow you to quickly and correctly decipher any even the most complex scheme.
The most difficult thing for needlewomen is to decipher the various patterns found in foreign knitting publications. This is primarily due to the fact that the symbols used abroad often differ from the symbols adopted in the countries of the former USSR.
Some large Japanese publications, in which the description of the schematic pattern is made in hieroglyphs, supplement all conventional icons with small knitting patterns. This approach greatly facilitates the work of domestic craftswomen and allows them to easily and quickly decipher the symbols and knit the pattern they like.
Experienced craftswomen recommend that when knitting patterns taken from foreign publications, first make a small piece of fabric and only then begin to form the whole product. In case of incorrect decoding of a schematic drawing, this will help to detect the error in time and correct it at the very beginning of work.
Relief columns
Stitches that are knitted not in a loop, but around the body of the stitch of the previous row, are called embossed. We wrote about how to perform them and what textures are obtained in the lesson about double crochets.
Knit Purl
And a few more simple drawings from the same lesson. In a pattern of crossed columns, circles indicate the number of air loops between them - usually there are one or two, but there may not be any at all.
Crossed Crossed to the right Crossed to the left 3 with a common top 5 with a common base
We make calculations and get acquainted with the density
In order to knit a high-quality beautiful thing, it is not enough just to find a pattern and decipher it. It is necessary to find out the density of the future product, as well as calculate the exact number of loops required for the manufacture of a particular pattern element.
Any knitting begins with a search for a schematic pattern and its subsequent decoding. That is, from a careful study of the diagrams and symbols for them.
After the description of the process of creating a knitted product has been thoroughly studied, you can begin taking measurements, creating patterns and calculating the density, as well as the number of loops. The appearance of a knitted fabric largely depends on the number of knitting needles, as well as on what threads the craftswoman used.
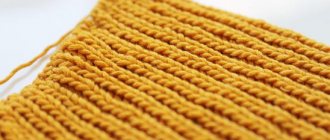
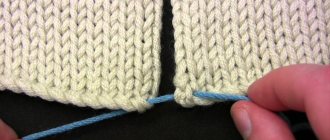
Due to the fact that the density of the same pattern may be different for each craftswoman, before starting work, you need to knit a small piece of fabric. As a rule, its size is 10x10 cm.
After the sample is ready, it is necessary to calculate the loops:
- take a ruler and measure the length of the knitted sample. In order to get a more accurate figure, do not take into account the first 2 and last 2 stitches from the edges of the sample;
- count the number of stitches in the measured area;
- divide the number of loops by the length of the sample. This will allow you to find out how many loops are in 1 cm;
- the result you get will need to be multiplied by the length of the product.
The resulting number is the number of stitches that need to be cast on the knitting needles in order to make this or that pattern. Separately, it is worth noting the fact that if several patterns are used in the work, for each of them you need to make a separate calculation and find out the density.
To summarize, we can say that the density of a knitted fabric is the number of loops horizontally and rows vertically. For each pattern, number of knitting needles and yarn, its own density is calculated.
There is a template for determining the knitting density and calculating stitches if you find it difficult to count by hand. This is a rectangular plate with a hole in the center for measuring the number of loops and rows of 10 cm. The plate has holes for measuring knitting needles. The device contains a table for performing calculations.
Pico
Pico is a small decorative element made from several air loops. We learned how to do it in the lesson on air loops. In the diagrams it is indicated in the shape of a droplet. If there is no number next to the picot symbol or inside it, or the description of the knitting pattern does not indicate the number of loops that the pique should consist of, three are made by default.
Now let's move on to those elements that we have not yet touched on in our lessons. In addition to introducing you to the symbols, we will tell you how to knit them.
Loops required for knitting openwork patterns and bump patterns
The following loops will be shown in pairs: first the main loop, which will appear in the diagrams. And then, the same loop, but shown to us as it will be knitted in a purl row. As a rule, these loops will not be indicated in the Japanese patterns themselves, but you need to know how to knit them.
Two knits together with a tilt to the left.
In the purl row - two purl together with a tilt to the right or just two purl together.
Two knits together or two knits together with a tilt to the right.
In the purl row - two purl rows together with a tilt to the left.
Three knit stitches together with a loop in the center without tilting.
Purl three stitches together without tilting.
Three knit stitches along with a left slant.
Three purl loops slanted to the right.
Three facial loops along with a tilt to the right.
Four knit stitches together. Five knit stitches together
Adding a new loop from the bottom row loop on the left and right.
From one loop, knit three, four, five loops. Knitting three loops from three loops.
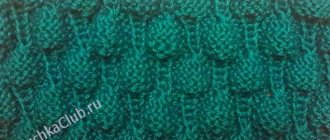
Knitting a cone.
Half-bump.
This element is often found in Japanese openwork patterns; it can cause difficulties for beginning knitters. Based on the symbol, it becomes clear that it is knitted in several stages. The checkmark shows the number of rows you need to go down (two, three or four rows down) and from the loop of the indicated row you need to pull several loops (the number of loops is indicated in the icon - 3 loops or 5 loops) like a bump. The loops go down higher. Now in the next row (in the purl row) these elongated loops are knitted purlwise and in the next row they are knitted together with the central loop. (See above for three knit stitches along with a loop in the center without tilting.) I remove the center loop, which is in the middle, for an extra. I cross the knitting needle, loops along the edges (2 or 4) and knit them together, and then I pull this resulting loop through the removed central loop.
A cone crocheted.
Wrapped loops.
The number on the icon shows the number of turns that need to be made around the loops.
Crossed loops, knitting "braid" patterns.
Elongated loops, broaches.
Reproduction of site materials is permitted only with an active link to the AMIMONO website
Lush column
This element consists of several columns, their number corresponds to the number of vertical lines, and the number of yarn overs corresponds to the number of horizontal ones. In the given symbols, the elements consist of three and five single crochets. In this case, the symbol can be either round or oval.
They are done like this: we make the required number of yarn overs, but we do not knit the stitch to the end - we leave the loop on the hook and the last loop of your stitch and move on to the next one, which we knit into the same base loop. In fact, we cast on loops on a hook, as in Tunisian knitting. Having completed the last unfinished column, we close them all in one step.
Step 1
Step 2
Step 3
Popcorn
Popcorn is a name that came from English-language magazines, and in Russian such a three-dimensional pattern is called a shishechka. The pattern is very similar to the previous one, but the element is knitted differently. We completely knit the required number of stitches, then take out the hook, insert it into the first of the stitches and pull the last of the knitted loops through it, after which we secure our bump with an air loop.
Step 1
Step 2
Step 3
Step 4
Step 5
Step 6
Conventions in knitting
To understand the pattern, you need to remember the symbols for knitting. There are not many basic icons: an empty square, triangles to the right and left, filled or not, a circle, vertical and horizontal lines, diamonds, filled or not, slanted lines to the right or left with an additional line to the right or left.
List of types of loops:
- facial;
- purl;
- yarn over;
- two together face left;
- two together facing right;
- two together purl to the left;
- two together purl to the right;
- facial crossed;
- purl crossed;
- edge;
- three together facial;
- purl three together;
- cross to the right;
- cross to the left;
- remove on an auxiliary knitting needle before work;
- remove on an auxiliary knitting needle at work.
Facial
The simplest loop is the front one. The symbol is an empty square or a vertical line. To knit, you need to insert the right knitting needle into the loop on the left knitting needle from left to right, hook the working thread, which should be behind the work on the index finger. Next, pull the thread through the loop and throw it onto the right knitting needle.
Two together with an inclination. Knit in the same way as a single one, only the right knitting needle is inserted into two loops on the left knitting needle at once. The symbol is a black triangle or an inclined line to the left/right and a dash perpendicular to it to the right or left.
The tilt can be to the right or left, this is done to decrease it in the desired direction. To tilt to the right, the right needle is inserted into the loops from left to right.
With a tilt to the left - the first loop is removed on the needle on the right, the next one is knitted with the front one, and the removed one is thrown onto the knitted one.
Crossed - indicated by the image of a loop. To perform this, the right knitting needle is inserted into the loop on the left needle from right to left, the working thread is hooked, and pulled through. The symbol is a black diamond.
Shifted - formed after knitting a decrease or two loops together. Their location is moved compared to the original one. The icon is an inclined line to the right or left.
Purl
When knitting this type of element, the working thread should be in front of the work. The right knitting needle must be inserted into the loop on the left knitting needle from right to left, wrapped with a working thread and pulled through. The symbol is a horizontal line.
To knit two together, you need to transfer first one loop from the left knitting needle to the right one, then the other. Then remove them again with the left knitting needle so that they change places, knit by inserting the right knitting needle into both at once from right to left. Designation – an open triangle with the lower corner to the left. This is a left-leaning option.
Two together with a tilt to the right - we knit two elements in one step with a purl stitch, insert the right knitting needle from right to left. Designation – an open triangle with the lower corner to the right.
Crossed ones are obtained by inserting the right knitting needle from left to right from the back side of the loop, then we hook the working thread and pull it through. Designation is an open diamond.
Shifted ones are formed when two or three loops are knitted together; there are fewer of them on the knitting needle, so the remaining ones are shifted to the left or right. There is no specific symbol because they are formed by knitting two or three together, knit or purl.
Yarn over
The yarn over symbol is a circle. There are capes for yourself and for yourself. We are talking about moving a knitting needle. Which type should be knitted is indicated in the description. With the help of this element, increases are made and an openwork knit is created. There are double and triple yarn overs.
A straight yarn over on the front side is made by throwing the working thread over the right needle towards you. Reverse - from yourself. Next - knitting according to the pattern. In the purl row it is knitted in a purl stitch. Double and triple yarn overs are made by throwing the working thread onto the right knitting needle the required number of times (two or three). When working with yarn overs, you need to count the loops so as not to make a mistake.
Rachy step
This type of knitting is indicated by a triangle, and is used to decorate the edge of the product so that it becomes smoother and denser. It was called the crayfish step because it is performed backwards - from left to right.
Step 1
Step 2
Step 3
Step 4