The article describes how you can sew knitted items yourself. You will learn what a knit stitch is and how to make a seam by hand.
If a jacket, sweater or other product is knitted, then, as a rule, this item consists of several parts. They will need to be sewn later. No matter how beautifully the craftswoman knits clothes, one sloppy seam can ruin all her efforts. Therefore, this procedure should be approached thoroughly. It is advisable to think in advance about how you will sew the parts together at the end, with what kind of seam, so that it is invisible.
general information
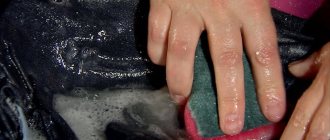
Those who are just learning how to independently sew knitted items need to learn the basic instructions regarding working with parts. The finished parts of future clothing must be ironed before sewing. The shoulder seams are sewn first, then the side seams.
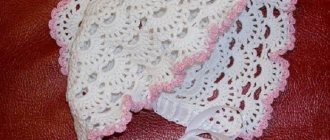
Stitched knitted item
Important! You cannot use a long thread when working; the optimal length is 45 centimeters.
We choose knitting needles according to your wishes
First you need to find out the diameter of the thread, because we will select knitting needles based on it. They come in 3 types:
- Wooden.
- Plastic.
- Metal.
For the hat you need 5 knitting needles with fishing line. If we work with two, we will get a cloth that needs to be sewn to get a headdress. In this case it will have a seam.
Loop-to-loop stitch
The secret line “loop to loop” is performed by beginning craftswomen. It is simple and allows you to qualitatively connect parts of garter and other stitches. A closed knit stitch can be used to sew a pocket or other part to a finished knitted garment. The open method is also often used when assembling material.
Making a seam Loop to loop
Sew two closed edges
The invisible row for closed edges is made similarly to the technology for the face and back. The thread is brought out from the wrong side to the middle of the stitch, after which they cling to the broach of the buttonholes of the second part, and bring the needle into the middle of the front loop from top to bottom.
Important! You should not take a thick tool when working.
Sew the two open edges
To perform inconspicuous stitching, stick the needle in 2 front steps, skip the back ones. The action is repeated on the canvas along the entire length. Then the open material is turned over and the opposite side is sewn. It is important to sew without tightening the thread too much.
You might be interested in Features of patterns from Anastasia Korfiati: how to learn cutting and sewing
Two open edges
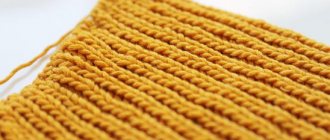
Stockinette stitch
The distinctive feature of this knit is its texture. It has two sides - front and back. On the front there is a pre-selected pattern.
Vertical seams “Mattress seam”
The correct mattress step is made according to the same pattern as a simple knitted step. The knitted parts are placed close to each other, row by row, and be sure to use the same thread used for knitting for stitching. A hat, sleeve or other wardrobe item can be fastened with a mattress seam.
Mattress seam
On the front surface
At the end of knitting, the pieces are ironed and then laid out on the table. The needle is inserted next to the edge and first loop, and the thread is pulled through. On the opposite side, pick up the broach between the loops. Then repeat the steps alternately and tighten the thread.
On purl loops
The loop is performed in the same way. The tool pierces the space between the outer and next loop. Then they stick it between the edge and the next hole. After 3 centimeters, the thread is tightened.
Execution on the front side
For serrated edge
Knitting along a scalloped edge is more difficult, but the algorithm does not change. Using a needle, pass the thread between the edge and the next hole, and also periodically tighten it, observing intervals.
Patterns for hats with knitting needles: diagrams and descriptions
English rubber band
This model is almost dimensionless. On average, we cast on 78 loops (for a simplified English rib, the formula for the number of loops cast on is 4n+2) on needles No. 4.
If desired, you can make an elastic headband from a 1 by 1 elastic band that can be tucked under. Otherwise, we make a headband with an elastic band 2 by 2 = 8 rows
We knit with an English elastic band: in the first row we make increases (= 95 sts).
A simplified version of the English gum:
- 3lp + ip - repeat;
- 2lp + ip + lp - repeat.
You can learn how to knit the classic version of the English rib using YouTube, but they look no different.
We knit upwards to make it 25 cm from the base. We begin to gradually decrease the singing, always knitting 3 together. In the first row, we take into account the outer edges, then ignore them and knit 3 along with the rest.
Finally, tighten the loops and sew the product along the seam. Keep in mind that you cannot tighten it too much, as the hat should turn out fluffy.
Stylish with braids
We cast on 94 sts and go (with knitting needles No. 4) with an elastic band (2 knits, 2 sp) about 6 cm. Move on to the braids:
- 2ip + 6lp + 2ip + 2lp - repeat;
- We knit according to the pattern, respectively, ip-ip and lp-lp.
On the 7th row of this knitting we make overlaps in a place with 6 lp. This can be done using toothpicks, alternately knitting the desired parts. Then we continue to follow the pattern 2ip + 2p + 2p and overlap again.
After the braids, we knit a row along the IS according to the pattern.
We perform the cycle described above only 3 times (3 overlaps are obtained).
Further - similarly, but decreasing to narrow it down.
Rubber band 2 by 2
We cast on the required number of loops and go in a circle to achieve the desired height of the hat:
- We knit the first sp under the second sp - the whole row;
- We knit 5 cm straight;
- (lp, sp, lp) - together + lp + sp + lp - the whole row;
- knit directly according to the pattern;
- 3lp-together + un - the whole row;
- ip under lp;
- insert the thread into the loose loops and tighten.
How to knit a hat for a girl?
A cat hat is an ideal option for a child.
Prepare the ears: cast on 17 loops and knit 4 rows in turn:
- lp;
- ip.
Next, we begin to remove the loop once in two rows on both sides.
The sharpness of the ears can be adjusted - it depends on the moment of the end.
The hat model can be almost anything - it all depends on your creativity. The main point is to form groups of wedges when we begin to decrease the loops. Their number should be even (usually 6) so that it is clear where to sew the ears.
Hand stitching
If the yarn requires preparation, the product is ironed and then stitched. The advantage of the seam is that it will not pull the item together. It is important to pass the thread below the closed row. The stitches lead backwards, and the thread is sure not to be damaged.
You might be interested in Beautiful chiffon dresses with long sleeves: patterns and tailoring
Important! Periodically you need to turn the part over to the reverse side to monitor the quality of the stitches.
Hand stitching
We pay attention to the raw materials for the future hat
The material should always be selected according to the time of year. In winter frosts and winds, wool or its threads will be especially useful and warm. For your baby, you need to choose a material that does not cause allergies.
Attention!!! Those who are just beginning to comprehend the art of knitting want to do it only with natural raw materials (wool). This error can “crawl into the light” when knitting a hat with only wool. Later, such a headdress will lose its shape, lumps and depressions will appear on it, and the wool itself will darken. For a hat, it is better to use mixed yarn.
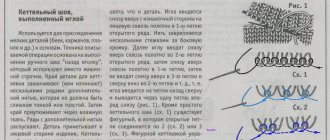
Kettel seam
A quilt stitch is used to connect the main parts of the product with pockets, trims, and trims. Before starting work, be sure to iron each component. Types of seam:
- needle;
- crochet
Kettel seam
Method one - with a needle
The part is pierced with a needle from the inside at the place of the second step. Then they stick it into the first loop and take it out through the third hole. Then they pass the needle from top to bottom into the second loop and pull it through the fourth hole from bottom to top. The advantage of the product is that it holds its shape for a long time.
Method two - crochet
A needle is not always suitable for the job. Therefore, there is a way to tie with the same seam using a hook. To do this, take a short tool, fold the parts face to face and knit them in a half-stitch.
Crochet work
How to sew a knitted snood using a knitted stitch?
To connect the loops of the snood, you can use a kettel stitch. It's not at all difficult to make. Just iron the edges. Insert the needle into the second, then the first loop. Then the third and again to the second. And so continue until the end. The result is a loop-shaped seam. In addition, the snood can be sewn with a vertical seam, as described above, and with a crochet seam.
How to sew the edges of a snood?
Crocheting open loops
Place the parts face to face and pick up the tool in two steps. Make sure that there is 1 piece on the hook from each part of the knitted product. Then grab the same number of subsequent loops and pull them through the loops on the hook. Work this way along the entire length. The stitched row should resemble a braid.
Crocheting parts
General instructions
- The connection of knitted parts is best done with the threads from which they are knitted. You can replace them with a flat thread of a suitable color. It should be strong enough and not fade;
- pre-sewn parts need to be WTO, taking into account the features of the pattern. After drying, it is advisable to sweep the product and try it on;
- The seams must be performed in the order recommended in the description of the model. If there are no such recommendations, then first stitches are made on the shoulders, sides, and sleeves. Finally, the sleeves are sewn in and finishing is done;
- The length of the sewing thread should not be very long. Comfortable length – no more than 45cm;
- try to keep the thread tension even. The seam line should be smooth: for horizontal you need to focus on the stitch of one row, for vertical – on vertical row. one point at a time For beginner knitters, you can mark the stitching line with a contrasting baste;
- If necessary, small errors can be adjusted by fitting for different lengths of the parts being sewn. But keep in mind that such adjustments can be made to a difference of no more than 1.5 cm;
- For some parts such as golf collars or cuffs with cuffs, part of the seam is done on the faces. side, part - on the wrong side. This is done to ensure that the sewing line is always inside the part.
Half double crochet connection
To make a seam, you need to fold the two parts of the product facing inward and pull the hook through them. And then remove the loop and repeat the first stage, grabbing the thread. Then pull out the eye and pull it through the loop on the tool.
Single crochet connection
Single crochet connection
The jacket can be sewn from knitted parts using single crochets. They also decorate clothes. To do this, fold the two parts inside out and knit single crochets, capturing only the edge holes of both sides. Actions are performed inside out.
Single crochet connection with an air loop
If the yarn is not flat, but thick, then this type of connection is used. The parts are folded inside out to each other, then single crochets are knitted with air loops, 1-2 loops are skipped one by one and another single crochet is knitted.
Important! This method is recommended for connecting parts whose connection must be elastic.
Making a connecting half-column
Zigzag connection
The point is that the hook grabs the edge loops of one part of the product, then the other. In this case, the joint is not very tight, it is visible from all sides. The fabric is connected with a contrasting thread, or the same color is selected.
How to sew a knitted hat using a knitted stitch?
When you sew a knitted hat, be sure to fold its edges evenly. In this case, you will get a matching knitting pattern and the seam will be practically invisible. a vertical seam to connect the loops on the sides .
- Thread the needle and start working on the wrong side.
- If the hat is knitted in garter stitch, then the thread must be threaded in a herringbone pattern so that the thread tightens the edge loops and does not differ from the main pattern.
Knitted hat with a turn up - sew the sides
Cord connection
Sometimes needlewomen take a cord to help. For stitching, make 3 additional loops. The first loop of the right side of the product is placed on the knitting needle, and it is knitted with a loop of cord into the first knit stitch. Knit the first knit stitch on the cord. The third and first loop of the left side is knitted into the first loop with a broach.
Drawstring connection
When all parts of the future knitted product are ready, they are knitted with a needle or crochet. To do this, different types of seams are used depending on the location of the connection, the type of yarn and the desired result.
How to close a double elastic band with a knitted seam?
The hollow elastic band is closed using a needle.
- First, make sure that you knit one knit stitch and one purl stitch. More precisely, knit a row according to the pattern: LP (front), IP (purl) and so on until the end of the row (plus two edge ones).
- Take a needle and thread. Thread it according to the diagram. Insert the needle upwards from you, as in the image, into the first loop.
- Then to the second and return to the first. Next, grab the third, return to the second, and immediately thread the fourth.
- Do this weaving pattern with all the loops in turn.
Close the hollow elastic
To make it clearer, see the weaving diagram in the figure below :
Italian seam