Many knitters often say that the most difficult thing in knitting a hat is to start it. In fact, everything is done very simply - and I will prove it to you. Just check out my master class.
6 0
There are several ways to knit a hat beautifully and so that its crown shape matches a certain model. Some options are simple and do not require special calculations or knitting skills. I present several such examples for beginners and even experienced needlewomen.
Preparing to knit a hat
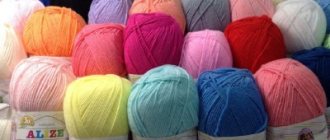
If you want to start creating a winter hat, then you first need to select yarn and knitting needles. Yarn can be different: wool, half-wool, acrylic. As a rule, the best option is a mixed yarn: acrylic and wool.
After selecting the yarn, you need to learn how to knit a hat; patterns for such knitting are in the magazines “Verena” and “Sabrina”. Knitting needles can be wooden, steel, aluminum. For a beginner, it is most convenient to knit with steel knitting needles; they have no roughness, they do not bend or break.
Types of loops when knitting
When knitting hats, different types of loops are used. The most important of them are the front ones, that is, when the knitting needle is hooked under the front part of the loop and the thread is pulled through it. When knitting a purl stitch, the needle pries up the back piece to pull the thread through.
Actually, knitting consists of alternating knit and purl stitches. The most popular type of knitting, ribbed, involves alternating knit and purl stitches in one row. That is, this is one purl and one knit, then repeat. Two knits and two purls, three knits and three purls, and so on can alternate. If you are interested in how to finish a hat with knitting needles, there are diagrams in magazines.
Another common type of knitting is knit stitch, on one side only knit stitches are knitted. But the front surface differs in that the fabric may turn out uneven.
The so-called “garter stitch” is very popular, which usually guarantees an even knitted fabric. With this type of knitting, knit and purl stitches alternate in different rows. That is, one row is knitted with knit stitches, the other row with purl stitches, and so on constantly. This look is suitable not only for hats, but also for sweaters, vests, and scarves.
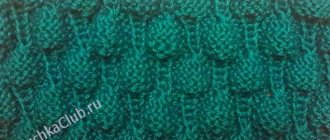
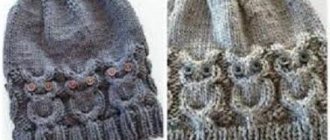
You can also knit a hat with braids; in this case, the rows of elastic cross regularly, and a beautiful pattern is obtained.
Reductions in six places
Having knitted the main part to the level of the top of the ear, we divide all the loops into six equal parts - these are future wedges. If the number of loops cannot be divided by exactly six, do not worry, make one or more of the wedges a little larger or smaller, but not in a row. Be sure to mark the demarcation points with loop markers.
We perform decreases at the beginning of each wedge, with the second decrease being performed in the fourth row after the first. Next, we make decreases in every second row. To get a more elongated crown, do the 3rd decrease in the 4th row from the second decrease, and then perform decreases in every second row.
You need to knit until there are 1-2 loops left from each wedge. Cut the yarn, leaving a long tail (40-50 cm). Next, you need to thread the tip of the thread into a needle and collect all the open loops on it, pull it tightly and use it to sew up the hole at the very top of the crown.
Knitting pattern
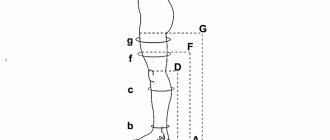
Before knitting a hat, the patterns for which are simple, you must first take measurements. This will be the volume of the head and its height from the ear to the top. We then knit a sample using the same yarn that will be used to create the main piece. It is small, measuring about ten by ten centimeters. Then the sample must be washed in warm water.
Then it is dried under natural conditions, and on its basis the loops are calculated to start knitting. You can now calculate exactly how many loops you will need to start working.
Knitting a hat on two knitting needles: a set of loops
To create a hat using two knitting needles you will need very little time. In addition, the product you create will be unique and exactly the right size for you or the person you are knitting for.
To make such a hat, you must find only one hundred grams of yarn, matching the needle number, a plastic needle with a wide eye (such a needle is usually sold complete with knitting needles).
After knitting the sample, we cast on the number of loops we need and begin knitting with an elastic band two by two or three by three. This elastic band will fit your head well. It consists of a uniform alternation of knit and purl stitches.
Two ways to reduce loops on a hat
Decrease at the edges
The standard size of the headpiece is 5557 centimeters in diameter and 1820 in height. Initially, the fabric is knitted evenly, and then begins to taper. You can decrease stitches with knitting needles on a hat when the piece is about 1215 centimeters in height.
The easiest way to decrease is to knit two or more stitches together at the end of the row. For training, you can take the same fabric and continue knitting (stocking), knitting 2 loops together purlwise - the edge stitch and the adjacent one at the end of each front row. This way, you will be able to knit several lines using the stocking method, decreasing along the edges.
Reducing the loops in the middle of the future hat
Another popular method is to reduce in the center of the canvas. When choosing this method, the decrease can be done from the front side of the cap, as this option will be more convenient. It is worth remembering that in order not to pull the product, you should not cut more than two loops at a time. If it is necessary to decrease only one loop, then the craftswoman knits two together at once. But if you need to reduce more, then they do everything at the same time.
Knitting more than two loops at once should be done according to the following pattern:
- Mark the middle three stitches you want to knit together with colored thread.
- Knit to them, then swap the marked stitches so that the third is instead of the second. To do this, remove all three onto the right knitting needle, pick up the third loop on it, then return the last and first to the left knitting needle and knit three together using the front walls. Next, you should complete the row using outside knitting.
Simple hat with two knitting needles
So, the elastic band is knitted, and we are already starting to think about how to finish knitting the hat. You can simply continue knitting with stockinette stitch after an elastic band 3-4 centimeters high, and eventually make a rectangle with a height of twelve to fifteen centimeters, and then pull the edge of the fabric together with thread. Then you just have to connect the sides of the rectangle with a needle. It must be connected with a kettel seam. The finished product can be washed, dried and steamed with an iron. And now it’s clear how to knit a simple hat.
A more complex version of the hat
If you want your hat to fit better on your head, you need to start shaping it after knitting the initial rows with an elastic band. You need to know exactly how to finish the top of the hat with knitting needles.
In the last row of elastic you need to somehow mark every twelfth loop, starting from the sixth loop. You can attach colored threads to these places. Now in every second row the loops marked with such threads are knitted together with the adjacent ones together with the front one. In the end, you need to decide how to finish the hat with knitting needles. As a result, you should have ten loops left on your knitting needles; you will pull them together with thread, leaving a long end. To connect the edges, you need to insert the same thread with which you knitted the product into a needle with a thick eye, and sew them together with a quilt stitch. You cannot use sewing threads, as they will prevent the hat from stretching. Then you will learn how to finish knitting a hat.
Adviсe
To form decreases on the top of the head, you can divide all the loops not only into 4 parts, but also into 5 or 6, but the rhythm of the decreases changes.
This method is suitable for a hat knitted in garter stitch, but you will have to divide all the loops into more than 4 parts.
If you want the hat to fit tightly enough to the top of your head, start decreasing at the top of the tips of your ears, give or take a centimeter. If you want to get an elongated cap, we recommend making decreases a little later, about 3-5 cm from the level of the top of the ear.
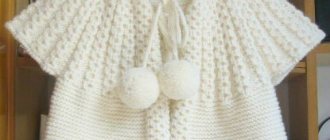
Making a pompom
Recently, hats with pompoms have come into fashion. A pom pom is an elegant solution to the question of how to finish the top of a hat with knitting needles.
To make a pompom, you will need two circles of cardboard, they are cut out with scissors. A hole is made in the middle of the circle.
The pom pom may turn out curly, and for this you are better off using yarn obtained from unraveling former knitted items. This will be a beautiful option for finishing a hat with knitting needles.
The yarn is wound onto cardboard circles (many layers need to be wound). After winding, the yarn is cut in the middle of the circle and tied to create a pompom. You also need to attach a thread 25-30 centimeters long to it. What is the easiest way to finish knitting a hat? Pompom!
Reductions in eight places
Everything is the same, only the knitting is divided into eight wedges. We make decreases at the beginning of each wedge (several times in the 4th row, then in every 8th).
The loops at the beginning of the wedge can be reduced in two ways:
- 2 p.vm. persons with a tilt to the right. Thread behind knitting. The right knitting needle goes simultaneously into 2 adjacent loops on the left knitting needle, grabbing them by the front segments, we knit them.
- 2 p.vm. persons with a tilt to the left. Exactly the same, only we grab the loops by the back segments. These are all the secrets of how to correctly decrease stitches when knitting a hat. We hope you find our lesson useful. Happy knitting!
Knitting on five needles
It must be said that a hat knitted with five knitting needles will turn out more elegant than a hat knitted with two. It is perfect for lovers of seamless things. And it’s easier to knit because you don’t have to think about how to make a beautiful seam. Of course, you still have to rack your brains about how to finish the stocking cap with knitting needles. But everything will look more elegant. You also need to decide on the answer to the question of how to finish knitting a hat.
To work you will need five knitting needles with open ends. At first, everything will seem very difficult. But over time, you will start to like knitting on five needles, most likely you will start knitting absolutely everything with them.
To do everything right, you need to know not only how to start, but also how to finish a hat with knitting needles. First, we cast on forty loops on two of them, distribute them onto four knitting needles so that each has ten loops, and knit them with a fifth knitting needle. It is necessary to ensure that so-called tracks, that is, holes, do not form between the spokes.
So we knit to a height of twenty to twenty-five centimeters, and then we begin to decrease the loops. In every second row we knit two knit stitches together every ten stitches. Then ten loops remain, which we transfer to one knitting needle and tighten with thread. That's all. You can also attach a pompom on top. And then you won’t have to think about what a hat is with knitting needles or how to finish knitting it.
You can also do it on three needles, knitting rows of the fourth, but not everyone likes this pattern. If you think about how a hat is knitted with knitting needles and how to finish it, you can come to the conclusion that knitting with five knitting needles is still more convenient.
Simple decreases
This method is ideal for simple knitting, for example, consisting only of knit stitches - what is needed for beginners.
First, you need to knit the base of the cap on circular knitting needles with facial loops to the required height. Next, we proceed to the formation of the crown: we switch to stocking knitting needles of the same or slightly smaller size (for example, if the base of the hat was knitted on circular knitting needles No. 3.5, stocking needles should be taken No. 3 or No. 3.5). Before transferring the loops, divide them into 4 equal (+– 2-3 loops) parts. For example, if a hat consists of 80 loops, divide them by 20 for each section.
We transfer the loops and start knitting a row with decreases: we knit the first two loops together behind the front wall, then we continue to knit the loops in the usual way, leaving the last 3 unknitted. We knit these last three loops in this way: we remove the 1st without knitting, we knit the 2nd in the usual way, after which we need to pick up the loop that we just removed and pull the already knitted one through it (we do a broach). We knit the outermost stitch of 3 stitches. We repeat this pattern on each of the four knitting needles.
The new row is knitted without decreases, but the next row after it is knitted according to the previously described pattern with decreases. Simply put, we alternate rows with decreases on each needle and rows without any decreases. We continue this until there are 4 (or less) loops left on each of the knitting needles, then you can safely tighten the crown with a thread. We advise you to grab it with a hook and carefully remove all open loops on it.