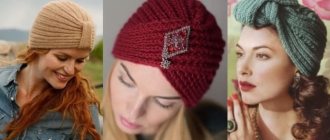
It’s great that in our time, in addition to adult fashion, there is also children’s fashion. What parent doesn’t want their daughter or son to look stylish and fashionable? Now every mother tries to follow not only adult, but also children's fashion. If you love knitting, you will have every chance to make a cool knitted beanie hat for your daughter or son. There are a lot of fashionable children's magazines; the oversized children's beanie hat from the American site looks very cute. Let's try to figure out how to knit a baby beanie hat.
Beanie hat - what is it?
In English, beanie means round hat. As a rule, this is a plain, calm headdress, without unnecessary accessories, fittings and fasteners.
Beanies first appeared in the last century in England. Comfortable hats were used by workers - mechanics, assemblers, electricians. Gradually, the fashion for hats spread to children - schoolchildren and students.
Tips from needlewomen
Knitted warm set - a good DIY gift option
Experienced needlewomen advise not to stop knitting a warm headdress. It can be complemented with easy-to-make accessories, for example, a snood or mittens made from the same yarn.
A simple and laconic headdress will become brighter and more elegant if you add a fur pompom to it on the top, decorate it with pearl beads, rhinestones or embroidery.
Advice! For a children's accessory, a pompom can be made from yarn that was used for knitting.
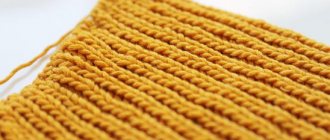
Beginners should learn to knit doubles with thicker threads without using complex patterns. It is easier to make, and large knitting will become a decoration in itself.
Who is the beanie hat for?
Today, the beanie hat has climbed to the top of the fashion Olympus. She has conquered absolutely all categories; now both children and adults are happy to introduce fashionable models of hats into their wardrobes.
Its huge advantage is that its shape suits absolutely all face types, which cannot be said, for example, about berets or caps. It is enough to experiment with changing the volume, color or adding a small lapel.
Do not forget that this is just a headdress and it can not only be a fashionable item of clothing, but also with great success protect from frost and winds.A wide variety of yarn will help you choose exactly what you need.
Women's hat for beginners
A simple hat model can be made elegant and fashionable if you use bright, high-quality yarn for knitting. To knit this hat you will need 100 g of thick yarn.
Process description:
- it is necessary to cast on an odd number of loops;
- knit 6 cm with a simple 2×2 elastic band;
- To knit a pattern you need an odd number of stitches. The pattern is obtained by knitting an elastic band by shifting due to an odd number of loops (1 row - edge loop, 2 knit loops, 2 purl loops, 2 row - one edge loop, 2 loops, 2 i.p.);
- for a voluminous hat, you will need to add one loop after the elastic every five loops, and then knit the pattern;
- for a tight-fitting hat, you need to finish knitting the hat after about 10 cm. For a voluminous hat - after about 15 cm. We begin to decrease the loops: we connect two loops together through two, we knit the second row according to the pattern, in the third row we knit two loops together through one, the fourth row knit according to the pattern, in the fifth we knit two loops together, in the sixth row we knit all the loops purl;
- remove the remaining loops and fasten them together.
General color trend
Children's hats look best made from yarn of bright and rich colors - red, yellow, bright blue, green. Contrasting inserts and chic buboes would be appropriate in the children's version.
Men's ones are made in restrained colors - black, gray, dark blue tones.
Women's hats include all color shades, mostly depending on the preferred style of clothing and the age of the beautiful housewife.
Beanie style
Today's fashionable hat fits perfectly into all styles of modern life. Sports, casual and even classic - you can choose your own hat for any style.
Note!
How to crochet a mouse and a rat: video master class on crocheting the 2020 symbol
How to knit a warm hat with ears for a newborn boy and girl - video tutorials with patterns, instructions for beginners
- How to crochet a beautiful scarf: video master class on creating unusual, beautiful, simple scarves for boys, girls, men and women
Play with colors and make a wonderful selection of your favorite things. As options, we bring to your attention a small selection that will allow you to imagine what the headdress looks like in different images:
- You have a long coat collecting dust in your wardrobe. Try putting together an outfit with a coat, trainers and a beanie.
- In early spring, when the sun is just starting to get hot, but it’s still quite cold outside, wear a light beanie hat complete with sunglasses. This technique looks really cool!
- Another spring look is a combination of wide leg-length trousers with classic shoes, your favorite light coat and a beanie hat.
- In winter, together with your fur coats and down jackets, a beanie hat with a wide scarf will become a stylish and trendy solution.
So, are you convinced that beanie hats will fit perfectly into your wardrobe and have you learned how to wear this item? Don’t hesitate and quickly learn how to properly knit something new for yourself.
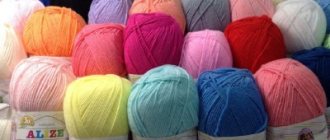
Selection of knitting needles and threads for a hat
Once you have decided what time of year you will wear the hat, under what things and in what places, you can come close to choosing the material.
For the winter season, it is recommended to make a hat from angora or cashmere - these are natural materials. If you are planning to knit a hat for an adult, then you can also look towards artificial materials - bamboo fiber, acrylic and polyester.
In the demi-season period, threads made from half-wool, merino and cotton will be relevant. Thin merino threads will allow you to create a warm and fairly thin hat, ideal for the off-season. Cotton hats are ideal in early autumn and late spring, because... They are unlikely to be able to protect your head from the cold.
Note!
How to knit a hat with a lapel using knitting needles or an elastic band: step-by-step instructions for beginners
How to crochet a winter hat: 95 photos of new models of warm, fashionable, original knitted hats with a lapel and a beautiful pattern
- Light and beautiful crochet shawl: photos of chic openwork scarves with simple patterns
Once you have chosen a yarn, carefully examine its label. The label usually indicates the number of knitting needles that are recommended for this type of yarn. Carefully study the photos of labels and do not hesitate to ask questions to the consultants. If no information is found, then follow the rule - the thickness of the knitting needle should be one unit greater than the thickness of the thread.
To work you will need straight or circular knitting needles. Which ones exactly will depend on the pattern. If the hat requires a seam, then you should take straight ones; for a seamless one, circular ones are ideal.
How to knit a double hat for women
First you need to knit a control sample and calculate your knitting density. Then, using a measuring tape, measure the circumference of your head and determine the length of the hat. The recommended standard for beanie is 30 - 32 centimeters.
After which you need to make the calculation as for a single cap.
Using our online calculator, all necessary calculations can be performed literally within two minutes.
After all the necessary preparations have been made, you can start knitting the hat.
Various hats
The particular popularity of hats entails the appearance of various variations. Check out the new products and decide what suits your head best. Classic solutions or newfangled trends, the choice is yours.
Facial surface
A beanie made with stockinette stitch looks simple and impressive; this model is especially interesting in its seamless version.
For a size 57 hat, take number 4 circular knitting needles with fine yarn (100 grams per 350 m length).
We invite you to familiarize yourself with a short master class:
- 132 stitches are cast into a circular stitch.
- The hat is knitted in stockinette stitch until the height reaches 24 cm.
- All loops are divided into 4 parts. Each part contains 33 loops.
- We perform the formation of the crown - 1 row and the next odd ones at the beginning of the wedge, the first knit stitch, then 2 together, then all knit stitches, leaving the last two wedges on the knitting needles. The penultimate loop must be removed, the last one must be knitted and threaded through the penultimate unknitted one. This is done for each of the 4 parts.
- 2 and subsequent even loops are performed completely with knit stitches without decreasing.
- After 3 loops remain on the knitting needles, you can finish your work, tighten the loops with working thread and carefully hide them on the wrong side.
- To decorate such a rather simple hat, choose the most beautiful crown in a specialized store. You can attach it to the hat using a button or simply sew it on, it all depends on the material of the top and your imagination, because when you use a button you can purchase several tops for one hat!
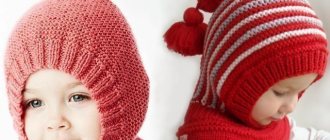
Beanie hat for a girl 5-6 years old
This knitted beanie hat is suitable for girls aged 5-6 years. However, you can knit it for any age; below is an approximate table of sizes for a classic hat. The master class is not difficult.
Just keep in mind that the knitted beanie hat should be 5-7 cm longer than the classic one, and we finish the hat at the very end, and not long before pulling it off, because it should look a little baggy. This baby hat for a girl is very easy to knit. If you are taking your first steps in knitting, this model is simple and understandable for beginners.
We knit the first half of the hat with beige threads, the second with white threads. We start knitting with a 2/2 rib and knit the main part of the hat with the lapel using purl stitch.
To work you will need:
- Bulky yarn Lion Brand Jiffy Solid – 85 g. / 123 m. – 100% acrylic, white and beige.
- Knitting needles 5 and 6 mm thick, circular or regular.
- Pompom cardboard.
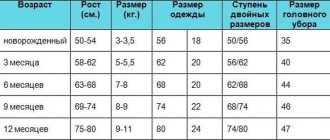
Knitting density – 15 loops / 19 rows corresponds to 10 / 10 cm. We start by measuring the volume of the child’s head with a centimeter. If this is not possible, see the table. As we can see from the table, if we want to knit a beanie hat for 4-5-6 years, then the head volume will be from 50 to 54. Let's take the average value - 52 cm.
Our knitting density with this thick yarn is 1.5 loops / 1 cm. This means we cast on knitting needles 5 mm thick. 52 * 1.5 p. = 78 p. We begin to knit a 2/2 elastic band (k2, purl 2)
We knit 36 rows with a double elastic band. The lapel of our hat will be 18 rows. That is, the entire lapel with an elastic band is 36 rows.
Then we switch to knitting needles 6 mm thick, change the thread to white and continue knitting with purl stitch:
Purl stitch:
1st row: purl all, 2nd row: all knit, 3rd row: repeat 1st row.
We knit 22 rows using purl stitch. That is, we knitted 58 rows in total from the beginning of knitting. Then we start decreasing.
59th row: knit 2 together – the whole row. 39 stitches left. 60th row: how the whole row looks like knitting, without decreases. 61st r.: 2 persons together. - the whole row, without decreasing. There are 19 stitches left. 62nd row: as see, knitting the whole row, without decreasing. 8 p. left.
We collect these last 8 stitches on a thread and tighten them. Carefully sew the seam. We make a pompom and sew it to the hat.
Voluminous beanie hat with knitting needles: description and diagram step by step
Large knit beanies are very popular this year. You can knit a hat from thick yarn very quickly; experienced needlewomen can do it in a few hours.
A voluminous and beautiful hat will go perfectly with any style of clothing, and if you add it with a scarf, you will have an excellent set. Bulky threads do not need an additional pattern; stockinette stitch, garter stitch, or simple elastic are suitable.
For example, for a size 52 hat, take threads (100 grams per 40 meters in length) and number ten circular knitting needles. It is proposed to knit a white cap, because... white color will add additional volume and will look good with any things.
- 46 stitches are cast into a circular stitch.
- With a simple elastic band (1 knit alternates with one purl) knit 36 rows.
- In the next 5-6 rows we make a uniform decrease by knitting 2 loops together.
- After 14 loops remain on the knitting needles, you will need to pull the working thread through them and fasten the crown.
- Pull the remaining thread to the wrong side. The hat is ready.
Models with braids - diagrams
Gray wool hat with beautiful braids. The model is knitted in cables in combination with garter stitch and 1x1 elastic. The yarn used in this work was Rowan Cocoon and Kidesilk Hize Cocoon, 6 mm knitting needles. and 8 mm + auxiliary knitting needles
BEANIE HAT WITH SPOKES PATTERN
Beanie with large braids and gradient. The headdress looks impressive. When knitting, one trick is used. The hat is knitted with two threads. First with a thread of one color, and during the process it is replaced with a thread of a different color. Then the work is done with two colored threads and again replaced with a thread of a different color. Knitting in two threads adds volume to the hat. This is the method used to transition colors.
DESCRIPTION OF HAT WITH BRAIDS
The model is made with large flat braids.
MODEL WITH BRAIDS - HOW TO KNITT.
, ,
Beanie headdress with beautiful openwork braids.
MODEL WITH BRAIDS - DIAGRAM
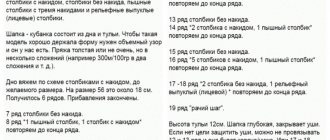
Beanie with beautiful braids. Consumption: 2 skeins of yarn, 50g/90m thick. A set of loops at the rate of 20 loops report (8 knit 2 purl 8 knit 2 purl, crossing loops every 11th row in any direction convenient for you), attention! The diagram shows the calculation for a cap size 54-56, increasing the report to 22 loops, that is, 8 knit 3 purl 8 knit 3 purl, we get a cap size of 56-58
HOW TO KNIT THIS HAT?
Hat with lapel
The lapel will decorate your hat and make it unusual. It is proposed to knit a hat with a lapel on circular knitting needles. Any pattern is suitable for this hat - plaits, braids, elastic bands. It is recommended to take fairly thin yarn (100 grams per 500 meters of length), knitting needle number 5.
Product description size 54:
- 70 loops are cast on in a circular manner.
- A 35 cm lapel is knitted with an English elastic band.
- Knit 4.5 cm with a regular elastic band (1 knit, 1 purl).
- Forming the crown - loops are knitted two together. In the next row, bring the working thread through the loops, remove one without knitting and knit the next 2 loops into one. Do this until there are 16 stitches left on the knitting needles.
- Tighten 16 loops with working thread and secure. Bring the end of the thread to the wrong side.
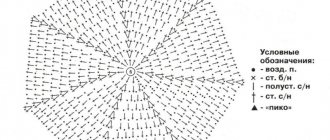
Cross knitting - chain pattern
Cross-knitting a beanie hat with a chain pattern is not at all difficult. The most important thing is to understand the process of entwining loops. We offer chain knitting patterns and technological entwining patterns. This will make it easier for you to understand the wisdom of knitting.
To work you will need:
- Valencia yarn (43% wool, 7% angora and 50% acrylic), 100 g/220 m.
- Knitting needles 3.5 mm thick. circular, but you can also work on regular ones.
- Ruler, scissors.
If you knit in one thread, then you will need 1 skein of yarn, if you want to make a thicker hat, you will need 1.5 skeins in 2 threads.
A beanie hat made with short rows of knitting needles, the knitting pattern is 30 cm in height. It can be worn with a lapel or slouched - whichever you prefer.
Abbreviations in words: knit - l., loop - p., purl - purl, row - r.
We knit a small sample with a “chain” pattern, see how many loops are contained in 10 cm. In our case, in 10 cm we got 18 stitches, therefore in 1 cm – 1.8 stitches. So we need to cast on 54 stitches for 30 cm ., but since the number of loops must be odd, we will add 1 p. - we get 55 p.
This is a diagram of the chain pattern. Using it you will quickly understand the essence of the pattern. But we need to take into account that in our master class the chain begins not from the 5th row, as in the diagram, but from the 3rd row.
Cast on 55 stitches on the knitting needles.
1st row: knit only with knit stitches, remove the 1st edge as usual and knit the entire r. persons Always try to make the first stitches tighter, so the hat will not stretch too much. We turn the work around.
2nd row: remove 1 edge, purl everything.
3rd row: shortened, this is already a chain pattern! Purl 1, slip 1, purl 1, slip 1, and so on until the last six stitches. We transfer the outermost, sixth stitch of the unknitted ones to the right knitting needle, thread before work, and with this thread we wrap the outermost (sixth) stitch. Next, our entwined knot returns to the left knitting needle. Our loop is entwined and the work is turned over.
Loop wrapping diagram.
4th row: after the entwined stitch, knit 1, remove 1 stitch, remove 1 stitch, remove 1 stitch, and so on until the end of the row. It turns out that we remove the stitches knitted in the previous row, and knit the stitches that were removed.
5th row: knit only, leaving not 6, but 5 stitches before the entwined st. The entwined st is knitted in this way: we insert the right knitting needle into the st in front under the entwining thread, grabbing everything together, we knit this knot.
Scheme for knitting the entanglement.
6th row: after the entwined stitch, purl until the end of the row.
There should be 4 rows between the chains.
7th row: knit faces. up to the last, now 4 sts, we entwine the last st and turn the work over.
8th row: purl until the end of the row.
9th row: chain until the last 3 sts. Purl 1 st, slip 1 st, purl 1 st. Remove 1 p. - so on until the last 3 p. Next, we need to tie the entanglement. Using the right knitting needle, we pass the entwined stitch from behind and knit everything together (pattern for knitting entwinement). Turn the work over.
10th row: remove 1 p., knit 1. p., remove 1 p., and so on until the end of the p.
11th row: knit everything, until the last 2 stitches, which we do not knit. We twist the outer stitch and turn the work over.
12th row: purl until the end of the row.
13th row: all knit stitches, up to the last 1 st, knit this knot together with the entwining. We turn the work around.
Row 14: purl. to the end of the river This is the first wedge. We should have 13 such wedges. It all depends on the size of the head. After 9 wedges, the work can be tried on. Put some work into your head, maybe 13 wedges won’t be enough for you, or vice versa.
15th row: everything is repeated from the beginning, from the 1st row.
Next, using a hook or a needle with a large eye, we sew the edges and tighten the crown of our knitting cap.
In the video: a master class on knitting a beanie hat using shortened rows of chains.
Knitted hat. Fashionable! Simple! Warm! MK.
Classic beanie
For the classic model, a popular and simple knitting pattern is initially used - garter stitch. Such a beanie made of threads with such characteristics would look great - 100 grams of thread in 110 meters. As a tool, select straight knitting needles number eight.
Garter stitch will be appropriate not only in women's, but also in men's clothing. Garter stitch is often used in children's products.In order for the hat to better hold its shape, you can use a double thread when knitting.
Beanie hat knitted description and diagram step by step - photo ideas from the best craftsmen
Please repost
0