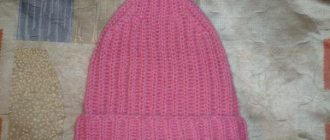
When the cold weather comes, everyone strives to quickly warm up, but at the same time look beautiful and fashionable. For several years now, hats with various patterns have remained in fashion. Beautiful designs change and improve every year, and therefore it is sometimes difficult to keep track of trends. But basically the patterns come from ordinary braids, where you need to know how to make a binding. It's not difficult, but you need to have patience and be careful. A hat with a braided pattern is very easy to knit, but at the same time it looks beautiful, rich and is quite warm.
Even someone who is just starting to knit can handle this pattern. At first glance, it may seem that such drawings are complicated due to their binding, but if the scheme is described in detail and the beginner sticks to it, then the result will be excellent.
Preparatory work
Like any cable knitting, the pattern used significantly tightens the fabric.
Therefore, you should first knit several rows for example to calculate the knitting density. Since in addition to braided knitting, a 1 by 1 elastic band will also be used, the sample should After determining the density of the pattern, calculate how many loops are needed to start working. You should focus on the previously knitted elastic band; the number of loops should be even. To do this, you need to know the head circumference of the future owner of a fashionable hat.
- at least 200 g of yarn;
- knitting needles of two sizes - No. 4 and 6;
- spare knitting needle for creating overlaps;
- gypsy needle or hook;
- marker if knitting will be done in the round;
- scissors.
The work will not take much time. In just a couple of evenings you can make a braided hat with knitting needles.
Learn to make a braided hat, step-by-step video tutorials on how to make a model
Successful mastering of the technique of knitting a braided hat!
According to many needlewomen, crocheting is faster and more convenient, light and openwork than knitting. For those who love the instrument, we offer a video lesson on the technique of knitting a braided hat. It is designed for beginners and will help them master this type of art.
Necessary materials:
- Mixed yarn (consisting of wool and synthetic thread) of medium thickness;
- Hook 3 mm.
To make the creative process comfortable, it is worth having before your eyes a description of knitting a pattern and its diagram.
We form the “top” of the hat by making an amigurumi ring.
1 row. 12 single crochets (SC) are knitted around the ring - this is 6 repetitions (rapports) of the main pattern. The first and each subsequent row ends with a connecting column.
2nd row. Knit 4 chain stitches (VP), 2 connecting stitches with double crochets (SS2H) from the first stitch (RS) of the first row and three CC2H from the last stitch (RSL) of the previous row (the hook is inserted behind the chain loops in this and all even rows) . Next, instead of chain stitches (VP), a connecting stitch with two crochets (CC2H) is knitted.
3rd row. *4 chain stitches, 2 CC2H from the second and third stitches of the previous row, 3CC2H from the last 3 stitches of the previous row (the hook is inserted before the chain loops and two CC2H here and in all odd rows).
Then there is an increase in loops (in the diagram these are pink and blue).
3 CC2H are knitted from the back half loop of the fourth CC2H of the previous row; 3 СС2Н - from the back half-loop of the third column of the previous row. The hook is inserted in front of three knitted stitches (thus, a repeat is knitted in the middle of the repeat of the previous row), 3 CC2H are skipped and repeated from * (instead of chain loops, 1CC2H is knitted). You should get 12 repetitions.
4 row. Knitted with the main pattern without any increases, 12 repeats in total.
The pattern looks like this:
5 row. Knitted in the same way as the third one. As a result of the addition, you should get 24 rapports.
Rows 6-13. Knit according to the pattern without any increases. This is where the woven part of the hat ends. The thread doesn't break. The last row should have 144 stitches.
The next stage is knitting the intermediate rows to align the edge. You should get 96 loops.
The rows are knitted according to the pattern:
The final part of the hat is the elastic band:
1 row. 2 chain stitches, 95 half double crochets, knitted behind the front half loop of the previous row, connecting stitch.
Rows 2-8. 2 chain stitches, alternating knit and purl embossed half double crochets, connecting stitch.
The thread is cut, the tip is hidden. The height of the product is about 19 cm.
Various options for braided hats
The headband of the cap can be knitted with a double elastic band or some other knitting material. An alternative to such edging would be a lapel. To create it, simply lengthen the rim to the desired size, for example, by half.
A very popular model of knitted headdress is takori. It is distinguished by the presence of a double lapel and is most often performed with an English elastic band. But a knitted braided hat can also be given this shape.
The hat can be decorated in several colors. This is more suitable for children's and bright youth options. Braids with a color gradient look beautiful. To create it, special yarn is used. You can achieve the desired effect yourself.
The finished hat is decorated to your liking. Quite discreet options can be equipped with some kind of logo printed on a small patch. A fur or thread pompom is often placed on the top of the product.
The headband and the main part of the headdress are decorated with buttons, rhinestones, crocheted flowers, and a scattering of beads. The option for a girl looks interesting when a narrow satin ribbon is stretched along the headband, the edges of which are tied at the side with a flirty bow.
Beautiful warm hat knitted with a braided pattern. Step-by-step master class
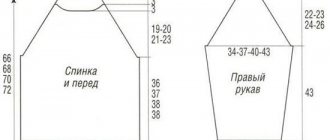
For a head circumference of 50-54 cm, cast on 64 loops. And let's close them in a circle. Next we will knit with an elastic band 2 by 2 approximately 2-3 cm.
Then for the pattern we need to make increments in the row. And we will knit them in all facial loops. That is, from each front stitch we will knit 2 new loops. We knit the entire row with knit stitches only. From all purl stitches we knit 1 new knit stitch. And after that you need to knit 2 more rows using stockinette stitch without any increases.
Let's now start knitting the pattern. Slip the very first 3 stitches of the row onto a auxiliary needle. And let's leave these loops before work.
Knit the next 3 stitches. We will return those loops that are on the auxiliary needle back. And we will also knit them with knit stitches. This is how the first overlap was formed.
We will continue to knit all the rows in the hat with knit stitches. First, remove 3 loops onto the auxiliary needle. Then we knit the next 3 loops. Then we return the loops from the auxiliary needle and knit them. So we continue to knit until the end of the row. After this, we knit 3 more rows in a circle without overlapping.
Next, the overlap needs to be done in the other direction. And for this we will knit the first 3 loops, and remove the next 3. Let's remove the auxiliary knitting needle with loops on it for work. Knit the next 3 stitches. And return the loops from the auxiliary needle back. Let's knit them. Again, slip 3 loops onto the knitting needle and put them to work. We knit the next 3 loops and then we knit 3 loops from the auxiliary needle. And so on down the row.
At the end of the row we remove 3 loops and take them to work. The next 3 stitches are already the beginning of a new row. But we will rearrange the marker for them. And we will knit these 3 loops. Then we knit the loops from the auxiliary needle. That is, we slightly shifted the beginning of the next row. We knit 3 rows of stockinette stitch.
And then we repeat the pattern from the very beginning to the required depth of the cap.
Next, let's start cutting off the loops. Let's make a row with overlap. And then we knit 2 loops together, then we knit 2 knit stitches, again 2 loops together. Again we knit 2 stitches together, then 2 knit stitches and 2 stitches together. This is how we knit the entire row. In the next row we simply knit 2 stitches together.
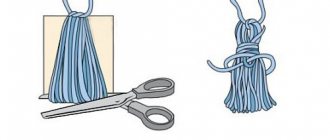
And just pull off the remaining loops with thread. Tie a knot inside the cap. You can decorate the hat with a pompom made from the same yarn or purchased.
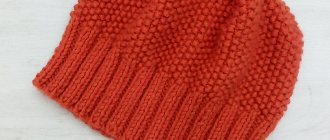
Hat with braided pattern
ready!
| Comments to the news “Beautiful warm hat with knitting pattern - braided. Step-by-step master class with photos” is already 0:
Interesting on the web:
E-book “The best handicraft master classes.”
After that, click the “Get book” button.
"Masterclasses" 2011-2017
. All articles on the site are copyrighted, copying is strictly prohibited. In case of partial citation, a direct indexed link to the “Masterclasses” website is required.
Attention! It is forbidden to use expressions in the form of obscene and insulting. HTML tags and URLs are not allowed
Knitting hats, more than 50 models with descriptions, Knitting for women
A hat is a very important, fashionable and necessary item of clothing for every person who lives in a more or less cold climate. There are a lot of beautiful factory-made hats in the store today. But you can’t always choose a hat of the right color or texture. It happens that only the latest fashion trends are on sale: a hat or beret that absolutely does not suit you. Or you bought a new coat, which goes perfectly with a menthol hat and snood. But you didn’t find either one or the other on sale. Although no, the store has a green hat, a blue snood, and everything is not the same. Or the price is such that with this money you can buy 2 kg of good yarn. Then all we have to do is take the knitting needles in our hands and knit the hat with knitting needles.
There are many patterns on the Internet for knitting hats: hat - beanie, hat - cap, hat - beret, etc. A knitted women's hat will decorate any look, so there should be many different hats in your wardrobe. Do not knit black, gray, brown hats. Buy bright, multi-textured threads and experiment with them. We need to somehow dilute the dullness of our everyday life.
It’s easy to knit a hat with knitting needles if you choose a pattern that suits your abilities. If you are new to knitting, then don’t get hung up on models with arans and braids. Of course, they look very impressive, but in such patterns it is difficult to count the number of loops, connect all the patterns correctly and make beautiful decreases. Find a suitable video lesson on knitting a hat for your level and knit according to it.
We have collected more than 30 models of knitted hats from our authors and beautiful models from the Internet. We hope that you will definitely like something. And if you knitted a hat for yourself, be sure to send it to our editor, we will be happy to post a photo of your work.
Knitted hat. Interesting models from the Internet
Knitting Nepal hats with knitting needles
For knitting you will need: – Drops Nepal yarn 2 skeins (I have color 4311) – short circular knitting needles 4.5 and 5, double needles 5 – crochet hook or knitting needle Dimensions after WTO when folded: width 20 cm, length 22 cm (for an adult, size 56-58).
Knitted hat description link
Knitted openwork hat
Size: for head circumference 55-57 cm. For the hat and mitts in the set you will need: 80 g of yarn for the cap and 40 g of yarn for mitts (ALIZE Cotton Gold, 55% cotton, 45% acrylic, weight: 100 g, length : 330 m), circular knitting needles.
Knitted hat and mitts description
Knitted hat with knitting needles “BIRGITZ”
- The size of the hat for the head circumference is 53-57 cm, the height of the hat is 20 cm.
Source: https://knitka.ru/20562/podborka-shapka-spicami.html
Everything, everything, everything about the hat with the Braided pattern
- home
- Blog
- Everything, everything, everything about the hat with the Braided pattern
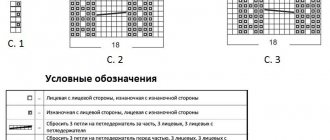
I’m posting a description of the braided hat and some tips and tricks in knitting it. The pattern is simple, thanks to it the hat turns out to be very warm, double, holds its shape perfectly and creates volume. And so, the first thing you need to decide on is the style. What type of hat suits you? On the head or a little more curvy? Or does it take at all? The number of increases after the elastic will depend on this. The braid can be different: 2 by 2 (cross of 4 loops, pattern is a multiple of 4), 3 by 3 (cross of 6 loops, pattern is a multiple of 6), 4 by 4, and so on further. Here is a standard 3 by 3 braid pattern. Don’t forget, if we knit on circular knitting needles, there are no edges, i.e. the pattern is simply a multiple of 6 in the case of 3 by 3 braid knitting.
We choose the yarn, based on this choice, we also choose the type of braid. Let's say here the yarn is Nako Arctic 100 grams/100 meters, the braid is 4 by 4.
This model is Harmony yarn... kind of like Vita. Braided 4 by 4. Model on the head.
This Lanagold 800 in 4 threads, knitted with a gradient, 6 by 6 braid, double elastic.
Have you decided on the model and yarn? Then we move on to knitting samples. We need 2 samples: the pattern itself and the elastic band. We measure and calculate the knitting density in the samples. When casting on loops, we focus on the elastic pattern! The “Braided” pattern tightens the fabric very tightly, so after the elastic it is necessary to make increases, even if the hat is on the head. And if you want a fluffy hat, there will be a lot of extras.
Now I’ll explain the principle using the example of the first, black, hat. So, yarn Nako Arctic 100/100, OG 56 cm. It took a little less than 200 grams. Cast on 96 loops, knit on circular knitting needles No. 5 (40 cm knitting needles) an elastic band 2 by 2 ( 2 knit, 2 purl). Here, be guided by your taste, my elastic band is usually 7 cm. Next, we begin to increase. Increase in any convenient way: either we pull out a loop from a crossed broach, or we knit 2 loops from one, see for yourself. If we want a hat on the head: we make increases every 3 loops. If we want a fuller hat: we make increases every 2 loops! That is: 2 knits, increase, 2 knits, increase. This is exactly our case. As a result, we have 144 loops on the knitting needles. If we want even more magnificent ones, then there is an increase through each loop; if we knit a take, then we knit 2 from each loop! We knit several front rows (5-6, not important), then move on to the pattern. – * leave 4 loops on an additional knitting needle before work, knit 4 loops, then knit the loops from an additional knitting needle * and so on until the end of the row. (be sure to mark the first loop of the row with a marker!) – 6 rows with knit stitches – 4 loops with knit stitches * leave 4 loops on an additional knitting needle while working, knit 4 loops with knit stitches, then knit stitches from an additional knitting needle * repeat until the end of the row (don’t forget to mark the first one with a marker stitch row) Knit 6 rows again. That is, we cross every 7th row. So we knit to the desired depth. We will begin the decreases somewhere 4-5 cm before the end of the hat, keep this in mind. Decreases: after the last cross made, knit 1 row. In the next row we will start decreasing. 1. We knit loops 2 together in those places where we have loops at the bottom of the cross, that is, it turns out: *4 knit, 2 purl together, 2 purl*. 2. *Knit 4, purl, purl 2 together.*3. *Knit 4, purl 2 together*4. *Knit 2, purl 2 together, purl 1*5. *Knit 2, purl 2 together*6
*knit all stitches 2 together”, continue this way until there are no stitches left on the knitting needles 20. Break the thread, thread it through a needle for sewing knitted items, thread the thread into the open remaining loops, pull it off, then pass the needle through these loops one more time and pull it off again. Well, decorate it to your liking. Thank you all for your attention
Vantseva Natalia
According to fashion trends
This hat is very fashionable, in addition, the designers assure that this model will also be in trend this winter. Usually branded items cost a lot of money, so many needlewomen, saving their money, knit such items themselves. Things you make yourself are more valuable, especially since you can add something of your own, then such a headdress will become completely unique.
What you need to prepare:
- semi-woolen threads;
- knitting needles number 4 and an additional knitting needle;
- scissors;
- needle.
For a head circumference of 56-58, cast on 70 buttonholes on circular knitting needles. Now we knit a regular elastic band 2 by 2 14 rows. When the elastic band is knitted, we must knit 3 rows with front buttonholes, while adding 24 loops. The pattern below shows the knitting pattern for the pattern. In this case, we remove three buttonholes onto an additional knitting needle in front of the product. We knit three loops, and then we knit three buttonholes from an additional knitting needle. And so we knit the entire row. Next, we knit 5 rows with facial buttonholes. And then we make the binding on the other side.
Related article: DIY gauze diapers for newborns with photos
After the second crossing, the pattern will become clearer. And so we knit to the required height, approximately 15 cm. And only then we begin to make decreases. During the binding period, using an additional knitting needle, we make a reduction behind the product. And after 5 rows you need to remove them from the main fabric. After that we knit a few more rows, and then knit 2 buttonholes together for 5 rows. At the moment when there are only 12-18 buttonholes, use a thread to tighten everything and pull the remaining thread inside the hat. All that remains is to sew the hat with the same thread, and everything is ready.
Braided variations
Braids are good on their own and can be perfectly combined with other types of knitting - cones, stars, braids, broaches, elongated loops. The main pattern can be modified at your discretion. The crossing may involve not 6 loops (3x3), as in the above diagram, but more or less of them.
Wide braid
Here is an interesting variety of knitting, which, by creating elongated loops and crossing 2x6s, allows you to avoid pulling the fabric. To form elongated loops in the purl row, inserting the right knitting needle into the knitting loop, you need to wrap it with thread twice, getting a double loop, and in the front row the extra turn is simply dropped. The principle of creating relief:
- 1st r. - facial;
- 2nd r. — 10 classic purls, 2 purls with additional thread wrapped around the needle (to obtain elongated loops);
- 3rd r. - Remove 2 loops onto a temporary knitting needle in front of the fabric, lowering the extra turn and pulling them out, the next 6 pcs. perform with knit stitches, then knit 2 elongated stitches from an auxiliary needle in the same way, knit 4. P.;
- 4th r. - at the beginning, 8 purl stitches are performed, then until the end of the row, 2 purl stitches with double twisting of the knitting needle and 10 simple purl loops are alternated, the last 2 pcs. before the edge they are knitted in the classical way;
- 5th r. - performed according to the pattern: knit 2 only at the beginning of the row, then make crossings (lower 2 pieces and leave before work, knit 6, knit 2 elongated loops from a temporary knitting needle as knit), which are separated from each other by 4 regular knits, the last 2 p. row - facial;
- 6th r. - having completed 6 purls, go through a row, alternately knitting 2 purls with a double turn and 10 simple purls, completing the level of 2 stitches with an extra turn and 4 purls;
- 7th r. — 4 knit stitches, overlap of 8 loops (2 pieces left before work need to be pulled out);
- 8th r. - repeats the 6th row;
- 9th r. - 4 knit stitches, then perform crossings (pull out 2 loops and leave them, without knitting, behind the work, knit the next 6 stitches, then knit 2 removed loops in the same way), between which 4 knit stitches are placed;
- 10th r. - like 4th;
- 11th r. - continue to knit according to the pattern, performing cross elements (leave the elongated loops at the back of the knitting) and separating them with four knit stitches;
- 12th r. - like 4th;
- 13th r. - crossing two elongated loops (leave for knitting) with 6 knit, 4 knit.
Repeat from the 2nd row.
Here, only 2 loops are involved in creating overlaps, and volume is achieved by using the purl stitch as a background. The “grid” is performed according to the following scheme:
- 1st r. - 1 purl, then cross with a slant to the right, first knitting the second knit stitch behind the front wall, then the first knit stitch behind the back piece, purl 1;
- 2 and 8 r. - 1 knit, 2 purl, knit;
- 3rd r. - swap 2 loops, placing the 2nd on top of the first, knit the front and back, the next 2 pcs. you need to cross to the left (the loops are swapped so that the first goes over the second) and perform 1 purl, then 1 knit;
- 4 and 6 r. - purl, 2 knit, 1 purl;
- 5th r. - first 3 pcs. pass by performing 1 knit and 2 purl, then alternate a left-oriented cross of two knit stitches (the first loop lies on top of the second) and 2 purl stitches, the last loop before the edge loop should be knitted;
- 7th r. - 2 loops are swapped so that the first is on top, then purl and knit are performed, the next pair is crossed (the second loop should lie on top of the first) and knits are knitted. n. and out. P.;
- 9th r. - like the 1st row.
Imitation weaving
If you don’t yet have the necessary skills and it’s difficult to manage overlaps, you can create an imitation of them. There are no strands here, and the pattern is formed due to the alternation of longitudinal and transverse elements, where the former are obtained through knitting, similar to a scarf, and the latter are decorated with an elastic band. Knitting pattern:
- 1st r. - knit 8, pass 8 loops, alternating 1 purl with 1 knit;
- 2nd r. - following the drawing;
- 3rd r. - 8 p. p., 8 pcs. knit with an elastic band 1x1, starting from the purl side;
- 4th r. - 8 elastic loops according to the pattern, 8 purl;
- 5th r. - according to the drawing;
- 6th r. — 8 pcs. with alternating knit and purl, 8 knit;
- Rows 7-11 - repeat from rows 1 to 5;
- 12th r. - knitted elements change places: 8 purl, 8 loops go through an elastic band, starting from the front one;
- 13th r. - according to the drawing;
- 14th r. — 8 facial, 8 pcs. with an elastic band, without deviating from the pattern;
- 15th r. - 8 loops with an elastic band, starting from the purl side, 8 knits. P.;
- 16th r. - follow the drawing;
- 17th r. - Go through 8 loops, as before, with an elastic band, then perform 8 purls. P.;
- 18-22nd rows - repeat 12-16th rows;
- 23rd r. - start from the 1st row.
“Braided” pattern with knitting needles – 13 options with diagrams, descriptions and videos
Perhaps every knitter has her favorite patterns: some adore elastic bands, some prefer openwork knitting, and some do not change the universal stockinette stitch at all... Today we propose to diversify your work a little by adding several options for dense braiding to your treasury ! The pattern of a braided pattern with knitting needles, proposed in today's master class, will allow you to decorate any product with an original, dense and at the same time quite simple ornament.
Legend
- cr. n. - edge loop;
- l. n. – facial;
- And. p. – purl;
- n. - take off;
- LS – front side;
- IS - the wrong side.
"Small braid"
- x ← – cross the specified number of loops to the left (skip the 1st p., place the right sp. behind the 1st p., 2nd p. as a l.p., 1st p. as a l.p., remove 2 p. from left sp.);
- x → – cross the specified number of loops to the right (skip the 1st p., place the right sp. before the 1st p., 2nd p. as an i.p., then the 1st p. as an i.p., remove 2 stitches from the left sp.);
For the sample we cast on an even number of loops.
- 1 p.: sn. cr. p., *2 p. x ←*, from to * to last p., 1 i. p. (= 1 cr. p.).
- 2 rubles: sn. cr. p., 1 i. p., *2 p. x →*, from * to * to the last 2 p., 1 i. p., 1 i. p. (= 1 cr. p.).
Knit and garter stitch weaving
Scheme of a dense braided pattern with knitting needles
The number of loops must be a multiple of 8 + 3.
- 1 rub. (IS): 3 i. n., *1 l. p., 3 i. p.*, from * to *.
- 2 r. (LS): 3 l. n., *5 i. p., 3 l. p.*, from * to *.
- 3 p.: 3 i. n., *1 l. p., 3 i. p.*, from * to *.
- 4 rubles: 3 l. n., *5 i. p., 3 l. p.*, from * to *.
- 5 rubles: 3 i. n., *1 l. p., 3 i. p.*, from * to *.
- 6 rubles: 3 l. n., *5 i. p., 3 l. p.*, from * to *.
- 7 rubles: 3 i. n., *1 l. p., 3 i. p.*, from * to *.
- 8 p.: 4 i. p., *3 l. p., 5 i. p.*, from * to * to the last 7 p., 3 l. p., 4 i. P.
- 9 rubles: 3 i. n., *1 l. p., 3 i. p.*, from * to *.
- 10 rubles: 4 i. p., *3 l. p., 5 i. p.*, from * to * to the extreme 7 p., 3 l. p., 4 i. P.
- 11 p.: 3 i. n., *1 l. p., 3 i. p.*, from * to *.
- 12 rubles: 4 i. p., *3 l. p., 5 i. p.*, from * to * to the extreme 7 p., 3 l. p., 4 i. P.
Braided pattern 2 x 2
- x 2/2 ← – dn. 2 p. for additional sp. before elm., 2 l. p. with left sp., 2 l. p. with additional;
- x 2/2 → – n. 2 p. for additional sp. per elm, 2 l. p. with left sp., 2 l. p. with additional;
The number of points must be a multiple of 8.
Basic series (IS): i. P.
- 1 rub. (RS): x 2/2 ← to the end of the row.
- 2 rubles: i. P.
- 3 rubles: 2 l. p., x 2/2 → – repeat until the last 2 p., 2 l. P.
- 4 rubles: i. P.
Braided braids with shadow
We dial at least 8 points.
- 1 rub. (LS): cr. p., *l. p.*, cr. P.
- 2 r. (IS): cr. p., *i. p.*, cr. P.
- 3 rubles: cr. p., *l. p.*, cr. P.
- 4 rubles: cr. p., *i. p.*, cr. P.
- 5 rubles: cr. n., *sn. 4 p. for additional sp. back knitting, 4 l. p. from left sp, 4 l. p. with additional sp.*, from 8 to *, cr. P.
- 6 rubles: cr. p., *i. p.*, cr. P.
- 7 rubles: cr. p., *l. p.*, cr. P.
- 8 rubles: cr. p., *i. p.*, cr. P.
- 9 rubles: cr. p., *l. p.*, cr. P.
- 10 rubles: cr. p., *i. p.*, cr. P.
- 11 r.: cr. p., 4 l. n., *sn. 4 p. for additional sp. over knitting, 4 l. p. from left sp., 4 l. p. with additional sp.*, from * to *, 4 l. p., cr. P.
- 12 rubles: cr. p., *i. p.*, cr. P.
Textured braid with constrictions
Rapport consists of 6 + 3 points of symmetry + 2 cr. P.
- 1 rub. (LS): cr. n., *1 i. p., 1 l. p., 1 i. p.*, from * to *, cr. P.
- 2 r. (IS): cr. n., *1 l. p., 1 i. p., 1 l. p.*, from * to *, cr. P.
- 3 rubles: cr. p., *thread over work, n. 3 p. on the right sp., 1 i. p., 1 l. p., 1 i. p.*, from * to *, thread over elm., sn. 3 p. on the right sp., cr. P.
- 4 rubles: cr. p., *thread over work, n. 3 p. on the right sp., 1 l. p., 1 i. p., 1 l. p.*, from * to *, thread after sample, sn. 3 p. on the right sp., cr. P.
- 5 rubles: cr. n., *1 i. p., 1 l. p., 1 i. p.*, from * to *, cr. P.
- 6 rubles: cr. n., *1 l. p., 1 i. p., 1 l. p.*, from * to *, cr. P.
- 7 rubles: cr. n., *1 i. p., 1 l. p., 1 i. p., thread over work., sn. 3 sts on right sp.*, from * to *, 1 i. p., 1 l. p., 1 i. p.. cr. P.
- 8 rubles: cr. n., *1 l. p., 1 i. p., 1 l. n.*, under work., sn. 3 p. on right sp.*, from * to *, 1 l. p., 1 i. p., 1 l. p., cr. P.
Master class on knitting
As an example, let's look at the process of creating a women's hat using the rotary method. Blue Alize yarn is used in two folds and stocking needles. The volume of the product is 56 cm, the total height is 21 cm.
The density of the elastic is 1.25 loops per centimeter, therefore, for knitting you will need 70 loops plus a pair of edge loops. They should be cast on with knitting needles No. 4. The further procedure for performing the work is as follows:
- Using a classic elastic band, we knit a headband to a height of 14 rows, which is about 5 cm. It can be wider.
- We move on to the front stitch, which corresponds to the first row of the main knitting. Increases should be made here. We perform them every two loops, restoring the loops from the inter-loop thread, or by knitting two knit stitches from one loop.
- There will be 107 stitches on the knitting needles. But for a braided pattern, their number should be a multiple of six and plus the edges. Therefore, in the next row we add 3 more (2 on the edges and one in the middle) so that the working stitches become 108. The total number will be 110. In this case, you need to switch to knitting needles No. 6. This is the second row of the braid, so it is done purl.
- In the next row we overlap according to the pattern of the Braided pattern. It’s not very convenient to do it right after the increases, so it’s better to knit a few more rows in satin stitch, and only then perform manipulations with the auxiliary needle.
- We repeat the pattern several times until the total height of the knitted panel is 16 cm. After this, we proceed to shortening the loops, forming the bottom of the cap. This should be done approximately 4.5-5.5 cm before the top of the product.
Bottom design
In order for the hat to look neat and presentable, special attention should be paid to working on its bottom. When knitting unfolded and circular fabric, proceed as follows:
- When knitting the next overlap, decreases are made in the group of loops that is located behind the knitting on a spare knitting needle. We knit them like this: knit 1, knit 2 together. We repeat this in each of the overlapping elements in the row. It turns out that in one row we got rid of 18 loops. There are now 92 of them left.
- The next 5 rows are performed, as before, in satin stitch without cuts. When making each crossing in the next row, decreases are made according to the same pattern as last time, but on the loops of the main part of the fabric, because now they will be behind the knitting. There are still 18 stitches left in the work - 74 stitches including edge stitches.
- The next two rows are knitted without changes, then in each front row, that is, every other row, all the loops are knitted in two. We repeat the contractions three times. After the first such decrease, 38 p. remain, then 20 p., and then only 10.
- We cut the working thread, leaving a fairly long end, which we pull through the remaining loops. We tighten and secure the thread, then use it to sew the back seam. All you have to do is hide the tail - and the job is done!
The described method of forming the bottom of a hat is suitable for knitting a braid with a repeat of 6 loops. If 8 or 10 loops are involved in the crossover, then the cuts must be made differently. We begin to make decreases after knitting the next overlap in those places that are behind the work:
- 1st r. decreases - 4 knit, 2 purl together, 2 purl;
- 2nd r. and all even ones - according to the drawing without decreases;
- 3rd r. - knit 4, purl 1, purl 2 together;
- 5th r. - knit 4, knit 2 with one purl stitch;
- 7th r. - knit 2, knit 2 together, purl 1;
- 9th r. - knit 2 together, knit 1 and purl;
- 11th r. and the remaining odd ones - two together, front one;
- 12th r. and the remaining even ones - purl 2 together.
How to knit a hat
The woven pattern is suitable for various models of headdresses, both tight-fitting and voluminous. This can be a women's, children's, men's or teenager's hat. First you need to prepare a sample of 2x2 elastic and braided knitting.
Knitting in this case is carried out with an unfolded fabric. When finished, you will need to sew the back seam. A detailed master class on knitting a braided hat is offered:
- The knitting density is determined using a pattern with an elastic band. This figure is multiplied by the required volume of the braided hat - here 56 cm. The result will indicate the number of loops required for casting on without taking into account the edge pair. In the example there will be 84 2 pieces.
- Cast on 86 stitches and begin ribbing, knitting 2 knit stitches and 2 purl stitches in sequence. This will be the headband. Its width is determined individually.
- Having finished the elastic band, move on to the main pattern. Taking into account the difference in knitting density, increments are made in the first row. In this case, you need to make additions after every 3rd stitch. The number of loops must be a multiple of 6, so they are increased to 116 pcs. (with edges).
- Knitting is done with a 3x3 braid to a height of 17 cm. Now you need to make cuts to round the bottom of the product. They start about 4 cm before reaching the desired height of the cap.
- To make the bottom look neat, decreases are made in the group of loops that ends up behind the fabric during the overlap. When performing each of these elements, 3 “back” loops are passed, knitting 1 front and 2 front ones together. At the end of the first row of cuts, there will be 19 loops. less - only 95.
- Next 5 rows are performed with knit stitches without decreases. When making crossings, decreases are made again where the loops will pass behind the main fabric, by analogy with the previous ones. There will be 76 loops left in the work.
- Now you need to knit 2 rows without decreasing. After this, through the row, all the loops are knitted in pairs. In this case, each time the loop mass will be reduced by half.
- The thread needs to be cut off and the last 9 pieces thrown onto it. They are pulled together, then a seam is made.
The knitted braided hat is ready.
Knitting in the round
You can knit exactly the same hat without seams using circular knitting needles or a stocking knitting set. When calculating the number of loops for a set, edge loops do not need to be taken into account, but 1 pc. need to be added to neatly close the typesetting chain into a circle. Step by step instructions:
- Having cast 85 loops, the last of them is threaded into the first and they begin to knit the headband.
- When the elastic reaches the desired height, they switch to a braided pattern. It is performed according to the same principle as with rotary knitting, only all the loops will be knit.
- When the height of the knitted fabric is 17 cm, you should begin to design the bottom. The first decreases are made in the row where the loops cross. The cuts must be hidden, so they are carried out in those areas that are behind the knitting. The number of times the cross elements are repeated in the circle, the number of stitches must be removed in 1 row of decreases. In this case, the fabric narrows by 19 loops.
- The second time the cuts are made only after 5 rows. After this, knitting a couple of turns without narrowing, work 2 loops together. For a more elongated crown, this is done through a circle, and in a tight-fitting model - in each row.
- The remainder is pulled onto a thread, and its end is secured from the inside out. The hat is finished.
Braided pattern with knitting needles - diagram, description, video tutorial
Hat made with a braided pattern
The braided pattern, made with knitting needles, is a way to create a warm item with an original, but relatively simple relief. Due to the constant overlaps, hats, scarves, and snoods made using this technique are almost impervious to cold and wind.
Article navigation
- Scheme
- Description
- Video tutorial
Scheme
In this case, each weave is three loops. Thus, one repeat - six loops.
Legend
Don't get too excited about the design being easy before you get started. At the very beginning of knitting, needlewomen are faced with the fact that the pattern becomes incomprehensible, which is why it is impossible to knit simply according to the pattern. A mistake in one loop will change everything - the pattern will not work. In this regard, the braided pattern with knitting needles is seriously inferior to the same braids, when knitting the current situation is much easier to control.
Description
- You need to cast on a number of stitches that is a multiple of 6 + 2 edge stitches
- Row 1 : knit stitches
- Row 2 : purl stitches
- Row 3 : knit stitches
- 4th row : purl loops
Row 5 : 1 edge, * 3 knit, remove 3 knit before working on additional knitting needles, 3 knit, 3 knit from additional knitting needle. From * repeat until the end of the row. The last loop is the edge loop.
- Row 6 : purl stitches
- Row 7 : knit stitches
- Row 8 : purl stitches
Row 9 : 1 edge, * 3 knit while working on an additional knitting needle, 3 knit, 3 knit from an additional knitting needle. From * repeat until the end of the row. The last loop is the edge loop.
Next, the pattern is repeated from row 2 .
Video tutorial
A detailed explanation of knitting a braided pattern, starting with casting on stitches and ending with important principles of working with the pattern. It will be useful for both beginners and professionals to improve their skills.
Source: https://vyazat-prosto.ru/uzor-pletenka-spicami-shema-opisanie-videourok/
Features of the woven pattern
Braid is a type of plait. Its basis is the front stitch, on which the loops are periodically overlapped. These elements are staggered relative to each other.
Knitting is carried out according to this principle:
- 1st row - all knits;
- 2nd and all even ones - purl;
- 3rd row - the loops are crossed by using a spare knitting needle: the first 3 loops are transferred to it and left in front of the knitting, 3 loops are knitted from the left knitting needle, after which the removed loops are returned to their place and also knitted;
- 5th and 7th rows - all loops are knitted;
- 9th row - the loops cross in the other direction, for which the first 3 loops are transferred to a spare knitting needle, which is transferred to work, first 3 knit stitches are knitted from the left knitting needle and only then 3 loops from the auxiliary knitting needle;
- 11th row - facial loops;
- 13th row - repeats the first.
The described option is not the only correct one. There are many variations of this pattern. For overlapping, not only six loops can be used, but also two, four, eight, etc. The more loops involved, the more embossed the product will be.
You can knit braid not only in rotating rows in two directions, but also in a spiral using stocking or circular knitting needles. The process does not become more complicated.
Decorate with a fur pompom
The braided hat is very beautiful and light, but at the same time keeps you warm. Due to this pattern, the product holds its shape for a long time and at the same time appears more voluminous. In this master class we will look in detail at how to knit a hat with a weaving pattern, and with the description the task will seem easy and even a beginner will be able to cope with it.
What we need to prepare:
- thread "Pechorda" 50 g;
- knitting needles number 4 and 6;
Now let's start knitting. To do this, we cast on 120 buttonholes and 2 more edge buttonholes on the knitting needles, it should be 56 cm if you knit a double elastic band. 1st row: you need to remove the edge buttonhole, * front buttonhole, remove one buttonhole without knitting it, purl, remove another one * but the edge buttonhole should be knitted purlwise.
2nd row: remove the edge buttonhole, * front buttonhole, one must be removed without knitting, purl, remove the next one and not knit it * - repeat this until the very end of the row. Again, knit the edge purl.
It is important that in this row it is necessary to knit those buttonholes that we did not knit in the first one. The height of the elastic band should be 6 cm.
Now we switch to number 6 knitting needles, which we will use to knit the pattern. Once the elastic is knitted, we add 12 more buttonholes for a total of 134 buttonholes. Let's start knitting the pattern.
Related article: DIY cardboard tank
1st row: we knit with only front buttonholes. 2nd row: now we knit with purls. Next, we knit the 3rd-5th rows with knit stitches, and knit the 4th and 6th rows with purl stitches. 7th row: knit the edge buttonhole, * transfer 4 buttonholes to an additional needle and leave them in front of the product, then 4 knit buttonholes, after the 4 buttonholes that were transferred, you need to knit them with knit buttonholes. 8th row: knit purl stitches. 9th row: we knit the front buttonholes.
Now we alternate rows up to 12. Already from the 13th row we need to start everything from the first row. We make a row of elastic 2 by 2. This will make 13 cm. Next we need to make decreases after the pattern: knit 2 knits, purl, now we combine two buttonholes, only knit purl. Elastic band again, height 1 cm and decrease the buttonholes: we knit all the purl buttonholes, two together, but after a row we combine the two front buttonholes, and on the next row we knit them on the front side, we knit two together through one buttonhole. The decrease continues for 5 cm. We pass the remaining buttonholes through the thread and tighten them, and pull the remaining thread to the wrong side. Then we take a fur pompom and sew it to the hat, and now our product is ready, you can wear it.