Today’s article presents for your consideration, dear blog readers, a double seam, also known as a reverse seam, or a French seam.
In the article you will find answers to the questions: “What is a double seam? Where is it used? How to make a double seam? Etc.
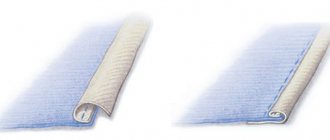
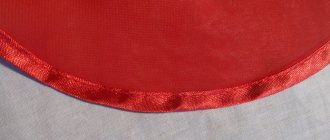
A double seam looks: 1) from the front side like a simple stitched seam, 2) from the back side - like a narrow fold.
The double seam is used to make only straight seams (or almost straight ones). That is, only on products where there are neither very convex nor very concave sections of the parts being connected, but only straight and even (or almost straight and even).
Connecting seams.
Double (reversible, French) seam.
One of the subtypes of connecting seams is a double seam, a very strong seam, since it is performed in two lines. Therefore, it is used when sewing bed linen, outerwear, when processing pockets, when sewing cuffs, etc. In general, it is used where high-strength seams are needed.
A double seam is also used when sewing products from transparent or very thin, loose fabrics. Since, with the help of this seam, the open sections of the seam allowances are also closed, then double seams look neat through transparent fabric, and they appear just as neatly through thin fabric.
Double seam, reversed - execution.
If the parts of the product that will be joined together with a double seam have not yet been cut out, then in order to make a double seam, first read the instructions below. (Instructions – recommendations regarding the width of double seam allowances).
When making a double seam, you need to remember that the second line reliably covers the cuts inside the seam, the cut threads do not stick out from it and the seam is neat; the standard is considered when the first line is made at a distance of 3 - 4 mm from the cuts, and the other 5 - 7 mm from edges of the part. The width of the finished double seam is 5 – 7 mm.
So, the width of the double seam, which the standard allows, is 5 - 7 mm. This means 5 – 7 mm,
plus 3 – 4 mm
for reliable closure of the cuts inside the seam (depending on the fraying of the sections, the higher the fraying, the larger the allowance).
The result is 0.8 - 1.1 mm
. This means that we need the allowances of the parts to be joined to be from 0.8 cm to 1.1 cm wide (the thicker the fabric, the wider the allowance).
If the parts have already been cut, the allowances along those sides of the parts where a double seam will be made between them should be adjusted to the standard 0.8 - 1.1 mm
. Fitting means cutting off the excess and adding what is missing from the 3-4 mm allowance allocated to the inner seam.
1. Place the two pieces wrong sides together! inward, combine the cuts and grind the two parts, laying a straight machine stitch at a distance from the cuts equal to 3 - 4 mm.
2. Trim the seam allowance as close to the stitch line as possible.
3. The stitched parts are folded along the seam line to the wrong side.
4. The parts are placed facing each other. We straighten the seam.
To do this, the resulting fold, if the fabric allows it - it is plastic and pliable, is immediately ironed. Or, if the fabric is “unruly,” stabilize it by making a temporary hand basting stitch with straight stitches or a hand basting stitch with bias stitches, but then you should also iron the fold.
5. After this, another line is laid at the required distance from the edge (5 - 7 mm). (The picture shows a double seam from the wrong side).
Temporary hand stitches, if any, are, of course, removed.
That's all! The seam is ready! All that remains is to iron the seam in one direction, according to the model.
As you can see, the peculiarity of a double seam is that when it is made, both the seam is cut and the cuts are processed.
The French seam is false.
There is one type of French seam - a false seam. When completed, it is almost no different from ordinary, real French. And even through transparent fabric, even the bright-eyed will not notice any difference.
Hand stitches and stitches: types and patterns
There are different types of stitches for hand sewing with a needle. They can be decorative or ordinary - this is a general classification. The first group includes species that are used only for decorating clothes. The latter perform a practical function.
Simple hand stitches
- "back the needle";
- marking stitch;
- forward the needle;
- edging with open cut;
- connecting seam;
- secret hem;
- edging with braid;
- hand furrier stitch;
- grinding and marking;
- padding seam;
- "crosses";
- running seam;
- hem;
- double or French seam;
- "check mark";
- sewing
Important! It is recommended to take a thread length from wrist to elbow.
Back stitch
At the very beginning of learning to sew, it is recommended to use a seam, the stitching of which will be strong and simple. “Back needle” is a basic stitch, it is used for fastening in difficult places on fabric products. How to do:
- Bring the needle up.
- Make a backward stitch. About 2 millimeters.
- Bring the needle up. Back off a few millimeters along the seam.
- Insert the needle into the end of the stitch and bring it out to the stitch in front.
When sewing a stitch, 3 mm are retreated from the edge of the fabric.
Important! There is also a version with skips.
Hand stitch “by the needle” (marking)
Linen can be sewn and even embroidered with stitches using the needle. They look like machine-made ones, look neat, and are simple to make.
How to machine stitch by hand:
- Bring the needle to the front of the fabric.
- Move a few millimeters to the right. Pull the thread.
- Bring the needle to the front side at the starting point, it will be to the left.
- Bring to the wrong side at the end of the stitch. Print on the front side to the left.
There is also an option with interrupted stitches, but when bringing the needle to the back side, the stitch is made wider than on the front side.
"For a needle"
Seam "forward needle"
A simple toy can be sewn using the “forward needle” stitch. It consists of gaps and seams and is used for lightweight products.
How to make a hand stitch:
- Fasten the thread from the edge of the material.
- Make a stitch of 5 millimeters.
- Bring the needle inside out.
- Skip the same number of millimeters.
- Bring the needle to the front.
- Make the next stitch.
It is recommended to maintain the stitch size when sewing. But the length may vary slightly; this type is often used for outlining a pattern.
"Forward the needle"
Open cut edge stitch
There is an option with an open and closed cut; it is used with different fabrics. They look identical from the front side, but from the back they can be distinguished.
- Align the binding and the edge of the material. Sew 5 mm from the edges.
- Unscrew the trim. Work with an iron.
- Fold it inside out and wrap the cut. Baste to the base.
- Sew a stitch along the front of the binding.
A sewing machine is most convenient for this method of sewing. This option is notable for the fact that it can be used to process even thick fabrics.
Open cut edging option
Reinforced connecting seam
This is an option for joining thick fabric, such as felt. If you have a suitable needle, you can process a “suit”, jeans, even coat materials.
- Make several stitches that go through all the layers.
- Take the next steps through 2 layers (if the previous ones were through 3). Retreat 15 millimeters.
- Leave the thread loose, do not tighten.
Recommended for use with strong thread and needle. The fabric is folded in three layers.
Types of connecting hand seams
Double linen seam
A double linen seam is more “delicate” compared to a closed seam. It is used in bedding and underwear products: sewing pillowcases, duvet covers, nightgowns. But it is also used when sewing delicate fabrics: chiffon, nylon, voile and the like. In these cases, it is called according to the fabric: French, that is, exquisite.
Why French? It is known that the French, lovers of everything refined and refined, have long set the tone in fashion, and in that distant time there were no overlockers. It is also known that their favorite thin fabrics have high flowability. And tailors figured out how to wrap the crumbling cuts beautifully and securely. And so the “French” seam was born. In our time of overlockers, this seam is also relevant when sewing thin fabrics, since the overlock stitch is too rough for transparent fabrics.
Already in relation to bed linen, the French seam began to be called linen seam. We also know that cotton does not have high flowability, but in these products it is exposed to aggressive influences that the overlock stitch cannot withstand. In addition, this seam prevents the accumulation of textile dust, fiber particles and feathers from pillows and blankets.
This linen seam is also sometimes called a reverse seam because during its execution the seam must be turned to the other side. But this name also “turns me out.”
The double seam is performed in two lines in succession. To perform it, the parts are first folded with the wrong sides inward, the cuts are aligned, and the first line is stitched at a distance of 0.3-0.4 cm; then they are turned inside out, the seam is straightened along the entire length with your fingers and a second line is laid at a distance of 0.5-0.7 cm from the edge. The first seam allowance should be covered inside the second seam.
To ensure that the seam is clean, of high quality, and the threads of the fabric cut do not peek out, it is necessary to straighten the cut before sewing and make sure that the stitching is even and not narrower than the first line.
These seams are labor-intensive, and they are used mainly in cases where there is no overcasting machine, if they want to sew high-quality products, and at home.
Hand stitches for working with beads
Types of beading differ in the method of attaching the beads and their location. The most common option is the monastery stitch.
How to perform monastic:
- Fasten the thread from the wrong side. Define a square.
- Insert the needle from below into the lower left part, pull it out in the upper right corner.
- Pull up the thread with the bead and repeat the stitches.
- The beads will be secured with the same tilt to the side.
- The last and first bead are reinforced twice.
Important! The thread should always be taut.
When working with beads, needlewomen also use the stem-shaped, arched, circular, “attached”, forward needle, and lowercase.
Convenient option for working with beads
Technology lesson on the topic “Double seam” (5th grade)
Technology lesson
Class:5
Subject:
Double seam
Target:
-introduce students to the purpose and technology of making a double seam;
- create conditions for developing skills in performing double seams; development of skills of comparative analysis, generalization and classification; development of attention and self-control.
Lesson type:
combined
Equipment:
tables “Correct fit”, “Threading”, “Machine seams”, cards No. 8, double seam samples, work boxes
During the classes
- Organizing time
- Updating of reference knowledge
Checking readiness for the lesson and the condition of workplaces
Card No. 8
Assignment: enter the name of the operation in the “Term” column
(answers: iron, decate, iron, iron, iron)
Questions for students:
- At what stages of the manufacture of garments is wet-heat treatment performed?
- What types of machine seams do you know?
- What is a stitch seam used for?
- What role does wet-heat treatment play when making a stitch seam?
- In what ways can stitch seam sections be processed? (students' answers)
-Today you will get acquainted with the technology of making another type of stitch seam. Lesson topic: “Double seam”
Table "Machine seams"
- Explanation of new material
-Double seam is used in the manufacture of underwear, suits without lining, as well as products made from thin bulk fabrics: tulle, organza. It refers to connecting seams. It is more durable than a regular stitch seam, as it is made with two machine lines. Hence the name - double. The parts to be joined should be folded with the wrong sides inward. The first seam is sewn from the front side. The width of the seam from the trimmed edge is 0.3-0.5 cm. After the first stitch, the trimmed edge is trimmed, straightened on both sides and stitched. The second stitch is made from the wrong side, and the cut edges are inside the seam. The finished seam width is 0.5 - 0.7 cm.
Review double stitch samples.
Examination of samples.
-When making a double seam, make sure that the allowance of the first seam does not peek out from behind the machine stitching of the second.
- Practical work “Performing a double seam on a sample”
—
Before starting work, you must carefully read the instructions and repeat the safety rules. Let's find out together what tools, devices and materials will be needed for the job.
Reading Aloud: Expository Reading Method
-after we have found out what is needed for the work, what actions need to be performed? ( children's answers
)
-That’s right, you should organize your workplace by removing all unnecessary things and arranging the necessary items rationally. Prepare the workplace.
Organization of students' workplaces
-We continue to get acquainted with the progress of practical work.
Reading aloud the progress of work: the method of explanatory reading. Demonstration of operations performed by the teacher.
-What safety rules do you need to remember for work? (children's answers. Repetition of safety rules)
-Are there any questions about performing practical work? If there are no questions, proceed.
Completion of work by students. Ongoing instruction from the teacher.
Organizing an exhibition of student works. Analysis of work, analysis of typical errors and identification of their causes.
- Consolidating new material
Working in a notebook
-Write down the purpose of the double seam in your notebook.
Write in your notebook:
Double seam refers to connecting seams. This seam is used when sewing linen, which is why the double seam is also called a linen seam.
Questions for students:
- What is the double stitch used for?
- Why is a double seam called a linen seam?
- How to check the quality of a double seam?
- Why is a double seam called a double seam?
- What rules must be followed when working with an iron?
- Summarizing. Assessment of student work
—
Double seam is used in the manufacture of linen and products from thin bulk fabrics. Don't be lazy about basting the pieces and then machine stitching. The basting prevents the machine from moving the fabric, the seams are neat and even. The machine stitch is laid at a distance of 1 mm from the basting line. The basting is removed by cutting the basting thread with scissors and pulling it out in small pieces.
Assessing students' work in class.
Homemade rear
: study theoretical material
Almost no garment is created without the use of machine stitches. Hand stitches mainly perform a temporary function of connecting parts, etc., but the final stage in the work is often the laying of machine stitches, which can also have a decorative and finishing purpose.
Machine seams are divided into groups depending on the amount of seam allowance, the number of machine stitches, as well as the bonded layers of materials being joined - that is, on the overall design. There is no clear boundary between groups of machine seams. For example, a connecting seam can also be a finishing seam, etc. In addition, a combination of various seams is not excluded. The classification of stitches, lines and seams can be considered in more detail in “GOST 12807-2003 - Sewing products. Classification of stitches, lines and seams." Below are the most popular and frequently used machine stitches and stitches, depending on their purpose.
Connecting machine seams
- Ironed connecting seam
- ironing
- setting open cuts
- open cut label
- linen sewing machine
Edge machine seams
- Hem-to-hem edge seam with open cut
- hem with closed cut
- hem with edged cut
- overturned in frame
- edging with open cut
Connecting machine seams (for fastening parts)
Connecting seam
Connecting stitch seam - for stitching sections, attaching small parts to larger ones, grinding strips, etc. There is a difference between a stitched ironing and a stitched ironing. With a backstitching, the seam allowances (cuts) are ironed in one direction, and with a backstitching - in different directions. They come with or without overcast edges.
Stitch ironing
Stachny ironing
Connecting seam
Connecting stitch - for connecting parts overlapping one another, connecting and securing seam allowances and folds directed in one direction. It is also often used to join parts of a product made of dense fabrics in order to obtain a thinner seam thickness. There are adjustment seams with open cuts and adjustment seams with closed cuts.
Set-up with open cuts
Adjustment with closed cut
Connecting overlay seam
Connecting patch seam - for connecting interlining parts when sewing yokes and patch pockets. There are overlay seams with open cuts and overlays with closed cuts.
Open cut label
Closed cut invoice
Connecting topstitch
Connecting topstitch - for finishing, as well as connecting parts of the product without allowing the seams to be ironed (specific materials - leather, etc.).
Connecting linen seam
Connecting linen seam - to ensure the strength and aesthetics of bedding, shirts, blouses, as well as sports equipment, industrial clothing, linen, products made from fine fabrics. There are three types of linen seams: linen closed, linen lock and double linen (French).
Linen sewing
Linen castle
Linen double (French)
Edge machine seams (for processing edges and cuts from fraying)
Hem edge seam
Hem edge seam - for processing the bottom of products, sleeves and other parts made of easily fraying fabrics (when sewing linen, outerwear, etc.). There are edge hems with an open cut, hems with a closed cuts, and hems with an edged cut.
Hem with open cut
Hem with closed cut
Hem with edged edge
Edge overstitch
Edge facing seam - for processing facing parts from thin fabrics - collars, cuffs, etc., to prevent displacement of the connection and increase the stability of the contour of the parts during clothing wear. They mainly use edge edging into a frame, edging into a complex frame, and edging overturning.
Overstitched in frame
Stitched into a complex frame
Welt in edging
Edge edging seam
Edge edging seam - for processing the edges of products, for decorating collars, side edges, etc. There are edge edging with an open cut, edging with a closed cut and edging with braid.
Edging with open cut
Edging with closed cuts
Edging with braid
Fabrics: characteristics and applications
Lasas: prevention and removal
Conducting the WTO correctly
Covering seam
The seam is intended for products subject to frequent washing, mechanical stress, stretching, and tearing. This seam is coarser, denser, stiffer and is used in denser, coarser fabrics, in contrast to the double seam. For example, when sewing bed linen, men's clothing: sports trousers and shirts, sports and workwear, soldier's underwear, tents and the like. For bedding, it is even more convenient than double bedding, since it is flat and textile dust and fluff does not accumulate in the seams.
The seam is made in two lines. To make a sewing seam, the parts are folded with their right sides inward, releasing a cut of the lower part by 0.7-0.8 cm, depending on the thickness of the fabric; This cut is used to bend around the top cut and a stitch is laid at a distance of 0.1-0.2 cm from the cut. Then the parts are laid out with their right sides down, the seam is folded to the side, covering the cut, and adjusted at a distance of 0.1-0.2 cm from the fold.
People are also looking for a double closed seam . Either I missed something, or I’m afraid to disappoint you - it doesn’t exist in nature. Maybe it's a seam lock?
The lock seam is made with one stitch on a two-needle machine with a special device. These are industrial machines. The width of the finished seam is 0.6-0.7 cm. If the stitching were not a chain stitch, but a lockstitch, then the seam could well be called double or mirror, which is confirmed by the seam pattern.
Today we met and learned how to perform a very important and useful linen seam : double seam, closed seam.
Share your opinion in the comments: which seam did you like best, did everything work out and will you use them in your work?
Ask questions. If the article was useful, share it with your friends on social networks, I would be grateful for your likes. By subscribing to the news, you will not miss new lessons, and will also receive a useful book as a gift, “Sewing machine for home use.”
With love, Olga Zlobina
Machine seams: the most popular types
French
Its task is to reliably connect the fabric to the processed back with closed seam allowances. Synonyms for French seam are linen seam or double seam. As a rule, it is used when working with delicate fabrics of low density and thickness, especially if crumbling fibers form on their cuts.
The seam is formed by a pair of lines, the first of which is needed to join the fabrics with the right side up, the second is to cover the allowances when folding the right sides inward.
Stitch seam “pressed” and “unpressed”
You can get it by laying a stitch stitch and ironing it, and then processing the material along the seam. The allowance, however, does not bend in either direction. The option is well suited for connecting the sleeve with the armhole, the belt with the upper skirt edge.
An iron-on seam is formed if, after joining the elements with a stitch, both seam allowances are bent and lowered, and then fixed with an iron on a certain side, depending on the cut of the model. The seam is well suited for joining shoulder seams and side seams of trousers.
You can get a seam pressed if you sew a stitch on a machine, spread the seam allowances in different directions and fix them in place by going over them with an iron. This method helps to securely connect the side sections on the back and front of the product, sleeve sections, etc.
Machine overlay stitch with open edges
An open-cut overlay stitch is used when sewing cut pieces on fabrics with edges made of treated fabric or non-woven materials, or for fastening elements visible only from the reverse side of the product. It is optimal for sewing leatherette, thick felt, leather, and suede.
Machine overlay stitch with one or two closed cuts
This seam is used to secure a yoke, cuff, pocket, or other decorative or functional element of an item to the base. Like the previous one, the seam is made by placing one part, facing up, onto another, facing the same direction.
Covering seam
A backstitch is ideal if you need to secure a connecting stitch while processing seam allowances at the same time. Quite often, such a seam is used when sewing products made from denim; it corresponds well to the density of this fabric.
When sewing, a pair of lines is formed, the last one is noticeable from the front side. As a rule, it is a finishing one, based on denser threads with a longer stitch length.
Lock seam
The lock seam is one of the most reliable methods of joining a pair of straight parts. Laying precise lines parallel to each other allows you to create not just a strong, but a beautiful seam. The main point when working is to accurately calculate the width of the allowances; you need to make 3 lines, the first one is connecting, the other 2 fix the lapels.
Topstitch stitch
The peculiarity of such a seam is the placement of allowances on different sides, their fixation using finishing stitches. The seam is presented in two types, the first is a version of the ironed seam, while the second does not involve mutual stitching of parts. A seam is needed to finish things, to work with materials that cannot be processed with heat or steam.
In order to form a machine stitch, you need to mark the required width along the fold, lay it in accordance with the markings and stitch it. The seam is needed so that a beautiful fold appears on the item.
Open/closed bevel adjustment stitch
To get the first version of the seam, you need to stitch the element in accordance with the markings, turn it to the front side and stitch along the edge. In this case, the allowance does not close, which is optimal, for example, when processing pockets. The second version is done in a similar way, only the allowance needs to be cut off and stitched on the inside with a finishing seam.
Machine overlay stitch with edging
The edging is inserted between the elements in accordance with the markings and attached. When laying a line, you need to maintain a distance of 3-4 millimeters from the edge of the edging. The parts are turned to the front side, an allowance is placed on one of them and processed with an iron. The seam is optimal when working on the front side of things, on linings.
Machine overlock seam with edging
The edging is added to the element of the item and is stitched. The parts need to be turned to the front side and run over them with an iron. This seam is well suited for sewing pockets, collars and similar elements of a suit.
Machine edging stitch with open or closed cut
Both seams involve attaching bias tape to an element of the item. The subtleties of the technology are somewhat different, in the first case the inner cut is not closed, it can be hidden under the lining, or left “as is”, depending on the characteristics of the item, the second method is focused on decorating the piping on outfits that do not have a lining.
Edging with braid
To decorate the edging with braid, you need to prepare the material with closed cuts. The width of the decorative element depends on the characteristics of the item; when making a seam, the edge needs to be wrapped in braid, folded in half, and a seam laid along the edge. The method is used when decorating pockets and other overhead elements of things.
Machine overlock stitch “in frame”
Overcast seams in a simple and complex frame are needed to create pockets and overcast loops. The technology is selected according to the design features of the model.
Machine overlock seam “in split”
To make such a seam, you first need to form a stitched seam “on the edge”, then turn the elements towards the front side, straighten the seam, focusing on the extreme placement. A machine stitch is used to sew belts and other accessories on both sides.
Machine overlock seam “in edge”
Using such a seam, you can decorate a pocket, collar, or side of a product so that unsightly fabric joints are not visible on top. The edging can be formed from the upper or lower element, depending on the features of the cut and design.
Machine overlock stitch with closed binding
To make such a seam, you need to bend the binding in half, stitch it to the element of the item along the edge at a distance of 5 millimeters, turn it to the front side and make a stitch along the edge. The seam is well suited for decorating lower elements on sleeves and facings on pockets.
Machine sewn seam with double tape
The technology involves stitching one side of the binding along the edge, turning it to the front side, bending it slightly and forming a stitch at a short distance from the edge.
Moscow seam
To make it, you should turn up the seam allowance by 5 millimeters and make a line at a distance of 0.2 millimeters. The excess fabric is removed, the edge of the element is turned up 0.3 millimeters, and the second line is formed directly on top of the previous one. The Moscow seam is ideal for accessories made of light, weightless fabrics, such as scarves or stoles.
Zig-zag machine stitch
Its formation involves bending the cut and laying a line along the edge. The features of the stitch depend on the model; excess fabric at the seam allowance can be cut off. The seam is well suited for processing the edges of flounces and sewing knitwear.