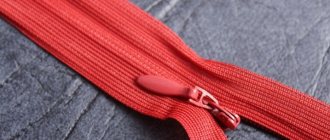
Good afternoon. Today I decided to write a separate special article on how to competently and correctly sew elastic into clothes. The article was written specifically for beginners in sewing, and therefore I will show everything in detailed step-by-step pictures. And I will give a more detailed explanation of how to sew in an elastic band in each of the FOUR WAYS.
Yes, yes, in this article I posted all FOUR methods of sewing in elastic . And for those who have a modern machine. And for those who have an old hand-made Singer, and even for those who do not have a sewing machine, I will tell you how to sew in an elastic band by hand.
- A NOTABLE METHOD for uniformly sewing in elastic (for those with a machine without a zigzag stitch).
- Manual method of sewing in elastic (for those who do not have a machine)
- ZIGZAG METHOD of sewing in elastic (without pulling it during the sewing process, but only after sewing)
- STANDARD METHOD of sewing in elastic (for any machine)
- BOBBIN METHOD (will help you sew in an elastic thread on a regular sewing machine)
I already talked about some of this in the article about beach dresses with elastic. But I wanted to consider all possible cases of using elastic bands in clothes. And give a more detailed and understandable method of sewing them to clothes.
But before that, we will proceed directly to our lesson. I want to inspire you with beautiful pictures of clothing models using elastic bands. You can sew stitching into all these clothing models yourself following the lessons from this article.
So let's admire, and therefore let's learn.
Elastic on sleeves
The sleeves are also partially rubberized for decorative purposes - in the cuff or shoulder area.
And, of course, sometimes in all of the above cases, fashion designers can replace the elastic with ordinary non-elastic twine pulled into a simple drawstring.
The fabric will also gather and fit, but such gathering on twine, of course, will not give elasticity.
Well, now let’s proceed directly to our master classes on sewing in elastic.
You and I will often model a tunic, dress, hat or swimsuit that will have an elastic band. And we will need to sew it in. There are two types of rubber bands...
What can you use as a guide?
But sometimes a pin is not at hand, and the ribbon needs to be inserted urgently. In this case, the following can be used as a guide:
- a paper clip that fits easily into the fabric;
- a small nail (in this case, the ribbon is wrapped from the side of the head);
- a cocktail tube or a pen refill (the lace is threaded inside and carefully secured with a stapler);
- a thick needle, for example, a machine needle or a gypsy needle (the ribbon that needs to be returned to its place is pierced with the sharp side and tied into a knot, and the guide with the opposite end goes into the drawstring);
- an unbent hairpin, a wire (the lace is tied on one side);
There is also a special device - a “puller”, which can be purchased at a sewing store.
You can get by with foreign objects if you bring the ribbon into a rigid state . This can be done by wrapping its tip with tape or thick paper. In the first case, you need to be careful, as the adhesive tape can damage the surface of the fabric.
Helpful information ! If you don’t have any of the above on hand, you can simply tie one end into a knot that is smaller in size than the hole in the drawstring. Next, insert it inside, moving it with your fingers. This method will be more difficult and longer, but will help in an unforeseen situation.
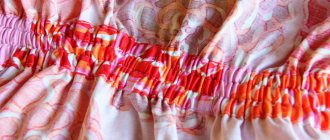
An easy way to sew an elastic band BY MANUAL (without a machine) is by stretching it on the edge of the table
Yes, yes, elastic bands can even be sewn in by hand - if the fabric is variegated or bouclé, that is, it is not afraid of crooked stitches, for the reason that they are simply not noticeable on it. Moreover, after sewing the elastic, the fabric at the sewing site will wrinkle greatly and all the stitches (no matter how crooked they may be) will be hidden in wrinkles and folds.
I sewed my first peasant blouse with elastic at a time when I was still afraid of a sewing machine. I used the same method of drawing marks on the elastic and on the fabric that I described above. The only difference is that when sewing, I did not put the fabric under the machine foot. I simply stretched the fabric with a span on the edge of the table (to make it easier to pry with a needle and thread) and sewed it tight with ties. The fabric tightened and hid the crooked stitches.
In one evening I had an exclusive item, absolutely handmade.
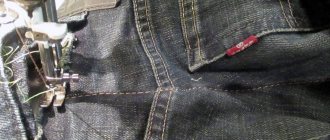
ZIGZAG METHOD is the simplest. Suitable for both regular elastic and elastic thread.
This method is generally the easiest for those who have a zigzag stitch on their machine. And it can even be done manually - after all, a zigzag stitch can be done manually
This method can be used to sew both elastic thread and elastic tape .
It is remarkable in that even an ordinary underwear elastic will be sewn evenly - and there is no need to make any fixation marks.
I’ll show you how this happens in pictures.
Step one - create a sample of the ideal piece of elastic.
We also start by wrapping the elastic band around the waist, choosing the optimal tension for us. Cut off this rubber girth. And we cut it in half - but we will not sew on this particular half.
She will serve as a model for us later. Now you will see and understand everything.
Step two - sew a wide zigzag behind the edges of the long elastic band.
Take a new piece of elastic the same length as the width of the product or longer.
We place it under the machine foot and select a zigzag stitch such that the zigzag step is wide enough and the needle never touches the elastic itself, but makes a zigzag, piercing the fabric a few millimeters from the elastic - Fig. 13.
That is, as you already guessed, we need the elastic band to move freely inside the zigzag.
Step three - try on the sample elastic band to the elastic band under the zigzag.
And when the entire elastic band is under the zigzag, we put our sample next to each other and make 2 marks on the elastic band under the zigzag - at the same distance as the edges of the sample segment - fig. 14.
Step four - tighten the zigzag elastic band to the desired length.
Now we pull the ears of this “zigzag” elastic band until the marks are near the edges of the product. There they need to be fixed - that is, manually sewn to the edges of the product with several strong stitches.
All is ready. By the way, you can do this zigzag manually - it’s very convenient and fast.
Under such a zigzag - but with a smaller stitch pitch, of course - you can also place elastic threads. You also put an elastic thread on the elastic sewing line. And in the same way, you cover it on top with a zigzag stitch - without piercing the elastic thread itself anywhere. And then we tighten the elastic thread inside this zigzag to the degree of tightness we need.
You can also place the elastic not under the zigzag stitch, but under a specially sewn strip of fabric - that is, a drawstring. Here's the method:
THE ROCKET METHOD is very simple and suitable for any machine.
We measure the length of the elastic sewing line with a centimeter (Fig. 17). We measure a strip of fabric (Fig. 18) of the same length. The width of the strip should be sufficient for our elastic to be hidden in the future drawstring - that is, the width of the elastic + seam allowances is equal.
We sew the drawstring to the line of passage of the future elastic - Fig. 19. And we pull our elastic into the resulting “tunnel” - that is, the drawstring.
We pull it in using a safety pin - we pin it on one end of the elastic and pull it through, feeling the pin inside the drawstring with our fingers, pushing it forward, wrinkling the fabric along the pin. The pin is slippery and fits well under the fabric, and pulls the elastic along with it.
To prevent the back end of the elastic from slipping inside the drawstring, it is better to first sew it to the entrance edge of the drawstring. And then, when the forward tip of the elastic appears on the other side of the drawstring, it will also need to be sewn firmly to the outlet hole of the drawstring.
Then the elastic will be firmly fixed at both ends of the drawstring and will never pop out.
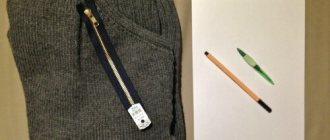
What else can you use?
Pen shaft
For this method, it is better to use an empty refill, although “experienced users” claim that ink does not flow out of the refill so easily and clothes do not get dirty when using this method.
- difficulty: high;
- duration: fast;
- Application: in offices and at home.
Procedure:
- The fabric part of the lace is pierced with a ball of the rod.
- The rod is carefully rolled into a ring and the opposite part of the rod is also put on the ball, as if “closing the ring”.
- Then the rod ring is slightly flattened with your fingers and pushed into the drawstring hole.
- Next, follow the usual procedure: using your fingers from the outside, push the rod to the outlet hole.
An important point is that you need to try to prevent the rod from “breaking” in half; the sharp corners will cling to the material from the inside, and it will become more difficult to push the lace through.
If you have a very thick empty rod, then you can use it to pull the lace into the drawstring using the principle of a tube with a stapler.
Why protruding laces are unaesthetic
Young people pay a lot of attention to details. Where an adult “put on shoes and forget,” a teenager will spend a long time trying on, choosing the color and length of the laces. And then he’ll be upset because of the bow that’s sticking out. And it constantly comes untied, threatening the owner of a pair of sports shoes with a fall if he steps on the protruding end.
How to lace without the laces sticking out
There are several lacing methods to prevent the ends from sticking out:
- You can simply hide them inside the sneakers under the foot, and cover the remains with the sides of the shoes. But do not think that this method will protect you from a possible fall. After all, without tying the laces, you will not be able to secure your foot tightly in your shoes, so there is a risk of losing both your sneakers and your balance while walking quickly. Use this method only in extreme cases, when you need to quickly put on your shoes and walk a short distance.
- This method is more reliable than the first, although it can also cause some inconvenience. Lace as usual, and tie the bow under the tongue, not on the outside. The problem is solved - the bow and the ends of the laces do not stick out. But another problem may arise - the knot will put pressure on the foot while moving.
- If the laces are too long and you can’t hide them under the tongue the first time, before tying the bow, pass them around the foot and only then tie it. If the laces do not rub your foot, you can use this method regularly.
- Try the double lacing method, which allows you to shorten long laces, which means significantly reducing the size of the bow. To do this, you need to pass each half of the lace twice through some holes, for example, in the center.
Stretching and heating
For the first option, take a chair or ironing board, a small table or an empty drawer. We completely pull the clothing over the item and leave it in this position for at least a day, and preferably for several days. You can first lightly moisten the area with the elastic thread so that the item dries in this position.
A greater effect can be achieved if the item is ironed with a hot iron. Wet the desired area of fabric on a skirt, dress, pants, jacket or other clothing using a damp towel. Alternatively, gently dip the material into water. It should become moist but not soggy. Heat the iron to maximum temperature.
We fix the clothes on an ironing board or a hard, flat surface so that the braid stretches to the desired length. Or put the product on a board. Cover the top of the item with damp gauze or cloth so that it completely covers the elastic band.
After preparations, carefully smooth the elastic band, after which it should stretch. Repeat the procedure if necessary. Adjust clothing until it reaches the desired size. It is important to perform the operation carefully, since many fabrics cannot be ironed at high temperatures, even through the fabric. And some types of materials cannot be ironed at all.