I don’t want to wear a “bat” and all sorts of shapeless capes all my life. My love for sewing saves me. Now your website can save you the opportunity to make a sleeve pattern FREE OF CHARGE! As soon as I appreciated the capabilities of your service, I immediately signed up my daughter, an aspiring dressmaker. She has already had her eye on several items. I immediately bought several patterns for myself and looked at them more”...
And further:
“...I really want beautiful clothes. And at the same time convenient. While dresses can still be bought ready-made, outerwear is simply a disaster. The sleeves are tubes! My mother has been struggling with her full hands all her life. Her blood pressure rises due to discomfort, and with age she even has a fear of getting dressed. Like children who are afraid to put anything over their heads. To the point of hysteria. It's horrible. We really look forward to your service!”
Of course, how can such a request be left unanswered? Moreover, the problem of full arms and narrow sleeves is very common. I'll tell you how to deal with it. I hope to help your mother and you!)
Method one
For all modeling methods we will need... a sleeve pattern. It is usually attached to the pattern for a dress or any other item that you are going to sew.
To ensure that when increasing the sleeve width, there is no excessive fit along the sleeve edge, I propose to carry out the following modeling.
1. Cut the sleeve pattern lengthwise.
2. Spread to the required width.
3. Cut the daedals along the sleeve width line under the armhole.
4. Connect the upper parts at the top, closing the edging line. Thus, we will keep the length of the hem line, and therefore the fit of the sleeve, unchanged.
5, If desired, narrow the bottom of the sleeve in the same way, connecting the bottom lines.
You can't stop sewing beautifully!
Miscellaneous, Secrets of cutting
Hello, friends!
Let's consider a situation when it is necessary to change the pattern with full arms.
In this case, the armhole in the finished garment will be narrow.
Accordingly, it will “pull” in the armhole area, creating folds, creases and discomfort to wear.
If you sew yourself using ready-made patterns, this defect can be corrected even before cutting, preventing troubles during sewing.
To correct a narrow armhole and insufficient sleeve width in the shoulder area , I suggest, first, choosing the “turn method”.
This is a special method that is great for changing a sleeve pattern for a fuller arm. Moreover, the “rotation method” increases the girth of the upper arm without changing the line of the edge.
If your arms are full at the top , you need to widen the upper part of the sleeve , for this:
- Measure your arm circumference.
- Calculate how many centimeters are missing in girth compared to the pattern.
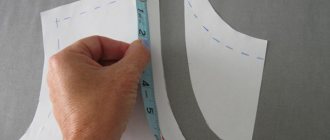
- Then, on the pattern pieces (or drawing), draw a line in the middle of the sleeve from the transverse mark on the sleeve hem (parallel to the direction of the grain thread) to the bottom edge.
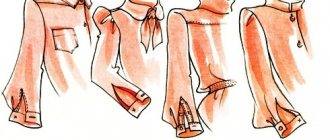
- Also draw a horizontal auxiliary line (Fig. 1), stepping back along the sleeve sections downwards by 2 -2.5 cm.
- Cut the part along a vertical line from the bottom almost to the top cut and along a horizontal line, respectively, almost to the side cut.
- Extend both upper parts of the sleeve by the missing number of centimeters (Fig.2).
- To avoid changing the width of the sleeve along the bottom edge, reconnect the lower parts of the sleeve along the bottom edge. The edges of the horizontal cut will slightly overlap each other. Please note that this “entry” must be the same on both sides, otherwise the balance of the sleeve will be disrupted.
- Align the bottom edge of the sleeve. Draw a new line for the direction of the grain thread exactly in the middle of the allowance (Fig. 3).
- IMPORTANT! When changing a two-seam sleeve pattern, use the same method, but only for the upper part. The lower part of the sleeve remains unchanged (Fig. 4 ).
If such a change is not enough , you can increase the height of the edging and accordingly change the patterns of the back and shelf (see figure below)
If according to the model it is impossible to increase the height of the sleeve (for example, in sports or a loose silhouette), then you can add the missing centimeters on both sides of the sleeve sleeve and sleeve cuts. In accordance with this, changing the patterns of the front and back. (see picture below)
If correcting the sleeve width and back/front details does not produce noticeable results, there may be deviations from the standard in the back area.
Options:
- Measurement The width of the back is significantly wider than the intended width of the back;
- There is a slight stoop.
In these cases, there will be a lack of length on the back piece.
Accordingly, you need to lengthen the backrest pattern.
An article about lengthening patterns is here;
Article about adjusting patterns for a stooped back here
The adjustment methods given are based on ready-made patterns.
If you build the base of the structure yourself and take all the measurements correctly, the drawing will take into account the features of the figure.
If inaccuracies occur during construction, check the correctness of the measurements and calculations.
We looked at options for changing the pattern with full hands.
If you have any questions or suggestions, write in the comments below.
Good luck to you!
Elena Krasovskaya https://shjem-krasivo.ru/
This is interesting:
- How to change a trouser pattern if you...
- About illusions in clothing or how to change...
- An unusual patch pocket for a coat and…
- We sew a transformable skirt. Preparing for...
- What are darts needed for? Processing and ironing of darts
- How to sew a gathered skirt with elastic…
Method two
Sleeve with top seam. It is very comfortable for full hands.
To model such a sleeve, simply cut the pattern lengthwise (from the middle point downwards) and spread it to the required width. Form longitudinal sections (they are called top) as shown in the figure.
If such a sleeve is placed a little higher, shortening the shoulder line, it will turn out even better. After all, the peculiarity of the physique of figures with full arms is soft roundness and a not too expressive shoulder line. Therefore, by moving the sleeve slightly over the shoulder, we will achieve a better fit.
To do this, shorten the shoulder by 1.5 -2 cm, and then increase the height of the collar by the same amount.
Indeed, the top seam on the sleeve, when modeling a full arm, is very convenient. And it can act not only as a constructive necessity, but also as a decoration if you approach it creatively. Take a look at the photo. Effective, right?
Trying on a sleeve
The correctness of the sleeve construction and compliance with the designer’s intended idea is checked by fitting, which is performed on a figure or mannequin. In individual tailoring, marks are made mainly on the right side of the body, with strong asymmetry - on both sides.
Characteristics of a correctly fitted sleeve
- Has the correct vertical position relative to the shoulder line.
- The natural tilt of the hand is maintained.
- Has no creases along the edge.
- The volume and length are adequate to the volume and silhouette of the product.
Fitting is the main method of identifying product design defects. During its implementation, the balance of the entire model is adjusted, the position of the shoulder seam, the depth and shape of the armhole are clarified.
season.ru
After clarifying the general position of the product, they work directly with the sleeve.
Key cutting errors
- Positional imbalance – diagonal stress deformations of the tissue.
- Assembly on the head of the pellet - inaccuracy of construction and extra length of cut.
- Insufficient height of the rim - diagonal creases, insufficient fit of the part to the body.
Dress
If your dress has become too tight, it's time to increase it a couple of sizes by adding inserts on the sides.
- Open the dress from the armholes along the side seams.
- Cut the strips to the required length and width and baste them to the shelves.
- Sew by machine.
- Finish the bottom and armholes.
The rectangular side panel will automatically increase the size of the armhole. And if the dress has a sleeve, then it will also have to be extended. To do this, open the seam of the sleeve and sew in a piece of the required size.
If the sleeve does not need to be extended, then the dress can be placed in the center. This option is extremely successful - if the additional detail is darker in color, it will visually elongate the silhouette and “hide” the sides. But here, keep in mind that the neckline will have to be redone, in particular if the model has a collar.
As for inserts, they can be anything. Make them rectangular, or if you want more freedom, then wedge-shaped. Stripes are suitable for a dress in a sporty style, an elegant item can be complemented with guipure or lace, and thick fabric looks great in tandem with leather or suede. In any case, it looks fresh and uncluttered.
If only the sleeves of the product are small, then supplement them with shoulder straps or stripes along the entire length.
- Open the shoulder seams and cut the sleeve down the center.
- Cut the insert to the desired length, pin the pieces, baste, and then stitch.
- Press the seams and fold the edge of the sleeve.
Shorts and trousers
If shorts or trousers become tight at the hips and waist, they can be expanded using side panels and inserts at the waist.
To do this, prepare companion material. It should be the same texture and as similar or, conversely, contrasting color as possible. By the way, in this case you can use braid or ready-made stripes.
- Open the side seams of the product to the waist.
- Cut the belt with scissors.
- Cut out the inserts of the desired size or take a suitable braid. Sew a large elastic band on top to provide additional comfort around the waistband. After this, measure the desired length.
- So that it is not too obvious that the insert is made of a different material, it can be decorated with lace or thin braid on the sides, stitching it 1 cm from the edge.
- Now connect the edge of the insert to the edge of the pant leg (right sides facing each other), pin and baste. Then baste the second edge.
- Sew the seams on the machine and press.
- Fold the bottom of the product.
If you need shorts or trousers to be wider and higher at the waist, then you can get by with wedge-shaped inserts.
- Put the product on and measure the length by which you want to increase the belt - from the button to the loop.
- Also note the depth of the divergence. That is, determine where the trousers do not meet.
- Undo the belt of the product not completely, but from the side seams and along the back.
- Open the side seam to the desired depth.
- You need to cut out two wedges from the required fabric. The width of each wedge will be equal to half the size of the divergence segment, and take the depth as the length. Make an allowance on the sides of each triangle.
- To adjust the belt, cut it at the back, in the center. Make the insert for it the size of the divergence segment.
- Pin the pieces together and then machine stitch them.
- Enlarge the waistband and then stitch it.
- Press the seams.
Sweater
The jacket is altered in the same way as the dress. If the item is tight in the chest, then the insert is placed along the back or front. The sleeve is expanded with shoulder straps or stripes along the entire length.
Any fabric, even contrasting in texture and color, will do for finishing. Combine cashmere with lace and guipure, knitwear with denim or leather, silk with knitted fabric - each option will be successful in its own way.
Any alteration of clothing requires skill in sewing. And if you are not too friendly with a needle, then entrust the transformation of your wardrobe to a professional. The dressmaker will cope with the task much faster than you, and will do everything so carefully that no one will even guess that the clothes have been repaired. And your favorite thing will last for many more years.