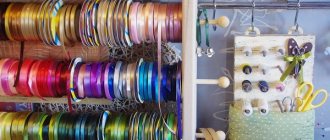
One of the most famous types of Japanese art is kanzashi . It consists of creating beautiful decorations in the form of flowers from pieces of silk ribbons. Here are master classes on how to make kanzashi from ribbon with step-by-step photographs. Roses, butterflies, hearts, bows and satin flowers using the kanzashi technique look elegant and delicate, and making them with your own hands is not at all difficult.
Satin flowers were especially popular among geishas; they used them to decorate all possible hair accessories: combs, hairpins, sticks. Kanzashi decorations made it possible to determine the character, and in some cases, the social status of the women who wore them, since the cost of the ribbons from which they were created could exceed the cost of the kimono itself.
Currently, this technique is popular all over the world and not only as a type of hair decoration. Kanzashi are used to create unique jewelry, and some decorate clothes with them. This technique is most often used by brides, since wedding paraphernalia looks very beautiful when decorated with snow-white kanzashi flowers. Young mothers also like this technique and create bright headbands and hair ties for their little princesses.
It is very easy to learn this technique, you just need to be patient, diligent and persistent, because such work is quite painstaking.
The materials for the classical kanzashi technique are natural silk and rice glue. But nowadays all possible fabrics and any glue are used, especially if you are just learning, then it is not at all necessary to take expensive materials.
Finishing the edge of the curtain with a regular seam
But you must admit that without a bottom seam, a curtain made of the most expensive and exquisite fabric looks untidy - you can’t do without hemming. Going to a studio with such a small order will require not so much financial costs as time and effort. It is much easier to finish the edges with your own hands using a regular seam. You can do it on a typewriter or manually.
First you need to accurately determine the length of the finished product. To avoid making mistakes with your measurements, leave the fabric hanging for 2-3 days: it will stretch and take its final shape. The edges of the fabric can be processed using different seams: depending on the type of fabric used for the curtains:
- It is better to hem light materials (organza, veil) with a double hem. In this way, you can process the edge of the fabric without an overlocker, because the edge will be in the middle of the folded material, without being subject to mechanical stress during operation.
- The edges of multi-layer, dense or lined fabrics are processed with an ordinary fold.
You can process the edges of the fabric manually; this is even preferable for plain materials with a smooth texture - the stitches on the front surface will remain invisible. The main thing is to use a needle to hook only one thread of the main fabric. If you make the stitch wider, it will “appear” on the curtain in small stripes or dots.
To shorten curtains with a machine, cut the fabric to the required length, taking into account seam allowances, make a hem, baste and stitch the product.
To make the seam less noticeable, use thin threads that match the color of the curtains as closely as possible.
Treatment with adhesive tape
A simple and convenient way for thin fabrics with a non-textured surface is using adhesive tape or braid. Injections with a needle will not leave marks on the material, and the edges of the curtains can be processed in a matter of minutes.
Adhesive tape
This method will be a lifesaver when you are in a hurry and don’t have a sewing machine at hand - carefully finishing the edge of the fabric by hand will take at least several hours.
To work you will need:
Let's get started:
- We bend the fabric (once), adjusting the desired length of the product.
- Smooth out the fold with an iron.
- We insert adhesive tape between the layers of the lower edge of the curtain and apply it again with a hot iron, fixing the hem.
Attention! If you are working with curtains made of heavy thick fabric or making a wide hem, glue the braid in several rows.
This method is quick to perform and “low-traumatic” for the fabric (since needles are not used), but not as reliable as classical methods with seams. After washing, the tape will come off and then you will have to repeat the operation.
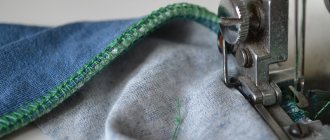
Machine operations
In order for the product to serve for a long time, and the quality of the work performed to be at its best, the edges of the parts must be processed in a suitable way.
Even if you don’t have an overlocker, but just a sewing machine, you can perform these operations:
- Straight stitch with hem. The edges of the cuts are folded and stitched, setting the stitch length to about 2 mm. On thin fabrics, for example, chiffon, silk, re-hemming is done and the seam is laid again. The product looks perfect and neat.
- Zigzag seams are performed by many machines; even a manually operated Podolskaya can be used for this purpose; you just need to buy a special attachment. This stitch is used for finishing edges instead of an overlock stitch. The thinner the fabric, the tighter the stitches need to be placed.
- Processing with bias tape. This method is used for sewing branded clothing. All open cuts are processed not with an overlock stitch, but with finishing tape. This distinguishes the quality of the products. Execution requires skill, but everything can be learned. Sections of lace and other delicate fabrics are processed in this way, since this is the only way to do the job accurately.
The sewing seam is used in the manufacture of bed linen, as well as for processing sections of thin materials. First, the parts are connected with the wrong sides facing each other, a seam is laid on the front side of the product, then they are turned inside out and stitched again.
As you can see, you can process the cuts by hand and using a straight-stitch sewing machine.
Let's get acquainted with materials that do not require processing
It is easiest to work with fabrics whose cuts do not fray. Modern technologies have made it possible to produce non-woven materials, which means that the fibers in them do not separate and therefore do not fray. Cutting clothing items from them is a pleasure, and assembly is even easier, because you only need to lay connecting seams.
Let's list these fabrics:
- artificial leather and suede;
- some types of knitwear;
- fleece;
- felted loden;
- neoprene.
Cardigans, which are sewn without finishing the edges of the collar, sleeves, or the bottom of the product, have come into fashion. The fabric does not fray, so you can do without overcasting stitches.
Fabric edging
The treatment of curtains made from fabric edging looks very neat.
- standard sewing “trio”: threads, needles, scissors;
- As an edging, you can use any strip of fabric: ready-made ribbon or braid cut from the material. The main thing is that its length is no less than the width of the curtain fabric.
Fabric edging
How to make edging with a machine, step-by-step instructions:
- If you are not using ready-made tape with finished edges, cut a strip of fabric to the desired length.
- The finished braid is simply folded in half, the cut tape is folded several times: first in the middle, then the raw edges are folded inward again. The formed strip is ironed.
- We insert the edge of the curtain between the folded tape, baste it, and then sew the parts together with a machine seam.
An alternative to edging is a frill, behind which the raw bottom of the curtain is hidden. But this method requires a certain stylistic decision. The way the work is done is also different:
- The edge of the canvas is hidden not between the layers of the strip, but behind the frill.
- It is recommended to pre-treat the bottom of the curtain with an overlocker.
Finishing the edges of organza and tulle
Working with dense fabrics is not particularly difficult. The main thing is to decide on the hemming method and select materials (threads, braid) that match the color of the curtain. Another thing is thin fabrics with transparent tulle textures.
Organza is often used as light curtains in combination with thick and massive curtains. But finishing the edges of organza tulle is not easy. Trimming excess length fabric is done in two ways:
- At the desired level (along the cutting line), the fabric is sewn with a zigzag seam and only then cut off. This is done so that the thinnest threads of the material do not fray.
- In the second method, additional processing of the edge is carried out immediately after cutting off the unnecessary length with scissors. The edge is brought to a candle (or other source of open flame) and burned. But this needs to be done quickly so that only the threads sticking out at the cut ignite, and the main fabric is not damaged by the high temperature.
Now let's start hemming. We form a neat double hem, baste it and sew it on the machine. For a beautiful drapery design, use weights.
Advice! To properly process the edges of the organza, when forming a double fold, ensure that the hem is the same size across the entire width of the curtain. A broken geometry of a straight edge line will look sloppy on the finished product, and a slipped seam will be covered with unaesthetic folds.
Another way to process tulle made from thin fabrics is with bias tape. This elastic braid is used to trim the edges of coarse mesh curtains, veils or light curtains with embroidery. In fact, this is the same edging of fabric with a finished ribbon or a cut strip of material: a veil, mesh or organza is inserted between the trim halves folded in the middle and stitched.
How to properly process the edges and bottoms of curtains
Beautifully designed windows always give the impression of coziness, composure and organicity of the interior. It’s good when you can go to the store, buy ready-made curtains and hang them. But quite often we are faced with specific desires in interior design or non-standard window sizes, ceiling heights, etc. In general, with parameters that may not fit the usual curtain sets.
Processing the edges of curtains
So what should we do? Then either an atelier comes into play, which will make the desired final “product” from a piece of curtain fabric, or your own hands, which may suffer a little (after all, decorative fabrics are not always pliable), but will make an excellent option for window decoration.
Fabric selection
It would seem, what does this have to do with how to process the edges of curtains? The reason is simple: if you do everything yourself, of course, you need to take fabrics that are most suitable for processing. This is why it is not recommended to use so-called “woven flax”. This is a decorative material for curtains, which is produced by weaving dyed and fairly large fibers together. There is one important nuance in the processing of this material - it crumbles. That is, it will be quite difficult to tuck the edges and process the bottom of the curtains so that they look like a beautiful, smooth, solid fabric. Without special equipment for processing, such curtains are very difficult to process, since the fabric will “crawl” and literally crumble during the process. But what to do in the case when this option is chosen, you want to process it with your own hands, but there are no special tools?
Option 1
This is where the first option for processing curtains will help. Moreover, it can be applied to both flax and cotton and other fabrics that have interwoven fibers. So, here we have a section of curtains. The bottom, naturally, looks unattractive: some of the threads stick out, some are simply cut off. What should I do?
To begin with, take and measure 10 cm from the bottom. We make a mark and sew along it the fabric folded in one layer. If there is no machine, we simply sew with our own hands, making a machine seam. It is best to choose the color of the thread to match the curtains. After this procedure is completed, we move on to the second step. To do this, you need to very carefully pull out the transverse fibers one by one with a pin or needle, leaving only the longitudinal ones.
The result is a neat, beautiful fringe, which can then be further processed. For example, take several fibers in a bundle and tie them in a knot. This is an original and simple approach to finishing edges. But for this, it is advisable to take a piece of fabric 5 cm longer than the distance from the cornice to the floor. Then the fringe will look beautiful. If you do it on shortened curtains, the look will be somewhat blurry and unnatural.
Kanzashi - master classes
DIY kanzashi strawberries
Kanzashi strawberries look bright, appetizing, elegant, but they are inedible. This is a great option for colorful summer hairpins for girls. Everyone is accustomed to the fact that the kanzashi technique is an unusual method of making believable and fantastic flowers and plant patterns. This tutorial shows how to make strawberries from satin ribbons. Girls who see them will definitely want to try them on, not for taste, but for their hair, because they are so beautiful.
For one flight clip we will need:
- Green satin ribbon in three different sizes (the shade may be the same or different): 3 cuts – 5*5 cm, 2 cuts – 1.2*15 cm, 3 cuts – 0.5*8 cm;
- White satin ribbon: 5 cuts – 5*5 cm;
- Red satin ribbon: 2 cuts – 5*8 cm;
- Green laces: 2 cuts – 8 cm;
- Green felt in the form of a circle - 3 cm or 4 cm;
- Yellow half bead with a diameter of 0.6 cm;
- Cotton wool or padding polyester.
One strawberry composition will consist of two scarlet berries on laces, a white flower glued to a green meadow. To make a flower you need to prepare 5 droplet petals, for a clearing - 6 green leaves of two varieties. The accessories for the job are given above, now let’s take a closer look at the stages of making a wonderful decoration.
How to make kanzashi strawberry step by step
Let's figure out what the accessories listed in the list are for. A green felt circle is the basis of a green meadow, red satin stripes are details for the berries, white satin stripes and a yellow half-bead are for the flower, green satin details are for the leaves and tails of the strawberries. See how to make paper crafts here.
Cut out semicircles from two red stripes (for convenience and a symmetrical result, you can use some kind of round object).
Fold the semicircle in half.
Sew the two combined ends of the former semicircle (preferably with red thread).
Fill the resulting red cone with padding polyester or cotton wool. Sew the upper part with the same red thread around the circumference.
Tighten the thread - you will get a small voluminous berry.
Also sew a green strip measuring 1.2*15 cm with stitches along one side. This time it is better to use a green thread so that it is not noticeable against the general background.
Tighten the green thread, you will get a rounded, wrinkled tail for the berry. Wrap it around the green lace and glue it on. Two parts of the strawberry (red and green on the string) are ready.
For one hairpin, prepare 2 delicious details. These strawberries will also serve as tassels; girls really love such elements in hairpins.
Cut out leaves from green satin squares measuring 5*5 cm. In total you will need three such leaves for one hairpin.
Give the leaves a more realistic shape and relief. To do this, use a knife. Heat the metal over the flame of a gas burner and press it against the leaf so as to press through the veins on the leaves. Burn the outer edge several times with the flame of a lighter, stretching the hot satin with your fingers in between.
Make 3 indicated leaves, and also prepare 3 more green loops from ribbon measuring 0.5 * 8 cm.
Proceed to the formation of the last detail - the white flower. White satin squares with a side of 5 cm will be used to make the petals. Bend them diagonally.
Bend again in height. Next, bend the corner of the top layer in the opposite direction. After that, lower it down so as to highlight the fold. Do the same with the other side of the petal.
Squeeze the lower part with your fingers or a clamp, cut it off and singe it with a lighter.
Prepare 5 white teardrop petals and 1 yellow half bead.
Glue all 5 petals into a flower. Cut out a felt circle. Now all the parts for modeling the hairpin are ready.
Glue the green leaves onto the felt. Glue a white flower on top.
Glue the ends of the green laces from below and press down with felt on top.
The elegant summer kanzashi product is ready.
And all you have to do is glue an elastic band on the back. This type of hairpin is best suited in this case. Make two strawberry bushes - a couple of summer decorations.
Option 2
More common fabrics, such as polyester, also need to be treated. When they are soft and elastic enough, there is no particular difficulty. You can process the bottom of such curtains even without using an overlocker. To do this, just fold the edges of the curtains and iron them thoroughly.
Attention! Synthetic fabrics should only be ironed through gauze or a simple cloth, and the temperature regulator of the iron should be set to minimum!
After the product has been ironed, you can begin machine processing. For a high-quality seam, you can use both standard and zigzag stitches. In this case, the thread will grab the folded and free part of the curtains well.
Option 3
This includes curtain-type curtains, as well as tulles. Often, fabric such as organza is used for such products. What is she like? This is an interweaving of synthetic fibers with fairly large gaps (windows). In some ways, organza is similar to a decorative multi-colored mesh. This fabric can be either elastic or completely unprocessable.
And what to do in this case? Naturally, it will crumble during the first attempts to cut it, prune it, etc. So what should we do?
It is best to properly process organza curtains by understanding the properties of the fabric. If it is elastic and can be sewn, then you can use a machine. But in any case, you will need tape to process the edges of such curtains. This could be a satin decorative strip. If the organza is stiff enough, then this strip can be glued on like an edge. In this way, you can decorate not only the bottom of the curtains, but also the sides. At the same time, tape can be not only a practical way to finish the edge, but also an excellent addition to the design. For example, black organza with a white ribbon, or vice versa. Or white curtains and red ribbon. In this case, the tape can be glued rather than sewn.
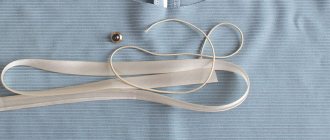
How to make a ribbon for rhythmic gymnastics with your own hands?
Bright and spectacular performances with the ribbon are the very part that no rhythmic gymnastics can do without. The fact is that if an athlete learns to skillfully handle this sports equipment, then even the most inconspicuous rhythmic gymnastics ribbon can make her performance unforgettable.
At the same time, it is possible to use a bright ribbon not only when entering the gym, but also when dancing at home.
However, this equipment is ideal only for those girls who compete in professional competitions, but for training or performances in kindergarten, you should choose a ribbon that you can actually make yourself, just like sewing an inexpensive swimsuit.
How to correctly and simply sew curtain tape into curtains - everyone can learn
Curtain (furnishings) tape is a braid, along the entire length of which cords are laid to create folds and holes or loops for attaching the product. Such fittings make it easier to sew window textiles, eliminating the need to create loops and folds directly on the fabric. It is not difficult to sew curtain tape of any size to curtains, the main thing is to make the correct calculations and follow the step-by-step instructions.
What is curtain tape and why is it needed?
Curtain tape is a soft type of fitting that is sewn to the edge of curtains and curtains. It usually has loops that are used to hang the curtain from the curtain rod.
One or more cords pass through the braid, sometimes they are supplemented with pockets. This design allows you to create various folds on the curtain. The type of drapery depends on the number of cords, the presence and shape of pockets.
The folds created by the braid spread throughout the entire canvas, adding sophistication to the interior.
Thanks to curtain tape, when making curtains you do not have to manually sew on loops and form uniform folds directly on the material. All these functions are performed by fittings that can be easily sewn on with a few lines.
Curtain textile accessories come in different varieties. It is classified by:
- Size. There are options from 1.5 to 10 cm wide. The heavier the curtain, the wider the tape should be. Typically, for light translucent fabrics, ribbons 2.5 cm wide are used, and for dense, heavy materials, six-centimeter fittings are used.
- Method of fastening to the curtain. There are sewing tapes, which have to be sewn onto the curtains, and adhesive tapes, which are glued to the fabric. The second option is considered less reliable and is only suitable for light curtains.
- Fastening elements. Usually, to attach to the cornice, there is a ribbon on the braid that creates loops. However, there are options with other fasteners: Velcro, eyelets, clothespins, etc.
- Blossom. Curtain braid can be white, translucent, transparent or colored. Transparent options are suitable for translucent, thin and light curtains, and thick white and colored ones are suitable for heavy, light-blocking curtains. Colored varieties are chosen in accordance with the color of the curtains.
- Material. For organza and veil tulle, fishing line accessories are used; for denser fabrics, a ribbon made of cotton, polyester or cellulose is suitable.
Another parameter for classifying ribbons is the type of folds that will be created when the cords are tightened. The calculation coefficient also depends on this:
- "Harmonic". Forms simple thin symmetrical folds. The build factor in this case is 1.5, and the width is 6.
- "Pencil". A classic variety that forms a simple, uniform assembly along the entire length of the canvas. Coefficient – 2.5, width – 7–7.5.
- "Wave" (sometimes called "sleeves"). Forms several massive rounded folds throughout the canvas. Suitable for heavy fabrics. The width of the braid can reach 10 cm, and the coefficient is 2.
- French assembly. When using braid, groups of folds are formed on the curtain, each of which includes 3 thin gathers. This variety looks best on long curtains. The coefficient is 2, and the width is 8.5.
- Double pleated. Forms groups of three thin folds in a checkerboard pattern. Wide braid (10 cm) has a factor of 2.
- “Waffle” (other names: “butterfly”, “chess”). Forms a diamond-shaped drapery. Coefficient – 2.5, width – 7.
- Counter folds. They move from different directions towards each other. The width of the braid from the counter assembly reaches 2.5 cm, and the coefficient is 2.
LiveInternetLiveInternet
Quote from katya27
Read in full In your quotation book or community!
Quite recently (about three months ago) I was captivated by the skill of creating kanzashi flowers. I decided to learn how to make such a beauty myself. But as in any other business, I had to face some difficulties. Luckily there is internet!!! and kind people who are ready to share their experience. So I also want to share with you, my dear readers, those useful tips that I took note of.
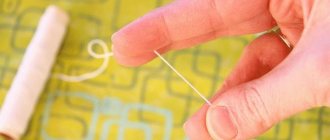
I'll start with what we need for work : fabric or ribbons, tweezers, a candle or lighter (soldering iron), pins, scissors, chalk and pencil, needle, thread, glue, base, product on which the flower will be attached, beads.
Well, here are the benefits themselves:
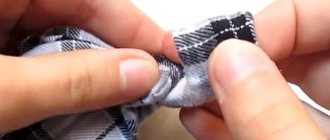
1. The principle of creating a petal : take a square of fabric, fold it in a certain way (depending on the model), the tip is scorched on a candle and pressed with tweezers to secure it. After all the petals are ready, they are glued to the base and to the product. (of course, not only classic petals are used in kanzashi. Your imagination comes into play here)
tall petal
To make the petal lower , you need to trim it as in the photo and melt the sections
2. Fabric . True kanzashi are made from natural silk (which is very expensive). A simpler and more affordable option are satin ribbons. They are easy to cut, melt easily and hold their shape well. The sizes used are from 2.5 to 5 cm. In principle, any non-flowing or low-flowing fabrics can be used for kanzashi. Most often used: satin, crepe-satin, organza, tulle, nylon.
3. How to cut? The most important thing is that the squares are even on all sides - this is the first step to perfect petals.
The tape can be cut in several ways:
a) fold the tip 90° and cut it off. it turns out to be a square. We apply this square to the tape and cut the same one along it (minus - a long process. Plus - even squares)
b) make a stencil of the required size (shown here on a 5 cm tape), wind the tape several times around the stencil, remove and cut. you get several squares at once. but do not wrap too much tape, otherwise the squares may become askew when cutting. (plus – it’s fast. Minus – it doesn’t always work out smoothly)
c) draw segments of the required length on the tape and cut along them.
We cut the fabric into long strips of the required width, and then we act on the principle of a tape, choosing an option that is convenient for you.
There are petals that are made not from squares, but from rectangles (method b and c) or even circles (circles are cut out on fabric separately or in several layers of fabric).
3. What to melt with? In Japan, the petals are not melted at all, but are glued with special rice glue. This glue can be made at home (as craftswomen say). This glue dries for a long time, leaves no marks and gives the desired shape to the product. the fabric does not fall off after it, but you still need to learn how to work with it. So, we use a simpler method - melt it. As for me, it is best to use a candle for melting - light it for yourself and melt as much as you need. At the same time, your hands are freer. Many people use a lighter or matches. They also use a soldering iron, which is used to cut the fabric, thereby immediately soldering the sections. It's up to you to choose.
4. What to glue with? It is better to glue the petals to the base with a special glue designed for processing fabric. Then the fabric remains elastic and does not tan. I use Moment-Gel glue. It dries quickly enough and does not leave unnecessary marks. Transparent, holds tightly, waterproof. I like. Some masters also recommend Moment-Crystal, Titan, and a glue gun.
5. To prevent melted ends from being black, melt them at the base of the flame , not above the flame.
Wrong (black marks will remain)
Right
6. Before melting the tip, trim it by 2-5 mm (or more if your idea requires it). I didn’t cut it at first, and couldn’t understand why the cane sticks so poorly and needs to be kept near the fire for so long? and then I realized that if I cut it a little, everything will turn out much easier.
7.
How to collect petals? Collect the petals first on a thread, and then glue them with glue (small flowers don’t need to be collected on a thread. Look at the product. Some craftsmen don’t collect on a thread at all, but personally, I find it more convenient to collect. Maybe everything comes with experience?...). The question is often asked: where to pierce a petal with a needle? It’s just as convenient for anyone. I pierce the middle of the petal, stepping back from the melted cut a couple of millimeters.
8. When making petals (especially sharp ones), bend the square in one direction , otherwise the petals will “look” in different directions and this will be noticeable on the finished product. Here, for example, there are two petals in the photo. One bent to the right, and the other to the left, and this was immediately visible.
9.Base for the flower. For the base, you can use thick cardboard, thin plastic, foam covered with fabric (shown using plastic as an example), felt, buttons, coins, pieces of fabric. You can glue the petals directly to the product (brooch, headband, hairpin, etc.).
10. You can spray the flower with hairspray so that it kept its shape longer (I personally haven’t tried it) or pre-gelatinize the fabric (if you gelatinize it, the flower may look rough).
11. When making double or triple petals, pin them to each other with a pin and make sure that it is exactly in the middle, then the petal will be even.
I hope these tips are really useful for you! Good luck with your work!
Text and photo: katya27. except for the first photo (it is signed).
Something was spotted here: https://forum.say7.info/topic40130.html, https://www.liveinternet.ru/users/3382558/post164621568/, https://www.liveinternet.ru/users/3271695 /post185018672/
PS: I tried to write briefly and clearly. I hope it worked. If anything, ask!
PPS : If interested, please click “like”.
Thank you in advance!
How to calculate the length of the tape
If you need to sew a ribbon to a ready-made curtain, then the calculations will be quite simple. Add another 10–25 cm to the width of the curtain. The resulting length will be the size of the braid.
When sewing curtains yourself, you will need more complex calculations. To calculate the width of the curtain itself and the length of the braid, you need to know the coefficient of the selected type of fittings and the length of the cornice.
To calculate the width of the curtain tape, the length of the cornice is multiplied by the drapery coefficient. To the obtained value add 10–25 cm per hem.
For example, if the cornice is three meters long and a tape is used that forms an ordinary accordion (coefficient 1.5), then the calculations will look like this: 300 x 1.5 + 10 = 460 cm.
How to choose the right wand
In order to become a champion, not only the length of the gymnastic ribbon must be correctly selected, but also the stick for it, so that a gymnast of any age will be comfortable.
If the length of the ribbon in rhythmic gymnastics is six meters, then the length of the stick for it should be no less than fifty-five or sixty centimeters.
In this case, the sasaki ribbon stick should be:
- fifty centimeters if the gymnastics ribbon was three or four meters;
- sixty centimeters, if the tape itself was six meters long;
- twenty-five or thirty centimeters if the ribbon is intended for children.
In addition to the fact that a stick for a gymnastics ribbon must be well-chosen in size, it can be one-color or two-color, lightweight or three-color, have a rubberized handle, or belong to a certain class (standard, junior).
Material preparation process
Before you sew the braid onto the curtain, you need to prepare it. For this:
- The curtain is being ironed. There should be no folds left on it. The fabric is ironed in accordance with the rules for caring for the material from which it is made.
- If the edges of the product are not processed, then they are hemmed, bending them twice.
- The loops on the tape are checked using an awl, screwdriver or any thin object. This is done so as not to sew the braid on the wrong side.
How to starch tape
All items in this sport are quite delicate, so it is not enough to purchase or make a gymnastics ribbon; you should store it properly. To do this, you can purchase a case for the tape at a sports store or make it yourself.
Before you purchase or make a satin ribbon, you should figure out how to starch the capricious material so that it does not lose the required shape.
To starch fabric, you should purchase potato starch (for a light shade) or corn starch, and it dissolves in the proportion of one tablespoon of high-quality starch per glass of cold water.
How to properly sew curtain tape
Sewing ribbon onto a curtain is easy. The principle of operation will depend on the type of curtain. The main thing is to follow the instructions and work carefully.
After the product is sewn, they begin to tighten the curtain using cords. This is done gradually, carefully straightening and distributing the folds.
It is important not to tighten the cords too tightly, otherwise the drapery will be sloppy. This is especially important for a figured assembly, in which each fold is part of the decor.
After forming the drapery, the cords are not cut, but tied with a knot that can be untied. When washing, the knots are untied and the gathering is straightened. This is necessary so that the curtain is washed evenly and no dirt remains in the folds. After drying, the cords are tightened again.
On the curtains
It is easier to work with heavy curtains than with translucent ones. In this case, uneven lines and imperfections will not be noticeable.
You can sew a wide curtain ribbon to a curtain by following the instructions step by step:
- The top edge of the curtain is folded to the wrong side by 2–3 cm. The fold is ironed. You can additionally use adhesive textile tape or sew a fold to the fabric.
- The curtain is laid out on the surface face up. The tape is laid along the edge so that it lies flat on the fabric, protruding 5 centimeters beyond the edges on the sides.
- The upper edge of the braid is fixed with tailor's pins, a basting is made, then stitched. It is important that during the process the stitching does not get on the cord (cord for tightening the drapery).
- The cords are released from the protruding edges of the braid so that they are on the outside. The edges of the tape are folded and secured with pins on the wrong side. The cords should remain sticking out on the sides.
- The ribbon, together with the fabric on which it is sewn, is folded to the wrong side. The top sewn part will be at the top, and the bottom at the bottom. In this case, you will get a neat, beautiful edge on top.
- The tape is stitched from the bottom from the wrong side. For reliability, start the line in the center.
- The cords are tightened, forming folds. Then they tie together.
How to choose a ribbon
As a rule, the choice and purchase of artistic tape falls entirely on the athlete himself or his parents. In order for the gymnast to be satisfied, it is worth clarifying that any ribbon consists of a special hard stick, viscose or satin ribbon of different lengths.
The ribbon with grosgrain sticks has a standard length of three or four meters and depends on:
The fact is that the professional version of the projectile has a length of four or even six meters. The tape is securely attached to a conical or cylindrical stick with a nylon pigtail or carabiner.
By the way, the ideal option for a ribbon for rhythmic gymnastics would be to completely match the color of the costume the gymnast will wear in competitions.
High-quality chacott ribbon is painted with bright acrylic paints or a permanent marker, and after coloring it is carefully ironed to ensure the color sets. The most popular color of ribbon for rhythmic gymnastics will be a shifted pattern, which can create the impression of additional dynamics and play of colors.