For a sport like gymnastics, choosing clothes is especially difficult. This is due to the fact that swimsuits must fit exactly to your figure and at the same time provide comfort and complete freedom of movement.
When purchasing a gymnastic leotard on various online resources or placing an order for sewing this item of clothing, you should take into account some of the subtleties of taking measurements and choosing fabric.
How to properly take measurements for a rhythmic gymnastics leotard
BASIC RULES FOR TAKENING MEASUREMENTS FOR GYMNASTICS LEOTSUIT
If you are planning to sew a leotard for gymnastics, a leotard for dancing or a leotard for figure skating, the person being measured should stand straight, without tension, maintaining his characteristic posture. The figure should be wearing thin clothing that does not add excessive weight.
When measuring, do not pull the measuring tape too tight!
- ОШ (neck circumference). A centimeter tape is applied above the seventh cervical vertebra, from the side and in front it passes along the base of the neck and closes in front above the jugular cavity.
OG (chest girth). In industry and retail chains, this measure determines the size of the product. The tape is applied horizontally around the body through the protruding points of the mammary glands and closes on the right side of the chest.
OT (waist circumference). The tape is applied horizontally around the body along the waist line. When sewing some products, you may need to measure the full waist circumference (from).
OB (hip circumference). The tape is applied to the buttock points, it runs horizontally around the torso, in front along the protrusion of the abdomen and closes on the right side of the torso. Sometimes you also need to measure the full circumference of your hips (Ob). Hip circumference is also very important when sewing skirts for ballroom dancing.
ШП (shoulder width). Measured along the middle of the shoulder slope from the base of the neck to the shoulder point.
Measure with the arm freely lowered from the end point of the designed shoulder seam along the outer surface of the shoulder to the bone on the wrist.
OP (shoulder circumference). Measured with the arm freely lowered. The tape is applied strictly horizontally. Its upper edge touches the posterior corner of the armpit, the tape closes on the outer surface of the arm.
DU (Skirt length). Measured from the waist line.
Otul (torso girth). The tape runs from the base of the projected shoulder seam in front through the groin to the seventh cervical vertebra in the back.
Source of the article: https://www.danceplus.ru/articles/merki_dlja_kupalnika/
The process of sewing a gymnastic leotard
So, all the tips have been taken into account, all the measurements have been taken, it’s time to stock up on the necessary material and proceed directly to the process of sewing a swimsuit. For this we need supplex, nylon threads and mesh. If desired, you can also purchase a small amount of decorative elements - rhinestones, sequins, etc.
We make a swimsuit pattern on a large sheet of paper; whatman paper is perfect. To make a swimsuit pattern on paper, you can use panties. We outline them and deepen the cutout on the thigh a little.
You can make a swimsuit more interesting by combining fabrics of different colors.
Afterwards we make a pattern for the upper part of the swimsuit. Then you can start cutting out the finished elements. We place the prepared paper patterns on the fabric and outline them with chalk or soap (do not forget about the seam allowances - about 2 cm). After all the preparations, you can cut out the pattern from the fabric and baste all the elements for preliminary fitting of a sports swimsuit.
Be sure to check the neck; if necessary, adjust its depth if the neck is too large. Then we sew the side of the swimsuit, and after that the main seams - the bottom and shoulder ones.
Let's start finishing the panties and sleeves. Do not forget about the additional gusset that needs to be inserted on the inside of the thighs.
Be sure to insert an elastic band into the panties and sew it on the waist. The last stage is to sew on the skirt. This is followed by a test fitting. If the swimsuit fits perfectly and no adjustments are required, you can complete the work process by decorating the almost finished product - gluing rhinestones, etc.
Advice. If you want to decorate the fabric with a special paint, then you should definitely carry out your plan until all the elements of the swimsuit have been sewn together.
Our material is coming to an end. His goal was to guide you through the process of creating your own gymnastics leotard. We wish you success!
How to properly take measurements for a rhythmic gymnastics leotard
The waist is a must. tie a stiff braid or lace. The figure should wear thin clothing. The measurements must be accurate, WITHOUT ADDING OR DECREASING (this is important), so that I know the exact parameters of the body.
Last name, first name of the gymnast. 1. Height 2. Chest girth - horizontal chest girth at the most protruding points. 3. Waist circumference - measure using the tape around the waist. 4. Hip circumference - horizontal circumference of the hips at the most protruding points 5. Back length to waist - measured along the spine, from the protruding vertebral bone at the base of the neck to the braid at the waist. 6. Double seat height - measure in the center from the intersection with the braid in the front to the intersection with the braid in the back, passing a measuring tape between the gymnast’s legs. 7. Thigh height - measure from the side, from the tape down to the expected point of the hip. 8. Arc - find the top point of the shoulder near the neck, draw a measuring tape across the chest, between the legs, along the back and return to the same point. If the swimsuit has a sleeve: 9. Sleeve length - measured with the arm slightly bent at the elbow from the protruding bone of the shoulder to the wrist. (If the sleeve is short, then measure from the protruding bone of the shoulder to the desired sleeve length line) 10. Bicep girth - measured around the arm in the armpit area 11. Elbow girth - arm girth at the elbow. 12. Wrist circumference - circumference at the narrowest point of the wrist. If the swimsuit has a skirt: 13. Length of the product in the front - measured in the front center from the base of the neck to the bottom of the skirt 14. Length of the product in the back - measured in the back center from the protruding vertebral bone at the base of the neck to the bottom of the skirt (usually longer than p. 16 front length (by 3-7 cm, depending on height))
Source of the article: https://vk.com/topic-46065560_27411526
Helpful tips for creating the optimal pattern
We bring to your attention some valuable tips from experienced craftswomen that will help you create the perfect pattern, as well as correct possible shortcomings. But before we begin to consider them, we will give, perhaps, one of the most important and simple pieces of advice: even if it seems to you that the product is damaged, do not panic. In most cases, everything can be fixed; you just need to deviate a little from the original idea, or think through everything carefully again.
Don't overload your swimsuit with too much jewelry
So, tips from seamstresses:
- Under no circumstances should you use a large number of seams or additional grooves in your product - the suit should be as tight-fitting, light and reliable as possible. And if there are additional seams on sportswear, this can lead to constraint in the movements of the performer.
- It is advisable to use a one-piece base to create a swimsuit, onto which a skirt is then sewn and additional elements and accessories are added.
- The front of the swimsuit should be shorter than the back. This difference in length will be located between the legs and will minimize discomfort when performing various exercises.
- The armhole should fit the handle very tightly. If this doesn’t seem particularly important to you now, then over time you will definitely understand what the beauty of this method is.
- You should not make the sleeve cap too high, otherwise this may lead to unsightly wrinkling of the sleeve every time you raise your arm.
- If, even while creating the pattern, you are still thinking about the final version of the swimsuit, it is better to “plant” it on the mesh. This will become a kind of safety net for you and will help you make the necessary adjustments if something happens.
- It has been experimentally determined that a large number of jewelry on a swimsuit (especially stones) will not make it much more beautiful. The best option is an unusual stylish design of the product itself rather than a large number of decorations on it. Because the swimsuit will look even more impressive without stones and will cost much less.
- It is best to glue sequins and rhinestones onto a product that has already been completely sewn, and not very tightly to each other (otherwise this may result in the swimsuit losing the necessary elasticity), preferably in a checkerboard pattern.
We choose the sizes of gymnastic leotards, focusing on the manufacturer’s size chart
Most online sales platforms, in addition to the product range, indicate manufacturers' sizing charts to help customers choose clothes as accurately as possible. In this case, the sizes of gymnastic leotards are grouped into a table where general parameters and measurements are indicated.
In addition, when choosing a model and size of a gymnastic leotard, you need to take into account the composition and quality of the fabric. For example, a gymnastics leotard made from natural materials may stretch and lose shape over time. Those swimsuits that contain synthetic materials are less susceptible to deformation and are more comfortable to wear.
You might be interested
Before creating a pattern, I think everyone understands that to get a swimsuit of the right size you just need to take the measurements correctly. Also, in order for the swimsuit to fit tightly to the body and not get lost when leaving the water, you need to know the elasticity coefficients of the material. They are also called elongation coefficients.
Determination of the elasticity coefficient.
With the elasticity coefficient of fabric for sewing a swimsuit, everything is more or less clear. As a rule, it is 0.85 units in both length and width. That is, almost all the measurements taken are multiplied by this value and the results obtained are put on paper when constructing a pattern. For example, with a hip circumference of 96 cm, the width of the swimming trunks will be approximately 40.8 cm (1/2 hip circumference * elasticity coefficient = 96/2 * 0.85 = 40.8).
When knitting a swimsuit, everything is not so simple. In any case, you need to knit a sample to select the size of the tool, calculate the knitting density, see how well the pattern fits the yarn, and of course, to determine the knitting elasticity coefficients. Even if you are going to knit from a magazine or someone’s master class, take the same yarn and tool, and follow every step exactly, the likelihood of getting it exactly right is very low.
For example, I knitted a sample with double crochets. Its size in a calm state is 12 x 10.6 cm. = 50 columns x 22 rows.
To determine the elasticity coefficients, it is necessary to additionally measure the sample in a stretched state. It is convenient to make such measurements by placing the knitted fabric on a pillow or ironing board, stretch it horizontally and vertically, only without fanaticism, so that the pattern is not greatly deformed, and pin it with tailor’s pins. When stretched, my sample measures 12.9 cm in width and 11.4 cm in height.
Horizontal knitting elasticity coefficient
will be equal to the length of the sample before stretching, cm / length of the sample after stretching, cm. I got 12 / 12.9 = 0.93
Vertical knitting elasticity coefficient
will be equal to the width of the sample before stretching, cm / width of the sample after stretching, cm. For me - 10.6 / 11.4 = 0.93.
Rounding to the nearest hundredth is sufficient. My coefficients turned out to be the same, but this is just a coincidence, it all depends on the composition of the yarn and the chosen pattern. When knitting, the measurements would be smaller because the pattern would stretch better. Well, using the same method, you can determine the elasticity coefficients of the finished knitted fabric if you have any doubts.
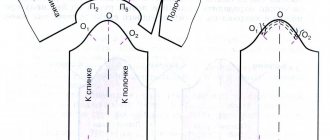
Constructing a swimsuit top pattern
To create a pattern for a swimsuit top with ready-made foam cups: 1. Take only 1 measurement - underbust girth (underbust circumference). You need to take measurements in a comfortable bra with a soft cup right along its edge, standing straight, with a straight back and not slouching. The centimeter should fit snugly to the body and not stretch. For me this measurement is 77 cm.
2. On paper, draw 2 horizontal lines at a distance of 4 - 5 cm from each other, depending on the size of the foam cup. The larger the size, the greater the distance between the lines.
3. For the pattern I will use the left cup. You can determine which one is left and which one is right from the inside by the size marking, which is applied closer to the center of the bodice.
We place the cup on the paper so that the left point of the lower arc is on the bottom line, and the right point is on the top line, and we designate the resulting points as A and B.
4. Holding the cup with your hand, we first trace its lower edge along the outer contour, obtaining an auxiliary line. Then, shifting the cup by the amount of its base (approximately 0.7 cm), we trace the outline again, obtaining a line for attaching the cup to the belt.
5. On arc AB we find the lowest point and designate it as D.
6. From point D, set down an amount equal to the width of the tunnel tape + the width of the elastic band. My tunnel tape is 1 cm wide, and the elastic is 0.7 cm. That is, we need to set aside 1.7 cm. We denote the resulting point as D1.
7. From point D1 we draw a horizontal line and get the bottom line of the belt.
8. From t. A to the left we set aside from 0.7 to 1.5 cm to get half of the belt jumper and put t. C. This value depends on how close you want to place the cups to each other in order to adjust the distance between protruding points of the mammary glands. For me this value is 0.75 cm.
9. From point C, we lower the perpendicular down and call the connection point with the bottom line of the belt the letter M.
10. From t. M to the right we measure a value equal to 1/2 of the measurement of the Underbust Girth (OpG), multiplied by the horizontal elasticity coefficient for sewing and the vertical coefficient for knitting, because the main part of the belt is knitted lengthwise. I get 77 cm x 0.93 / 2 = 35.8 cm. We denote the resulting point as E.
11 From t. E to the left, measure half the width of the fastener (mine is 1 cm) and put t. F.
12. From t. F up, set aside the height of the fastener (mine is 2 cm) and put t. N. This way we get half the length of the belt and its width at the back.
13. Now all that remains is to connect points B and H to get the upper border of the waistband of the swimsuit bodice. This can be done with a smooth concave line, or with a separate exit to the strap.
14. We have received a pattern - the basis of a belt or bra, which now needs to be modeled for a swimsuit. We transfer the contours of the pattern onto tracing paper.
15. There are several options here. If you want to make a swimsuit bodice with ties, the length of the belt needs to be increased by the length of the ties.
16. You can also increase the width of the waistband and extend the back by the width of the clasp for a sportier look.
17. You can reduce the width of the jumper, making it, for example, 1 cm.
This value depends on the chosen swimsuit top model.
When reducing the jumper, you need to determine the point of attachment of the side of the belt to the cup. We measure the arc of the cup, divide the result in half and find the central point to which we transfer the line of the lower edge of the belt, after which we draw the new height of the back of the belt and its upper border.
The pattern for a bodice with a monocup is constructed in a similar way. Only here we cannot deviate from the width of the bridge of the finished monocup, and its height, during modeling, must be no less than that specified by the manufacturer.
Even when modeling a pattern for knitting a swimsuit, you need to take into account the fact that the knitted cup itself, the jumper and the knitted belt along the edges will be additionally crocheted.
Constructing a swimsuit bottom pattern
Before creating a swimming trunks pattern, you need to decide on their model. The main options are shown in the image below.
It is better to choose swimming trunks according to your body type. There are only five main types, which are determined by common characteristics. These are a circle (apple), a triangle (pear), an hourglass, an inverted triangle and a rectangle (banana).
To determine your body type, you need to take 3 measurements: chest circumference, waist circumference and hip circumference.
For a Circle figure, the waist circumference is almost equal to the hip circumference. In this case, the chest and hips may not be large, but there is excess weight and a protruding belly. Legs are usually thin. With such a figure, it is advisable to avoid swimming trunks with large patterns and give preference to solid-color models or models with vertical stripes.
The Triangle figure type is characterized by a difference between hip circumference and chest circumference of more than 10%. The shoulders and waist are narrow. For this type of figure, it is recommended to choose swimming trunks that are as laconic as possible, seamless and without unnecessary decoration, as well as slimming models. As an option, dark-colored shorts are suitable to visually reduce your hips.
With an Hourglass body type, the hip circumference is approximately equal to the chest circumference (the difference is no more than 10%), and the waist circumference is less than the hip circumference by more than 25%. The width of the shoulders visually matches the width of the hips. Thongs, thongs, slips or hipsters are great for this body type. But you shouldn’t choose shorts, they will look too simple.
In the Inverted Triangle figure, the shoulders visually look wider than the hips, and the waist circumference is almost equal to the circumference of the hips. With this type of figure, it is better to choose models with decorative elements: ties, frills, prints. A model with a high waistline will add extra volume to the hips, which will look quite impressive.
For the Rectangle body type, the hip circumference is approximately equal to the chest circumference with a difference of no more than 10%, and the waist circumference is slightly less than the hip circumference (no more than 25%). This type of figure is suitable for models with a high waist, as well as with decorative elements on the hips to make them visually wider.
To create the swimsuit bottom pattern, I will use store-bought panties in my size. This is exactly the model of swimming trunks I want to get.
Of course, from the point of view of the cutter, making a pattern based on the finished product is mega unprofessional. But this method is very simple in terms of execution and effective in the final result, since there is no need to build a basic pattern and model it:
1. First, let’s take 4 measurements: - barrel height (Wb) - measured along the side seam of the panties
- top girth (OpV) - measured along the upper edge of the panties
- bottom girth (OpN) - measured along the bottom edge from the barrel
- saddle height (S) - measured in the center of the panties from the top edge of the front to the top edge of the back.
You take your own measurements to get your individual swimsuit size. For example, I got: - barrel height (Wb) - 4 cm; — top girth (OpV) – 85 cm. — bottom girth (OpN) – 88 cm; — saddle height (Hs) – 43 cm.
2. On paper, draw a right angle with the vertex at point A.
3. From t. A to the left we put aside a value equal to the Height of the saddle (Vs), multiplied by the vertical elasticity coefficient and set t. B. With my measurements it turns out 43 x 0.93 = 40 cm.
4. We divide the segment AB in half and call the resulting so-called letter K.
5. From points A and B we set aside the height of the barrel according to the measurements (mine is 4 cm). We call the resulting points C and D.
6. From points C, K, D and B we draw auxiliary vertical lines.
7. From t. A and B down the vertical lines we set aside a value equal to 1/4 of the measurement of the Top Girth (OpV), multiplied by the horizontal elasticity coefficient and set t. E and F. For me this value is 85 / 4 x 0.93 = 19.75 cm.
8. From t. E up, set aside 1.5 cm and put t. E1.
9. From point F we put 1.5 cm down and put point F1.
10. From point C and D down the vertical lines we set aside a value equal to 1/4 of the measurement of the Bottom Girth (Bottom Girth), multiplied by the horizontal elasticity coefficient and set points L and M. For me this value is 88 / 4 x 0.93 = 20.5 cm.
11. From point L up, set aside 1.5 cm and place point L 1.
12. From point M we put 1.5 cm down and put point M1.
13. From point K downwards we put aside 1/2 of the bottom line of the gusset of the panties. The gusset is an internal pocket that performs a hygienic function and I believe that swimming trunks should have it, just like panties. I get 5.5 / 2 = 2.75 cm. We call the resulting point K1.
14. From point K to the right, set aside the height of the gusset and set point K2. In my example - 8.5 cm.
15. From t. K2 downwards we put aside 1/2 of the top line of the gusset and place t. K3. My distance from K2 to K3 is 7.5 / 2 = 3.75 cm.
14. From points A and B, set aside 0.5 cm to the left and place points A1 and B1.
15. We connect t. A1, E1, L1, K3, K1, M1, F1, B1 and get a pattern for half the front, gusset and back of the trunks. To get beautiful leg cuts, you can outline the contours of the finished panties.
16. The only thing I want to change in the resulting pattern is to lower the bottom line of the gusset on the back of the swimming trunks by 1 cm. In general, the standard width of the gusset is 5 cm and may vary slightly, depending on the model of swimming trunks, and its height is calculated according to formula and is equal to 1/10 of the hip circumference. For example, with my hip measurement of 94 cm, the gusset height will be 94 /10 = 9.4 cm.
We received the swimming trunks pattern ready-made. When cutting fabric for sewing, you will need to add seam allowances, and to calculate the number of loops and rows in knitting, on the contrary, shift the contours downward by the width of the binding.
For example, I will knit swimming trunks using this pattern. The width of the binding will be approximately 0.5 cm. Based on this, I draw new contour lines without affecting the central fold line and side cuts.
Now the contours of the pattern can be transferred to tracing paper. In knitting, the same pattern will be used to cut out the fabric lining. Just don’t rush to cut out the finished pattern yet. It may have to be adjusted directly while knitting.
That's all I have for today. Next time I will knit a swimsuit on molded foam cups using the patterns I built today.
Sizes of sports suits and training clothes
When choosing the size of a sports suit or clothes for the gym, we start primarily from the measurements of the athlete’s OG and Height, and not from age, since at the same age children can have very different builds. Our costumes are based on the measurements of a child’s conventionally typical figure.
To choose a comfortable sports suit, measure the chest girth and height of the child. Now, using the Suit Sizes table, you can determine which size your child’s measurements are closest to.
Size chart for sports suits:
| Height | OG | FROM | ABOUT | Size |
| 116-122 | 56-60 | 50-52 | 61-63 | 28-30 |
| 128-134 | 64-68 | 54-57 | 66-70 | 32-34 |
| 140-146 | 72-76 | 59-61 | 74-78 | 36-38 |
| 152-158 | 80-84 | 62-64 | 82-86 | 40-42 |
Our suits are made from soft but slightly stretchy footer material. To accommodate your child's growth, you can choose one size larger when ordering a suit for your athlete.
Size chart for training clothes:
| Height | OG | FROM | ABOUT | Size |
| 104-110 | 52 | 48 | 59 | 26 |
| 110-116 | 56 | 51 | 62 | 28 |
| 122-128 | 60 | 54 | 66 | 30 |
| 128-134 | 64 | 57 | 70 | 32 |
| 134-140 | 68 | 60 | 74 | 34 |
| 140-146 | 72 | 63 | 78 | 36 |
| 146-152 | 76 | 66 | 82 | 38 |
All the fabrics from which our sportswear for the gym is made contain lycra, thanks to which the products stretch well, so when choosing a size there is no point in taking such clothes with a large margin.
If you have any questions, contact us by phone, or write to wa/viber at the number or send by mail [email protected] the article, color and size of the product you are interested in and our manager will definitely contact you!