Home → Patterns → Taking measurements correctly is the main and first step to perfect patterns
It is impossible to take all your measurements correctly! This is my firm belief. But often we have no chance to entrust this to others, because neither a neighbor, nor a husband, nor a girlfriend will do it correctly.
Even cutters in the atelier do not like to work according to the measurements taken by a colleague.
Why do you need your own pattern?
Correctly taken measurements are important to us not in themselves, but as a mathematical “given” for a reference individual pattern.
When the popular Burda magazine appeared in our country, many became hooked on these patterns. But, it must be said that things sewn using them look “clumsy”, and the styles are monotonous.
Each pattern has to be adapted to suit you not only according to individual sizes, but also to remove something from the style and add something, taking into account the characteristics of your figure or fabric.
And, most importantly, in advance how it will fit .
It is clear that the light did not fall like a wedge on Burda! But with all the delights of magazine patterns, you need a standard of your own personal base pattern , the fit of which will be impeccable.
Using your pattern, you can always compare the magazine one even before transferring it to paper.
You will soon see that it is much easier to become a little more skilled in modeling and make any patterns yourself on your own individual basis.
And in magazines and the Internet you can only look at styles and interesting cut details. Gradually, a valuable collection of what you love will accumulate around your foundation.
Using one single pattern you can sew your entire basic wardrobe!
You can see the features of my pattern making system separately HERE.
In the meantime, I’ll introduce you to a very convenient format for creating and storing patterns. I get asked about this very often.
Preparing for measurements
Materials and tools
- Pen or pencil.
- Paper.
- Tape measure.
- Lace.
- Large mirror.
modernhomepulse.com
Prepare before you start. Put on a bra. It should be without foam inserts, while supporting the breasts well. On top, wear tight-fitting but not tight clothing. You should feel comfortable and free.
What is convenient for drawing patterns and how to store them correctly
Among the benefits of creating your own pattern, I consider decluttering the stock of patterns, which are often removed just in case.
You will have your own standard, which is not difficult to rebuild (will take 10-15 minutes) if your dimensions change. Or make corrections if an inaccuracy is discovered during operation (there is no limit to perfection!).
That's all for today... If you liked the beginning and you are with me (trust me), start preparing to build the pattern.
Stock up:
- A4 paper
- tracing paper or wide (30-40 cm) unwaxed baking paper
- pencils
- ruler, rectangle
- pattern
Details about the tools can be found in the article Tools for patterns and cutting
Let this be a stepping stone for some of you in the tailoring business. Sewing is perhaps the best of handicrafts.
Purchase the course “Creating patterns for the whole family and all sizes, including 60+”.
- Related Posts
- Top 5 stationery products we use for cutting and sewing!
- We sew bed linen!
- Stitch seam
- How to watch video courses in good quality without downloading them to your computer and without taking up space on it...
- Transforming your office wardrobe into a holiday outfit
- How to determine the quality of fabric when purchasing
Discussion: 17 comments
- Tatiana:
March 26, 2021 at 5:08 pmThank you very much, everything is clear, good luck!
- Tamara:
September 25, 2021 at 08:23 pm
I would like to express my deep THANKS to Irina for her courses on knitwear!!!!!!. Now I am not afraid to sew T-shirts or trim any neckline on a knitwear product. I know that everything will work out. Good luck to you and your channel!
- Catherine:
January 19, 2021 at 10:35 pm
Thanks a lot. Everything is accessible, understandable, and easy. I sew only for the family, but often some questions arise, either with the cut or with the processing technology. I found a “life preserver” for myself in your videos. You are simply smart and talented!
- Irina Voroshilova:
June 5, 2021 at 12:37 pm
Natalia, of course, the rug is needed specifically for knives.
- Natalia:
June 5, 2021 at 10:04 am
Irina, thank you, everything is very clear, cool and beautiful, I want to create! Just a question: if you buy a rug, then of course it’s not relevant without knives?
- Tatiana:
February 24, 2021 at 09:31 pm
Thanks for the wonderful sewing tips! Good luck!
- Galina:
February 23, 2021 at 09:35 pm
Irina, good afternoon!
As always, interesting, relevant and informative. I'm looking forward to the next materials.
I use ready-made patterns and the results are not always successful. Subsequent adjustments take a lot of time, but how useful it is to check the selected ready-made pattern before cutting or, by analogy, build your own, individual one!
- Lyudmia:
February 2, 2021 at 07:07
I’m studying with Irina on the Apprentice course. Previously, for me, patterns and cutting fabric were something terrible and then all the adjustments to the figure, I bought a lot of books on sewing, from different authors, but it’s all wrong. And now I build with pleasure and sew knitwear without fear. Irina and Anfisa are simply smart, and the courses couldn’t be better. I’m not afraid to recommend to others!!!!!
- Natalia:
February 1, 2021 at 03:42
Thank you very much, Irina, for taking the time and sharing your knowledge and skills with us. You explain it very clearly and easily.
- Valentina:
January 28, 2021 at 11:27 pm
I'm starting to learn and sew and all the advice from this site is very valuable to me. Thank you, Irina!
- Irina Voroshilova:
January 28, 2021 at 6:21 pm
Galina, there’s actually nothing wrong with this. You can even take the typical back width for your size. For an adult, its variation is not that big, 19-21 cm, if you take half the width for the pattern drawing, just like the actual shoulder width is 13.5-14 cm. So this should not cause any special fears. Not higher mathematics and not milligrams from the pharmacist. Be bolder - experience will only come to those who take risks and do it. And the risk... funny... is it really a risk?!))
- Galina:
January 28, 2021 at 6:11 pm
Irina, thank you very much, indeed, even the fear of incorrectly determining the width of the back itself was scary, and drawing up the pattern was always postponed...
- Irina Voroshilova:
January 28, 2021 at 04:54 pm
Crimplen was sewn on ordinary machines. With knitwear, not everything is smooth if you don’t know the subtleties.
- Marina:
January 28, 2021 at 4:45 pm
Thank you very much, Irina. I use the materials on your site for the benefit of the whole family. I find a lot of new things for myself, because in the days of my youth in the 60-70s, knitwear was rarely sewn, in particular, I had to deal with crimplene and tricotine, which is not relevant now. I sewed products from these fabrics without the necessary equipment and consumables and knowledge of processing technology, everything is intuitive. Somehow they survived. Now I’m trying to acquire modern knowledge and skills
- Tatiana:
January 27, 2021 at 11:22 pm
Thank you very much, everything is just great!
- Catherine:
January 20, 2021 at 04:01 pm
Irina, thank you for the excellent information on the initial preparation for cutting. We look forward to continuing.
- Olga:
January 3, 2021 at 08:08
Irina, Thank you for such an informative video with a clear presentation of the material. Very professional. Looking forward to the continuation...
How to take measurements for a dress?
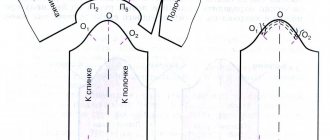
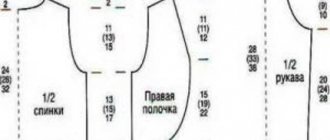
On a piece of paper, write down in a column the designations of all the parameters listed below. Leave enough space for notes.
Ask your assistant to measure the volumes in the places indicated in the picture and write down his readings in your column. When you finish measuring, you can double-check to be sure.
Ask a Question
Let's start with the chest:
Og – chest circumference. We encircle the chest with a centimeter: from the back along the edge of the shoulder blades, in other words, along the line of the bra fasteners; in front - along the protruding points of the chest.
Osh – neck circumference. We measure the base of the neck. We grab it with a centimeter: from the back at the level of the seventh vertebra, from the front above the jugular fossa.
From – waist circumference. Measured at the level of the elastic band.
About – hip circumference. We grasp the thigh with a centimeter at the level of the protruding points of the buttocks.
Dpt - the length of the front (front) to the waist. Measure the distance from the waist line to the base of the neck.
Vg - chest height. We measure the distance from the base of the neck to the middle of the chest.
Ds - length of the back to the waist line. Find out the distance from the base of the neck to the waist line.
Shs - back width. We measure the distance from one armpit to the other.
DP - shoulder length. We measure from the base of the neck to the junction of the shoulder and arm.
Or - arm circumference. We place a centimeter at armpit level around the arm and measure its circumference.
Dr - sleeve length. We measure the distance from the shoulder to the expected edge of the sleeve.
Determining clothing size by hip circumference
To determine the exact size of clothing, it is necessary to correctly measure the horizontal girth of the desired part of the body. Results may be rounded according to typical clothing characteristics. It is not recommended to rely on labels, even if the item fits well.
Determining clothing size by hip circumference
When rounding parameters down, you need to remember that the finished garment will fit tightly to the silhouette. If the values have been rounded up, then the item will “sit” loosely. The sizes of men's and women's clothing (according to hip volume) are indicated in the table.
Women's sizes
According to anthropometric standards, the female figure is divided into several types. Their dimensional characteristics vary.
Main features:
- hip circumference (half circumference is not taken into account);
- chest girth (third option, Og3);
- height.
Female figures are divided into several complete groups. They can be determined by simple mathematical operations: it is necessary to subtract the values of Og3 from the OB indicators.
Body types
The following standards were adopted in the CIS:
- First group. The difference between hip volume and chest volume is 1-2 cm.
- Second group. The difference between hip volume and chest volume is 5-6 cm.
- The third group, the difference between the volume of the hips and the volume of the chest is 9-10 cm.
- Fourth group. The difference between hip volume and chest volume is 13-14 cm.
- Fifth group. The difference between hip volume and chest volume is 18 cm.
Sixth group (zero completeness). The difference between hip volume and chest volume is 2 cm.
Table of sizes of women's skirts, trousers, shorts according to hip volume (other indicators are also indicated):
| Sizes in CIS countries | Int (international format) | Hip volume | Waist | Bust volume |
| 70 | 5XL | 141-144 cm | 137-140 cm | 140-143 cm |
| 68 | 5XL | 137-140 cm | 131-134 cm | 136-139 cm |
| 66 | 5XL | 134-136 cm | 127-130 cm | 132-135 cm |
| 64 | 4XL | 131-134 cm | 124-126 cm | 128-131 cm |
| 62 | 4XL | 128-131 cm | 118-121 cm | 124-127 cm |
| 60 | 4XL | 125-128 cm | 112-115 cm | 120-123 cm |
| 58 | XXXL | 122-125 cm | 108-111cm | 116-119 cm |
| 56 | XXL | 119-122 cm | 104-107 cm | 112-115 cm |
| 54 | XXL | 116-119 cm | 100-103 cm | 108-111 cm |
| 52 | XL | 113-116 cm | 94-97 cm | 103-107 cm |
| 50 | L | 110-113 cm | 92-94 cm | 99-102 cm |
| 48 | L | 107-110 cm | 90-93 cm | 95-98 cm |
| 46 | M | 104-107 cm | 84-87 cm | 91-94 cm |
| 44 | M | 101-104 cm | 80-83 cm | 87-90 cm |
| 42 | S | 98-101 cm | 64-67 cm | 83-86 cm |
| 40 | XS | 95-98 cm | 60-63 cm | 79-82 cm |
| 38 | XXS | 92-95 cm | 56-59 cm | 75-78 cm |
The measurements of the waist, hips and chest may vary depending on the individual characteristics of the female figure.
Men's sizes
Male figures are also classified according to the type of fullness.
To determine it, you need to subtract the waist measurements from the chest volume values:
- First group. The difference between chest and waist volume is 21-22 cm.
- Second group. The difference between chest and waist volume is 15-16 cm.
- Third group. The difference between chest and waist volume is 9-10 cm.
- Fourth group. The difference between chest and waist volume is 3-4 cm.
- Fifth group. The difference between bust and waist volume is 1-2 cm.
Groups are arranged in descending order. Negative values are achieved due to the characteristic excess of OT to Og3 indicators.
Dimensions for men's shorts and trousers:
| Size (standard designation) | Hip volume | Waist |
| 68 | 134-137 cm | 122-125 cm |
| 66 | 131-134 cm | 119-122 cm |
| 64 | 128-131 cm | 116-119 cm |
| 62 | 125-128 cm | 113-116 cm |
| 60 | 122-125 cm | 110-113 cm |
| 58 | 118-122 cm | 107-110 cm |
| 56 | 115-118 cm | 104-107 cm |
| 54 | 112-115 cm | 101-104 cm |
| 52 | 109-112 cm | 108-101 cm |
| 50 | 106-109 cm | 105-108 cm |
| 48 | 103-106 cm | 102-105 cm |
| 46 | 100-103 cm | 99-102 cm |
| 44 | 97-100 cm | 96-99 cm |
It should be remembered that the main indicator when choosing shirts, sweaters and shirts is chest girth.
Children's sizes
When choosing children's clothing, it is necessary to take into account the height and weight of the child. Newborns usually buy things 1-2 sizes larger.
Dimensional characteristics:
| Child's age | Weight | Height | Hip volume | Waist | Bust volume | Size |
| 12 years | 34-37 kg | 150-153 cm | 80-81 cm | 80-81 cm | 80-81 cm | 38 |
| 11 years | 32-35 kg | 144-147 cm | 74-79 cm | 74-79 cm | 74-79 cm | 36 |
| 10 years | 30-33 kg | 140-142 cm | 70-74 cm | 70-74 cm | 70-74 cm | 34 |
| 9 years | 28-31 kg | 132-135 cm | 68-73 cm | 68-73 cm | 68-73 cm | 32 |
| 8 years | 26-29 kg | 126-129 cm | 65-69 cm | 65-69 cm | 65-69 cm | 32 |
| 7 years | 24-27 kg | 120-123 cm | 62-65 cm | 62-65 cm | 62-65 cm | 30 |
| 6 years | 22-25 kg | 114-118 cm | 56-60 cm | 56-60 cm | 56-60 cm | 30 |
| 5 years | 20-23 kg | 110-112 cm | 54-58 cm | 54-58 cm | 54-58 cm | 28 |
| 4 years | 17-19 kg | 107-110 cm | 52-55 cm | 52-55 cm | 52-55 cm | 28 |
| 3 years | 15-17 kg | 105-108 cm | 50-53 cm | 50-53 cm | 50-53 cm | 26 |
| 2 years | 13-15 kg | 97-100 cm | 49-51 cm | 49-51 cm | 49-51 cm | 26 |
| 1 year 6 months | 10-12 kg | 85-89 cm | 46-48 cm | 46-48 cm | 46-48 cm | 24 |
| 1 year | 8-10 kg | 79-83 cm | 43-45 cm | 43-45 cm | 43-45 cm | 24 |
| 6-9 months | 6-8 kg | 72-75 cm | 40-42 cm | 40-42 cm | 40-42 cm | 22 |
| 3-6 months | 5-7 kg | 69-71 cm | 38-40 cm | 38-40 cm | 38-40 cm | 22 |
| 90 days | 4.5-6 kg | 62-65 cm | 36-39 cm | 36-39 cm | 36-39 cm | 20 |
| 60 days | 4-5 kg | 53-56 cm | 35-37 cm | 35-37 cm | 35-37 cm | 18 |
| 30 days | 3.5-4.5 kg | 50-53 cm | 33-35 cm | 33-35 cm | 33-35 cm | 18 |
When choosing children's clothing, you need to pay special attention to the quality of the material. Synthetic fabric may cause an allergic reaction.
Basic rules to follow when measuring your hips
You can measure your hip volume as accurately as possible if you take the correct position. Measurements may turn out to be “floating” if you use a measuring tape with incorrect divisions in the process.
Experts also recommend paying attention to the time of day. It is preferable to take measurements in the morning or afternoon. At sunset, natural light will be dim; measurements are usually not taken in the evening. To consider all the features of the figure, it is necessary to place several additional lighting sources in the room.
For these purposes, lamps that emit soft light are used. They are installed at a short distance from the mirror. Experts recommend removing clothes and preparing the necessary measuring equipment before trying on.
So that clothes don't get in the way
Measuring the volume of the hips, waist or other parts of the body must be done correctly. Experts recommend removing all clothing before trying on. If you wrap tailor's tape around fabric (trousers, skirts, tunics), the readings may be distorted.
There is no need to take off your underwear. Women can remain in a thin slip, provided that the fitting takes place in an atelier or other public places. Shirts are usually made of chiffon, crepe de Chine or silk. In this case, it is necessary to subtract 1-2 cm from the obtained indicators.
Measurements are taken wearing only underwear and always standing
Especially for such cases, you can purchase a slimming shirt. Such combinations are made of thin, elastic material. The shirt fits tightly to the body and usually has chiffon or lace inserts in the hip area.
During fitting, a man can remain in thin underwear. Trousers, long johns, shorts and other clothing must be removed. Particularly shy men can wear thin gaiters or tights. In this case, you need to subtract 1-1.5 cm from the obtained values.
Use a mirror
To assess the strengths of a figure and identify possible shortcomings, measurement of hip volume in men and women is carried out in front of a mirror. It is advisable that the object in which people see their reflection be placed in a living space. In fitting rooms, studios, and shopping centers, mirrors are usually installed that visually make you look slimmer.
You need to take measurements in front of a mirror
You need to take measurements in front of a mirror to get the most accurate result. If the tape wrapped around the hips gets twisted, the readings may increase by several centimeters.
Standing in front of the mirror, first of all you need to determine the maximum high point. This is quite easy to do. To be sure, you need to measure several times. This will allow you to get accurate indicators. Also, the final result depends on the position of the body.