In every woman's wardrobe, the belt plays an important role. With the help of a properly selected belt, you can hide figure flaws and highlight its advantages, refresh a gloomy dress and add zest to your everyday look. With the development of many types of needlework, a wonderful opportunity has arisen to choose, model and create a belt with your own hands. This self-made accessory will highlight your individual and creative features. Making a belt for yourself has its undeniable advantages: you don’t need to go shopping to find a suitable belt; you know exactly what suits you and do the work, taking into account your personal nuances and preferences; a handmade product? It costs an order of magnitude cheaper than a ready-made purchased product.
In this article we will look at options for creating special belts with which you can turn absolutely ordinary and boring things into a formal outfit.
Types of fabric belts
Today you can choose a girdle element for all occasions. They are divided into several types, differing in the methods of fastening.
- Belts with a mechanism for fastening: with Velcro, with buttons, with buttons, with rings, with yarn, with hooks.
Men's tuxedo belt
- Back-up belts: one-piece ties and those that are stitched to the main part of the element.
- Mixed belts. A type of element in which there is a tie on one side of the accessory and a small ring for fastening on the other.
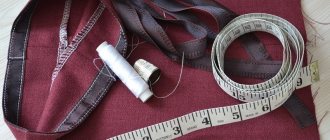
Sewing tools
Important! In the case when it is necessary to sew a belt for clothes that is tied at the back, it should be taken into account that much more material will be needed.
How to create a beautiful belt for a wedding dress
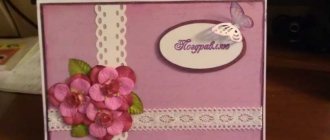
Today I will show you the process of creating a wedding accessory for the bride - a belt on a dress, which can become a bright accent in the bride’s image.
For me it came out like this:
We will need:
- a small piece of lace with embroidered flowers;
- a piece of soft mesh;
— one sew-on rhinestone (about 13 mm);
- white, ivory and pale pink beads (diameter 3-8 mm);
- gimp;
— ivory “rice” beads;
— the cabin is white (it shimmers very beautifully for me);
- a piece of felt 10 x 30 cm;
— grosgrain, satin, silk ribbon for the belt;
- thread, needle.
I cut out elements from lace, and from embroidered large flowers I will form a large flower. If your lace is different, then you can use the principle of forming the elements of the belt. I also embroidered another wedding belt using this principle simply on the mesh.
From felt we cut out two rounded rectangles 5 x 21 cm. We put one aside, we will use it to cover the wrong side of the belt at the end of the work.
Find the middle (center) of the rectangle.
Draw a petal 4.5 cm high and about 5 cm wide.
We cut out 6 petals from a soft mesh and put a fold in the center of each petal.
And we form the central flower of the belt: we pin and sew petals from the mesh.
We pin and sew lace petals onto the mesh petals (larger flowers cut out of lace). We pin the remaining lace onto the felt to create texture.
We cut out leaves from lace, I got 4 of them. on each side, your number may be different, the whole point is to cover the felt with leaves on both sides of the central flower.
We lay out the leaves, forming a pattern, and sew them on.
Sew 6 smaller petals into the middle of the central flower. The base for the belt is ready, let's start embroidering.
I start with the center round piece. We cut out circles from felt with a diameter of 30, 20, 15 mm.
We sew them on top of each other. This pyramid will need to be sewn onto a small piece of felt about 6x6 cm (then we will trim off the excess).
We sew a rhinestone into the center (I have the color graphite).
We cut the gimp into pieces of 7.5-8 mm. Around the central rhinestone we sew 10 beads, diameter 5 mm.
We sew a thread between the beads.
I take a piece of lace without embroidery, reminiscent of an uneven mesh. The felt rectangle will need to be rounded. It’s convenient for me to do this in stages.
And we sew it on, randomly placing folds, cutting the felt under the mesh in a semicircle, as a result, the diameter of the central embroidered element will be 4 cm.
Then I added more mesh, I wanted it to be visible under the beads. We sew on a beige bead with a diameter of 8 mm, the felt was cut out in droplets just for convenience, you can immediately cut out a round shape.
Symmetrically with respect to this bead we sew on 4 pink beads (diameter 3 mm) and one piece of rice.
We repeat again.
We fill the remaining space with chopping (I collected 4 beads), forming a volume.
This is what you should get:
The central rhinestone seemed very dark to me and I covered (sewed) it with mesh. The middle of the flower is ready.
Now we embroider the flower petals with chopping and try them on with the embroidered middle so that I can see in which areas I need to do the embroidery.
I take small lace elements (I sewed them on as the top layer of petals), I need 2 of them.
We sew a 5 mm bead and 6 grains of rice into the center.
We sew a gimmick between the rice grains (pieces of about 10 mm).
We randomly sew a piece of mesh underneath.
Add 4 pink beads (3 mm) to the mesh.
We embroider the flower petals with chopping.
We make two such elements.
Add three beads to each leaf. It all depends on your taste and desire, I wanted the texture of the lace to be visible, so I didn’t sew it up completely.
We try on and sew on the embroidered elements.
I had these small flowers on the lace; all further steps can be done simply on the mesh without embroidery.
We sew on the beads, there is a gimmick around them, and we fix it.
We sew grains of rice around each bead, forming a flower.
Between the grains we sew 3 cutting beads.
All elements of the belt are ready, we will assemble it.
We sew the embroidered elements onto the ribbon, and on the wrong side we sew a second rectangle of felt with a hidden seam, covering the wrong side.
The belt is ready! Using the same principle, you can make a decoration for a wedding hairstyle. 
Thank you for your attention!
General recommendations
Before you start making, you need to decide on your preferences. Decide in advance on the shape, texture, clasp and color of the accessory. Also, before going to a specialized store, you should adhere to some recommendations, namely:
- Decide for what purpose the element is needed. For a casual look, evening or business suit;
- Such an accessory must necessarily match the chosen suit, or be a universal one that can match even the most unexpected outfit;
- Select how to use the element. As a decorative item or to express the shape of a bow.
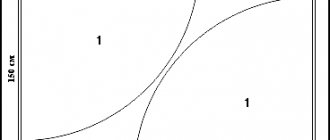
Obi belt pattern
Necessary materials
To make a fabric belt with your own hands, you need to prepare the materials that will be needed for sewing, namely:
- Yarn. This item does not have to be purchased in stores; it can be removed from an old belt and used in a new product;
- Fabric (satin, leather, leatherette, material for stockings);
- Lining;
- Threads in the color of the belt;
- Sewing machine;
- Tape measure;
- French pins;
- Scissors:
- Large standard pin.
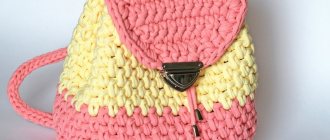
Belt bag
We sew a fabric belt for an evening dress with our own hands
I now have a simple belt in my wardrobe, but I also want to choose a worthy accessory for an evening dress. This is also easy to do, although it will require a little more time and patience. Today, wide belts with clasps, such as in the photo, are in fashion. It is its creation that we will do.
To sew such a belt, measure your waist circumference. Since it will be on the fastener, you need to add 4 cm to this measurement for it, as well as 2 cm for the seams. Such a belt will fit snugly and securely on your figure. In order for a wardrobe item to keep its shape, it will need to be reinforced with non-woven fabric, which may result in shrinkage of 1-2 cm, which must be added to the final length of the product. Thus, with a waist size of 60 cm, you will need 68 cm of fabric in length. It is best to choose a width of 5-6 cm. Large ones can cause discomfort when worn.
The stages of creating a belt are as follows:
- Cut out a strip of the required length and width. How to determine the length is now clear; the width is determined in the same way as for a simple belt;
- Bend the belt in half and draw a midline with chalk or soap;
- Now we sew the corsage ribbon from the inside out as follows. The length of the tape is equal to the length of the belt minus 2 cm, which we took for the seams, the width is 2 cm less than the width of the belt. Those. If the finished belt width is 5 cm, the width of the grosgrain ribbon should be three. Using a sewing machine, sew the tape from the inside to one part of the belt, retreating 1 cm from each edge;
- We fold the belt in half with the wrong side out and sew it on three sides, just like in a regular belt;
- We turn the belt right side out and carefully sew the edge that remains unsewn;
- Now all that remains is to sew on buttons, hooks or decorative fasteners - you can choose any option. The belt is ready.
The finished product can be decorated with beads, rhinestones, fabric flowers, appliqués, and embroidered with beads and bugles. There are countless decor options and each will add beauty and sophistication to the accessory.
How to take measurements and calculate the length and width of a belt
Before you start work, you need to take measurements. Since without them you may end up with a belt that is not the right size. To avoid this, you just need to follow a few steps, namely:
- Take an old belt that you would like to change.
- Place it on a flat surface, it can be a table, stool or floor.
- Measure the length using a tape measure or measuring tape and remember the result, which will be used to make a new sash.
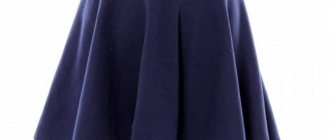
Sash for a child (girl)
How to sew a fabric belt with your own hands
Many people are interested in how to sew a belt for a dress made of fabric. To do everything efficiently and reliably, you should follow the step-by-step instructions:
- Cut a couple of strips of fabric, and one strip of interfacing, about 2 centimeters in size or larger;
- Connect all the strips with pins and sew them together, removing the pins in the process;
- Next, you should trim the remaining fabric using scissors, turn the product inside out and insert a pin into the fabric, pulling it through the end of the belt and grouping the material into small folds;
- After this, you need to complete the seam with a straight stitch, turn it inside out and iron it with an iron;
- Next you need to hide one end inside the sash and finish it with a regular straight stack;
- The final step is to pull the completed end of the belt through the yarn and stitch it to the base of the piece so that the buckle is tightly secured in the ring of material.
A satin belt for a woman is very easy to sew
How to sew a wide belt from fabric with corset hooks
Step-by-step instructions for sewing a wide fabric belt:
- Cut a strip of material twice the width of the desired result.
- Prepare two cut strips of dublerin and iron them with a high temperature iron on all sides, keeping the distance between the strips of dublerin approximately one millimeter.
- The seams need to be ironed. If the fabric cannot be ironed, it should be fixed with adhesive tape.
- Prepare corset hooks by cutting off the required length and width, and secure with a web, turning them inside out a couple of times. Such actions are performed with the right side of the corset hooks. The left side must be cut off, folded in half and the cuts ironed.
- Using adhesive tape, you should strengthen the hooks inside the belt and similarly connect all open sides, as well as stitch along all sides of the product.
Leatherette for the encircling element
How to sew a sash belt with your own hands
The technology for making a “sash” type corsage is as follows:
- It is necessary to cut three parts of the element: middle, wide and two parts of the ties. To avoid uneven ties, the easiest way is to cut with a knife on the carpet for carving, and also use a metal ruler.
Leatherette sash
- Select threads by color. Then sew the ties to the middle part of the belt using a zigzag stitch. This stitch is common to almost all household sewing machines. In the case when she is unable to take a leather product or skips stitches, you can stitch it yourself.
- Sew along the perimeter of the belt using bartacks. This action is necessary so that it cannot stretch during wear. It also looks quite attractive, and absolutely every sewing machine can handle this type of work.
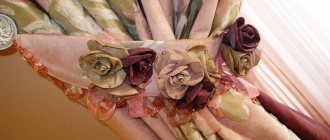
Delicate satin
Delicate and romantic, bright and catchy, satin belts will harmoniously complement your mood and decorate a celebration or holiday. Even a strict and discreet sheath dress with the help of such an accessory will take on a completely different look, turning into an elegant evening outfit.
Recently, it has become fashionable to decorate even wedding dresses with satin belts. On the innocent white material of the bride's dress, such an accessory will look especially impressive and solemn.
A satin belt decorated with rhinestones, beads or a bow will look chic on a wedding dress.
To sew such an item yourself, you first need to decide what item of clothing it will be used with and what events you plan to attend in it. To create such an accessory you will need a small piece of satin, sewing tools and a positive creative attitude.
- First you need to measure your waist and estimate the width of the future belt.
- Multiply the resulting dimensions by 2.
- Cut a strip from the fabric equal to the parameters that we found out in step 2, plus 1 cm.
- Step back 0.5 cm from the edges of the strip and draw lines.
- Sew along this line, leaving part of one side intact.
- Turn the product inside out through this hole and sew it up.
- Iron.
Related article: DIY paper Christmas toys
When the belt is ready, you can experiment with the option of tying it. There are 3 main ways:
- French bow (the ends of the belt are tied by folding them in half);
- butterfly;
- single-loop.
If the fabric is not long enough
There are cases when, when purchasing material for a belt, they mistakenly take the wrong size and it turns out to be insufficient for production. For example, there is a piece of fabric measuring 60 centimeters, and the belt needs to be cut out to be 75 centimeters or more long. In this case, it is necessary to sew ribbons of suitable size to the extreme points of the belt, thus adding the missing length of the material. You can tie ribbons into bows or knots to make the belt look more elegant. You can also use ribbons of contrasting colors, in this case a visible effect is created that the waist appears narrower and the figure acquires a slender outline.
Using a drawstring when there is not enough fabric
How to strengthen a stitched waistband
Many people notice that when worn for a long time, the belt wrinkles and stretches, thereby acquiring a not very attractive appearance. To avoid this, you can make internal reinforcement using an edge gasket or non-woven fabric. The width of the gasket or seal must be the same as the width of the finished product.
Important! The edges of the edge gasket are treated with a special substance that secures the cuts and it is because of this that they should not be trimmed so as not to spoil the material.
Strengthening the element
Thus, it was discussed what an obi belt is, the pattern and sewing of this product. Sewing a wide belt for a dress with your own hands, like any other, using almost any technology will not be difficult, and every household sewing machine can handle this. Once made, the belt will accentuate the figure and decorate any skirt, dress or business-style suit.
Knot Belt
Weaving objects from knots is called macrame. This is the oldest type of needlework, which appeared literally with the first knot tied. Initially, this technique was used for domestic needs, for weaving fishing nets and lids for baskets. Gradually, this craft began to develop into art, and today needlewomen can create many amazing things from macrame, such as hanging flowerpots, curtains, tablecloths, napkins, clothing items, decorative elements and much more.
In our article we will look at creating a belt for clothes from macrame. Materials for weaving can be any thread of any thickness, silk, cotton, linen, wool, etc. You can also use cords, both thread and leather.
To learn how to weave macrame, you need to have such qualities as accuracy and perseverance, since the work is quite painstaking and will require a little patience from you.
The master class presented below will demonstrate a variant of weaving a light belt for beginners, the creation of which does not require any special experience or skills.
First you need to decide what clothes, in what colors and on what occasions you will wear this homemade accessory and choose threads for weaving.
In addition to threads, you will need the following tools:
- sewing pins;
- scissors;
- a pad on which you will attach the pins (if the thread is too thick, you will need plywood).
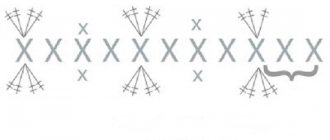
When weaving this belt, you will need only two types of knots - flat and rep. The product itself consists of diamonds, the weaving of which requires 6 threads. First you need to secure the threads with pins stuck into the pad, as shown in photo 1:
Related article: Crochet daisy: diagram and description for beginners with photos
Work should begin with the third thread from the left; it will serve as the basis for the rep knot (photo 2). Weave this thread with diagonal knots of three right threads (photo 3, 4).
Then, as a basis, you need to take the thread with the knot of the first rep knot on the left. On it, weave 2 of the same rep knots from right to left with the two remaining threads (photo 5, 6).
Next we weave the bead as shown in photo 9.
Now we close the diamond as follows: direct the main threads to the center of the diamond at a right angle and make two rep knots on each thread (photo 10).
The first knots are woven with the same threads that tied the outer rep knots. The second ones are obtained by crossing the threads (photo 11, 12).
Now you can create a diamond. You can go to the product itself.
Attach 12 threads with pins so that 40 cm of length remains unused.
The first diamond is woven in the center on 6 threads.
Using the remaining threads on the sides, weave 2 more rhombuses close to the central one.
The fourth diamond is woven according to the principle of the first.
Having received a beautiful rhombus made up of 4 small ones, step back 15 cm, secure the threads with pins and weave the next figure like the first.
Once you've created 4 large diamonds, start brushing on each side. The warp will be 10 threads in the middle, the working threads will be the 2 outer ones.
Make knots at the ends of the threads, trim off the excess and wear with pleasure!