Video, Processing pockets, Recommendations, Sewing techniques
An idea that combines the functions of a pocket and a belt loop
Hello, friends! Today we’ll look at the cutting and processing of a lined patch pocket, which combines the functions of a pocket and a belt loop.
Important! For your comfort, the publication is made in two formats: text and video, which discusses in detail the construction of the pattern and sewing a pocket with a lining. I recommend studying both versions, which complement each other.
Many years ago, in a sewing magazine, I came across an interesting idea that combined functionality, convenience and decorativeness in one unit.
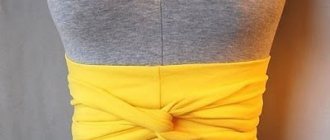
The knot was an unusual patch pocket for coats and jackets: 2 in 1. Pocket with a belt loop function.
Agree, the idea is wonderful.
I remember, I noted it and decided to repeat it sometime. I returned last spring when I was sewing a demi-season coat.
The coat has a straight silhouette, a stand-up collar, and the model is laconic, without unnecessary details or stitching. I wanted to decorate the model in a suitable way.
Selecting a pocket type
The choice of a pocket that combines the function of a belt loop is not accidental.
When a model is without frills, any details immediately attract the eye. Therefore, I did not consider stitched belt loops.
Carrying the belt in your hands or hiding it in your pocket is also not the best option.
Those who have been in similar situations will understand me: when it gets warmer or you need to give your clothes a relaxed shape by removing the belt, but there is nowhere to put it away, you have to hide it in a bag or pocket, or hold it in your hands. Not very comfortable.
The patch pocket that will be discussed successfully solves such problems, because one part combines two functions.
Sewing and connecting the pocket to the product is not difficult. The main thing is to carry out the necessary preparation and careful cutting.
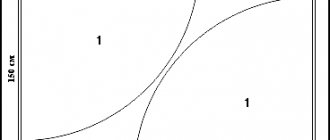
The pocket pattern can be made based on a standard patch pocket.
When creating it, remember to match the dimensions of the pocket construction with the size and height of your figure.
This means that the more corpulent (larger) the volume of the figure is, the larger values from the average should be selected and vice versa.
The location of the pocket is also determined by the model and clarified on the figure during fitting.
Note:
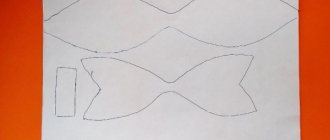
I recommend drawing out a pocket pattern and making a paper template based on it. When trying on, pin to the product. On the figure, finally determine the location, size and shape of the pocket, marking it with chalk or stitches along the contour. Based on it, build the finished pattern and other details necessary for processing, for example, a lining piece.
Patch pocket - basic concepts
The pocket can be of various configurations: in the form of a circle, square, with pointed tips. It is better to take the top facing for processing as a whole piece. The following types of elements are used:
- without lining;
- with a one-piece lining;
- lined with additional fabric;
- with an inclined entrance, the upper edge of which is made with a narrow hem.
Knitted pocket
Knitted items and details will never go out of fashion; they always serve as an original and stylish addition to the image. You can use them to decorate bags or dresses. Let's consider several variations. Before starting work, you need to carefully consider the place for our patch pocket. At the selected location, pick up the loops (their number depends on the desired width of the part) and transfer them to the knitting needle.
Choose the pattern you like and knit it according to the pattern, but do not forget to leave two loops at each end; knit them strictly in garter stitch. When the desired size is reached, purl 2 stitches, then 5 rows in stockinette stitch and cast off. The first knitted pocket is ready.
How to sew a patch pocket smoothly
Each master with experience acquires his own secrets of sewing on overlays. Let's look at the basic recommendations that will help make your work more accurate.
From the inside
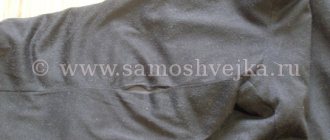
Before sewing the element, it is worth ironing the hem allowances along the entry line. In the rounded areas, notches are made using scissors. To make the corner oblique, it, together with the ironed seam allowances, is folded in and fixed with an iron. The entry line is ironed twice: starting 1 cm inside the part, and then the line marked with chalk. You can simply back up the edge, turn the fabric over, stitch along the side, and trim off the excess fabric on the side. That's it, the internal work is completed and the part is ready for grinding.
To get the perfect edge, cardboard stencils are used when cutting out. With their help, you can delicately tuck the side. The workpiece is inserted under the upper cut and, tucking in the seam allowances, is ironed.
For a square frame, first fold the allowance diagonally in the corner area.
When choosing a one-piece facing for work, the piece of fabric is folded in half with the right side inward. Next, a stitch is laid, making an indentation of 1 cm from the edge. In this case, it is necessary to provide a notch in the seam measuring 3 cm. To achieve the correct shape, the allowances are cut off: for a rectangle diagonally, and for a circle, notches are made using scissors. Next, the element is turned onto the face and ironed. If a lining is used, then the parts are folded right sides together, stitched along the top edge, also leaving a recess of several centimeters. In this case, the allowances are ironed towards the lining. By bending the lining and the edge of the part along the fold line, stitch the side parts and the bottom edge.
An open gap after connecting the lining and the pocket on the coat can simply be sewn up by hand or with a finishing stitch.
Outside
The patch pocket is placed on the cut in the designated place on the front side of the cut along the visible marks. To prevent it from moving during the sewing process, it can be basted or secured with pins. In this case, the pins should be perpendicular to the pocket. This will protect the element from unwanted shifts. The product is connected to the hem of the bottom of the pocket, making sure that no threads are visible from the face. The pocket is attached with one or two lines. The second line should cover the open parts of the hem.
Over time or with intense wear, the corner parts wear out and become unsightly. To strengthen them, additional decorative stitching is required, at the end of which small triangles are placed. A tight zigzag bartack at the end of the main stitch is also suitable.
Uncover
The pocket in question is lined and sewn to the product with a stitch to the edge. When a product contains “sporty notes”, such processing looks good.
Thanks to the facing lining, the pocket holds its shape and the seam allowances are hidden inside. Neat and high quality.
If machine stitching is not suitable for the model, you can sew the processed workpiece with blind stitches.
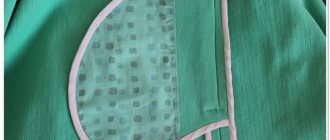
After specifying the shape of the template on the figure, proceed to cutting on the fabric. Pin the finished pattern, mark allowances along the sections of the part 0.7-1.0 cm and cut along the contour.
Cut the lining fabric piece to the size of the top or 0.2 cm less to create a piping inside the pocket.
If the top fabric is loose, not very dense, and does not hold its shape well, it must first be backed up with a spacer.
Additional materials for you:
Reverse patch pocket
Patch pocket with wide facing. MK
How to sew a jacket from jacket material with fur
Features of sewing patch pockets on different fabrics
There are many types of sewing parts. They depend on the product model, material and selected processing method. For example, the denser the material used, the more regulations there are for it.
Items for outerwear and suits require the use of cushioning and lining materials. In products made of light textures, such as robes, dresses, children's clothes, lining is not used. Particular attention should be paid to elements cut along an oblique thread. The facing from the inside must be duplicated with an adhesive film. In other options, it is enough to process the facing with a hem seam with a cut pre-processed on an overlocker.
The patch pocket is used for different types of products. Knowing the basic nuances, it is easy to cut and process even for a novice seamstress. We hope that the recommendations offered will help in your work.
How to tie silicone shoelaces? Different ways
How to protect shoes from salt porridge and reagents?
Summarize:
We looked at the cutting, processing and connection with the product of an unusual patch pocket for coats and jackets: 2 in 1.
Thanks to its design, the pocket additionally serves as a belt loop, being an interesting decorative element.
Cutting and sewing will require some sewing skills, but using what you've learned, sewing a pocket is fairly easy.
The coat withstood the season perfectly. My only criticism is about the belt.
The fabric is quite dense and fleecy, the belt turned out to be somewhat more massive than I imagined. I'm thinking of replacing it with an alternative option. Perhaps a leather belt or something similar.
An idea that combines the functions of a pocket and belt loops is worthy of attention and implementation in various sewing projects. I recommend.
By the way, the clasp on my coat also turned out to be unusual. There is one interesting find associated with it, which I liked and still makes me happy.
Great for beginners due to ease of use. Experienced, will add options to the known methods.
***
Have questions? Impression? Share in the comments to the article or by mail.
With wishes of good luck, Elena Krasovskaya!
Product with valve
A pocket with a flap can be decorated in two ways. The flap can be knitted as a continuation of the pocket, or maybe separately. The main condition is that the width of the planned valve must necessarily be equal to the width of our pocket. If you decide to sew it, then you need to do it to the top edge. You can also attach the valve directly to the binding itself. Make a valve, leave the loops of the last row open, then knit 2 loops together. Knit the front to the pocket, and close the loops for the patch pocket with the flap in the purl, and in the front, instead of the usual ones, knit the loops of pre-knitted burlap and the flap.
Don't forget that variety is not only in the new design, but also in color. Be sure to show your imagination and experiment with shades, because they can serve as a great accent to your completed look.
Hemming a knitted T-shirt
First, fold the bottom of the T-shirt as shown in the photo and press the hem.
Since this seam is made on T-shirts using a cover stitch machine, which not everyone has, we will secure this hem using a regular straight-stitch machine. The stitching should be done on the wrong side of the T-shirt. Now you need to iron the hem using a steam iron and the T-shirt is ready.
Video showing how a household flat-stitch machine works, used specifically for sewing knitted fabrics.
Trimming strip for neckline and armhole
Prepare an edging strip of elastic fabric. As I already said, we will need it for edging the armhole and neck of the T-shirt. Calculate its length and width yourself, depending on your taste and the size of the dress or T-shirt.
See how a regular sewing machine and an overlocker sew knitted fabrics.
Second way
Cast on two fewer stitches than you need for your pocket and purl 1 row. Now you need to add 1 loop on both sides. Do this three times. When you knit the required height for the strap, close two loops on both sides and knit 3 cm with an elastic band. Close the loops and turn the resulting edge on the sides and bottom edge, fasten it to the wrong side of the part.
Select the desired location on your garment and stitch the pocket to the base.
Little secret! To make our pocket perfect, lift the warp loops onto a knitting needle with working yarn and sew them to the pocket loops, carefully removing the basting.
Pocket connection principle:
- start knitting the pocket with auxiliary yarn (knit 2-4 rows like this); when you finish your pocket, you can unravel the auxiliary yarn and close the open loops using a seam. Visually determine the location for the pocket and sew it with stitches, strictly following the contour;
- when your pockets are ready, make a beautiful (or patterned) binding, sew it with a zipper and attach the already decorated pocket to the clothes;
- Finish your pocket with an elastic band; this simple trick will prevent your pockets from bulging out.
Related article: White knitted sweater with buttons for women with photos and videos
Processing side and shoulder seams
Before sewing a T-shirt, you need to sew the shoulder seams, and before that, connect both parts of the T-shirt together with pins or basting.
All operations, except for sewing on the pocket and hemming the bottom of the T-shirt, will be performed on a four-thread knitted overlocker. If you don't have an overlocker, you can use the overlock stitch of a regular sewing machine. But the quality of your work will noticeably decrease.