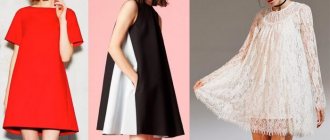
Cap sleeves are one of the most spectacular ways to decorate dresses, sundresses and blouses, both for girls and older ladies. They are characterized by the fact that they cover the top of the shoulders, but do not reach the level of the armpit. They can be narrow and fluffy, single-layered or multi-layered, made from airy chiffon and from dense fabric that holds its shape well. The wing is built based on the basic sleeve pattern that we have already created earlier. The cap sleeve, the pattern of which will be created in today's lesson, can be modernized by making it voluminous or flowing, thereby forming completely different silhouettes!
We make changes to the basis:
Back
- Lower the back neckline. From the end of the shoulder we draw a straight line, slightly raising it from the shoulder. What length of the wing you want, measure it by hand.
- We lower the armhole by 5 - 10 cm, draw a wing in an arc.
- Draw a cutting line for the top from the skirt.
Shelf
- We move the chest dart on the shelf from the shoulder to the middle.
- We lower the neck of the shelf: along the shoulder by the same amount as along the back, mine is 5 cm; in the middle is slightly higher than the dart, mine is 3 cm. We decorate the neckline with a smooth line.
- The length of the shoulder and wing are the same as on the back. Lower the armhole the same way as on the back. The wing is arched.
- Along the side cut, lower the cutting line of the top from the skirt by the same amount as on the back. Smoothly raise the line towards the center. I have 3 cm below the dart.
Skirt
- Lower the skirt to the desired length
- We expand the bottom by 7 - 15 cm.
- At the top of the skirt and along the waistline, measure the width of the dart and transfer it to the side seam. It’s okay if you can’t remove the entire width of the dart, the main thing is that the side line is beautiful and as similar as possible to the front and back.
It is better to cut the skirt “on the bias”.
I cut out the front skirt with a fold; folded back skirt; folded back top; top front 2 details.
This is interesting: Pattern Wrap dress for women
Fashionable lanterns 2021
All types of lanterns are at the peak of fashion: lush and not so, of any length, with any style of dress.
Long
Lanterns 7/8 long, up to the wrist and even lower, can be seen not only on dresses for the autumn-winter season, but also on summer models, as well as evening dresses. This applies to the designs of gigot, Juliet sleeve, bishop, corrugated . Women with imperfectly shaped hands should take a closer look at them.
Elbow and 3/4
Medium length sleeves include puffs, gigots and pagodas . They emphasize the grace of the hand and forearm.
Short
Short styles are pagoda, tulip, bouffant, with drapery. Look good with high-waisted women's dresses. An excellent option for summer dresses and children's models. Not suitable for women with full shoulders.
Sewing
I overlock the shoulder, wing and side sections on the front and back with a narrow stitch using an overlocker.
I sew the shoulder seam.
I finish the neckline with bias tape.
I’m inserting a video that explains in detail how to process it with bias tape. Rewind to 1:50.
I fold the wing sections and hem them to the side seam.
I smooth out the cuts beyond the shoulder seam and hem the seam allowances.
I sew the center front and pull it down to 6 cm. 6 cm because 3 cm above the dart, 3 cm below it was laid during modeling.
I fix the assembly and overlock the cuts with an overlocker.
I sew the skirt to the front and back, and overcast it. On the back top you need to stitch the darts, if you haven’t already.
I join the side seams and overcast them.
The wing section is folded up to the side seam; side tops are overlocked separately; The skirt sections are overlocked together.
Back.
I overlock the bottom of the skirt with an overlocker, turn it under and hem it.
The dress is ready.
Good luck.
Selecting fabric and preparing for work
The wing sleeve can be sewn from any fabric. It is better for beginning craftsmen to choose cotton or other dense fabric that does not create unnecessary folds when sewing and will not fray on the threads.
Cotton
If you need to create a free type of flowing folds of the wings, you should take tulle with soft stretch, chiffon, organza and other material. To make an elongated vest or long clothes, you need to take faux or natural leather with corduroy and suede. Thick remnants of fabric will protrude the sleeves and give them the shape of real wings.
Knitwear
To work, you need to take a one-piece fabric with a pattern, thread and angle for sewing, pencil, paper, compass and scissors. Prepare accessories for decoration. Also, if necessary, take a photograph of the sample whose silhouette the artist is going to make.
Note! To prepare the fabric for sewing, you need to cut and finish the edges by basting or removing threads by fire. This way, you can achieve the most accurate wing effect and professional work.
Single layer cap sleeve
Next, we will analyze the entire modeling process step by step:
- we outline the pre-constructed main sleeve pattern;
- draw a middle line;
- along it we lay a segment equal to the length of the sleeve;
- if the part is above the elbow, draw a horizontal line; if below, draw a curve parallel to the edge of the base sleeve;
- cut out the workpiece;
- we draw several segments along it from the bottom to the edge at an equal distance from each other (look carefully at the second drawing in the photo!);
- We make cuts along the drawn vertical lines, not reaching the top by 5 mm;
- we spread each sleeve cut to the same distance (by 3-6 cm, depending on the desired volume);
- We trace the outline of the pattern and apply seam allowances, as shown in the second drawing.
The sleeve pattern is ready!
This is interesting: Dress pattern with frills (size 86-134)
Sewing instructions
To make wings on a dress, sundress, blouse or T-shirt, following the trend of the fifteenth century, transform the image and make it more feminine, you must first decide on the size and type of models. You also need to think about how they will be sewn and decorated. Choose a suitable fabric. The most interesting models are long models that serve as a continuation of the dress and reach the very end.
Note! Before cutting out the parts, you need to fold the fabric in half and mark the finished paper pattern. If seam allowances have not been taken into account, you must add one or one and a half centimeters to the bottom hem at this stage. Then cut out several blanks with a fold and sew the parts.
Sewing the product
To sew parts, you need to process the outer rounded edges using an overlocker or a fine zigzag sewing machine. Iron the purl seam allowance. Lay a narrow, dense line along the zigzag fold along the front side. Carefully trim the seam allowance from the inside out close to the line. Iron the seam allowances. Pin the sections to the straps and mark their ends on the sleeves. Baste the strap ends and cut off the allowances between the marked parts, leaving up to 5 millimeters. Overcast the seam allowances, sew the protruding sections using a tight zigzag and once again place the sleeves on the straps and stitch to the edge.
Finished products can be decorated. An interesting decoration option at the moment is decorating with beads, sequins, sparkles and lace. The last idea will be interestingly and beautifully implemented on multi-layered sleeves or on a turtleneck, emphasized by wings.
Finished model
In general, creating wing sleeves is not difficult, you just need to choose the right fabric, prepare for work, create the correct pattern and follow the instructions provided for sewing the product.
You may be interested in sewing an invisible hidden zipper into skirts
Cap sleeve dresses
And we will show you step by step how to sew it. Model 109 (, ) from Burda magazine 09/2013. Sizes 34, 36, 38, 40, 42, 44 Length from waist 72 cm.
You will need
Dress A
Silk velvet (with a pattern repeat height of 63 cm) 140 cm wide: Sizes 34−40 - 3 repeat heights (1.89 m) Sizes 42, 44 - 4 repeat heights (2.52 m) Sewing threads.
Dress B
Patterned crepe-satin 135 cm wide: Sizes 34 - 38 - 1.75 m Sizes 40 - 44 - 1.80 m Plain chiffon 150 cm wide: Sizes 34 - 38 - 1.75 m, Sizes 40 - 44 - 1.80 m.
Recommended fabrics: dress fabrics, for dress B - transparent fabrics, for the bottom layer - opaque fabrics.
Uncover
Please note that on the layout plans, the direction arrow of the grain thread on the paper pattern pieces is parallel to the edge (fold) of the fabric. Dress A Made of silk velvet: 1 front with a fold 1 piece 2 back with a fold 1 piece 6 sleeves 2 pieces Dress B Made of crepe-satin/chiffon: 1 front with a fold - 1 piece for each fabric 2 back with a fold - 1 piece for each fabric 6 sleeves - 2 parts for each fabric. Allowances: Around the details of the paper pattern, mark on the fabric using a ruler and tailor's chalk allowances for the hem of the bottom of the dress - 4 cm, along the sections of the armholes and sleeves - 1 cm, for the remaining seams and along the cuts - 1.5 cm. Cut out the details along these lines . Seam lines and markings: Contours of pattern pieces and markings (seam and bottom lines), except for the direction arrow of the grain thread, on the outer halves of the skirt panels - the halves of the pattern pieces, indicated on the layout plan with solid lines - transfer to the wrong side of the cut pieces - for dress B only on crepe-satin parts - using a gear wheel and burda copy paper.
Sewing
When basting and stitching, fold the cut parts with the right side inward. Backtack at the beginning and end of each seam. DRESS A ■ Darts. Fold the back along the middle line of each dart with the right side facing inward, and pin together the dart lines. Sew the dart by stitching from the middle of the dart to the tops of the dart. Do not tack at the tops of the darts, but tie the stitch threads tightly. Cut the tuck depth at waist level (Fig. 1) and iron it to the mid-back line.
■ Side seams. Before placing it on the back, right side to right side, pin off the side cuts. Stitch, starting the lines exactly at the marked armhole lines. Press seam allowances and overcast. Turn the dress right side out. ■ Sew in sleeves. Pin each sleeve along the sections of the back armhole from the top (control measure 2) to the side seam, aligning the transverse marks 7. Sew in the sleeve (Fig. 2).
Turn the dress inside out. Then pin the sleeve along the sections of the front armhole from the side seam to the top section (transverse marks 3 and 8). Sew in the sleeve (Fig. 3).
■ Sew in the other sleeve in the same way. Overcast each seam allowance together from cross mark 7 to cross mark 8. Press the seam allowance onto the sleeve. Overcast the allowance on the other section of the sleeve from control mark 7 to control mark 8. Turn the allowances inside out and iron. From mark 7 to mark 8, stitch the edge of the sleeve at a distance of 5 mm (Fig. 4).
■ Top seams of sleeves, shoulder seams and neckline. Before placing on the back face to face, fold the top sections of each sleeve. Pin off the shoulder sections from the cross mark and the upper sections of the sleeve, while unscrewing the allowance along the outer cut of the sleeve again. Stitch (Fig. 5).
Press the seam allowances, press the neck allowances inside out. Overcast the neck and shoulder seam allowances to the sleeve seams. Sew the allowances along the neckline by hand (Fig. 6).
Turn the allowance along the outer cut of each sleeve inside out again. Turn the outer edge of the sleeve inside out and pin it to the sleeve seam allowances from the top seam of the sleeve to the 7/8 cross mark, sew by hand (Fig. 7).
■Hem hem. Overcast the hem allowance at the bottom, iron it inside out and sew on by hand with loose stitches.
Dress B
■ Process crepe-satin and chiffon as one layer: place the chiffon parts on the corresponding parts of crepe-satin, wrong side to right side, sweep the cuts along the contours.
On the back, also place running stitches at the dart lines (from the crepe-satin side). Sew the dress in the same way as dress A. Photo: burdastyle.
Sleeve flounce wing
This sleeve will be sewn into the armhole of a dress or blouse. The step-by-step process is described below:
- take the finished pattern of the shelf and back of the product;
- determine the length of the sleeve along the bottom seam and along the shoulder line;
- measure the length of the shelf and back opening;
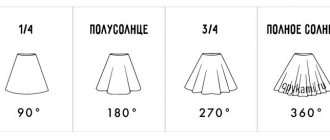
- draw a semicircle, the radius of which is equal to the sum of the length of the shelf and back, divided by 6.28;
- Based on the measurement obtained, we construct the line of the shoulder and the bottom seam of the sleeve;
- draw the outer contour of the sleeve in a smooth arc;
- We cut out two sleeve blanks with a fold (don’t forget to add 1.5 cm seam allowances).
Now we have finished the wing sleeve! The pattern is ready!
Review
Here is this blouse from all sides.
Ribbons are tied at the back. A good addition, in my opinion.
Frankly speaking, this is not really my option. First I decided to try making a sample. Therefore, some of the seams are not processed, do not be surprised. The gathering at the neck is generally less than half.
But, in general, the experience is positive; it can be made from some soft summer fabric.
How to sew and sew on a cap sleeve
Before cutting out the parts, you should fold the selected fabric in half in the direction of the grain thread and place the finished paper pattern on it. If you did not take into account the allowances on the pattern, be sure to add 1-1.5 cm to the hem at this stage! Next, we cut out two blanks with a fold and proceed directly to sewing:
- we process external rounded cuts using an overlocker or a sewing machine with a fine zigzag;
- iron the seam allowance on the wrong side;
- we lay a narrow, dense stitch along the fold in a zigzag pattern (along the front side);
- on the wrong side, carefully trim the allowance as close to the stitching as possible;
- iron the allowances along the straight cuts of the sleeves inside out;
- pin the ironed sections of the sleeves to the straps;
- mark the ends of the straps on the sleeves;
- cut off the allowances between the marks, leaving up to 5 mm, and overcast them;
- sew the protruding sections with a tight zigzag;
- Once again we place the sleeves on the straps and stitch them to the edge.
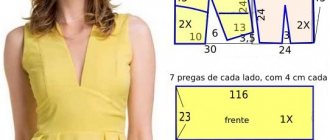
Master classSummer dress with frill/flounce and wings on the shoulders
Today I want to show you how to sew a summer dress with a frill/ruffle and wings on the shoulders. I sewed it for my youngest daughter. Dress made of satin (100% cotton), I won this fabric at the Fox Fabric Studio store.
No special pattern is needed. I transferred the pattern for the front and back from the top of the T-shirt, they are almost the same, only the neck is different - at the front it is 3 cm lower.
We adjust the back a little. We divide it into 2 identical parts, cutting it in half. Then add 2 cm each (for the fastener), as shown in the photo below.
For a dress for an approximate height of 104-110 cm, I got this pattern.
We transfer it to the fabric.
Sew at the shoulders where marked with a dotted line and iron the seams.
We sew another such piece for the lining.
Place the pieces on top of each other with the right sides facing in and sew where indicated by the dotted lines.
Slightly cut the edges on the rounded parts.
Turn it right side out and iron it.
For wing-shaped sleeves, cut 2 pieces 35x8 cm.
We sew them together from the wrong side, where it is marked with a dotted line.
Turn it right side out and iron it.
At the bottom we assemble using a needle and thread.
We sew a second such sleeve and sew it to the shoulders in the armholes, bending the edges of the armholes inward (this process is shown in more detail in the video above and on my YouTube channel).
The upper part of the dress is ready.
I also created the pattern for the lower part of the dress using a T-shirt (do not forget to add 1 cm to the seams on each side). From the armhole down to the hem the width increases. The hem width and length of the dress are at your discretion.
We increase the width of the pattern by 5-7 cm.
For a height of 104-110 cm I got this pattern. We cut out 2 identical parts from the fabric.
Fold the edge of the armhole 2 times and stitch. We repeat this on all the details.
We place both parts of the skirt for the future dress on top of each other with the right sides facing inward and sew along the sides where marked with dotted lines.
Now we connect the top and bottom parts of the dress.
First we sew the front part of the dress from the wrong side.
Then we also sew the back parts together. The dress is almost ready.
All that remains is to sew the flounce to the hem of the dress. For it, we cut a strip of fabric 15x160 cm, bend it in half and sew the smaller sides together.
We bend the lower part of the flounce 2 times to the wrong side and sew the hem. On the upper part of the shuttlecock, we assemble it using a needle and thread or on a sewing machine using a shirring foot.
From the wrong side we sew the flounce to the bottom of the dress.
We fasten the clasp. I sewed on a button.
I got this summer dress with a flounce and cap sleeves.
And this is how it looks on my youngest daughter.
For my eldest daughter, I sewed a dress with a flounce and cutouts on the shoulders (see the master class at the link). For both dresses I needed 1.5 m of fabric with a width of 160 cm.
For these dresses, I sewed elastic bands for Solokh’s hair (master class at the link).
Other master classes on sewing dresses: - Dress with a double frill and a difference in length - Dress with a frill using a sweatshirt pattern - Sundress dress with a frill/ruffle at the bottom - Sundress dress with a flounce (3 patterns) - A-line dress with long sleeves - Sundress with straps - Knitted dress for kindergarten - Princess Sofia dress - Dress with ruffles - Denim sundress with Peppa Pig - Solokha headband - Sweatshirt with a voluminous collar
Airy wings with gradient
Another type of “wings” is a smooth gradient of chiffon fabric of different shades. We will describe the creation process below step by step:
- we cut out four layers of the sleeve, starting from the widest (lowest) level;
- We cut out each upper level 2.5 cm shorter than the lower one;
- we process the outer edges of the wings with bias tape (this will add fluffiness to the sleeves);
- using a glue gun (without glue!) we singe the sections of the sleeve;
- fold the sleeve lengthwise with the face inward, pin and sew the seams;
- iron the allowances;
- insert the finished chiffon sleeve into the open armhole and sew to the edge.