The trench coat is stylish and at the same time very versatile and practical item in the wardrobe. The main distinguishing characteristics of this raincoat are the large turn-down double-breasted collar, shoulder straps, cuffs and belt. Also, this coat features two rows of buttons on both fronts.
To sew a trench coat, as a rule, hard waterproof fabrics are used: cotton twill, gabardine and other fabrics with special impregnation.
Made in classic colors (black, white, all shades of beige), the trench coat will look stylish for several seasons, allowing you to create many completely different looks - from elegant to sporty.
In this master class we will sew a trench coat using pattern 113 from Burda 9/2010.
Find your perfect trench coat: 20 trench coat patterns
Preparing to sew a raincoat
First of all, you should choose the fabric that you will use to sew a stylish product. Give preference to dense, wrinkle-resistant material that will reliably protect against the vagaries of nature. If you want to sew a raincoat that you can wear until the cold weather, choose a fabric with a thin layer of synthetic padding as a base. Leather models look very elegant, characterized by unpretentiousness in tailoring. Whatever material you choose, do not forget about the lining fabric, which will give the item a more aesthetic appearance and hide the internal seams.
Before purchasing material, you should decide on the parameters of the product. If you want to sew a long raincoat, take the fabric “with a reserve”, taking into account that the fabric will rise a little due to the stitching. Also, do not forget about the accessories - buttons, snaps, zippers, which should be matched to the color and style of the future raincoat.
The product can be either monochromatic or combining several different colors. The classic model of a raincoat is fitted, with a double-breasted collar, optionally with a hood, belt and two internal pockets.
This is interesting: Raincoat pattern
How is the pattern made?
A women's raincoat is made according to a pattern, before making which you will need to take your own measurements: shoulder width, chest volume, length of sleeves and the length of the product itself. Then, using the measurements, you should design the following details on paper:
- back – 2 pcs;
- sleeves – 2 pcs;
- front - 2 pcs;
- Collar bead – 2 pcs;
- front pick-up – 2 pcs;
- valves for pockets – 3 pcs.
The number of collar details depends on the chosen cut, and if you choose a style with a hood, then this element is usually missing.
If you have any difficulties making a pattern, there are plenty of professional video tutorials online for beginners, which show you the entire process of sewing a product step by step. A high-quality pattern is the key to a beautiful and perfectly fitting product. It is better to measure the parameters of your figure several times than to receive a product that is too large or, conversely, small.
When the pattern is completely ready, you can start sewing the raincoat, having prepared the following tools in advance: tailor's scissors, threads to match the fabric, needles, pencil or chalk for marking.
Fabric selection
To sew a raincoat, of course, you need water-repellent material. According to its characteristics, this fabric can be classified as a technical material, but it can also be purchased in a regular store. The level of moisture protection is often indicated on the label.
If there is an inscription “dry10”, it means that the material holds 10,000 mm/cm² per day. You can also find “breathable” water-repellent fabrics on the counters. Such a raincoat will not allow the greenhouse effect, so it will be as comfortable as possible at any time of the year.
The presence of the “upward arrow” symbol indicates the breathability of the fabric.
We are talking about everyday clothes, and not about a special suit for multi-day hikes; you can choose a simpler material - calendered nylon or lavsan.
It is easy to create a raincoat using the old method from cotton fabric, soaking it yourself with a water-repellent solution. Another technology, more modern, is sewing a raincoat from thick IKEA bags.
Other similar material is also used as a substitute.
sncmedia.ru
IKEA bags are very durable and waterproof, and can also be sewn. They are ideal for a raincoat due to their characteristics.
popcornnews.ru
What to consider when sewing a raincoat from bags
- Draw pattern lines along the fabric texture (stripes). This technique will make the product less brittle.
- Try to form fragments of the product in such a way that the inside and outside textures match. Sometimes it's hard to tell which side of the bag is which, so pay attention to the texture and color.
- Make sure all seams are on the inside of the jacket.
- Cut out identical pieces by folding the material either in half or just together. This will save a lot of time.
- When ripping bags, use scissors or a utility knife.
Do not cut them into pieces, otherwise the fabric will begin to fray and additional time and money will be required for processing.
Materials and tools
- Several IKEA bags (4-5 pcs).
- Sewing machine.
- Scissors.
- Needles.
Progress
- Print or draw a pattern.
- This pattern is suitable for creating a medium sized women's raincoat.
- Cut out all the pieces.
- Cut out four pieces for the sleeves. Separate the two bags. Do not touch the hem (the part where the handles are inserted). One bag should be enough for two sleeves.
- Divide the other bag without folding. It will be used for two pieces of the back.
- In the next bag you open, do not touch the hem either.
This will save you from having to finish the bottom edge later. If the handles are in the way, carefully tear them out and stitch the torn areas. From the resulting piece, cut out two front pieces. - Cut two pieces for the hood using leftover pieces or a new bag.
- Connect the sleeves.
- Take two sleeve pieces and sew along the longer edge. Repeat this for the other sleeve. When unfolded, there should be two pieces that match Figure A.
- Then sew along the other edge as in picture B.
- Sew the back.
- Connect the two pieces and stitch along the long edge.
- Connect the back to the front parts.
- Sew the shorter vertical edge of the front to the edge of the back, right first. Repeat this step with the other front piece on the left.
- Sew on the sleeves.
- Secure the inverted sleeves with needles on the wrong side of the product, and then stitch. Do not sew the shoulder edges all the way. Later they will be sewn to the hood.
- Form a hood and sew to the base of the product.
- Then use a hem stitch along the edge of the hole.
- Sew the hood to the base.
- Finish all exposed edges of the piece.
- Cut two pieces from the handles of the bag (10 cm each) and sew them into the seams on the sides, thereby forming loops for the belt.
- To make the belt, sew two handles of the bag. Light with fire or stitch the ends so that they do not fray.
- Form two more long strips of handles and sew them along the bottom edge of the raincoat to protect that edge from quickly fraying.
- The raincoat is ready.
02
instructables.com
instructables.com
instructables.com
Repost so you don't lose
fashionelement.ru
Spring always brings joy with rainy days, with pleasant fresh aromas and large puddles that you want to run through. Naturally, you want to run through puddles so that you remain dry, so rubber boots and oilcloth raincoats were invented for such an activity. It is the raincoat that I want to invite you to sew yourself today.
How to sew a poncho yourself from oilcloth
To sew a raincoat you will need: • Beautiful oilcloth, you can choose different colors in sewing stores. • Oilcloth of a different color for the lining. • A shirt that suits you with a hood and a long-sleeved jacket. • Scissors. • Pins. • Sewing machine. • Centimeter. We will not take measurements, because...
We will sew according to the things we wear. We place a long-sleeved jacket on a sheet of oilcloth folded in half and trim the edges in a semicircle. From the semicircular edge to the end of the sleeve there should be ~10 cm on each side.
There should be about 20 cm or more left from the bottom of the jacket to the edge of the oilcloth, depending on how long you want the raincoat to be.
Now we make a hole at the neck of the jacket. We measure the holes for the arms exactly along the sleeve. We apply it to the edge of the oilcloth and in the place where the shoulder is, we begin to cut off a round hole slightly larger than the neck.
We cut the oilcloth from the neck to the bottom on one side.
We make a sleeve from a rectangular piece of oilcloth.
- We sew its inner sides.
- We pin the hole and sleeve together and sew them together.
- In the same way, we sew the upper part of the raincoat from a more elegant oilcloth.
We measure the hood according to the body shirt. From oilcloth we cut out blanks ~15 cm higher than the hood and ~10 cm wider. We sew the two parts together along the back edge. Sew it to the neck of the outer part of the raincoat.
- We also sew a hood for the inside of the raincoat and sew it to the neck.
We insert two parts of the raincoat one into the other. Sew along the bottom edge, the edges of the sleeves and along the edge of the wrap and hood.
- We make a loop in the upper part and sew on a large beautiful button.
- That's all, our raincoat is ready, you can go for a walk in the rain.
www.handmadiya.com
svet_anaAuthor - Galina_O. This is a quote from this post. Unisex Raincoat. Modeling diagrams.
- size 54/56 size 46/48 size 50/52 size 42/44 size 38/40
- Original post and comments on LiveInternet.ru
svet-ana.livejournal.com
When else should you take care of waterproof clothing, if not in the damp spring, flowing into the damp early summer? We suggest sewing a simple raincoat for a child so that your child does not get wet and walks around dressed up. It doesn't take much time or effort on your part, this laminated cotton rain poncho can be made without a pattern!
Source: https://gepur-shop.ru/shit/kak-sshit-nakidku-dozhdevik-s-kapyushonom-svoimi-rukami-vykrojki.html
Step-by-step instructions on how to sew a raincoat quickly and easily
- Transfer the pattern to the fabric, carefully cut out all the parts from the fabric. Be very careful not to miss the slightest dart.
- Sew all the prefabricated parts of the sleeve, front, and back using a sewing machine. Then all seams should be carefully straightened and ironed.
- Make holes for buttons or think about the location of the buttons. If you plan to use a zipper as a closure, skip this step.
- If you are sewing an autumn raincoat with pockets, sew the inner parts to the front of the product.
- Based on the measurements, sew burlap sleeves from the lining fabric and carefully sew them on the wrong side. At this stage, it is worth considering what kind of sleeves you want - classic or with cuffs.
- Connect all the pieces using shoulder and side seams.
- The collar, hood and sleeves should be sewn in last, when the base of the item is completely ready.
- Sew the lining fabric to the main part of the product and connect it to the sleeves.
- If you plan to focus on the waist, sew a belt.
This is the easiest and most affordable way to sew a raincoat with your own hands. There are many other styles - loose, asymmetrical length, short sleeves. If desired, you can further decorate the product with embroidery, ornaments or sequins. A handmade raincoat will not only become comfortable clothing for every day, but will also allow you to show your individuality and refined taste.
Cloak Cloak pattern Outerwear Sewing Needlework Handmade
Related Posts
Basics and tricks for cutting a raincoat with your own hands, patterns
There are no special tricks to sewing a raincoat. The only points worth considering are the processing of the bottom and cuts. The easiest option is to cover all cut lines with bias tape or tape. There are various color options on sale that can be matched to the material or in contrast to it. If you are sewing a raincoat from raincoat fabric, the braid can be cut from the same fabric. If you are processing the front shelves and hood, the fabric or braid needs to be folded in half. You don’t have to process the bottom of the raincoat at all, but simply turn it up a couple of turns and stitch it.
On thick fabrics, there may be a problem with punching through loops, so the best option would be a zipper or sew-on buttons.
For those who do not want to bother with patterns, there is a simple option for sewing a raincoat - using an existing item. In this way you can sew a raincoat-poncho. All you need to do is place the jacket on a piece of fabric, take the necessary measurements and cut holes in the right places. For tourists, you can sew a raincoat for a backpack with your own hands, then all the necessary things will remain dry. Below are options for patterns of raincoats of various models.
Straight cut polyethylene raincoat
Straight cut polyethylene raincoat
Cape-cloak with hood
Cape-cloak with hood
Raincoat-poncho without sewing
Fashionable women's raincoats for spring and autumn
Raincoats almost never go out of style and this season is no exception. The vast majority of fashion houses presented a wide variety of models in their ready-to-wear collections. When studying fashion trends, it is worth immediately noting that a classic raincoat is always relevant.
As for styles and lengths, fashion designers advise paying attention to double-breasted styles of classic cut and loose models; the length can be very different, from short raincoats like a parka jacket to very long maxis. As you can see in the photo, every fashionista can choose a raincoat according to her taste, figure and preferred style.
Lovers of feminine romantic style also have something to choose from. Many collections feature models with a cut-off waist and a wide bottom. Length – up to or just below the knee and maxi. The color of a raincoat in modern fashion is the personal preference of every woman.
You can safely choose fabric in bright colors or printed material in the online store. For classics, it is recommended to give preference to light shades from milky to light beige and coffee. Many fashion designers presented maxi raincoats in dark colors and black.
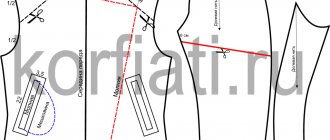
Sewing a raincoat - stages and nuances
The pattern of a medium-length double-breasted raincoat with an English collar and welt pockets with flaps consists of:
- Back – 2 parts;
- Front – 2 parts;
- Sleeves – 2 parts each;
- Collar – 6 parts;
- Front trim – 2 parts;
- Collar trim – 2 parts;
- Flaps for pockets – 2 parts;
- Knee strap – 1 piece.
The photo shows a diagram for constructing a pattern, which can be adjusted according to dimensional data and individual characteristics of the figure. When preparing for work and cutting, you need to take into account that you will also need lining fabric and duplicating material for the front and collar hems. If the main fabric is soft, then you can additionally duplicate the upper part of the sleeve and back.
Stages of work:
- Machine stitch all the prefabricated parts - back, sleeves, collar;
- Sew pocket flaps into the front details;
- Sew burlap pockets from lining fabric;
- Insert burlap through the slit with the wrong side facing out and sew it in from the wrong side of the front;
- Sew, connecting the right sides of the hem to the front parts;
- Connect the shoulder seams, then the side seams;
- Sew in sleeves and collar;
- Sew lining fabric.
Raincoat cut options
Today, raincoats of various colors, textures and models are in fashion. A raincoat, poncho, cape, trench coat, mac are options that can be taken as a basis. Decorate it with some decorative elements and your individual item will be the envy of everyone.
The simplest cut option is a poncho raincoat, which can be cut in two ways.
- A circle of fabric with a diameter equal to the measurement from wrist to wrist across the neck of a child or adult.
- Based on a square in which the side seams are drawn into the sleeves.
The poncho can be fastened with a zipper, buttons, or a belt. Or it can simply be put on over the head. The length may also vary.