All cuts on the wrong side are covered with bias tape.
The design of this pocket in the side seam largely coincides with the pocket in the relief seam with a leaf. The principle is the same, but several techniques are added after stitching the burlap. The difference in technology is explained by the fact that in a coat the inside of the pocket is covered with a lining and does not require super-clean processing of the cuts.
In our case, the pocket is made in the side seams of the dress skirt. For pockets with raised seams, the procedure will be exactly the same.
- One of the burlap pockets, which will be sewn to the back half of the skirt (or to the side if the pocket is in a raised seam), must be cut out from the main fabric or a valance must be sewn on. The burlap will be visible in the finished product. So, we cut out 2 burlaps of a convenient shape for you. The burlap is wider than the pocket entrance by 1.5-2 cm on each side.
- We secure the entrance to the pocket from the inside against stretching with double tape.
- We carefully mark the beginning and end of the pocket - both on the burlap and on the panels of the skirt (or reliefs. In our example, the pocket is intended for a small lady's hand - 12 cm is enough.
- We pin the burlap to the side cuts, aligning the control points for entering the pocket, “face to face.” We stitch from point to point. We iron the seams.
- Now we will do a couple of operations with the front half of the skirt. - cut the burlap allowances exactly to the control point. - stitch along the edge (1-1.5mm) of the burlap along with the side seam allowance - from point to point.
- We fold the panels of the skirt with their right sides facing each other, pin them together, aligning the control points, and wrap the tails (allowances) of the pocket burlap inward so that they do not get caught in the stitching.
- We connect with a machine stitch very carefully “from point to point.”
- Let's straighten the burlap pockets and match them. Irregularities need to be trimmed with scissors. Next, you can join the burlap together with a machine stitch, or you can make the edging with bias tape. Steam after all hand and machine stitches.
- The pocket is ready, but the cuts remain unfinished. We edge them with bias tape. Don't forget to secure the pocket on the front side. The operation is quite labor-intensive, of course. If there is no desire or time, then the edges can be processed with an overlock stitch. Everything will be just as neat and clean on all sides.
Bias binding, cut strictly at an angle of 45 degrees to the weft and warp, should be made yourself from delicate thin fabrics, rather than using a rough store-bought one.
Pocket in the seam Pocket in the seam sewing technology
Pocket in the seam Technology of sewing a pocket in the seam Since many people now order things with a pocket in the seam, we decided to show you a simple method of sewing a pocket in the seam, maybe later we will show you a pocket with edging or other options, for example, how to sew a patch pocket* . Natasha will show the work process, and I will try to comment on it for you so that everything is very clear and understandable to you on how to make a pocket pattern if you want to sew a product with such a pocket.
For a sample, we take a fabric on which the white stripe is our conditional side seam and mark approximately 15 cm on it - this will be the entrance to our pocket.
On the fabric, mark the location of the pocket along the side seam line
To process the entrance to the pocket, it is desirable to have an adhesive material that has practically no stretch, we need to cut a strip of adhesive material a little longer than the entrance to our pocket, the width of the strip is slightly wider than the seam allowance, this is approximately what it should look like
working with adhesive material
Now we need to prepare the pocket burlap ourselves. To do this, we take fabric; if the size of the pocket entrance is 15 cm, for burlap you need to take 18 cm.
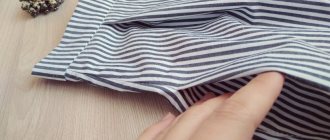
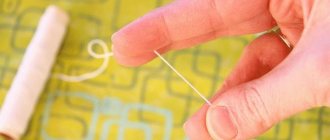
In order to determine the shape of the burlap pattern, apply your hand and trace its free contour as in the photo
creating a burlap pattern for a pocket, taking into account the size of the hand
The shape and size of the burlap is determined by the hand, but if you want to be able to put a phone or tablet in your pocket, then you can cut it out taking into account the size of the phone or tablet. The very principle of constructing a pocket pattern is important.
determine the size of the pocket valance
At the beginning of the whole process, it is necessary to treat the side entrance of the front part of the product into the pocket with adhesive material, the second side is not strengthened, but Natasha, out of habit, cut out two adhesive strips for two pockets, and then we will go to the overlock.
WTO when processing the entrance to the pocket with adhesive material
We process the side seams using an overlocker and the valance.
overlock processing of valance and side cuts
we determine the place for the burlap pocket on the side seams
We attach the valance to the burlap from the back side. Before we start stitching the burlap, we need to process the burlap sections on an overlocker; we process one burlap with a valance, the other without a valance, and we will connect it to our side seam.
attach the valance to the burlap
Don’t forget to thread the overlocker tails, we showed you how to do this, you should already know this.
we tuck the tails into the seam after overlocking
There is a mark on the side seams for entering the pocket; it is advisable to fall into a size between these marks.
the main thing is to get into the markings for the pocket on the side seam
In the photo, the burlap with the front piece is glued with adhesive material**, and along the back there is burlap with a valance so that the burlap is not visible from the back. We stitched the seam and folded back the pocket burlap to make the stitching, but first it was necessary to iron it in order to make the stitching neatly and easily so that the burlap never fell out of the pocket.
ironed and stitched
The stitching width is 1 mm, remember that when stitching we must sew without catching the beginning and end of our burlap, so that later we do not have to rip this seam.
stitching the burlap pocket
After one side of the burlap has been stitched, the second must be laid out on the back so that all the marks for entering the pocket of the front and back pieces match, so that the burlap is sewn at the same level.
checking the side seams to match the entrance to the side pocket
We sew from notch to notch. We make notches and then press the side seam. We connect notch to notch to understand where we should sew the side seam
we work with the side seam
We sew the parts together, but at the same time maintain the same width of the seam allowance so that we do not have oblique waves along the fabric.
We skip the entry point to the pocket and continue sewing the side seam.
sew the side seam
Here is our pocket, bend the stitching along the seam and iron it with a slight roll so that the lining does not come out.
Let's begin ironing the side seam. Notches are visible in the side parts where the entrance to the side pocket in the seam is formed. Iron the entrance to the pocket from the front and back sides.
iron from the front and back sides
After this, we connect the burlap together with pins, do the basics, if suddenly there are any excesses and unevenness, we cut off all the excess
making the basic burlap pocket
When stitching burlap, you need to work carefully so as not to stretch the fabric; the seam allowance for stitching is first larger, and then 1 cm.
working with pocket burlap
After this, we process the entire pocket in a circle using an overlocker, thread in the remaining threads so that the seam does not unravel, and iron our burlap pocket
working with pocket burlap
and the entrance to the pocket is on the front side, you can press it down with a pad in order to iron it well
Pay attention to the entrance to the pocket, what the valance looks like. It remains to make two fastenings on the machine, 1 cm in size
This is what the pocket entrance and fastenings look like
This is what the finished pocket looks like in the seam from the front and back
This is what our finished pocket looks like in the seam. We showed you all the technological operations for making such a pocket, a now fashionable item of clothing.
*How to sew a patch pocket https://www.youtube.com/watch?v=dYDlT0GmX0M&t=96s
** Video about Adhesive materials can be viewed here https://www.youtube.com/watch?v=CJH-cqeFhwI&t=4s
continuation of the topic about Adhesive materials here https://www.youtube.com/watch?v=zEEvhZu5Bck&t=190s
“Hidden” foot for stitching
To sew a hidden zipper, a special foot is used, which allows you to sew it as close to the teeth as possible. It is not always included with the sewing machine, but is sold in specialized stores. It differs from the usual one in the shape of the sole: on the surface of the product there are grooves or grooves for the zipper spiral.
To choose the right presser foot, take with you to the store any one that is suitable for your sewing machine. The paws of different models have design features:
- on the “leg”;
- with removable sole;
- with screw fastening.
They can also be metal or plastic. Metal models will last longer. Plastic is a less durable material. Over time, such a foot is deformed by the needle or the teeth of the machine bar, and its sliding deteriorates. But if the foot is needed for one-time work, then a plastic product will do.
There are two types of claws for hidden zippers - plastic and metal
Processing of fastener in side seam with pocket | SEW MYSELF
Sometimes it becomes necessary to process the fastener in the side seam with a pocket.
And this often causes difficulty even for experienced needlewomen. I think that this master class will help you successfully cope with the task!
We will be making a closure in a regular skirt with pockets built into the side seams.
- First we sew the pocket burlap along the rounded part.
Sew one piece of burlap in a straight line between the pocket entrance slits, connecting the right side of the burlap to the right side of the skirt and aligning the top edge of the pocket and the skirt.
The seam went between the pocket entry marks, thus connecting the pocket lining to the front
skirts. At the very end of the stitch we will make cuts to turn the pocket inside out (inside the skirt).
Carefully turn the pocket inside out and iron it, straightening the edge to the wrong side (inside the pocket).
invitation
The course on sewing a lined skirt without a belt is a small part of the Knitted Boom .
- write a message in the comments or in the pop-up (red) window in the lower right corner of the site,
- In the message, indicate your email, name and payment method convenient for you.
SHARE WITH FRIENDS, SAVE THE ARTICLE ON SOCIAL NETWORKS
Progress
On the wrong side, mark the entrance to the pocket. The width of the rectangle should be 6-10 mm less than the width of the zipper, the length should be 3-4 mm greater than the length of the zipper.
Strengthen the entrance to the pocket from the wrong side with an adhesive pad.
Insert pins in the corners, moving the marking control points to the front side. Draw lines on the front side, attach the zipper to the bottom edge, right side in, as shown in the photo. Baste along the line of the entrance to the pocket, having previously marked the zipper tape (the distance between the stitching lines should be equal to the width of the entrance to the pocket).
Sew together the burlap pocket pieces, folding them right sides together. Iron the seam allowance towards the lining without bending the valance.
Place the top edge of the pocket burlap (valve, wrong side down) over the basted zipper. Stitch exactly along the entry line of the pocket. Secure the beginning and end of the stitch without going beyond the marking corners.
Baste and stitch the leaf to the top edge of the pocket opening, placing it with the fold upward, as shown in the photo. The stitch should go exactly along the line of the entrance to the pocket, and the width from the fold of the leaf to the stitching line exactly corresponds to the width of the entrance to the pocket. Secure the beginning and end of the stitch without going beyond the marking corners.
In-seam pocket: a master class on working on an open version and a zipper. Master class pocket in seam
HomeMiscellaneousMaster class pocket in the seam
The pocket in the side seam is one of the most convenient in terms of cutting and sewing; in the finished product it looks very decent: it does not puff up, does not sag, and is practically invisible.
Recently, such pockets have begun to be used in almost all products: outerwear, skirts, trousers, business clothes, cardigans, tracksuits and much more.
In this article we bring to your attention an analysis of the work on a pocket in the seam; the master class shows work on both an open one and a zippered one.
Open option
This pocket looks perfect in a coat or jacket. Following the step-by-step instructions provided, you should not have any problems sewing it. So let's get started.
First of all, we need to cut out two pieces using a burlap shape.
Choose the shape and depth according to your preferences. On the reverse side of the product you need to make marks where your pocket will be located. Smooth cuts of the future pocket must be processed by first sweeping it with an overlocker.
Having attached our future pocket to the front and back pieces, align all the edges and pin with sewing pins to prevent movement. We attach each pocket detail separately to the front of the product and to the back.
Be sure to pay attention to the fact that we do not complete the stitching by about 1 centimeter.
- Turn the burlap right side out and align the edges and secure with pins.
- We sew our pocket on a machine, stepping back from the edge 1 cm, please note that the stitches should meet the side seam.
In order for our pocket to turn out neat in the end, we need to trim off the excess.
Turn the burlap over to the wrong side, straighten and iron.
We sew our pocket again, as on the front side.
Sewing a pocket with a zipper
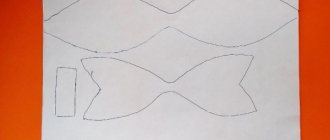
In order to make the pocket in the seam closed, i.e. with a zipper, we need to do the following. Using the pattern, cut out two parts. See diagram below:
- Remember that when making a pocket pattern, you need to make seam allowances of about 1 cm, and for the seam that will be sewn to the main product, the allowance can be increased to 1.5 cm (in the picture it is marked as number 2).
- Before you start working, pay more attention when choosing the zipper itself: it should be in harmony in color with the main product, the teeth should not stand out from the overall picture.
- Finish the seams of the pocket and the product itself that will be sewn together.
- The main parts of the product should also already be stitched; only the place where our pocket will be located remains untouched.
- The zipper should fit clearly under the pocket cutout, then it will be more convenient for you to work.
- We iron all the allowances to make it easier to work in the future.
- To prevent our zipper from moving in one direction or another when sewing, it needs to be basted.
- Please also note that the zipper should be fastened from top to bottom.
- Now let's start sewing on the pocket parts, to do this we put the first part on the zipper as shown in the photo and baste it.
- There is also one constant rule: the convex side of the pocket always overlaps the front of the product.
- We make a line along the edge at the entrance of the pocket.
- Fold the pocket piece over from the wrong side and iron it.
- We sew the second part of the pocket as shown in the photo.
We lay a line along the entrance to the pocket. We format this line as follows.
The entrance to the zippered pocket should be smooth and neat. Having completed all these steps, you need to proceed to the final stage.
Video on the topic of the article
- knittochka.ru
Just recently we had cool, comfortable weather, the apple trees were blooming, and now it’s already +32!!!! So, for that comfortable weather, I had a raincoat sewn for my daughter. The raincoat is almost like that of adults - lined, with reliefs
There are pockets in the side seams. By the way, for beginning seamstresses such pockets are a godsend: they are sewn easily and quickly, and at the same time it is difficult to spoil the fabric, as, for example, when sewing welt pockets. Therefore, below I show the MK pockets in the side seam. Maybe it will be useful to someone.
- After cutting, we place the pocket part on the shelf part “face-to-face” (in the photo I have a plain fabric underneath for visual convenience)
- Sew exactly between the markings for the entrance to the pocket. Making notches We do the same with the BACK piece: put on the second pocket piece and sew along the entry line into the pocket
- Place the BACK piece with a sewn pocket on the SHELF piece with a pocket with right sides facing each other. the pockets are turned away and also lie “face-to-face”
- Sew the side seam BELOW/ABOVE the entrance to the pocket. We begin the stitch at the end point of the beginning of the stitch with which the pocket is sewn (= notch)
- Sew the remaining open side seam of the POCKET (top and bottom). We also start the seam from the notch
- unfold the pocket, lay out the seams, pin, smooth out
- turn it over to the front side and stitch the entrance to the pocket from the side of the shelf
We turn it inside out again, connect the pocket pieces right sides together and sew along the edge. If you are not planning on lining, then the edge of the pocket must be overcast.
straighten the pocket forward and sew the edge of the bottom seam allowance with a short stitch to the side seam allowance so that the pocket does not “run” back. That’s it. Ready. Fast and easy. Truth?))
And now you can put your hands in your pockets, sing songs, dance.....
….and ride on the swing!))))
stranamasterov.ru
Pockets with a leaf are very popular nowadays; if desired, they can be used in any product. A master class on pockets with a leaf will be outlined below, but first we suggest looking at the types of welt pockets and their patterns.
Let's look at the types
Now let's talk about the most popular types of pockets with a leaf:
- welt pocket with set-in ends;
- welt pocket with patch leaf;
- welt pocket with zipper leaflet;
- welt pocket with a leaf in the raised seam. Very often such a pocket is used on products such as coats.
Let's look at the basic rules for sewing these pockets and step-by-step instructions for them.
Set-in technique
This type of pocket with a leaf is considered one of the simplest to make. Also, such pockets can be sewn without lining, which also significantly reduces working time.
This is what our leaf looks like:
This side will be visible in the product. Next we make two pieces of burlap pocket and a dolevik.
- Be sure to pay attention that the length of the lobe should be approximately 4-5 cm longer than the leaflet.
- On the product, using a piece of soap or chalk, we mark the place where our pocket will be located.
We process the entrance to the pocket with a dolevik. Carefully sew and iron the leaf, apply it along the marked lines and stitch it. We place the burlap with the front side on the front side of the product, fasten it with sewing pins so that all the lines are aligned. We sew the burlap and iron it well.
We cut the entrance from the shareholder side, as shown in the photo above. We sew the second piece of burlap. We turn both parts through the slit to the wrong side, straighten and stitch, grabbing the corners of the main fabric. We straighten and iron the finished pocket.
With an overlay leaf
We prepare all the details according to the pattern. Mark the place for the pocket on the product. We process the longitudinal sections of the burlap and the leaf, and mark the stitching lines. We apply the piece of paper to the front side of the product, making sure that all control lines and points are aligned. We bend the allowance on the piece of paper and apply burlap along the lines, attaching it.
We cut the entrance to our pocket from the side of the lobe in such a way that the burlap fabric and leaves are not affected. Having attached the second part of the burlap, we attach it. We also attach all the seams of the burlap and the leaves and iron them well. And finally, straighten and process along the contour of the burlap.
With a zipper
Mark the pocket frames on the product and select the zipper of the required length. We sew strips of lining fabric on the sides of the zipper and insert a slider. We cut out the leaf according to the pattern. We apply the finished piece of paper to the intended frames, align it at all points and attach it. If there is excess fabric, then trim it, sew on a zipper and make a slit in the frame.
We turn the pocket inside out and stitch the seam in the shape of the letter “P”. We put fasteners on the corners.
We cut out the burlap parts, attach them as close as possible to the main seam, align the edges of the burlap and stitch along the contour. Iron and steam the product well. That's it, the pocket is ready.
For clarity, we attach detailed videos.
Video on the topic of the article
I sewed a sports jacket for my son and decided to share my experience. Today on the agenda is processing a pocket in the side seam. You can read more about sewing different pockets HERE
The pockets in the side seam do not sag or bulge. If necessary, you can put a lot of interesting and necessary things in them. Especially for children! I, as I wrote above, made pockets in the side seam on my son’s sports jacket (you can see it HERE). Pockets in the side seams are used when sewing any outerwear. Making such a pocket is much easier than any other.
So let's look:
side seam pocket processing
All photos are clickable. Click on the photo to view it in better quality.
First, we sew the seam itself, in which there will be a pocket. We leave unstitched the area where the pocket will be sewn into the seam.
We cut out the burlap pockets. One is completely made of lining fabric, the second is composite: part of the lining fabric, part of the main fabric (I think this is called embellishment). This is done so that the pocket is not so noticeable. The length of the vertical cut of the burlap is equal to the entrance to the pocket plus 2-3 cm. The depth depends on the size of the palm.
- We sew the parts from the main and lining fabrics of the 2nd burlap together.
- Pin the pocket burlap to the pocket opening.
Sew Do the same with the burlap from the lining fabric, i.e. pin it to the opposite side of the pocket entrance and sew. The processing of the pocket in the side seam is in full swing. Let's move on.
Press the seam to the side of the burlap and stitch close to the edge. Distance 0.2-0.3 mm.
Pin together 2 burlap pockets
Sew and process using an overlocker (if the product is unlined). You can trim the edge with bias tape. It will look very nice.
That's the whole lesson. The side seam pocket is finished. The pocket is ready! Are you ready? Write comments.
See more interesting and useful sewing master classes HERE
Was everything clear? It is very important for me to know your opinion on this master class.