Mittens will warm your hands on a cold winter day. The top of the model is made of light raincoat fabric, thanks to which you can play snowballs or build a snowman, and the warm lining made of soft fleece will allow you to spend more time on a walk.
To make the mittens fit better on your hand, we inserted an elastic band: this is especially true if you are sewing mittens for a child.
Our master class will tell you how to create a pattern for any size and how to sew mittens with your own hands.
Children's double-layer mittens
This master class suggests using warm knitwear - footer - for the main fabric, and making the lining for the mittens from fleece.
- Gather the palm area.
- Cut the corners; this manipulation will allow you to carefully turn the product inside out, avoiding pulling.
- Move the seam allowances to the sides and iron them.
- Sew the lining in the same way and insert it into the main part.
- In order for the mittens to hold better, an elastic band is sewn on. Below the top cut, two parallel lines are laid - this is a drawstring where the elastic band is inserted. Its length is equal to the circumference of the wrist, or slightly shorter. It should not fall off or press.
- The final step is to machine stitch the top edges.
Step-by-step master class with photos:
- Using the pattern details, cut out all the necessary parts of the future mittens. From the main raincoat fabric - two external parts and two internal lower ones; made of durable raincoat fabric - two inner top ones; from lining fleece - two copies of each part; made of insulation - only two external parts and two internal lower ones (we will leave the upper internal part without insulation, so that it is convenient for a child to take the same snow with mittens or hold on to the handrails on the playground).
- You can start by sewing the lining. Place the top and bottom fleece lining pieces right sides together and pin in place along the curved line of your thumb.
- Place a knitted seam on the machine and sew this line on both mitten blanks.
- Now, with the right sides facing in, fold the inner and outer pieces of the lining and pin them along the entire perimeter, except for the bottom edge.
- Sew the lining mittens around the entire perimeter, except for the bottom edge, using a knitted seam.
- Now you need to insulate future mittens. To do this, attach the insulation parts to the corresponding parts from the main raincoat fabric and secure with pins.
- Stepping back just a little (literally 1-2 mm) from the edge of the materials, sew the parts with a straight seam to secure the raincoat fabric and insulation together.
- Stepping back 3 cm from the bottom edge, attach an elastic band to the underside of the insulated parts and stitch it with an elastic zigzag (this is a dotted line in the form of a zigzag), slightly stretching the elastic band while sewing. Thus, with the help of an elastic band, you will make the mittens more comfortable: they will not fall off children’s hands while wearing them.
- This is what the inner part with elastic will look like:
- Fold the inner and outer parts of the raincoat fabric with the right sides inward, pin along the perimeter and sew with a straight seam along the entire perimeter, except for the bottom edge. Turn the finished mitten right side out.
- Insert the mitten from the lining into the main mitten made of raincoat fabric, carefully align these parts in the place of the thumb. Sew the bottom edge of the product with a hand stitch.
- The “donut” for edging the edge of the mitten should be slightly narrower than the edge of the mitten itself. Cut the required length of elastic band (10 cm will be enough for one mitten) and sew its ends on a machine using a knitted stitch.
- Fold the ring of elastic band in half along the bottom edge of the mitten. Secure with a hand basting stitch.
- Sew the elastic banding around the entire perimeter using a knit stitch. Finish making the second mitten in exactly the same way.
This is how you can sew children's mittens - mittens - on your home sewing machine! You can make mittens for adults in a similar way, but to do this you will need to create patterns: trace your palm on paper and add up to 1 cm on all sides. Happy sewing and warm mittens!
2018-12-12
Previous: How to sew children's winter overalls? Overalls with Velcro
Next: Cocoon diaper for premature babies - Master class on sewing
About Svetlana Marchenko
Mother of two children. Freelancer. I love to cook and learn something new.
Making a pattern
The first step is to make a pattern.
To do this, take two or three sheets of A4 paper. It is better to use thicker paper for patterns. For example, for drawing.
The tools you will need are: a soft pencil, an eraser, a ruler, a tailor's yardstick and scissors.
- Take a sheet of paper. Place your palm on it. We draw around the perimeter to determine the size.
- We put marks for the thumb so that we know where the entrance for it will be.
- From the drawn figure we create an even, symmetrical part and draw it again on paper. We make allowances for freedom of fit and seam one at a time - one and a half centimeters around the perimeter, and at the bottom half a centimeter for the seam.
- Don't forget the finger marks.
- We connect our marks with a smooth line.
- Cut out the part along the outer contour.
We trace it on a new sheet of paper. - We cut out the newly outlined part and get the pattern: part No.1.
- From the first cut out part, where we have drawn the entry line for the finger, we cut out the unnecessary corner and get part No.2.
- On a new sheet of paper we outline part of part No. 2, as shown in the photo.
- Apply your thumb and mark its length.
- Using a soft line we draw a figure, as shown in the photo.
- We cut out the resulting part and get part No. 3.
- Once again, on a new sheet, circle detail No. 1.
- We attach part No. 2 and draw an arc.
- We apply part No. 3 to the arc and trace it around the perimeter.
- We cut out the resulting figure and get part No. 4.
- We apply a strip of paper to the first part and draw a trapezoid four to five centimeters high. We cut it out and get part No. 5.
- So, we have a set of patterns for mittens.
If you plan to sew mittens from fur or very thick bulky fabric, then you will need one more piece.
This is a strip two centimeters wide and a length equal to the perimeter of part No. 1 plus two heights of part No. 5 to increase the volume of the mitten so that the hand does not feel cramped in it.
This is interesting: Pattern for women's mittens (size SML)
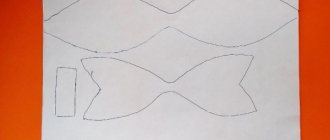
Mitten pattern
This template is designed to create mittens for a five year old child. The pattern consists of three parts: outer, inner top and inner bottom. To get the correct size pattern (for a 5 year old), enlarge this image on the computer until the bottom line of the outer piece is 7cm. Then hold the pattern paper to the screen (the outlines of the pieces will show through), trace the pieces and cut them out . When cutting out, make allowances of 1.5 cm on all sides.
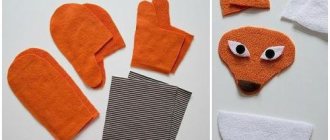
Mittens – foxes
A funny decor - a fox's face - will be a wonderful decoration. For appliqué elements, base material or felt is used.
The parts are pre-glued with a “cobweb” or fixed with running stitches. Then machine stitch the top.
Mittens with separately cut finger
The finger pattern is designed for left and right hands, so the parts are cut out in mirror images.
- First, stitch the main details along the contour.
- Then the elements of the finger are sewn together and neatly connected to the cuts of the hole.
- A tightening elastic band is inserted and the bottom of the product is processed.
How to insulate knitted mittens
Sometimes ordinary winter mittens are not as warm as we would like. If you sew fleece into mittens, the problem will be solved.
In order for the lining piece to fit perfectly, it is advisable to create a pattern yourself based on the finished mitten.
Products are decorated as desired, for example, funny animal faces.
This educational video will show you how to insulate mittens.
In addition to fur mittens, you can sew accessories from fur
In addition to women's mittens, you can also sew men's mittens for fishing or hunting. Believe me, a man will really appreciate such a gift if he is a passionate fisherman. True, the fur for such mittens needs to be quite durable, like sheepskin or mouton.
Excellent mittens are made from an old sheepskin coat. The sleeves can be used to sew mittens, and the rest will be used for a sleeveless vest that will keep you warm in a cold room in winter. To sew mittens from sheepskin or pieces of sheepskin, no lining is required. The cut parts are firmly connected with a furrier's seam, and the upper edge (hand entrance) of the mitten is simply folded with fur “on the face.” You don't even have to fasten this hem.
In addition to fur mittens or mittens, you can sew a lot of various other accessories. For example, as in this photo - “headphones”.
Making them is not at all difficult, the main thing is to show a little patience and ingenuity. Later I will post a simple master class.
Here's another interesting option:
Real fur makes very cute women's wallets, handbags, phone cases and many other “baubles”.
Try to figure out which ones you need yourself. Source
For needlewomen:
Bath sundress made of terry towel
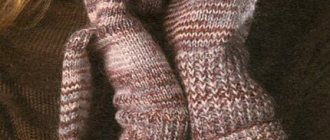
Socks “Forest Tale”
DIY sweater boots
Required materials and tools
In addition to the sweater itself, you will need:
- pins;
- strong threads;
- decorative elements (buttons, beads, appliqués).
A few words about the sweater itself. To make mittens from it, it must be wool and a little felted. A synthetic jumper will also work. Warm mittens can be made from an old fleece blanket. Thin openwork fabrics are not suitable as they will unravel immediately after you wash them. Thin polyester is also not the best option - it stretches well and does not stitch well.
Mittens: selection of material and preparation for work
How to sew mittens with your own hands? Even sewing beginners can do this job!
If you or your children sometimes spend time in a cold room or, for example, in a car, you can sew warm and cozy mittens only from fleece: double-sided or with a thinner lining.
If you want to sew mittens for severe frosts, you can additionally insert a layer of thin modern insulation, such as Thinsulate.
So, let's sew mittens with our own hands!
Constructing a pattern
Take a sheet of any paper and a pencil. Place your hand on the sheet with your thumb slightly tucked into your palm. The remaining fingers should lie freely. Trace the palm, leaving an allowance of about 5-8 mm. Mark the top and bottom of the thumb, as well as the bottom border of the mitten.
Draw a loose shape for the mitten, the width of the bottom edge should be equal to the width at the level of the thumb. From the top point of the thumb to the bottom, draw an oval, divide it in half and draw a horizontal line until it intersects with the edge of the mitten. Apply your hand again - the horizontal line should start from the bottom edge of the thumb on the inside.
Separately retake the general outline of the mitten, cut out one part from the first pattern and draw a third part, as shown in the diagram.
Uncover
Cut two pieces A, B and C from fabric for the outer side and two pieces A, B and C from fabric for the lining.
If the lining fabric is voluminous, for example thick fleece, cut the parts from the facing fabric larger by 2-3 mm along all contours.
The allowance along all edges is 1 cm.
Progress
Prepare tools and materials:
- Outer fabric and inner fabric parts
- Elastic band, threads
Fold parts B and C in pairs with the right sides inward, matching the contour of the thumb. Sew the horizontal seam and the outline of the thumb. Finish the stitching at the level of the horizontal seam.
Trim the seam allowances with zigzag scissors or notch the seam allowance in the rounded areas. Press the horizontal seam to the sides. Place the stitched parts and parts A with the right sides facing inward. Place your “thumb” down and stitch from the place where the thumb stitch ended, all the way down to the bottom of the mitten.
Lift the finger piece up and stitch from the bottom of the mitten to the thumb, stopping exactly where the previous lines ended.
Trim the seams.
Unscrew the outer parts of the mitten from the bottom edge to the elastic line and mark it along the front side.
Turn the inner mittens right side out. Place the outer mittens inside. Make sure the thumbs on the outer and inner mittens match.
Pin the edges of the outer and inner mittens.
Sew along the marked line from the front side.
Step back from this stitch to the edge by the width of the elastic plus 2 mm and make a second stitch, leaving about 1 cm open.
Insert the elastic into the open seam using a safety pin. Stitch the edges of the elastic and sew up the open part of the seam.
Fold the edges of the inner and outer mittens inward and pin or baste.
Sew along the edge. Turn the mittens inside out and straighten your thumbs.
Completing of the work
You are only a few simple steps away from beautiful, warm hand-made mittens:
- Turn the sweater inside out and place your palm on the bottom of the garment. Use a marker to trace the outline of your hand. Thanks to the fact that the sweater is turned inside out, there will be no marks left on it.
- Take fairly sharp scissors and carefully, without haste, cut through two layers of the product along the contour.
- Take pins or needles with colored balls and pin both layers of the mitten together. This way they will be firmly fixed and will not “ride” while you sew them. By the way, you can sew the halves together either by machine or by hand.
- Once you've finished stitching the mitten, all that's left to do is trim the seam. It will turn out to be bulky, which will create inconvenience while wearing the product.
- Almost ready, all that remains is to repeat all the same steps for the second hand.
- If you wish, you can decorate your new mittens from an old sweater with beads, rhinestones, fur, pom-poms, appliques or regular buttons. It all depends on your imagination.
The sewn product will warm your hands for many years to come. In addition, such mittens can be an excellent gift for the New Year, because they will preserve your care and love. If you want to give them to a loved one, mother, or grandmother, then you can take measurements from old gloves. If desired, you can complement the mittens with a lining of a scarf or towel.
As you can see, sewing your own, unique mittens is quite simple. You just need a little imagination and a good mood. Tell us if you have ever given gifts made by yourself and what they were. Share your answers and stories in the comments.