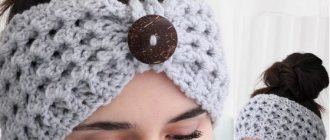
Children's headband - how cute and elegant it is! This decoration is suitable for girls of all ages: from toddlers to teenagers. Before making a headband for a girl, let’s decide on the material of the decoration.
It can be a headband made of lace, felt, satin ribbons, fabric, knitwear. These headbands for girls are made by mothers with their own hands before a photo shoot or a princess’ birthday. A headband for a girl, made with love by a mother or grandmother with her own hands - what could be better and more original. Flower stencils are included.
How to sew a headband with a bow
The fourth method It is better to make it from knitwear. A rectangle is cut out in length slightly less than the girth of the head, if the fabric stretches well, then 1/3 or 1/4 of the head girth can be removed, if not, then a couple of centimeters and without allowances, in general it depends on the stretchability of the knitwear . To check, you should apply the fabric to your head and pull it around the circumference and feel how comfortable it is, choose the width at your discretion. Decided on the sizes and cut them. You also need to cut a rectangle for the bow; the width can be the same as the headband, and the length is about 1/3 of the length of the headband in two layers.
And a small rectangle or square to hold the bow and headband together.
I also recommend watching a selection of master classes “How to make bows from different materials”
How to make a large, lush, beautiful bow from ribbon, fabric and lace? How to properly make a bow from a wide, narrow and thin ribbon with your own hands? How to make a beautiful simple bow from nylon, paper ribbon and satin, grosgrain hair ribbon?
And the fifth idea, a headband with a wide bow that can be tied.
This is interesting: Pattern Plush hat with ears and tassels (size 86/92, 98/104, 110/116)
Flower stencils for headbands
Using these stencils you can make all kinds of flowers for headbands made of felt, organza, lace, leather, and so on.
Pink headband
The baby's head volume is about 45-46cm.
We will need:
- melange yarn, 100% cotton (50g per 152m), light pink color – 50g;
- the same, dark pink for decoration;
- knitting needles No. 3;
- hook number 3.
Patterns used:
- facial surface: in faces. R. – facial, in purl. R. - purl stitches;
- openwork: 1p.: 1kr., 1l., *2p. in 1l., 1n.* - from * to * repeat until the end of the r., 1kr.;
- 2p.: purl.
Knitting density: faces. Ch. 23p. for 33r. equal to 10 cm by 10 cm.
Description of the headband for girls
We cast on with knitting needles 90 sts. light pink thread and knit 1 p. purl. Let's move on to faces. Ch. and perform 6p with this pattern. Next we knit an openwork pattern. We complete 6 r. persons Ch. We close the loops. Sew the short sides of the bandage. Using a dark pink thread, we crochet along the long sides of the product 1 row of single crochets and a picot next to it. We twist a lace from a dark pink thread and stretch it into an openwork row.
Elegant headband with lace
Beautiful headbands for girls are obtained if you use a lace ribbon to make them. For this you will need:
- a wide lace ribbon slightly less than the circumference of the child’s head;
- a small piece of wide elastic;
- narrow lace ribbon for decoration;
- several beads.
Measure out a wide ribbon with the intention of inserting an elastic band into the back of the piece to keep the headband in place. Carefully trim the edges to avoid fraying of the lace. Sew on the elastic.
Make small flowers from a narrow lace ribbon and sew them to the headband. They can be made by sewing the ribbon into a ring, and then gathering it along one edge onto a thread. You can also make a lush bow from a narrow ribbon. To do this, it should be wound on the base, sewn in the center, and then straightened out, giving the desired shape. In the center of the flower or bow you need to place decorative elements: beads or rhinestones. You can also use ready-made lace bows or flowers, which are sold in stores.
This headband for a girl will go well with an elegant princess-style dress, which is so popular among mothers and daughters.
We crochet an original headband for the baby for the summer
There's nothing better than a summer crochet headband. The girls look cute and love to show off in them. Four-ply worsted, cotton or linen yarn, as well as a hook no larger than 5 mm in size, are best suited.
Cast on a chain of chain stitches of the required length, but their number must be strictly a multiple of 4. Add three more lifting stitches. Insert the needle into the third loop from the hook and make three double crochets in one stitch.
Skip the next loop and then knit a single crochet. Repeat the skip and in the next stitch you already knit four double crochets. And then everything according to the diagram:
Having reached the end of the row, turn the knitting over and again follow the pattern from top to bottom. By tying a chain of air loops in a circle, you create a semblance of circular knitting. And the result is light floral motifs.
When you get to the beginning of the row, make one stitch up and the other down.
Using a single crochet stitch, connect the loops, secure the yarn, leaving the working thread longer. Carefully bring the ends of the bandage together. Before wearing, it is better to rinse under running warm water. If everything was done correctly, the result should look like in the photo:
Fabric headband:
This fabric headband looks very original and can be easily decorated with a variety of decorative accessories.
Materials: scissors, elastic band for the head (head diameter minus 3 cm), sewing machine, satin fabric (approximate size - 30x10 cm), a small piece of fleece, sealant (non-woven fabric, for example), accessories.
- Sew the non-woven and satin strips together from the inside out, and overlay the edges. Don't touch one of them.
- Turn over the open edge and sew with a blind seam.
- Form folds and sew in the center using a machine.
- Sew the strip to the elastic, and fasten the fleece on the inside (so that nothing rubs).
- Decorate. All!
How to make baby headbands with your own hands
How to make a headband with your own hands? To make a beautiful headband for your baby, you need to use high-quality fabric and unusual decorations. This master class uses lace braid, which will become a wonderful basis for a future accessory. Materials:
- lace braid;
- tape measure;
- scissors;
- threads in the color of the braid;
- needle;
- cotton fabric for decoration;
- large beads or rhinestones for decoration.
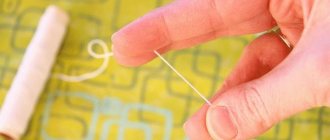
Let's get started with step-by-step instructions for making a beautiful hair ribbon. To make a bandage with your own hands, you need:
- Measure the circumference of the child's head.
- The length of the bandage should match the circumference of the head in centimeters. If the strip of braid is longer, the bandage will fall off. If the tape is shorter, the accessory will put pressure . Cut the lace to fit the circumference of the baby's head.
- Using thread and needle, connect the two ends of the ribbon . You need to sew the tape carefully. This can be done with hot glue, but then the decoration will not be as durable.
- For three colors, cut three strips of cotton fabric 30 cm long and 8 cm wide.
- Finish the bottom of the strip . Stitch carefully. Assemble the workpiece into an accordion on a thread, slowly pulling it out.
- Close the strip of fabric into a circle and tie a knot. To make the circle look neat, tie a thread on the back of the product.
- Glue beads or rhinestones representing stamens onto the finished flower.
- Sew flowers onto the lace braid with threads or glue with hot glue. The decoration is ready .
Felt headband
Felt is a material that is perfectly suited for the job. It does not wrinkle and has neat edges. You can make very beautiful flowers from felt to decorate a headband, and not just flowers.
This work uses different flowers, which can be made from felt using glue or a needle and thread. After the flowers are made, they are sewn on with a wide elastic band. You can take any sizes of flowers, from 4 to 10 cm. It all depends on the age of the girl and the purpose (holiday, photo shoot). Flower stencils are located at the end of the article.
Flowers are easy to make. You only need to print or draw a few stencils by hand. Anemones turn out delicate and beautiful, roses and hyacinths are great for decorating a DIY headband.
Rose and hyacinth. For hyacinth, cut out a strip 20 cm long, height - from 10 to 15 cm. Bend the strip in half and make cuts, not cutting 1.5 cm to the end. Roll the workpiece into a tube and secure the leg.
For anemones you will need 6 petals, cut in 2 places and a black cut fringe - the middle detail. Don't forget the leaves for the flowers. It is better to take an elastic band that matches the color of the princess’s hair.
And here are anemones with different leaves and centers. Choose which ones you like best.
Soft bandage for little ones
This headband can be used to decorate the head of a newborn baby. Besides the fact that it looks very cute, it also keeps you warm.
In order to make such a bandage, you will need a piece of soft and thin fabric. The width of the cut should be approximately 2 times the width of the future product. In addition, you will need another small piece of the same fabric for decoration.
Measure out a rectangular piece of fabric. Its length should be equal to the circumference of the baby’s head, and it is also necessary to leave a seam allowance.
Sew the ends of the bandage. Then gather the fabric along the seam and secure the seam.
Now the seam should be finished. To do this, you need to cut out a rectangular piece from the same fabric that will seem to tighten the bandage. It must be wrapped around the seam and connected into a ring. You can decorate the headband with a bow made of the same fabric.
This is interesting: Pattern Headband with bow (size 1 month - 4 years)
MK Beautiful headband: knitting a model with removable decor
kisLinka
Guru
- #2
I want a bow like this for myself too! I absolutely love these “girly” accessories from the era of the 60s - in my opinion, they are very playful and flirty. Do you think it will go well with long hair with bangs?
Juni
Guru
- #3
kisLinka wrote:
I want a bow like this for myself too! I absolutely love these “girly” accessories from the era of the 60s - in my opinion, they are very playful and flirty. Do you think it will go well with long hair with bangs?
Click to expand...
With the right outfit - great! For example like this
bussinka
Guru
- #4
kisLinka wrote:
I want a bow like this for myself too! I absolutely love these “girly” accessories from the era of the 60s - in my opinion, they are very playful and flirty. Do you think it will go well with long hair with bangs?
Click to expand...
This is a pin-up style)) Very cool flirty retro ❤ Not only a headband, but also the whole image needs to be thought through. If you create a complete ensemble - headband + clothes + accessories, then of course it will suit you
- #5
For adults, you can sew it without elastic at all - it also holds up perfectly! Used for a themed bachelorette party.
Tosha
Newbie
- #6
How lovely! I’ll definitely make these for my daughters this summer!
Ideas for baby headbands
In the video - an organza headband for a baby:
DIY: Baby Headband | la.mansh
Headband made from Solokha fabric - master class
The Solokha headband for a little girl can be called universal. This headband is suitable for any hair, especially convenient in summer. A DIY solokh headband is a great solution for summer hair.
We make a pattern for OG = 48 cm. At the top are the main 2 parts, at the bottom is the part for the elastic band.
To work you will need:
- 2 pieces of fabric: 58/12 cm and 20/12 cm.
- Elastic band 10 cm.
- Sewing machine or needle and thread.
- Centimeter, scissors, paper.
- Tailor's pins.
We make a pattern on paper. For a head circumference of 48 cm, we will cut out a 20/12 cm rectangle for the elastic band and 4 more rectangles – 29/6 cm – for the main bandage. Measuring 10 cm from the end of the main part, we make 2 cuts at the top and bottom (this will be a bow). We pin the pattern to the fabric, add 1 cm seam allowances on all sides and cut out 5 parts.
We put the 2 main parts with the right sides facing each other - we will grind them down.
We sew it down, leaving a small hole through which we will insert the part with the elastic band. We sew, retreating 1 cm from the edge of the part.
We turn the main parts with the “ears” onto the face. We take a piece 20/12 cm and sew it along the length. Turn it inside out. Then use a pin to insert the elastic inside this part.
We secure the elastic band on both sides with two lines. You should have an assembled part. It is advisable to stitch this part along the entire length - in the middle.
Next, take 1 part with “ears” and insert the part with an elastic band into the hole that we left. We combine the edges and sew on the machine. We do the same with the 2nd part with the “ears”.
We sew up the remaining holes using a blind stitch by hand.
All that remains is to iron it and tie the “ears” into a knot.
The video shows how to sew a solokh headband with your own hands, a master class for beginners:
How to sew a cotton headband. How to sew a “solokha” headband