Flip-top gloves, or mitts as they are also called, knitted with knitting needles from warm yarn, will always look fashionable. Their popularity lies in their high level of comfort. Initially, this style was invented for market sellers who found it inconvenient to work with gloves, and without them it was very cold.
Workers found a way out of the situation by cutting off the ends of standard gloves. But the fingertips still remained cold. Therefore, it was decided to create an additional convertible top, which allows you not only to confidently count money and take various goods, but also protect your palm from the cold.
Not only market sellers liked the ability to quickly free their fingers. Nowadays, flip-top gloves can be found not only among adults, but also among children. In this case, such a model can be connected independently.
Where to start knitting gloves with opening fingers?
First of all, to make transformable gloves with your own hands, you need to collect all the tools for the job. Experienced and novice needlewomen will find the following useful when doing needlework:
- Knitting needles in the amount of 5 units;
- Yarn – 1-2 skeins of 140 g each (acrylic, acrylic with wool). You can take skeins of different colors;
- Needle . It is necessary in order to bring all the elements together.
Attention ! The size of the knitting needles should correspond to the thickness of the yarn. For the winter period, denser yarn is used, which means the knitting needle size will be from 4 to 4.5 mm. The product for the spring-autumn period will be made from a thin thread. This means that 2.5 mm knitting needles will be useful in your work.
For ease of use, the folding top of the transforming mittens can be fixed. To do this, a small button is sewn on the back of the hand. And on the convertible top there is a loop.
Some craftswomen knit a fixing elastic band separately. It looks like a thinly knitted flap, which will be sewn on both sides and will act as a retainer for the convertible top.
General job description
The flip-top gloves will consist of three parts: a back and front base, a flip-up top and five fingers. Work begins with creating the foundation. Then they move on to knitting the fingers and creating a convertible top.
On a note ! The technology of knitting convertible gloves is not as complicated as it seems at first. The only important thing is to monitor the knitting density. In this case, all the parts will be symmetrical and fit together well.
The convertible top must be tied as tightly as possible. It is important that it fits well to your fingers, which will provide warmth in cold weather.
Gloves can be plain or patterned. Both options can be additionally decorated with buttons or sequins. When creating a model for a child, it is important to pay due attention to the elastic band. It must fit tightly around the wrist, otherwise the child may lose the gloves.
Main stages of work
Determining the size:
- We trace our hand on a piece of paper;
- We measure the circumference of the wrist - usually 15.5-18 cm. We will count on an average of 17 cm;
- We measure the circumference at the widest point of the arm. We will count on an average of 18 cm;
- We measure the distance from the beginning of the thumb to the base of the hand - usually 6-8 cm;
- We fix the number from the beginning of the little finger to the base of the hand - 9-10 cm;
- Measurements from the base of the thumb to the base of the hand are approximately 10 cm.
- Based on these measurements, we form a control sample in which 2 loops should be 1 cm.
Important ! All measurements must be taken with the hand relaxed. It is important to record the numbers with a small margin of 0.5 cm so that it does not become tight.
For beginning needlewomen who are knitting gloves with cut-off knitting needles for the first time, it is better to knit with light threads. On dark yarn, the knit and purl stitches are difficult to see, so you can get confused.
Let's start knitting gloves with open fingers
- We cast on 36 loops and divide them equally into 4 knitting needles;
- We knit in the round with an elastic band (1 knit, 1 purl);
- Use a marker to mark the beginning of the row. We knit an elastic band 5-6 cm wide. You can have more if you want to make the cuffs long;
- As soon as the cuff is completed, we begin to knit with facial loops. On each knitting needle you need to add one loop;
- So we knit three rows;
- Then we form a wedge for the thumb. If we knit gloves for the right hand, then at the beginning of the first knitting needle we make a yarn over, for the left hand - at the end of the fourth knitting needle we make a yarn over.
- We knit three rows in stockinette stitch;
- On the fourth row, add a loop, knit three loops and make another loop;
- We knit the remaining three rows in satin stitch;
- In the next row we form a yarn over, knit 5 loops, add a loop;
- We knit three rows in satin stitch. We start a row with a yarn over, form 7 knit stitches and then yarn over again;
- We form three rows of satin stitch;
- Using the same pattern, we knit further and form a wedge for the thumb to the end;
- Slip 11 stitches onto a pin or knitting needle. We distribute them in half;
- We begin to decrease the loops (we knit together the last loops from the quadruple and the first knitting needles) until the wedge goes away. It is necessary to reach the level of the little finger.
You should know! Here you can switch to a different color, thus visually marking the area where the folding hood is formed. In the case of plain gloves, you can simply leave a marker or pin.
Finger formation stage
- There are 40 stitches on the knitting needles in total. We knit the loops on the first knitting needle. On the next one - only the first 6. Slip off 4 loops from the second and 6 loops from the third onto a pin. We collect three air loops. Thus the little finger was formed;
- We knit three rows in a circle;
- We distribute the remaining loops among the pins. We remove 4 loops on 1 pin, 11 loops on another and another 6 on the third (for the ring, middle and index fingers, respectively);
- We distribute the remaining 11 onto 3 knitting needles and add four more air loops to them. We knit the index finger in a circle, approximately 2-3 cm. At the end we knit a row with an elastic band and close the loops;
- We tie a thread from the side of the palm. Remove the loops from the pin and add 3 more air loops. Distribute the loops and knit similarly to the index finger;
- We proceed in a similar way with the ring and little fingers.
We knit the folding top of transformable gloves
- Turn the glove over with the back side and cast on about 25 loops at the marked place;
- We form an edge loop, turn the glove over (upside down) and knit purl rows;
- We put two knitting needles together and form another 25 loops;
- There will be 51 loops in total. We knit the loops formed from the glove using stockinette stitch, the rest using an elastic band;
Important ! To ensure a neat edge of the elastic, you need to turn over all the loops in the first row of elastic before knitting.
- So we knit 5 rows and begin to decrease, gradually knitting two loops together in each row.
- We connect the folding part together.
Knitting the thumb
- We tie the thread and form 6 loops;
- We remove the remaining loops from the pins and distribute the loops onto the knitting needles;
- We knit several rows along the length of the thumb;
- At the end of the loop we gradually remove and tighten the edge.
Gloves (mittens) with a folding top can be an original and useful gift for a loved one. This accessory will appeal to all ages. The product is much warmer than the classic version of gloves and will protect your hands even on the coldest day.
Taking measurements
To knit gloves, take the following measurements:
- hand circumference (OK) - 20 cm (we measure the widest part of the hand, the measuring tape fits tightly around the hand);
- the length of the hand from the wrist to the base of the thumb is 6 cm;
- length of the hand from the wrist to the base of the little finger - 9 cm;
- The length of the hand from the wrist to the base of the index finger is 10 cm.
Warm knitted gloves - step-by-step instructions
- Cast on 20 stitches for the sample and knit a few cm in a stocking pattern, measure the width.
- Knitting density: 20 loops / 6 cm = 3.3 loops in one cm.
- Loops for knitting palm circumference: 3.3 loops * 17 cm = 56.1. This number must be a multiple of 4 in this case equals 56 loops.
- For one knitting needle you need: 56 loops / 4 knitting needles = 14 loops.
- For one finger you need: 56 loops / 4 knitting needles = 14 loops. Since the fingers are different, you need to add 1 loop each to the middle and index fingers, and subtract 1 loop from the little and ring fingers. For girth between fingers, cast on two additional loops.
- (14+1)+2=17 stitches on the index finger.
- (14 + 1) + 4 = 19 loops on the middle finger.
- (14 - 1) +4 = 17 stitches on the ring finger.
- (14 - 1) + 2 = 15 loops on the little finger.
- Middle finger loops + 3 = 22 thumb loops.
Product edge
The elastic pattern report consists of 6 loops: 2 knit loops, 4 purl loops.
Pattern
The pattern report consists of 6 loops.
- 1st row: k2, p1, k2, p1.
- 2nd row: k2, p1, yo, turn 2 loops over and knit together knit, p1.
- 3rd row: k2, p1, k2, p1.
- 4th row: k2, p1, k2. knit together, yarn over, p1, k2, p1. Thus, knit another 4.5 cm.
The technique of knitting 2 inverted loops together with a knit stitch is shown in the video below.
Glove base
Knitting finger gloves
Please note: the knitting pattern for the second glove is similar to the first, only the additions for the thumb must be made on the third knitting needle, and the little finger must be knitted on the other side. Both gloves should be symmetrical.
Now you need to turn the glove inside out and fasten all the threads, lightly steam it with an iron or through a damp cloth.
Warm gloves with knitting needles are ready. The knitting process is quite painstaking, but the result is worth it.
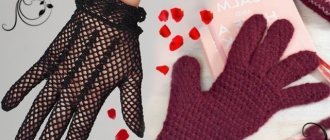
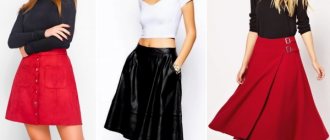
Gloves are a beautiful and useful thing. They can not only warm, but also decorate, make the image more sophisticated, calm, or vice versa - bright, catchy. Crocheted gloves offer a particularly wide variety of models for all seasons and occasions, which create worthy competition for models created with knitting needles.
It is due to this method of execution that gloves can turn out to be both dense and textured, and very thin, openwork. Of course, the deciding factor will be the yarn you choose - it is responsible for the warmth, thickness and degree of delicacy of the product. Such a variety of knitting possibilities allows you to get equally beautiful gloves for women and girls, comfortable and practical gloves for children, and warm gloves for men.
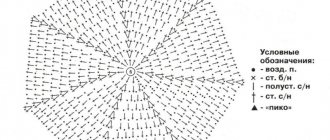
Crochet gloves - diagram and description
Let's take a closer look at the most common options for crocheting gloves, including a method of crocheting products for beginner needlewomen. We will also learn how to crochet mitts - fingerless gloves, and we will analyze in detail the methods of knitting men's, women's and children's gloves.
Knitting for beginner needlewomen
Crocheting gloves provides the opportunity to create fairly thin, but dense and warm products. Let's try to create one of these, while performing a simple pattern of the same type.
Crocheting gloves for beginners starts with determining
your hand measurements
. You can do this as follows: trace your palm with a pencil or pen on a sheet of paper. Now, in accordance with the diagram, we measure the following indicators:
A
- the width of the palm at the base of the fingers (the approximate width of our glove);
B
- distance from the base of the palm to the bend of the thumb;
C
is the distance from the base of the palm to the tip of the middle finger (glove length without cuff);
D
is the distance from the base of the palm to the base of the little finger.
Materials for work:
- jersey;
- hook No. 2.5.
Progress
We collect a chain of chain loops equal in length to the circumference of the wrist + 1 cm to freely put on the glove. We connect the chain into a ring with a connecting post and to start knitting the first row we make 3 lifting air loops.
First row
knit st.
s/n and finish the row with a connecting loop in the last lifting loop. Next, to knit the second row
, make 2 air lifting loops and knit an elastic pattern, alternating convex and concave relief columns.
Finish the row with a connecting loop. the next rows
of elastic in the same way as the second. The cuff of the glove, knitted with an elastic pattern, can be of any width from 4 to 6 cm at your discretion.
Then we move on to knitting the main part of the glove.
. We knit the glove in half columns in circular rows in a spiral, that is, we do not make lifting loops, then the seam of the initial loops of the row will not be visible.
For yourself, mark the sides of the glove where the thumb will be located and where the little finger will be located.
Having connected 2-3 circular rows with half-columns along the side near the side of the thumb, we begin to make additions to expand the wedge of the thumb. To do this, in the next 5-7 rows, add one half-column at a time, knitting two from one loop.
When the height of the knitting reaches the base of the thumb in the last row, without tying 6-7 loops to the edge, we pick up a chain of 8-9 chain loops and fasten it into the arch through 12-14 loops of the previous row. This creates a hole for the thumb, which is knitted last.
Before you start knitting the fingers of the glove, calculate the loops for each finger. You can identify them by trying on the glove and noticing the loops on the inside and outside. To knit the little finger, attach the thread from the palm side, make 3-4 air loops and attach the arch to the back of the glove. Next, knit half columns in a circle to the height of your little finger.
Closer to the tip, make decreases on both sides of the finger to narrow it. When you have knitted your finger to its full height, close the loops by knitting single crochets in a circle - one of the two loops. When the hole narrows, cut the thread and secure it by pulling the tip through the loop. Insert a needle into the remaining tip of the thread and mend the remaining hole, thread the thread on the wrong side.
If you look at your hand, you will see that the fingers are located at different heights - the first little finger, the index finger a little higher, and the middle and ring fingers at the same level. Therefore, after knitting the little finger, return to knitting the main part of the glove. Taking the remaining thread to work, knit one circular row with half-columns along the inside, the arch at the base of the little finger and the outside of the glove. Now you can knit the ring finger. Attach a new thread to the inside, tie a chain of 4 chains. loops and secure the arch on the outside (photo 1).
Knit half stitches to the height of your finger, narrowing it at the top, making decreases along the sides. Finish the knitting in the same way as on the little finger - make decreases by knitting two single crochets together until the opening narrows to a small hole.
Take back the remaining main thread and knit one round row through the arch of the ring finger. Next, attach the thread for knitting the middle finger. If you get a large hole for your finger at the base, then make decreases in the corners, knitting two half-stitches together (photo 2).
Knit the index finger with the thread left from the main part of the glove. Attach the thumb yarn and knit in the round in half stitches, decreasing at the corners first, knitting two half stitches together until the hole is equal to the diameter of the finger. Next, knit it to a height and narrow it with single crochets.
The glove for the other hand is knitted in the same way, but in a mirror image. The back part can be decorated with a knitted flower or embroidery.
Model without fingers
Fingerless gloves, also called mitts
, allow you to drive and use your phone quickly and without discomfort. In addition, the process of knitting this model is much simpler than knitting simple gloves - because here you do not need to work with each finger separately. , since they are knitted for both the summer and winter seasons. Let's take a closer look at how to crochet fingerless gloves, which look very impressive in the autumn and winter.
Materials for work:
- yarn “ADELIA Jessica” (67% wool, 33% polyester, 260 m/100 g);
- hook number 3.
Progress
First, you need to make a chain of air loops of such length that, folded in half, four fingers can easily fit into it. We will knit the mitt from top to bottom - from fingers to wrist. Let's close the chain into a ring using a connecting stitch, knit two chain stitches and then three rows of single crochets (photo 1).
Next we move on to knitting with lush columns. A lush stitch is three or more “under-knitted” double crochets, knitted in one loop at the end. In this case, the lush columns consist precisely of three “incomplete” double crochets. To make a fluffy stitch, we make a yarn over, insert the hook into the loop of the previous row and pull out the thread. We knit the thread into the resulting loop and yarn over (photo 2).
There are two loops on the hook. Let’s yarn over again and again “loosely knit” a simple double crochet (photo 1). There are three loops on the hook (photo 2). Let's repeat everything again - there are four loops on the hook (photo 3). Finally, we knit all four loops at the same time (photo 4). The lush column is ready!
We knit three rows of puffy stitches, then three rows of single crochets, then two more rows of puffy stitches. In principle, the alternation of different knittings can be anything - it all depends on the taste and desire of the knitter.
We have come to the base of the thumb. We knit a chain of fifteen air loops and attach it with a connecting post to the main knitting four loops from the beginning of the chain. Let's try on the mitt - the thumb should fit freely into the hole intended for it. If the hole is smaller or larger than you need, change the length of the chain (photo 1).
Let's continue knitting in the circle with single crochets - only the row has become longer by fifteen (in this case) loops. Here it is more convenient to knit in a spiral, without lifting loops (photo 2).
Having knitted two rows with single crochets, we begin to make decreases. It is best to do them this way: evenly decrease four loops in a row - knit the next row without decreasing - decrease four loops again - knit the row again without decreasing. There are four rows with decreases in total. Having finished decreasing, we will knit another four to five rows without decreasing. Let's complete the knitting with five rows of embossed stitches.
The details remain: the upper part, like the hole for the thumb, can be decorated next to a picot, having previously knitted two or three rows of single crochets. We knit the second mitt in the same way as the first. A pair of fingerless gloves is ready!
Master class - how to knit men's gloves
As a good gift for a loved one, you can crochet men's gloves. This will not take much time and effort, especially if you work according to the master class on crocheting gloves. In this case, we will talk about beautiful gloves that will look great in a monochromatic, moderate color scheme, preferably black, gray, dark blue.
To begin with, you should also trace the outline of a man’s hand on paper, or measure his old gloves.
Materials for work:
- thin acrylic or wool blend yarn;
- hook No. 2-2.5.
The gloves are knitted in the transverse direction from the little finger to the thumb. One glove consists of two parts: the back with four knitted fingers and the inner with a knitted fifth thumb. We sew the finished halves of the glove together; finally, tie the cuff along the bottom with an elastic band made from embossed columns.
Progress
Cast on the initial chain of chain stitches from the beginning of the cuff to the tip of the little finger according to the pattern. Next, knit rows in single crochet stitches the width of your little finger. Start each new row of columns with one lifting air loop.
When knitting single stitches towards the fingers, knit to the base of the ring finger and cast on a chain of chain stitches up to the tip of the ring finger.
The inner half of the glove is knitted exactly the same as the back half up to the middle finger. At the beginning of knitting the index finger, in a row of stitches in the direction from the cuff to the fingers, tying the stitches to the base of the thumb, cast on a chain of chain stitches equal to twice the length of the thumb. Close the chain into a long loop, continuing to knit stitches in a row to the base of the index finger, then cast on a chain of chain loops to the length of the index finger.
Work several rows of single crochets, first along the index finger chain, along the wrist row to the thumb loop, then along the thumb chain and then to the cuff. Having turned the work, knit the stitches in the opposite direction until you have knitted strips the width of your index finger and thumb.
Place the two halves of the glove, the back and the inside, together. You can connect them by crocheting a row of connecting posts along the contour or simply sewing them with a needle; also sew the sides of the thumb. Turn the sewn glove over to the other side so that the seam is on the inside.
Along the bottom of the glove, first knit a row of double crochets, then two rows of embossed stitches, alternating convex and concave. Knit the second glove in exactly the same way, only when sewing, place the pieces so that the thumb is on the other side.
How to knit openwork gloves for a woman
Adding gloves to your wardrobe is always a great idea, because they warm your hands and complete a woman’s look in the cold season. Even needlewomen without much experience can do this with their own hands; you just need to select a detailed knitting pattern with a description. Let's look at how to create openwork crocheted gloves with step-by-step photographs.
We take measurements
Using the hand measurement method indicated at the beginning of the article, we determine the size of future gloves. Now you need to calculate the required number of loops. Usually, in descriptions of knitting gloves they mention how many loops are contained in a 10*10 cm sample. However, you can do it simpler: knit a small sample (10-15 loops, 4-5 rows) and find out how many elements are in whole centimeters.
In this case, there are 3 double crochets per 1 cm, that is, initially 3 air loops. The width of the glove is 8 cm, which means 8*3 = 24 (add 1 more loop to make the pattern symmetrical = 25).
Glove knitting pattern
Rice. 1: Knitting pattern for the upper part of the right glove; Rice. 2: Knitting pattern for the bottom of the right glove. Rice. 1: Knitting pattern for the thumb of the glove; Rice. 2: Knitting pattern for glove cuff.
Progress
We begin to knit the upper part of the glove of the right hand. We cast on a chain of 25 chain stitches + 3 chain stitches to move to the next row. We knit 2 rows with double crochets in each loop (photo 1).
In the third row we knit 6 double crochets, then we start knitting the pattern: we skip one loop, in the next we knit a “fan” of 6 double crochets, we skip one, two double crochets. We repeat the pattern element 2 more times and finish the row with double crochets (photo 2).
We knit another 8 rows with the pattern, or as many as needed for your hand size - try it on to know for sure. In the next row above the outer “fans” we knit only 3 double crochets, through one loop (photo 1).
We knit another row with a pattern element in the middle. Then 2 rows with single crochets. At this stage, the length of the part should be equal to the distance from the base of the palm to the base of the little finger ( d
).
Now you need to distribute the number of loops on each finger: 25 / 4 = 6 and one loop in reserve (6 - on the index finger; 7 - on the middle finger; 6 - on the ring finger; 6 - on the little finger).
We knit 19 double crochets, since the little finger is located slightly lower than the other fingers - we leave 6 loops for it.
Move to the next row and begin knitting the ring finger. In this case, there are only 10 rows of 6 double crochets. Finish with a “fan” of 6 double crochets in a loop in the middle of the row, fasten and cut the thread. At this stage, it is important to try the part on your hand to find out the desired finger length.
We knit the middle finger in the same way. In this case, there are only 12 rows of 7 double crochets. Finish with a “fan” of 6 double crochets in a loop in the middle of the row, fasten and cut the thread.
We knit the index finger in the same way as the ring finger.
We knit the little finger. In this case - 7 rows of 6 double crochets. Finish with a “fan” of 6 double crochets in a loop in the middle of the row, fasten and cut the thread. The upper part of the right glove is almost ready.
We tie the part in a circle with single crochets (2 single crochets for each outermost stitch, the tops of the fingers - 1 stitch in each loop and 1 stitch in the spaces between the fingers for a beautiful turn).
Now is the time to move on to knitting the lower part of the right glove, in accordance with the patterns indicated above.
We cast on a chain of 25 chain stitches + 3 chain stitches to move to the next row. We knit the lower part of the glove with double crochets. We knit so many rows so that the length of the part is equal to the distance from the base of the palm to the bend of the thumb ( in
). In this case - 10 rows (photo 1).
In the next row we leave room for the thumb. We knit 2 double crochets, skip 8 stitches (or as many as you need, try them on), above them we knit a chain of the same number of chain stitches and continue knitting with double crochets. In the next row, we knit 1 double crochet into each loop of the chain.
We knit to the base of the little finger. In this case - 3 more rows. We knit the little finger. Then we knit a row of 19 double crochets (photo 2). Then we knit the remaining fingers in the sequence: index, middle, ring.
We knit the thumb. To do this, we fasten the thread to the post adjacent to the place for the thumb, and knit 3 air loops. Then, 8 double crochets in each stitch and another double crochet for the adjacent stitch. In the next row we decrease one stitch, in the next row another one, up to 8 stitches (if the base of the thumb is wide, you can knit 2 rows without decreasing the stitches). In this case there are only 8 rows. Finish with a “fan” of 6 double crochets in a loop in the middle of the row, fasten and cut the thread.
Knit the other half of the thumb in the same way. And tie the parts with single crochets.
Another interesting model of knitted gloves is thin openwork. They are suitable for girls. same for girls. Beautiful, light, delicate - they are perfect for a beautiful outfit for a matinee, graduation or any other celebration. A detailed master class will help you learn how to crochet children's gloves.
Materials for work:
- cotton threads No. 30-40;
- hook number 1.
Progress
We start knitting gloves from the fingers. To do this, we knit 8 single stitches into the initial ring, tighten the ring, make a connecting loop in the first stitch and begin knitting with arches of 3 air stitches. loops in a circle around the cylinders, tying the index and middle fingers, try on the knitted cylinders and add arches to the base of the finger.
Connect the finished cylinders for the index and middle fingers and tie them around with 1-2 rows of the main pattern.
The next cylinder on the ring finger, also attach to the side of the middle finger and tie around now 3 cylinders.
Then it’s the turn of the little finger, attaching the cylinder of the little finger, tie the main pattern around the palm, do not forget to try on the glove while tying and, if necessary, make smaller arches between the fingers on the inside of the palm.
Having tied the glove to the thumb, attach the knitted cylinder and continue tying, making one arch decrease in each row on the inside of the palm from the point of attachment.
Having knitted to the end of the palm, stop decreasing and knit in the round until the required length of the glove, then tie the edge with a beautiful border according to this pattern:
Video lesson
A video master class will help beginning needlewomen quickly get used to the technique of crocheting gloves. This will save time and protect you from possible mistakes made by beginners. The video shows an option for knitting mittens - another interesting way to combine gloves, mittens and mittens.
Works from our readers
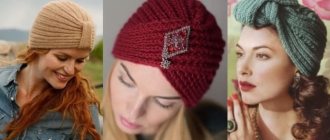
LD kit. Catherine's work
The set is knitted with a pattern called “Oak Leaves”. LD are the initial letters of the name of the pattern. Set size: gloves – palm volume – 20 cm, hat – 52-54 cm.
Knitting set: hat and gloves
Author Ekaterina. For knitting you will need: Yarn Art Merino Exclusive yarn (50% wool, 50% acrylic, 220 m / 100 g) 200 g light gray, knitting needles No. 2.5 and No. 3.5; knitting needles No. 2.5 (5 pcs.), needle for stitching.
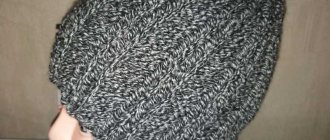
Gloves, beret and scarf made of down
Gloves, a beret and a scarf made of down are the work of Ksenia Vinogradova, sent to the Women's competition.
For knitting, you needed 100 g of “Winter's Tale” yarn (100% goat down 300m/50g), knitting needles No. 2, circular knitting needles No. 2, sock knitting needles No. 2.
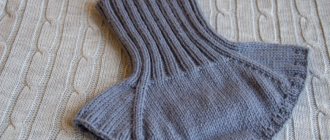
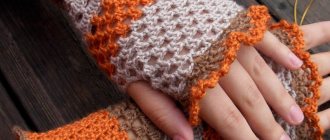
Knitted fingerless gloves
Work by Irina Stilnik.
Description of gloves
I cast on 40 stitches on toe needles. (4sp.x10 stitches) knitted with 1x1 rib, 19 rows.
I knitted it quite tightly so that in the future the elastic would hold its shape and be tight, then I knitted another 2 cm in stockinette stitch. I left room for the thumb (I removed 8 stitches on a pin, and instead cast on 8 chain stitches on a knitting needle). Then I continued to knit the fabric from the front stitches for another 3 cm. Then I knitted an elastic band, the same as at the beginning. Having knitted 9 rows of elastic, I closed the loops. Tied my thumb. If desired, the mitts can be decorated with beads or ribbon. I wear them with pleasure!
Rules for knitting mittens and gloves for beginners
First option
This master class provides a detailed description with which you can crochet an interesting colored mitten with a folding top. To knit such a mitten, you don’t need to spend a lot of time, and even more so, the work is worth sitting down for a couple of evenings and making a masterpiece with your own hands.
What you need to knit these mittens:
- Bambino thread 100% acrylic 200 m per 50 g, and we need one skein of turquoise color, 30 g of burgundy and white;
- hook number 3;
- two pieces of buttons.
To knit the back part, make a chain of 32 chain buttonholes. Next, we tie this chain on both sides with single crochets. To turn the work and knit on the other side, you need to knit three single crochets into the last buttonhole. Then you need to knit in two directions - forward and reverse, changing the colors of the threads for 12 rows, while in each row we make an increase of three times two single crochets.