You can complement and decorate a man's wardrobe with a vest. A men's sleeveless vest will become an indispensable item for anyone who works outside in the cold season. The same sleeveless vest will help make your office outfit more formal. The product can be bought or knitted with your own hands. It turns out that choosing such a wardrobe item in a store is not so easy. It needs to be harmonious with the rest of your clothes. To knit it, you need to choose threads and choose a pattern that a man will like.
Short description
The original men's knitted vest is a practical and comfortable sleeveless garment that can be safely worn over a shirt, golf or sweater. Depending on your body type and personal preferences, you can knit a fitted, semi-fitted, straight, long or short model. The main advantage of such clothing is that it goes well with almost all styles and looks. A sleeveless vest knitted from high-quality yarn is most suitable for cool autumn evenings and cold winters. In addition, many women often decide to knit a vest as a gift for their beloved man.
It is also worth considering that there is one big difference between men's vests and sleeveless vests - the number of parts. The vests consist of two shelves and a back, and are also equipped with a special fastener.
But sleeveless vests only include the back and front.
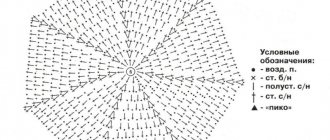
Men's knitted vest pattern
There are a large number of patterns for knitted men's vests; we offer interesting and simple options.
option 1
option 2
option 3
Types of sleeveless vests
Over the past few years, the leading position has been occupied by the vest model that was made in elementary stocking stitch. The secret of such a product is that the front rows of all parts are connected to each other by facial loops. The cut in this case can be completely different:
- Necks with a small collar or in the shape of a miniature toe.
- The main part of the front part is divided into two shelves or solid.
- The planks are tied together with a neat braid, a small elastic band or other pattern.
These options are often chosen by beginning craftswomen, because making mistakes in this case is quite difficult.
Selection of yarn and knitting needles
Experienced craftswomen always note that a men's vest knitted with knitting needles should be equipped with button fasteners. That is why it is better to select 6-7 small buttons in advance that will match the main color of the selected yarn. In order for the final result of the work done to fully meet all the requirements, you must first knit the sample. It is from this that it will be possible to calculate the required number of loops that will need to be cast to make a vest of the required size. In addition, information is always indicated on the yarn, thanks to which you can calculate the approximate consumption of the thread used.
It is worth noting that it is much easier for beginning craftswomen to work with Lanagold yarn . Such indicators are due to the fact that its composition contains 51% acrylic and 49% wool.
As for the choice of knitting needles, it all depends solely on what pattern needs to be made and the number of yarn used. No less important is the density of knitting, which is absolutely individual for each needlewoman. This is due to the fact that during operation different intensity of thread tension is used. Because of this, sewing the same item may require different amounts of yarn.
When the yarn number is selected, then you can safely select the most suitable knitting needle size. In this case, it is important to note that the thickness of the thread should not exceed the thickness of the knitting needles used.
Many craftswomen prefer to knit several samples of yarn in advance, which should be made with knitting needles of different thicknesses. It is from these samples that you can choose the most suitable option.
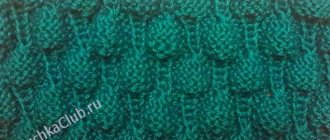
Models of men's knitted vests, photos
option 1
This option is very good because it is easy and simple to knit. There is a simple pattern here, and you can also choose absolutely any thread for knitting this product.
option 2
This version has a rather complex pattern, but interesting. This type of vest is also ideal if you combine a men’s vest with a shirt, turtleneck and even a sweater. You can use any thread for knitting. Also, the model will look good in any color shades.
option 3
Quite a stylish type of vest that can be worn with a tie or even a bow tie. It is impossible to freeze in such a vest, since it is knitted from thick wool yarn. In this option, you can choose any color; a drawing in any color will look beautiful and original.
option 4
This vest has an original pattern that is very easy to knit. You can use any thread for knitting this vest, but preferably not too thin; Turkish types of threads, such as Yarnart or Gazal, are perfect.
option 5
A great option for a vest with buttons that will go with any outfit. The only thing is that knitting will be a little difficult for beginners, since the pattern is complex. But when knitting, you can use any other pattern, not necessarily this one, or just knit with stockinette stitch, which will also look quite attractive.
Classic model
Recently, more and more craftswomen are deciding to knit a men's vest with knitting needles. The diagrams and description of this process are quite simple, especially if you already have relevant experience. To sew a classic vest you need to follow a few simple steps:
- We take knitting needles No. 3.5, cast on 123 loops and knit 7 cm with an elastic band (1 loop should be front, 1 purl).
- Now you need to take needles No. 4 and continue knitting the pattern according to the pattern. In one purl row you should add no more than 8 loops, for a total of 131.
- On both sides for the armholes at a distance of 40 cm we close off 4 loops (this procedure is carried out until 99 loops are released).
- Under each shoulder at a height of 70 cm, be sure to close 28 loops. To form the neck, 43 loops are allocated.
- The front part is knitted according to the same pattern as the back. But at a height of 42 cm you need to make a V-shaped neckline cutout. For the result to exceed all expectations, you need to close the middle loop and knit both sides separately. Every other row, decrease along the inner edge 20 times, 1 stitch at a time. At a height of 68 cm, we close 28 loops for each shoulder.
- At this stage, you can safely begin assembling the vest. Each detail must be glued to the pattern and slightly moistened. The product must be allowed to dry. Now you can sew one shoulder.
- Again we take knitting needles No. 3.5 to pick up all the stitches along the edge of the neckline. We outline a corner loop and knit with an elastic band (1x1). In this case, in each paired row on both sides we decrease one loop 6 times.
- We knit another 10 rows and close the loops according to the pattern.
- Gradually sew the second shoulder. Along the edges of the armholes, be sure to lift the loops using knitting needles No. 3.5. We knit another 6 cm with a 1x1 elastic band. Only after this will it be possible to close the loops according to the pattern.
- We perform all side seams.
After this, self-knitting a vest for a man can be considered complete .
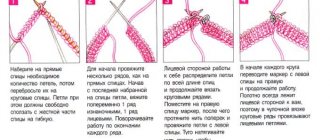
Men's knitted vest with a hood, diagram with description
Knitting a hood is not that difficult. It can be knitted separately, and then attached to the vest, or you can start knitting it after the main part of the work is ready. The hood can be knitted in several ways: according to the principle of knitting the heel, as well as dividing into the left and right parts (the second option is convenient for knitting hoods with patterns).
This version of the vest can be complemented with a scarf of the same color, and you can also knit an original men’s hat and gloves.
You can see several more options for knitting vests by watching the video.
A sophisticated product
Many representatives of the stronger sex, who often attend business events, increasingly prefer a knitted men's sleeveless vest. Schemes and descriptions of making such clothes are distinguished by their versatility, because the final item will definitely turn out neat and unobtrusive. The presented model is most suitable for those men who wear clothes of sizes 52-54.
First of all, you need to knit the back. We cast on 110 loops and knit with an elastic band of 6 centimeters one after another. In the next row you need to add 12 stitches to make 122 stitches. Only when the craftswoman has knitted at least 49 centimeters of the product will it be possible to close the loops for the shoulder bevel. Initially, 4 pieces each, and then in every second row you should decrease three, two and one loop. Having knitted 25 cm, we close 34 loops along the edges from the beginning of the bevel. As a result, 34 central loops should remain, which must be removed on an additional knitting needle.
Preparing for work
If you know how to knit, then this task will not be difficult for you. First of all, you need to decide for what purpose this thing is needed. Next, you need to select the threads and select the appropriate pattern.
To correctly calculate the number of loops for a men's knitted vest, you need to knit a pattern sample with the selected threads . Using it, the knitting density is calculated and the required number of loops for the front and back of the product is calculated.
For those who are making a large product for the first time, experts recommend making a life-size pattern. It is used when you need to close loops for armholes and necklines.
Unconventional approach
Over time, each craftswoman gains the necessary experience to independently make any amendments to the patterns used. In this case, an unusual sleeveless vest for men, which is very practical to wear and looks attractive, is in great demand.
To sew the back, you need to cast on 126 loops and carefully knit with an elastic band of 7 cm. When you have knitted 37 cm, you need to make a special armhole, gradually closing 10 loops (5 loops only once, after that there are 3 loops in every second row, and then 2). After this, you can safely knit without any decreases. The neck is formed at a height of 67 cm; there should be 42 loops in the center of the sleeveless vest. Having knitted 4 rows, you can carefully close the loops on both sides, thereby completing the back.
The front part is knitted in the same way. When 45 cm are knitted, the work must be divided into 2 equal parts, each of which is knitted separately. From the next row you need to decrease one loop 21 times. All loops are closed only after the craftswoman has knitted 65 cm of the product. The binding and neck must be tied with an elastic band (6 cm 1x1). Depending on personal preferences, the finished product can be equipped with original and spacious pockets. Having done all these manipulations, you can get a high-quality and original sleeveless vest that is suitable for men of all ages.
Neck treatment in a men's knitted vest
V-shaped neck processing
Before forming the neck, you should initially select the desired height for the neck. This could be a deep V-shaped neckline or closing the neck loops in a circle. In such cases, they apply the finished product to another item, for example, to a T-shirt, and use it to measure at what distance the neckline will begin.
- Initially, you need to finish the left side of the work. To do this, in every third row, the 2nd and 3rd loops should be knitted with pulling.
- On the right side, knit the last two stitches together for the bevel.
- To form the strip, the edge is cast on and the loops for the binding also begin to be cast on the left side.
round neck processing
- To knit a round neck, it is important that all its edges are smooth and round.
- After the knitted parts have been processed, it is necessary to cast on the knitting needles the loops corresponding to the length of the neckline. You can cast on through one loop, not necessarily in a row (there will be no holes).
- You should knit with an elastic band of 2 x 2 approximately 7 cm. The number of loops should be a multiple of 4.
- After knitting, close the loops and hide the thread.
Original item with zipper and pockets
This model is the most popular, as it is not only youthful, but also very practical. The main importance in this case is the correctly selected yarn and combination of colors used.
A men's knitted vest will definitely complement the image of a confident man. To knit such a product yourself, you need to follow these steps:
- Initially, you need to prepare high-quality material. In this case, it is best to use high-quality, pleasant to the touch yarn of a dark brown color. To work you will need around 600 grams. You also need to take blue thread (200 g), a strong brown zipper and knitting needles traditional for this procedure.
- The parameters of the elastic band should be within 1x1. Each purl row must be knitted according to a specific pattern.
- The edge should consist of two consecutive loops. The first two must be knitted in neat stockinette stitch.
- An excellent result can only be achieved if the density is 17 loops per 24 rows.
- Particular attention should be paid to sewing the back. Using a brown thread on a needle number 4, you need to cast on 94 loops and knit four centimeters with an elastic band. After this, you can knit in stockinette stitch using blue thread. When the height of the product is 48 centimeters, then on each side of the elastic it is necessary to close three loops for the armhole at once. After 2 cm from the beginning of the armhole, the middle 18 loops should be closed for the future neckline.
- If the height of the fabric being produced reaches 68 cm, then you will need to gradually close 24 loops for each hanger.
- Now you need to make the right shelf. For a spacious pocket, you need to cast on 21 loops with brown thread and knit with a neat stockinette stitch.
- When the height of the workpiece has exceeded 10 cm, it can be safely put aside. You need to take needles No. 4 and blue thread to cast on 46 loops and knit a 4 cm elastic band. It is worth noting that on the side of the zipper you need to make an edge of two loops.
- Take knitting needles No. 4.5 and knit with stockinette stitch (it is important not to forget about the edge).
- When the height of the working fabric exceeds 13 cm, then to exit into the pocket on the front side you need to cast on 17 loops, and remove 21 loops onto an additional knitting needle (they must be replaced with burlap pocket loops).
- At a height of 40 cm from the edge of the product, it is necessary to close the hole for the hand from the side of the seam (3 loops). In each subsequent row, close 2 times with 1 loop.
- For the neckline, you need to close six loops at a height of 20 cm from the beginning of the armhole. When the height of the product is 70 cm, you need to close 24 loops to form the shoulder line. It is worth noting that the left front is knitted in a similar way.
- All that remains is to assemble everything into a single structure. The craftswoman needs to make shoulder seams. Using knitting needles with blue thread, we collect all the loops along the edge of the neckline. We knit 13-15 cm with an elastic band (everything should correspond to the picture). Absolutely all armholes are processed in the same way, only the height of the elastic band being formed should be at least three centimeters.
- To make pocket flaps, you need to remove 24 loops from the previously left extra knitting needle with blue thread.
- At this stage, all that remains is to sew in the prepared zipper and make neat side seams.
Knitting with a braid pattern
For size 52−54 you need:
- 600 grams of yarn;
- knitting needles number 4.
Based on the knitted pattern, we determine the knitting density: 10 cm is 20 loops. Having this data, we get to work.
You should start knitting from the back. Having cast 110 loops on the knitting needles, you need to knit 6 cm with an elastic band. 1x1 looks better in work. In the last row, evenly add 12 loops: 122 stitches on the knitting needles. We continue further work according to the diagram, which shows only the front rows. In purl rows, all stitches are knitted according to the pattern.