Home → Fabric properties → Right side of fabric
The right side of the fabric in textile materials can be difficult to determine. Today we will talk about how to find it. We will take into account only textile materials. That is, we will not consider knitwear in this article.
The question of determining the front and back side arises every time you start sewing.
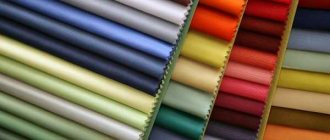
And it’s good when the face is significantly different from the backside:
- colors on the face are brighter;
— the drawing is clearer;
- the texture is denser...
But what if it is difficult to determine the front side?
For visual learners, there is a video at the end of the article.
The right side of the fabric in a roll
It is better to take care to find out how to distinguish the reverse side from the front side of the fabric at the stage of purchase in the store. When the fabric arrives in a roll, the seller knows exactly where the right side of the fabric is. Although different materials do not fold the same way.
Most fabrics are packaged face inward to avoid accidental damage during transportation and to prevent the fabric from fading if the roll is exposed to ultraviolet radiation. Woolen, silk, printed fabrics and most others are rolled inside. Only cotton fabrics are folded face up.
Front side of tulle
Tulle is a lightweight transparent fabric with a mesh or patterned structure. To determine the “face” or underside of the material, you should fold its edge and carefully examine both surfaces. The outer surface will be more shiny, smooth or, conversely, with voluminous lace. Then it’s worth studying the edge. If visual techniques did not help determine the outer surface of the tulle, you should remember tactile sensitivity, which certainly will not let you down. If after this you still have doubts, you should contact specialists in a store or studio, who often ask the question “how to determine the sides of materials” and find the correct answers to it.
Only when it has been possible to determine “which side of a particular fabric sample is the front” can one begin to create the product for which the fabric itself was purchased. This will help to avoid material costs, as well as nervous shock.
How to determine the right side by the edge of the fabric - a universal method
Edge – a narrow (1-1.5 cm) edge of the canvas, which is necessary in the production process. The first sign of how to recognize the right side of a fabric by the edge is to look for punctures on it. They are clearly visible and will have either a convex or concave appearance. This is how the front side of the fabric is determined by the holes. Since the material is placed on the machine inside out, the bumps of the punctures will be on the face. This method of determining the wrong side and right side of the fabric is suitable for most fabrics.
If the punctures are not visible, look at the surface roughness: the face will always turn out to be smoother.
When the front and back sides of the fabric cannot be determined by touch, pay attention to the color - on the front side of the edge you can usually see inclusions of threads of a different color from the main color. They will not be visible from the inside out.
Another marker is possible technological inscriptions. The manufacturer can write the batch number and country on the edge. But there may be only one or two such inscriptions on a roll.
Double-sided fabrics
A large number of fabrics produced today can be classified as double-sided or double-faced. As a rule, the front side of the fabric is very difficult to determine. In this case, understanding exactly which side is which can only be achieved in one of the universal ways: along the edge or at the stage of purchasing a roll. It is difficult to distinguish, for example, the sides in tartan - this type of variegated fabric looks exactly the same on both sides.
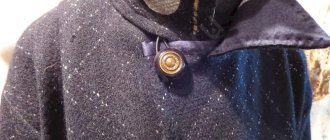
Raincoat fabric: basic properties
Raincoat fabric can be plain or patterned, smooth or quilted. Stitching is used mainly for clothes with insulation, and the thickness of the puncture should be minimal so that fluff or padding polyester does not come out.
At the same time, the raincoat fabric “breathed,” that is, it allowed air to pass through. After this, gabardine trench coats became fashionable among ordinary people, they were transformed into raincoats, jackets of various lengths and styles, and then into coats and even overalls.
Now the composition of raincoat fabrics can be different; they are mainly made from mixed fibers. Domestic ones consist of cotton and lavsan, foreign ones are made of cotton and polyester. Also, raincoat fabric can be 100% synthetic - from lavsan and polyester (polyester base) or lavsan (polyester) and nylon (polyamide).
In the mid-twentieth century, the Italian organic chemist Giulio Natta invented isotactic polypropylene, which was subsequently used in the production of bologna fabric (the name from the Italian city of Bologna).
In order to prevent the inside from coming out, you need to put a stitch inside the cap along the edge, this way we will secure our seam.
Turn it right side out and carefully run the iron along the seams in order to later lay a finishing stitch along the upper edge of our cap.
Now we need to insert the parts into each other with the front sides inward.
And here's the front one.
And stitch along the top edge straight in the circle.
Next, iron the seams again and add a finishing stitch along the top edge.
Front view.
How to sew a fabric mask with a filter? Sewing exactly repeats the algorithm of method No. 1. However, during the manufacturing process it is necessary to insert a filter between the layers of the mask. This protection will help avoid even the smallest particles.
In a pandemic, a person can only protect himself from infection with a dangerous virus. Unfortunately, this is not so easy to do, because it is difficult to buy in a pharmacy. There is nothing left to do but make a mask with your own hands from fabric. To do this, you need to buy medical fabrics with the desired properties, and our online store for sewing materials Decobay will help you with this.
More homemade products: How to shorten shoe laces without cutting them - with photos
Instructions on how to determine where the front side is for different fabrics
In addition to universal methods for determining the front and back sides, there are also individual ones for each type of fabric. First of all, the material needs to be laid out on the table and one corner bent so that you can closely compare the face with the back. It is better to do this in daylight. Some fabrics will show both sides well even in artificial light. But there are some that look deceptive and can let you down in the evening light.
- Printed fabrics. They are easy to work with. Even a beginner in the sewing craft can guess what criteria are used to determine the front side of a fabric with a print. The printed design looks bright and clear on the front side and dull and faded on the back. In addition, your face will feel smoother and more even to the touch, perhaps with a little shine. From the inside, the fleecy (fluffiness) of the fabric will be felt more and there will be no shine.
- Defects on fabrics. Today there are not many fabrics with defects produced, but they do happen. If you see a knot or a barely noticeable thickening of the thread somewhere, this is the wrong side; all defects during the production process are hidden there.
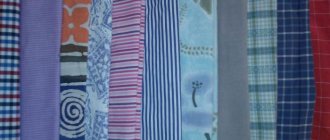
- Plain fabrics. On the front side the edges have colored threads, which are not present on the back side.
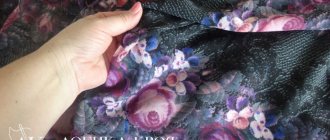
- Textured fabrics. These are materials with a voluminous pattern such as jacquard or boucle. This also includes all lace fabrics. Here the method of determination is simple - the front side of the fabric has a large convexity of the pattern, which is easily determined by touch. The color will be brighter on the face, but this difference is not always noticeable, especially in the evening under lamp light.
- Atlas. The front side of this type of fabric is always glossy or shiny. Where the surface is matte is the reverse. However, the beauty of satin fabrics is that both sides look spectacular together in finished products. But this does not eliminate the need to strictly monitor the correct cutting.
- Satin fabrics are rougher on the inside and vice versa, smooth and shiny on the outside. Here, on the reverse side, the hairiness is especially noticeable, which is not present on the face.
- Crepe fabrics. It is impossible to visually distinguish the face from the back, only by the edge, but this is not particularly necessary - both sides are almost the same.
- Fuzzy fabrics. What is the front side of velvet type fabric? This is the side where the pile is longer. Very easy to determine
- Blended fabrics. They pay attention to possible defects and roughness (knots and weaves). The front side is shiny and looks perfectly smooth, the back side is matte and faded.
- Curtain fabrics. As a rule, the front side of the fabric is determined by the greater convexity of the pattern, looks perfectly beautiful and does not have any defects or the slightest imperfections.
- Transparent thin fabrics. In them, the brightness of the pattern is usually difficult to discern - the face and back of chiffon and cambric can only be determined by the edge. It is also not always possible to visually understand materials such as cotton and linen.
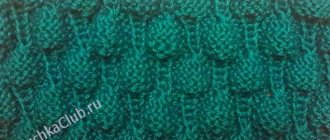
- Knitted fabrics. As a rule, in most of them, due to the large curvature of the threads, the back side of the cross-knitted fabric is more matte than the front side.
The most reliable option for determining the front and back sides of a fabric is to ask the seller to mark the back with chalk when purchasing. This will eliminate unnecessary doubts and save a lot of time.
Marking of parts when cutting
When sewing, situations arise that make it difficult to determine the front side. For example, loss of lobes, poor vision or lighting. In production, cutting details are marked in the preparation area.
In everyday life, it is also important to mark the cutting details as soon as they are cut out. The parts are stacked in pairs and you know where the face is and where the back is. The mark is made on the wrong side.
Marking is done with chalk or etiquette tape on the reverse side of each cut detail.
Sometimes, for example in high-quality plain weave fabrics, it is extremely difficult to determine the right side. In such cases, you need to choose the side of the fabric you like best and consider it the front. However, you shouldn’t ignore the markup in such cases either. In a product exposed to light, the fabric may show different shades.
Share your experience in the comments! This will help beginners (and not only) not to make mistakes and not lose their creative enthusiasm before completing the project!
- Related Posts
- Stretch velvet. Patterns
- Velvet dress - a modern choice
- We sew bed linen!
- TOP 5 features of sewing knitwear
- Adhesive interlining materials for sewing
- How to determine the quality of fabric when purchasing
Discussion: there is 1 comment
- Maya:
September 6, 2021 at 09:09 pmThank you!
Method 2: Sewing a medical mask with a filter
Every day after use, the mask should be washed in hot water and ironed to kill the microorganisms accumulated in it.
Buy flax for a medical mask
There are many ways to sew a medical mask from fabric. Remember that a medical mask does not provide 100% protection against infection, but it will help protect you from infecting others. In the Decobay online fabric store you will find all the necessary fabrics for medical masks.
The authors extracted pattern instructions from the proprietary KnitPain software. The patterns come in different sizes and cover a wide variety of designs, from regular back stitches to lace stitches. There are about a thousand templates in the set, which were divided into small 20x20 sections. From these areas, a two-dimensional set of commands can be generated. In total there were 12392 photographs with patterns. The authors then created new images in two different ways:
The first 5 rows of the table are the results of previous neural networks for comparison. It can be noted that the S + U Leaning method turned out to be closest to the accuracy of Img2prog.
— displacement (racking) : changing the location of the spokes relative to each other.