More and more fashionistas and fashionistas are switching to online shopping.
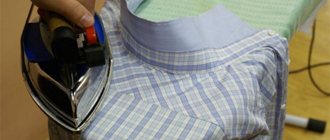
The specified volume parameters do not always correspond to those specified in the size tables and diagrams. Therefore, it is very easy to get into trouble by ordering something without trying it on. If such an embarrassment occurs, and there is no possibility of a return and the money has been paid, there is nothing else left to do but to give the new thing to the atelier, into the hands of the milliners. If you are at least a little comfortable with a needle and thread, it will not be difficult for you to sew up clothes with your own hands. In addition, this is a significant saving, and the process will take very little time. Let's look at the example of a shirt.
How to make a shirt a size smaller
It is difficult to make a shirt that is too wide, but making it a size smaller is a matter of one evening.
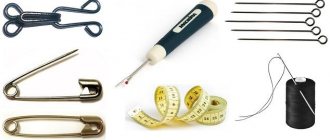
Prepare your tools:
- several needles of different thicknesses for piercing the material;
- fixing pins;
- centimeter for measuring measurements;
- sharpened tailor's scissors
- chalk.
The sewing process is almost the same for both women's and men's clothing items.
First you need to decide in which places the item is too big, then start repairing it. Experienced seamstresses recommend wearing items inside out. This makes it more convenient to take away the excess fabric, pin it together, and mark out new lines for the stitches.
After this procedure, turn it inside out and try it on.
The easiest way is to fit it. When doing this work, the main thing is not to make folds along the line.
It is better to sew a product with a seam in the middle of the back not along this seam, but along the sides, making a rounded stitch.
The work process step by step:
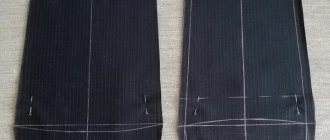
- Put the shirt on the person inside out, that is, facing the body.
- Starting from the bottom seam, pin the fabric together so that a slight rounding is formed in the waist area.
- Above the waist, pin the shirt 10-15 cm upward, making a smooth transition from the new line to the old one.
- Lay the product out on a flat surface and carefully lay a basting thread.
- Sew along the basting, trim off excess fabric.
- Finish the cut with a zigzag.
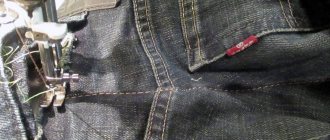
Shirt sleeve repair
First of all, here is how long the sleeve should be:
A man's shirt often has to be shortened not only in length, but also the sleeves. Many dressmakers are confused by the cuff.
You can shorten sleeves with cuffs in two ways. But first you need to determine the length of this part. The cuff should reach the bone, which is located at the base of the thumb, that is, extend beyond the edge of the jacket sleeve by about 1.5 centimeters.
Easy way
You can only shorten the shirt in a simple way that is always worn with a jacket, since you will have to make a reduction approximately in the elbow area.
Put on a shirt, pin up excess fabric, check the length is correct, sew on a machine, remove excess fabric.
Another way without touching the slot:
- Open the cuff and secure the folds with pins.
- Measure the length to be removed, not forgetting the seam allowance.
- Trim off excess fabric.
- Sew on the cuff.
Complex repair option
How to properly remake a sleeve, cutting off the splines:
- Open the cuff, pin the folds completely, or better yet, sweep them away so they don’t come apart.
- Undo the splines.
- Shorten the sleeve at the bottom, leaving an allowance of 1 cm.
- Measure the size of the old spline.
- Mark a new slot: set aside the same length from the bottom cut line that it had.
- Make a cut for a new spline.
- In the upper part of this part, make a triangular cut equal to the one that was there.
- When turning splines, start working with a narrow element. Sew it down into a triangle at the top of the cut.
- Next, stitch on the wide facing.
- Sew on the cuff and topstitch.
Putting all the parts together
Now all you have to do is put the sleeves back on. After turning the shirt inside out, turn the sleeves right sides out. Arrange the shirt and one sleeve as shown in the photo below, making sure the buttons on the cuff are facing down toward the table (if they are up, you'll need to switch sleeves).
Place the sleeve inside the armhole as shown in the photo below.
Align the raw edges of the sleeve and the armhole, then pin everything together well and you can sew it neatly.
Repeat the same manipulations for the other sleeve, smooth out all the seams and admire your new smaller shirt!
Found a violation? Report content
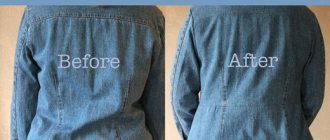
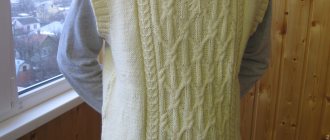
Reducing shoulder width
The product is wide at the shoulders and is not difficult to reduce to the desired size. If the shirt is not too large, then it can be sewn in without ripping.
Without ripping
- Measure the length from the collar to the end of the shoulder, mark.
- From this mark, draw a line with chalk to the armpit along the front and back.
- Cut the fabric along the drawn line, leaving an allowance.
- Pin the top of the cut piece to the end of the shoulder line.
- Baste with back and shelf. The size of the armhole has become larger, so it needs to be reduced. The reduction is described above in the text
- Sew the joined parts and iron them.
Repair with ripping
- Use a seam ripper to cut out the sleeves.
- Determine the length of the shoulder, draw with chalk on the fabric. Check symmetry.
- Cut off the excess fabric, connect the sleeves to the back and front, and sweep. If the sleeve does not coincide with the reduced armhole, then it should also be sutured.
- Double stitch.
What to do if the shirt is too big in all respects? It is necessary to complete all stages in turn. First sew in the shoulders, then the armholes, then along the side seams. Then shorten and sew in the sleeve.
The last step is to shorten the shirt. It is necessary to mark the desired length, bend the fabric 2 centimeters, and baste. Then iron it, make another fold, iron it, and sew it on a machine. A woman's shirt can be hemmed on the arms.
Layouts for armholes
When sewing in sleeves, you may encounter various difficulties - folds along the edges, tightening of the fabric in the armhole. Without control notches, part of the part moves up or down. Therefore, having found your “ideal” basis for the bodice and sleeves (it is usually single-seam), it is worth creating a layout for the armhole according to your measurements. It will allow you to make all the adjustments in advance, and there will be much fewer mistakes during fitting.
The drawing does not take much time and fits on a standard A4 sheet. Having made a basic pattern, you can use it to create various clothes - jackets, dresses with long sleeves, coats. You will simply need to attach the layout in the “working” pattern and determine whether it needs to be expanded, deepened or reduced. It will help solve many problems even at the drawing design stage.
Possible shortcomings
- Inconsistency between armholes and sleeve lines (for example, if the gathering allowance is not made or is too large, or the magazine pattern does not suit you personally). You need to move the top point along the edge to suit the features of your figure.
- The difference between a layout and a ready-made “alien” scheme, which does not take into account individual sizes and body features. If you use a standardized drawing rather than an individual one for cutting, you will have to change its armholes (adjust the depth, the slope of the seam along the shoulder).
- Violation of the length of the side seam. When changing the size of the armhole, place the parts of the drawing side by side and make sure that the designations for the back and front waist are on a single line.
lystit.com
How to sew a collar
If the collar is large, then it is better to take the men's shirt to a tailor. Only an experienced seamstress can do this job.
A women's blouse with a soft collar can be repaired with your own hands.
Stages of work:
- Open the collar, turn it inside out, then fold it in half, find the middle, mark it so as not to lose it. Spread it apart, retreating from the middle by 7-8 centimeters in both directions.
- Measure how long it needs to be sewn, baste on both parts of the collar, sew on a machine, cut off excess fabric, smooth out the seams.
- Machine sew the torn part.
- If the collar of the blouse has become larger, it must be sewn in along the shoulder line or along the seam on the back.
- Sew the collar in place
Let's start sewing
When you have outlined everything, tried it on and you are completely satisfied with the appearance of the product, you can begin the “machine work”. But sewing on pins is very inconvenient, so we do the following:
- We mark the top of each dart with chalk or a water marker.
- We make a mark on the waist line where it intersects with the future dart.
- Immediately on the waist line we mark the width of the dart.
- For convenience, we connect the width marks and the vertex using a ruler.
- Remove the pins.
Correcting
Of course, everything looked perfect on the model, because that’s what you were striving for. It looks like you drew all the lines accurately. But all this does not give a 100% guarantee that the darts on the finished product will be symmetrical and identical. It’s better to measure seven times, and only then write:
- Determine the line of the middle of the back - there is a dot there.
- Fold the product in half so that the fold is exactly in the middle of the back.
- Don't forget to carefully match the side and shoulder seams, as well as the armhole lines.
- Insert three pins into the fold line - below, at the waist line and above.
- Connect the punctures with a straight line.
- Check the perpendicularity of the middle of the back and the waist line (a very convenient thing is a tailor's square).
- Check how well the dart lines match. If they diverge, they need to be corrected.
Important! There are situations when the darts should not be the same. If a man has a noticeably curved spine, check only the symmetry relative to the midline; there is no need to align the vertices, nor the depth.
Shutdown
The next stage of work is sewing the darts. The procedure is the same as when sewing any other product with similar details:
- Baste the darts strictly along the lines.
- Try the shirt on a model and see how it all looks.
- If necessary, make another correction.
- Sew the darts, paying special attention to the tops - there should be no sharp transitions, the transition into the main fabric should be very smooth.
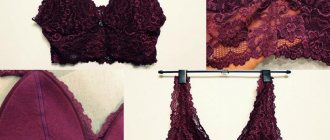
Wide blouse requires suturing
I liked the blouse, but it is too wide. It's okay, it can be reduced. You can sew the blouse in width by using darts and reducing the side seams.
Excess width can be taken into the side seams. At the same time, you need to understand that you will have to reduce the armhole and sleeve width by the same number of centimeters as the side seam or make the armhole deeper so that the sleeve fits into it.
Darts at the back
It's easy to make darts. Follow the advice from experienced craftswomen: make a dart pattern on paper, cut out the location of the dart. Turn the blouse inside out and fold it in half.
Having marked the middle, set aside 10 centimeters from it in both directions. Using the pattern, simply trace the cut out dart on one and the other side of the product with chalk. The upper corner should reach the chest, and the lower corner should reach the hips.
Pin out the darts, try on the product to make sure it fits your figure. Then sweep and smooth the darts to the sides.
The main defects associated with the armhole
In self-sewn or ready-made clothing, there may be design defects and imperfections that appear during movement. When modeling a product, it is very important to calculate the size of the increases and distribute them, based on the physique and configuration of the model.
If you set incorrect values on key structural chords, the shape of the product will be distorted. Therefore, when creating an armhole, you need to carefully measure the circumference of your chest and determine the increase based on it. The quantities are related and change in inverse proportion. As the increases on the chest increase along the armhole, they are reduced in width. The required armpit depth is also taken into account. The larger it is, the smaller the increase in width should be.
When putting on a thing, you can immediately detect a problem, but a number of shortcomings “appear” only in motion.
The main static defects of the armhole
- The shelves are too short, “turned up” or overlapping each other. To eliminate it, you need to correct the axillary line.
- Deviation of the sleeve forward or towards the back, caused by incorrect definition of notches along the armhole. It is worth suturing and redoing the neckline to correct longitudinal, oblique or transverse creases.
- Oblique folds under the axillary notch (towards the shoulder blade), resulting from too little inclination of the cuts along the shoulder. You will have to deepen the armhole while simultaneously adjusting the shoulder line.
- Creases along the armhole, running obliquely along the front to the neckline (they appear if the flange on the side is too long). To fix it, you need to deepen the neckline, change the chest dart and shorten the seam on the side.
beautiful-dusha.ru
Other disadvantages may appear when moving:
- inconvenience when moving your arms forward - they are caused by excessive narrowing of the armhole - therefore, before suturing it, a careful fitting is performed;
- unaesthetic shape of the armhole due to an incorrectly narrowed edging on the sleeve - the neckline is redesigned;
- difficulty raising the arm - the depth of the cutout decreases, while the reserve is used (it is left along the bottom line).
An incorrectly sewn sleeve can also wrinkle on a finished item - they correct the situation by adjusting it and the armhole. To correct this and other shortcomings, it is necessary to re-design the cutout line.
How to make a uniform shirt smaller
Often military, police, and railway workers are given a larger shirt. Is it possible to reduce the size of a uniform item? The principles of reduction are no different from the repair procedure for all types of this wardrobe item.
You should reduce your military shirt size by one size without ripping. Pin the shirt, starting from the shoulder to the armpit, sweep it, iron it. Sew by machine. Cut off the excess fabric and process the cut using an overlocker.
If the product has elastic, then along the side seams it should be reduced to elastic:
- Open the sleeve, reduce the side seam.
- Reduce sleeve width.
- Sew on the sleeve.
If the product is large at the shoulders, then you can reduce it in this way:
- On the shirt owner, measure the required distance from the collar to the shoulder line, mark with chalk.
- Lay the shirt out on the table and draw the line of the future seam along the marked line. Fold the product in half and make a symmetrical mark on the other side of the product.
- Cut along the drawn line. Cut a few millimeters from each sleeve and baste to the central part of the shirt.
- Sew on a machine, remove excess fabric, zigzag along the cut.
If the collar is soft, then decrease it as on a women's blouse.
Sewing a children's shirt
To sew a sleeveless shirt for a child, you should turn it inside out and lay it out on the table. Next, mark the new lines for stitching with chalk. Seamstresses recommend immediately taking into account the width of the sleeve.
Baste with thread, try on, sew on a machine. The rest of the repair of the product is done in the same way as on adult things.
Finally: we have made a selection of recommendations from experienced seamstresses on how to sew a shirt. They achieved results through experience. If you have your own techniques for repairing shirts, write in the comments. They will come in handy too. Learning new things is always interesting.
What you need for work
So, let's prepare the ground for sewing. You will need:
- Needle of the required thickness.
- Pins for securing parts.
- Sewing machine (if you have one).
- Threads matched to the color of the product.
- Scissors, preferably sharpened ones.
- Centimeter tape for measurements.
- A bar of soap or chalk for drawing.