Both everyday and festive women's Russian national costume requires a headdress. They are presented in a very diverse manner, and a modern person can very easily get confused. Moreover, most likely, they will seem almost the same to us. And in the times of our ancestors, it was by the headdress that one could immediately understand where a woman was from, what her social status was, and whether she was married. Let's try to figure it out together and make a “magpie” headdress with our own hands, the pattern of which will be very simple and understandable.
Magpie headdress pattern. Women's headdress - magpie.
Women's Slavic headdresses are returning to everyday use. A good hairstyle and a good headdress are a very strong amulet for a woman, and since a woman is inherently a protector of the family and clan, it is also for the family.
The magpie is a long woven fabric that is attached to the pussy and goes down to the back and shoulders.
When unfolded, it resembles a bird. Nape - a fabric with a hard base, laid at the back to cover the hair at the back of the head. Browband - an embroidered strip that covered the forehead, tips of the ears and temples. A scarf was also tied over the magpie. The woman wore magpie and golden-headed for about two years after marriage. After she gave birth to a child, and her status as a young woman changed, she was given a different costume and a different headdress: the cap, the Soroka warrior, is an ancient headdress of a Russian woman in its way of wearing it. The most famous are the Kargopol and Voronezh magpies.
All magpies are a little different. For example, the Kargopol magpie can be immediately distinguished from any other by the peculiar shape of the headband, hanging over the forehead with a sharp protrusion. Such a protrusion is created due to the pointed bottom. As a rule, most of the known species of magpies are soft, so under them they additionally wore a headdress of a rigid design, allowing them to maintain the shape of the headband. Under the Kargopol magpie, a kind of cap is put on with a hard “Hoof” over the forehead, called “sderikha”. Sderiha plays the role of a warrior, collecting and tying her hair, and the hoof serves as the basis for an elegant beaded headband.
The “Magpie” wedding headdress consisted of three parts: a kichka with small sharp horns, a back of the head and the “magpie” itself, which was heel-shaped.
The pattern (diagram) of a magpie has 3 main parts: the headband, the back of the head and a special patch made from the main fabric, which lengthens the back of the head. The design has a rigid frame - a sewn-in cardboard strip 20 cm high. Ties 5 cm wide made of chintz fabric are attached to the headband.
Pattern “Magpie” from the magazine “Wonderful Moments. Russian folk costume."
Let's dive into history
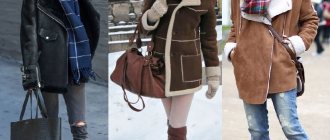
In the old days, each province had its own fashion for hats and accessories. Therefore, one glance at the young lady was enough to understand where she came from. Also, the headdress “told” about the woman’s marital status. It was also used to demonstrate the level of wealth in the family. Wealthy ladies preferred to decorate it with fur or expensive fabric.
Married girls were forbidden to leave the house with their heads uncovered. It was considered a great sin if even one strand caught the eye of strangers. People believed that for such an offense the brownie would be able to drag the young lady into the attic. And the angry gods could punish the foolish lady with a crop failure or a serious illness.
If a girl was left with her head uncovered through no fault of her own (for example, her headdress was torn off during a quarrel), then she could sue the offender and demand compensation for damages. Therefore, Slavic beauties never wore their hair down and braided their hair.
After marriage, girls wore a magpie headdress. In the nineteenth century, it was worn not only by peasant women, but also by members of the nobility. The headdress was close in appearance to the Scythian calafs. It was characterized by rich colors, large headphones and intricate embroidery.
The magpie was first worn on the wedding day or after the wedding night. The process took place in a solemn atmosphere, it was a whole ritual. Elderly ladies braided two braids for the young woman and arranged them in the shape of a wreath. Then they placed it on the magpie’s head.
| Throughout her life, the girl changed her outfit several times. She wore one in the first year of marriage, and after the birth of the child she put on another model. Then the magpie was changed after the birth of the fourth and fifth baby. |
Sometimes a headdress was the most expensive element of a woman's wardrobe. The magpie-goldbreaker was allowed to be worn only on holidays. The high price for the headdress played a cruel joke on it; almost not a single copy has survived to this day. An expensive item was bought up and destroyed, used for smelting precious metals. Return to contents
Himona headdress pattern. We sew an ancient headdress - warrior
Difficulty: medium
Working time: 2 hours
Pattern or template: download
Materials: cotton fabric, thread, scissors, pins, sewing machine, sewing needle
- I feel like a beautiful woman! I’ll walk past the mirror or look at the reflection in the window - well, she’s pretty, no words!
It turned out to be a simple headdress that I brought her as a gift to the dacha. As you already guessed, it was a warrior. And she, my Nina, lives all summer with her elderly mother, who is already 91 years old, and who simply comes to life when she is in the air, away from the city. And so every summer. Just two years ago, Zinaida Ivanovna could give young people a head start, and went to the garden alone, and worked there for two, but today she quietly walks along the paths, enjoying the silence, birdsong and the smells of nature.
I am making this lyrical digression only to interest you in the ancient headdress that women wore at the beginning of the last century. Well, I love national Russian clothes! And I think that you won’t find anything more beautiful in the world!
And I sewed a warrior from summer chintz, exclusively for the garden and trips to the forest. I found the pattern on the Internet on Svetlana Khachina’s page. Dimensions in centimeters are indicated in red. So, taking graph paper for convenience, as I did, draw the same one for yourself.
I want to warn you that in the title photo there is another warrior. I already actively wear it. Together with you we will sew a new one.
All components of the patterns have a lining. I didn't make any seam allowances. I cut out the lining together with the main fabric, “one to one.” Main fabric.
Lining.
We fold the bottom “face to face” with the lining. Where there were marks on the pattern - this is a designation of the boundaries of the “tail” of the warrior. In these places on the pattern I made small notches. We use a typewriter to draw the dotted line marked with a pencil.
Turn it right side out.
And iron it. Now you need to double stitch the front part for assembly.
Putting the assembly together. Distribute it around the circle. To make sure it's correct, I try it on my own head. You will immediately understand where you need to adjust or, conversely, “stretch” the assembly. As a rule, the collection is denser on the frontal part, and very sparse on the temporal part.
Now we need to assemble and sew the necklace with ties.
We sewed and ironed the seams.
Now we add “face to face” the two resulting parts. We sew the place indicated by the dotted line from the beginning to the end of the ties.
Turn it inside out.
Iron it with an iron.
We mark the middle of the edge. We will need to sew it to the front of the bottom. At the bottom we also find the middle.
We combine two parts with aligned centers on the wrong side of the bottom.
Now be sure to baste, starting from the middle, in one direction, then in the other, until the end of the ties. We sew and turn inside out.
We iron the result, and it turns out like this from the inside out.
Let's move on to the face. We also attach the headband to the bottom.
This is how we basted the front part.
When you reach the end, stop. For example, I iron the ties first.
Then I combine them, and then baste them in such a way that I can immediately stitch them on the machine.
We asked for it. The warrior is ready!
The photo cannot be positioned vertically. That's why I'm posting my image below.
Enjoy your needlework! Have a great mood, my dear beauties!
Additional items
A magpie costume for a girl can look different. After all, if you take as a basis, for example, a fluffy tutu skirt, a black and white poncho that resembles wings, and a hat with a veil, you will get an original and modern bird. Girls aged 6-11 years old will be happy to try on this look.
bairma_balchinova_
avtorskaya_vishivka
And girls under 6 years old will absolutely love the idea of wearing real wings made of cardboard and fabric to the matinee. They look almost real and are quite difficult to spoil.
godini007
elen_belkina
Additional elements of a magpie costume for a girl can include: a felt mask and an elegant composition of ribbons, beads and feathers placed on the headband.
mango.mango.craft
irish_andrienko
All items can be made with your own hands, but creating a mask will be easier.
Making a mask
All you need:
- Draw a sketch of the mask on paper and cut it out.
- Transfer the sketch onto black felt.
- Cut out the area around the eyes, inserts for the wings, eyes of the bird and beads from white felt.
- Cut out a beak from yellow material.
- Consistently glue all the parts together.
The finished mask can be decorated with rhinestones.
Sew a magpie headdress. DIY magpie headdress - pattern
Both everyday and festive women's Russian national costume requires a headdress. They are presented in a very diverse manner, and a modern person can very easily get confused. Moreover, most likely, they will seem almost the same to us. And in the times of our ancestors, it was by the headdress that one could immediately understand where a woman was from, what her social status was, and whether she was married. Let's try to figure it out together and make a “magpie” headdress with our own hands, the pattern of which will be very simple and understandable.
What is a magpie?
“Magpie” is an independent women’s headdress or an addition to another headdress. It is also called the crown or peg.
A simple “magpie” includes:
- Ochelye;
- Wings;
- Tail.
Important! In some variants there may be only two parts: headband and tail or headband and wings.
What do you need for work?
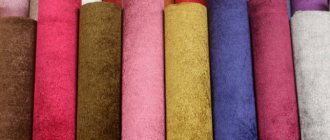
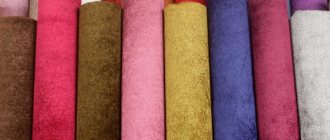
- To make this headdress they used silk, calico, and velvet on a canvas backing.
- Embroidery, beads, and gold embroidery were used for decoration.
Important! Some models consisted of two dozen elements, and putting it on required time, deft hands and painstaking care. Historians note that this headdress is very similar to the Scythian kalaf, which is characterized by bright colors, huge headphones and embroidered solar signs.
Often, the head decoration was the most expensive part of the wardrobe. Girls could wear rich “magpie-gold-crushers” on holidays, two or three years after the wedding. After the birth of a child, there was a change in social status, and the woman wore different clothes - a cap and a warrior.
Varieties
There are differences between the “magpies”. Let's look at the most famous types of this headdress.
Kargopolskaya
It immediately stands out because it has a unique shape: it hangs over the forehead in the form of a sharp protrusion. In order to create it, the bottom is made pointed.
Important! Usually the bindings were made soft, so under them it was necessary to wear an additional hard headdress, thanks to which the shape of the headband was maintained.
The Kargopol “magpie” was worn with a peculiar cap called sderikha. She plays the role of a warrior, who collects and tightens the hair. The hard “hoof” above the forehead acts as the basis for an elegant beaded headband.
Wedding
This headdress includes three parts:
- Kichka with small pointed horns;
- Back of the head;
- “Magpie”, which has a heel-like shape.
The back of the head was made of velvet, which was embroidered with gold threads. It was fixed to birch bark to give rigidity. This part was intended to cover the back of the head. Its top and sides are sewn with strips of silk fabric, on the edges of which there are ties. Then they need to be crossed on the forehead and tied around the horns several times. Thanks to this, the tussock and the back of the head are tightly held together.
Important! A small golden “magpie” is placed on top of the horns. The main motif of the embroidery that decorates the back of the head and the top of the headdress is “trees”. The same pattern is used to decorate the sleeves of a wedding shirt.
Sew a magpie
We are no worse than our ancestors, so we’ll look at how to sew a “magpie” headdress with our own hands. Of course, we take modern realities into account and replace the birch bark with cardboard.
Preparation required:
- Thread;
- Needles;
- Lent;
- Sequins;
- Braids;
- Scissors;
- Centimeter tape;
- Sewing machine.
The entire scope of work will be as follows:
- Cut the fabric. Its dimensions: width – 20 cm, length – head circumference.
- On about ten centimeters out of twenty we sew various decorations: braid, sequins, ribbons.
Important! Don't forget to leave two centimeters of fabric at the bottom for hemming.
- Fold the fabric in half and stitch the edge of the fold.
- Cut out another piece of fabric measuring 50 by 70 centimeters. In this case, your back will be slightly covered.
- Find the middle of the length and round off the top using scissors.
- We decorate the bottom with various little things or tassels.
- The corners can be left straight or slightly rounded.
- The lower part from the middle of the length is trimmed using bias tape.
- We process the upper rounded part with double stitching.
- After this, you need to pull the ends of the threads to form a beautiful assembly.
- Then you need to combine the headband and the gathering, but do not sew them together.
- Everything is turned over to the wrong side and a piece of cardboard measuring approximately 30x7 cm is applied.
- We insert ribbons or fabric, trimmed or hemmed, into the headband.
- The place where the cardboard is located must be stitched so that it does not move.
- We process seams using a sewing machine.
That’s it, the “magpie” headdress is ready with your own hands!
We hope our article was useful to you. Now you know exactly how to be the most original at a fair or holiday, because such a costume, made with your own hands, will certainly be remembered by everyone.
Everyday kokoshnik. Part 1
Hello! What is promised, as usual, must be fulfilled, therefore, I am starting to lay out a master class on sewing an everyday kokoshnik sample from the Oryol province.
You can read my short story related to this headdress here: https://www.livemaster.ru/topic/343109-malenkaya-istoriya-odnogo-kokoshnika?vr=1&inside=1
There are a great many Kokoshnikov in Rus' and this is only one of the options. If you like it, I will be very happy.
It is worth noting that to sew this household item, you must have at least minimal skills in sewing, crocheting, embroidery and beading. During the master class I will only talk about the stages of work. If I start explaining in detail HOW all this is done, the master class will turn out to be endless. Please understand me.
So let's get started. To begin with, let’s agree that we will primarily use the materials that we have at home. And only if you don’t find the necessary material at home, you can go to the store, but first to a friend’s. Firstly, this is in the traditions of our ancestors, because everything that was on the farm, especially textiles, was recycled. From a shirt that was worn out in places, they sewed smaller shirts, scraps were used for dolls, blankets, rugs, etc. This is not so much saving as a respectful attitude towards natural resources, which, as you understand, in the world of total consumerism are godlessly exhausted. And secondly, each of us has deposits of all sorts of materials at home, which are constantly replenished and often just lie as ballast. It's called acute hamster disease. It is treated as described above. For example, I am categorically going to use only Chinese beads, which have stuck with me since the times when I was not yet familiar with Czech and Japanese. And if there’s not enough, I’ll rob my sister. She also has a lot of things. Mine has been checked and will not peel off. And its irregularities, which are so annoying in professional embroidery, will add a nice folk flavor to our product. You will see what kind of victory you will experience if you follow my advice!
I’ll say this about the time investment: the master class will be read soon, but the kokoshnik will not be sewn soon, so be patient. It took me about a month of free time.
We will need:
To create a pattern:
1. Centimeter tape.
2. Pattern paper. You can glue A4 sheets together.
3. Pencil (pen, felt-tip pen).
4. Ruler, square and, if possible, a pattern for rounding the lines.
5. Calculator or sheet for mathematical operations in a column.
For the kokoshnik:
1. Fabric for the kokoshnik is orange or another red shade. In my case, this is an orange linen vest brought to me by a customer, I’ll get out of it. If you buy ready-made fabric, if the width is over 1 meter, 25-30 cm will be enough.
2. Rough linen fabric for the inside of our kokoshnik. I have it in my photo as a background. With a width of 140cm - 25cm, if the linen is thin, then - 30-35cm.
3. Scissors.
4. Threads for sewing fabric, preferably natural and durable. I have cotton reinforcement since Soviet times. Yes! I know a lot about hamsters! 
5. Needles for sewing and threading.
6. Threads for stringing beads, stronger.
7. Crochet threads, ideally thin wool, I will have iris (pink, yellow, blue, green).
8. Satin ribbons of four colors (pink, yellow, blue, green) 3 - 4.5 cm wide and 50 cm long
9. Thin chintz for lining the hair cap. Not in the photo, but it can be any fabric with a small folk pattern of “polka dots” or “flowers”. Width - 50 cm, length equal to the sum of the width of all ribbons + 2 cm for hem.
10. Black ribbon 1 - 1.2 cm wide and 2.5 m long for finishing - if you find it - cotton, at the last moment I wanted to add glamor, so I bought velvet.
11. Small shirt buttons with two or four holes. Within 70 pieces. Yes. Our dowry is not poor.
12. Beads and beads of different colors, textures and sizes, the brighter the better.
13. Large beads with a wide hole – 2 pcs.
14. Sequins of different colors and sizes, maybe brighter.
15. The braid is gold or other colors, I laid a couple of strips because it lies there and there is nowhere to put it. If you don’t want to bother with sewing on beads, you can only use ribbons of different colors. IMHO it's more fun with beads.
16. A strong thin ribbon for ties on the kokoshnik - 25 cm on each side. I still have the velvet one, I’ll sew it on.
17. A strip of velvet fabric 5 cm wide and 61 cm long. This is so that our kokoshnik does not rub our forehead. You can replace it with velvet ribbon, but it is important that it is very soft. Still, the fabric is better.
18. Whalebone for the frame. (!) NOT NECESSARY. The one used to strengthen corsets (pictured on top of the orange fabric). This is my way of making my life easier. It could be metal, in my photo it’s polyethylene (she lowered her eyes shyly).
19. Doublerin for those who want to give the structure additional rigidity.
20. Crochet hook corresponding to the thickness of the thread.
21. The most important thing is patience and a good mood. For, as we sew, so will it be worn.
Almost everything I listed is in the photo. So to speak, a group photo before work.
1) First, let’s prudently save ourselves from unpleasant situations and treat the fabrics so that they shrink. We soaked linen (or cotton) in hot water, let it cool, let it dry, and ironed it with steam. If the linen is thick enough, we put it aside until cutting; if it is too thin, it is better to duplicate it. And for now we also put it aside.
2) And we do the pattern ourselves.
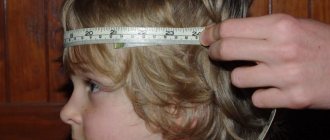
The main measurement we need is head circumference. The measurement is taken along the line on which the edge of the kokoshnik will be located. In the middle of the forehead, through the middle of the ear and to the base of the skull. I got a full girth - 57 cm. There was no one to take a photo of me at the time of measurement, so imagine for yourself.
We are building the front part of the kokoshnik.
We draw a line, on it we mark the length of the head circumference (57) + 2 cm (for freedom of fit) + 2 cm for the drawstring from the embroidery (when you embroider the headband, you will understand) = 61 cm. Divide the segment in half and build a pattern on one half. First we divide this half into four parts. Along the center/fold line we put 14 cm up, the next line from it is also 14 cm up. We connect. Now along the back seam line we set aside 6 cm. Let these be constant values so as not to confuse yourself once again. Then we draw a line as shown in the drawing from the 6 cm mark to the second 14 cm mark. Along the back seam we make a bevel 1 cm upward, and then use a pattern to round the top line. This is the bottom sewing line. If you don’t have a pattern, you can do without it, just draw a smooth line to beautifully round all the corners. The basis of the drawing is blue, and what should be the output is red. Now carefully fold the pattern in half along the fold line, chop it so it doesn’t move, and cut it out. Mark the middle of the fold with a notch. Thus, we get a perfectly symmetrical pattern without distortions. We sit, admire and praise ourselves (1 minute)
3) We build a pattern for the bottom.
Now it’s a scare for humanists. Calculate the diameter of the circle. To do this we need to measure the length of the rounded side of our first pattern (top side). Oddly enough, I also got 61 cm. Oddly enough, because I’m also a humanist. And I don't understand this.
Let's remember the geometry and subtract the radius of the bottom circle using the formula C=ПD. Where C is the length of the rounded part of the previous pattern and, in combination, the circumference of the bottom; P – number Pi (3, 14); D is the diameter of the future circle. We need a diameter. We get D=C/P = 61/3.14 = 19.42. Divide in half, get radius = 9.7, round to 9.5. In this case it doesn't matter. Draw a perpendicular and measure the radius in a circle. Then we decide which of the perpendiculars becomes the middle of our bottom. We measure 1 cm per drawn radius and give the pattern the appearance of a drop, cutting off part of the circle, as shown in the picture. Now we check the length around the perimeter. It should be the same as on the rounded side of the first pattern, that is, 61 cm. If it turns out less, add it; if it turns out more, cut it off.
I hope you understand, because such texts are difficult for me.
Now we carefully fold it along the center line, chop it off so as not to break the symmetry, and cut it out. We mark the middle of the fold with a notch to make it easier for us to combine the fabric and pattern.
The finished patterns should look like the photo below. We will combine them in the same way after cutting the fabric.
To check, we go to the mirror, apply the pattern of the front part to ourselves, see how harmonious it will look. It may turn out that it will be too high for you or, vice versa. Let's correct it. Again we admire and praise ourselves (1 min).
4) Now we lay out our prepared and ironed main fabric, pin the patterns so that the grain thread coincides with the fold lines of our patterns. We cut out, leaving 1.2 cm seam allowances on all sides. Be sure to mark the central fold lines in order to prevent distortions, and also mark a perpendicular on the bottom; a velvet ribbon will then be sewn onto it. In the same way, we cut out both parts from raw fabric for the inside. We cut the bottom fabric sparingly so that we can fit a strip 25-35 cm wide and 55 cm wide for the stiffener. (see point 15). For me, the main part is made from pieces, but the seams will be covered with embroidery and no one will look at them, so I’m not worried. Now I’ll figure out whether it’s necessary to duplicate it in my case.
It turns out, one piece from each fabric.
5) We are engaged in the edging of the kokoshnik. We put the bottom aside for now.
We place the parts one facing each other, between them we lay a strip of velvet (the one that is 5 cm wide) so that the front side faces the main (orange) fabric. We combine the center and edges and pin them together.
Sew the seam back with the needle, leaving 1.2 cm at the beginning and end of the seam. The finer the stitch, the greater your honor and praise as a craftswoman.
6) Turn the seam right side out. The orange detail faces one way, and the gray and velvet detail faces the other.
Now we adjust so that the front side slightly overlaps the back side (1.5 - 2 mm). Tailors call this “perekant”. We baste along the edge.
7) Turn it to face you and mark the extreme points for our beaded strip on the headband. Sew on the first row of beads or sequins, leaving 1 mm of open fabric along the edge. Thus, we secure our edge.
 Now we fold the top side of the velvet ribbon and, while sewing on the beads/sequins, we attach the velvet at the same time. We try to hide the knots.
9) Sew all rows of decorations onto the necklace, alternating colors and textures. The width of the decorative strip is about 6, maximum 7 centimeters. In order to get beautiful edges rather than chopped off, I suggest bringing each subsequent row down at the beginning and end, bending around the previous one. This is how it is in my photo.
Sewing on the decorative stripes will take you some time. Be patient. In terms of small and long-term decorative work, this is just the beginning. Here's what we got:
We sit and admire (at least 5 minutes). You can spin in front of the mirror or in front of your family.
To be continued.
Best wishes, your MariKo (MarinaKostina).
The second part of the master class: https://www.livemaster.ru/topic/363697-povsednevnyj-kokoshnik-chast-2?vr=1&inside=1
www.livemaster.ru
Magpie headdress. Magpie (headdress)
Magpie.
Tula province Soroka is an ancient Russian headdress of married women or part of it. It was widespread in central and southern Russia, as well as among some groups of Karelians, Vepsians, Mari and Mordovians. Was the richest of women's headdresses; By the beginning of the 20th century, the magpie fell out of use.
The magpie, like a headdress, is a kind of kichka, slightly lower on the forehead, and slightly higher on the sides than a regular kichka.
The main items that together formed this headdress were the kichka, the magpie itself, the back of the head, the forehead, and the scarf. Additional - various decorations made of beads, feathers, ribbons, artificial flowers.
A married Cossack woman in a festive costume with a magpie. The village of Vyshnyaya Zalegoshch, Novosilsky district, Tula province. 1902
Mari in a magpie headdress. Yaransky district. 1905-1906
The kitschka was a soft canvas cap, on the front of which there was a solid eminence. The kitty was pulled in at the back, tightly fitting the head. The elevation on the front part of the kichka, called kichka, horns, sderiha, hoof, was varied in shape: in the form of a shovel (shovel-shaped kichka), a horse's hoof (hoof-shaped kichka), horns directed upward, up and back (horned kichka), as well as in the form of a circle or semicircle (kettle-shaped kichki). In the same area there could be different versions of kichek.
Soroka (crown, binding) - the upper part of the headdress, worn over the kichka. It was usually made of calico, silk, velvet on a canvas or chintz lining. The magpie was usually sewn from two or three pieces of fabric. Its front part was called brow, ochele, chelishka; side parts - wings; back part - tail. Along with magpies in the form of caps, magpies that were not completely sewn together were also common: only the headband with the “tail” and the “wings” with the headband were connected.
The back of the head (the back of the head, the back of the head, the block) is a rectangular piece of fabric, glued or sewn onto a solid base made of cardboard, birch bark, quilted canvas, etc. It was laid at the back, covering the hair on the back of the head and part of the neck, and tied with ribbons around the kichka under the magpie .
Browband (forehead, headband, bald patch) - a narrow (from 3 to 8 cm) strip of canvas, trimmed with braid, beads, beads, placed around the head in such a way that one of its edges was covered with a magpie, and the other covered part of the forehead, temples, tips ears. The ends of the forehead were tied under the back of the head.
A scarf is a necessary accessory for a magpie. It appeared as part of the headdress from the second half of the 19th century, taking the place of the towel and fly.
A magpie decorated with embroidery or precious stones was called a sazhenaya; There was also a winged magpie (with side lobes with strings, or wings): the hair was pulled together by a sderich at the back of the head. Sometimes a pearl garter was added to the front of the magpie on the magpie itself (also known as the ocela). If a scarf was tied over the magpie, then it was called “magpie with a howl.”
An unusual “magpie”, more like the headdress of an Indian leader or the tail of a peacock, was worn by representatives of the ethnographic group of Novosilsky Cossacks, who lived in a number of villages of the former Novosilsky district of the Tula province. N. M. Mogilyansky, who explored these regions in 1902, wrote: “The women’s costume has been much more fully preserved in some villages of the Novosilsky district, where, for example, in the village of Vyshnyaya Zalegoshcha, this women’s “rite” has been preserved in amazing completeness and diversity to this day. has since enjoyed widespread recognition. The photographs posted here show two married women in festive costumes; one of them is in the “forty”, a headdress consisting, in total, of fourteen separate parts, putting on which is a long and complex procedure, requiring a lot of time and great skill.... By the way, a small amount of silver is in the threads of these “golden “headdresses are the cause of their mass destruction: buyers buy hundreds of headdresses and burn silver from them.”
Voronezh province
Nizhny Novgorod province
Nizhny Novgorod province
- Russian folk headdresses
- Belgorod region folk costume
- N. M. Mogilyansky “A trip to central Russia to collect ethnographic collections” Materials on the ethnography of Russia. Edited by F.K. Volkov. Volume 1.- Publication of the ethnographic department of the Russian Museum of Emperor Alexander III, St. Petersburg, 1910
- N. M. Mogilyansky “A trip to central Russia to collect ethnographic collections” Materials on the ethnography of Russia. Edited by F.K. Volkov. Volume 1.- Publication of the ethnographic department of the Russian Museum of Emperor Alexander III, St. Petersburg, 1910
- Shangina I. I. Soroka // Sosnina N., Shangina I. Russian traditional costume: Illustrated encyclopedia. -SPb.: Art-SPB, 2006. - pp. 302–307. — ISBN 5-210-01612-9.
Final image
Magpie is very often depicted as a business woman, so such a costume can be complemented with an apron or headscarf.
If a prototype of a fashionable magpie is being created, then there is no way to do without bright, eye-catching jewelry. Beads, clips, bows and ruffles can all be used to complete the look.
feeria.karnaval
prokat_karnaval_kostym
elena_fomochkina
razvivawka_kz
prokat.kostumov.odessa
Sewing a scarf
We stock up on the following necessary materials:
- White calico (70 cm).
- Black lining fabric (should remain from the wings).
- Glue gun.
- Scissors.
- White satin ribbon.
- White threads.
- With a needle.
From the purchased piece of fabric you need to cut an isosceles triangle. If you have time, the scarf can be decorated with a satin ribbon sewn along the contour. If there is none, then it is hemmed manually or by machine.
Remember, we still have black fabric in stock. She will go to cutting out circles. Their number is arbitrary. These circles are glued to the scarf with hot glue. You see that making a magpie costume with your own hands is not at all difficult.
How to make a crow's beak
You will need
- - paraplenty;
- - needle;
- - black cotton threads;
- - black thin fabric;
- - graph paper;
- - ruler;
- - pencil;
- - black cap;
- - linen elastic.
Instructions
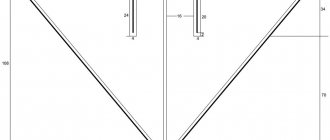
Create a pattern. To do this, it is best to take graph paper or a double-checked piece of paper. Draw a line 8-10 cm long and divide it in half. Draw a perpendicular to the middle at a distance of 15-20 cm and place a dot. Connect it to the ends of the initial segment. You now have an isosceles triangle. Its dimensions depend on the size of the cap. Cut out the pattern.
Trace a triangle onto a piece of paraplene and cut it out. It is better to do this with a sharp knife with a trapezoidal blade, but you can also use sharp scissors. Make 2 triangles from black fabric.
Natural fabric is preferable, since it is not dissolved by Moment glue. First test the synthetic one by smearing a piece of glue with glue.
note
You dig one triangle exactly along the contour, the second - with allowances for the thickness of the paraplene and gluing.
The paraplene base must be shaped. To do this, sew the triangle with a thick cotton thread along the entire perimeter using a “forward needle” seam and gather it a little. Apply glue to the underside of the larger triangle. Glue it to the concave part of the base. Fold the allowances onto the upper convex part and press. Let the workpiece dry.
Overcast the upper triangle or overlock it around the perimeter. Sew it along the contour with a “forward needle” seam and try it on to the base. Gather it so that its shape matches the shape of the paraplene. Lubricate the wrong side with glue and press it to the base. While the beak is still wet, you can carefully cut the basting thread in several places and pull it out.
But if the basting seam is neat and even, then you don’t have to do this.
Dry the beak. Sew it to the cap so that it remains horizontal when put on. To do this, sew it with a seam “over the edge” from the front side of the cap using very small stitches. Tighten the stitches well, but so as not to tear the paraplete.
Helpful advice
The beak can also be made with a thin foam pad. To keep it in shape, make an outline of rigid wire. The edges can be soldered or glued into a tube - for example, from the refill of a ballpoint pen. The foam triangle should be slightly larger than the beak needed. In this case, it is better not to paste it over with fabric, but to sheathe it.
You can paint the foam rubber itself black, then you won’t need fabric at all. To shape a cardboard crow's beak, make a hole in the center.
You can sew a crow's beak from fabric without any padding. Cut out 2 triangles and make a long undercut along the middle line.
Topstitch it, then place the pieces right sides together and sew along all the seams. Rigidly starch the beak.
Sources:
- how to make a beak out of paper
Source: https://www.kakprosto.ru/kak-95853-kak-sdelat-klyuv-vorony