If you are a beginner seamstress and are wondering which pocket will be easiest for you to sew, then this master class is for you. When I started sewing, I didn’t know how to sew a pocket in the side seam; it seemed complicated and incomprehensible to me. And I always wanted to have a skirt with such a neat pocket. It is simply ideal for any dress, the pocket seems to be hidden in the side sections, and at the same time it can replace a clutch, because it can easily fit a phone or keys
Primary marking and cutting
First of all, you need to decide at what height the pocket will be located along the side seam and what dimensions it will have. It all depends on your personal feeling of convenience.
Marking is carried out in several stages:
- To process the side sections of the skirt, it is customary to leave a seam allowance width of no more than 2 cm. If you want to place a pocket here, then you will need to step back about 3-4 cm from the edge of the product. This is exactly the allowance needed to create the side seam itself and the inner pocket, located in it. We retreat 4 cm from the edge and draw a line along which the side seam of the trousers, skirt or dress will run.
- We determine the location of the entrance to the pocket and the size of the entrance to the pocket. These indicators are purely individual. Determine the top limit and length of the pocket. The last indicator corresponds to the width of the palm when half opened. The average entrance length is 15–16 cm.
- Add about 2 cm of seam allowance to the resulting lines. We cut off all excess.
- Now you need to take lining fabric or burlap. We will need two pieces of such fabric. It is from these that the inner part of the pocket will be formed.
- We apply the pieces of burlap folded together to the upper border of the pocket entrance and to the side seam.
- Determine the shape of the workpiece. To do this, place your half-open palm on it and draw a dotted line around it. This step is very important, so make sure that the dimensions of the pocket in the seam correspond as much as possible to your understanding of convenience.
- Now the workpiece should be cut out in two layers so that the length of its side cut coincides with the entrance to the pocket of the main part.
- The allowances for entering the pocket must be glued with double-lined non-woven material.
We have prepared for you a detailed video course “Sewing Basics”
Get it now for free!
get a course
Cutting out the parts
The photo shows in detail how the patterns are transferred to the fabric using sublimation chalk. I also use a ruler with an arrow to mark seam allowances. Some patterns already have allowances, in which case you transfer only these lines and cut along them.
Lay out taking into account the warp thread (lobar). The photo shows how the parts are located relative to the edge.
In my case, I use thin suiting fabric, and I make everything from it. Sometimes a special “pocket” or “pocket fabric” is used for burlap. It can be used to make both a part with a cut off side and the main part. But in open areas, parts from the main fabric are sewn directly on top of the “pocket”. I am not demonstrating this option here.
Let's start creating a pocket located in the side seam
Once the marking and cutting have been completed, you can begin stitching the parts. This is done as follows:
- We apply one piece of the lining to the front side of the front piece, and the second to the front side of the back piece. We connect them with pins.
- We retreat 1 cm from the cut of the entrance to the pocket, give a line along the front and back halves.
- We bend the lining parts and iron them.
- Now we connect both halves of the product parts with their front sides facing each other. We combine the side seams and the lining parts, securing them with pins.
- We start stitching along the side edge, then we reach the line of entry into the pocket. Here you need to switch the machine to the tack mode, stitching about 1.5 cm in this way. Next, switch back to normal mode and connect the lining parts with a machine stitch. The lower border of the pocket entrance should also be strengthened by laying a bartack.
- Turn the workpiece over to the front side and iron it. The inside of the pocket in the seam should be adjacent to the front half of the skirt.
In addition to ease of operation, a pocket in the seam has another important advantage - inconspicuousness. Therefore, such a pocket is the best option for a skirt or an elegant evening dress. Use a thin lining fabric so that the inside of the product does not protrude outward, and the side seam looks aesthetically pleasing.
Welt pocket with set-in leaf.
Hello, dear readers!
Today, dear readers of the blog, you will get acquainted with a welt pocket with a leaf with set-in ends (set-in leaf, mortise leaf).
And we get to work right away!
First of all, we mark the location of the future welt pocket on the product.
A welt pocket with a leaf with set-in ends is applied to the product using four lines. These lines determine the dimensions of the pocket.
Dimensions of a welt pocket with leaves with set-in ends (for adults): the length of the entrance to the pocket can be 14 - 16 cm, the width 2 - 5 cm.
The distance between the two horizontal lines is the width of the finished pocket (leaves). The valance and leaf are sewn along these two lines (see further in the article).
The distance between the two vertical lines is equal to the length of the pocket (leaf) in its finished form.
It is advisable to draw all lines long, protruding far beyond the boundaries of the pocket. Then it will be more convenient to combine the pocket parts using them.
On the reverse side of the product, the place where the future permanent residence of the pocket is marked, we strengthen it with a dolevik.
Now let's start cutting out the pocket parts.
Leaflet.
This is what a leaflet looks like prepared for making this kind of welt pocket.
You can read in detail about how such leaves are made in the article “Leaf of a welt pocket”.
Valance.
Dimensions of this part: the length is exactly the same as the leaf,
and the width is twice as large as the width of the finished pocket (leaves).
Lining (burlap).
We cut out two identical pieces from lining fabric of a suitable color. Their length is the same as the length of the finished pocket (leaves), and the length of the valance.
But the width (pocket depth) according to the model, as needed.
Go ahead. This is what our leaf looks like from the front side (this side will be visible on the product and it is reinforced with non-woven fabric).
Turn the leaf over to the other side and “upside down”.
And on this side of it, with the front side facing this side of the part, also “upside down”, we place one of the lining parts.
We combine the sections of the parts with each other, sweep them away
and connect them with a machine stitch. Seam width 0.7 – 1.0 cm.
We secure both ends of the stitching with bartacks.
Iron the completed seam allowance onto the lining.
Now we “move on” to the valance. This is the front side of the valance and this is how this detail will be placed on the product.
We place the second piece of the lining on the valance with the front side and “legs up”.
We combine the sections of the two parts, sweep away the parts,
and then join with machine stitching. The seam width is 0.7 - 1.0 cm. (We perform bartacks at the ends of the stitching).
Iron the completed seam allowance onto the lining.
This part of the burlap pocket can be “made up” of two parts (valve + lining for today’s article), or you can also use a valance - a one-piece piece, as in the article “Welt pocket with stitching sheet.”
Now we “migrate” directly to the product. Combining the lines previously drawn on the parts (the lower, horizontal line of the frame, on the product + the line of width of the finished leaflet, on the leaflet), we place the leaflet with the lining part sewn to it on the marked place under the pocket.
The leaf is placed with the main, “front” side facing the product, fold down, with the “legs” (the lining stitched to the leaf) up.
To prevent the parts from moving relative to each other, carefully sweep them away.
And then along the line that determines the width of the finished leaf, we lay a stitching line.
The machine stitch is laid only up to the marks that show the short sides of the finished pocket (leaves). This stitch is best done without bartacks. And to secure the ends of the stitch, you can go back a couple of centimeters.
We discard the lining piece in the opposite direction.
The valance, connected by a seam to one of the lining parts, is placed right side on the front side of the product. We align the location of the valance with the edges of the already stitched leaves.
We combine the seam line on the valance (seam width 0.7 - 1 cm) with the upper horizontal line of the frame on the product and baste the parts.
Then we lay a stitch line along the aligned line.
The machine stitch is laid only up to the marks that pass through the extreme points of the previously completed stitch (the line of stitching the leaf to the product).
And this stitch is also best done without bartacks, and its ends can be secured by sewing a few centimeters of stitching in the opposite direction.
Further. Now you need to cut the shelf along the entry line into the pocket. To make this “procedure” more convenient to carry out, we draw a frame on the wrong side of the product, connecting the ends of the completed lines with lines. We draw another line in the middle of the frame. From points on this line, at a distance of 1.3 - 2 cm (according to the model) from the short transverse sides of the frame, draw four more lines to all four corners.
How to correctly cut a part along the line of entry into the pocket?
The part is cut along the line of the middle of the drawn frame
and further along the lines to the corners, not reaching the end points 0.1 - 0.2 cm.
We cut it very carefully! None of the parts should get under the scissors from below!
We turn all the stitched parts into the resulting cut onto the wrong side of the product.
We straighten out all the details, seams, etc. and sew out the seam for attaching the valance and leaves with oblique stitches
And then, we baste the edge of the leaf to the pocket frame so that the part of the leaf does not warp.
The seam allowances for attaching the valance can be pressed onto the valance or ironed out (according to the model). When the fabric is thick or the product will be made with a lining, the seam can be ironed. To do this, marking the allowances is done.
If the fabric is not thick and the product does not have a lining, the allowances of this seam are ironed to the valance. Then the width of the allowances of this seam is equalized with the width of the part of the frame that is folded up, and then, at the very end of making the pocket, all open sections of the completed pocket can be processed to prevent fraying.
Further. Along the line on the short, transverse side of the frame on the product, we bend the part on which the pocket is made to the wrong side.
We sew together the edges of the valance and the leaves using hand-stitched stitches so that when stitching the main fabric they do not warp relative to each other.
And along the line of the frame, we lay a line.
To better hold the corners of the pocket along the base, it is advisable to lay as many as three lines (on each side). At the last stage, using the same line, simultaneously with securing the short sides of the pocket (leaflets), we also lay a line along the lining parts, “turning” them into pocket burlap.
Lightly iron the entire pocket, securing all parts, folds, etc. in their places, then remove the manual auxiliary stitches and perform a full ironing of the pocket.
Here it is, a handsome man, a ready-made welt pocket with a set-in leaf!
Such welt pockets can be located on products vertically, horizontally and at an angle.
We had a welt pocket with a leaf with set-in ends, where the leaf has the shape of a rectangle. But there are also welt pockets where the leaf can be shaped like a diamond. Such pockets are made on products only at an angle.
But there is nothing supernatural in their production. They are made in the same way as welt pockets with a leaf - a rectangle. The only difference in their execution is that the valance and leaves are adjusted to the product along lines that are slightly offset relative to each other to the sides.
Good luck to all! See you in the next article! Sincerely, Milla Sidelnikova!
Second way
If you want to hide the lining so that it is not visible, then proceed differently. On the side seams of the garment, three centimeters of fabric are left for projections, to which parts of the pocket will subsequently be sewn. First, sew one piece of the pocket pattern to the protrusion, then sew another separately to the second side of the skirt. Then the two parts are shaped with an overlock foot and carefully smoothed inward.
Then comes work on stitching and processing the pocket itself. To do this, first sew 4 cm down, and then along the entire circumference of the rounded part of the pattern. Then all edges are processed with an overlocker. All that remains is to iron all the seams and turn the product right side out.
This type of pocket is considered by cutting and sewing experts to be the easiest option. Indeed, compared to its welt counterpart, sewing a pocket into the side seam is not difficult. After reading the detailed description, any master will be able to cope with this task in a matter of minutes.
Don’t forget that if you are sewing on a bright and contrasting pocket that is visible to the eye, then you need to use the first method. If you are making protrusions and the pocket will be completely hidden in the side seam, then the second method will suit you. Happy work!
How to sew a cocoon dress with your own hands using a ready-made pattern
Read in this manual:
- Description of the set of patterns and dress style.
- Consumption and choice of fabric for a dress.
- How to download and print patterns.
- How to cut a cocoon dress using a pattern.
- How to sew a dress with your own hands step by step: How to sew burlap on the same level.
- Methods for processing the neckline of a dress.
- Clasp processing.
Buy and download this dress pattern
Description of the pattern, set and style of the dress
Electronic pattern for a “cocoon” dress with pockets in the side seams.
Sizes: 40-52 (buyer receives ALL sizes).
File format for downloading in the order:
PDF in full size and without seam allowances.
By paying for the order you will receive links to download two dress pattern files in gradations of sizes from 40 to 52:
- A4 PDF file, adapted for printing patterns on A4 sheets of paper in any program on any device, including mobile phones.
- Multi-format PDF file for printing on sheets of any format from A0 to A4 on a printer or plotter in Adobe Reader.
The difficulty level of sewing is simple - a model for sewing for beginners.
This style of dress is suitable only for slender girls with narrow hips.
The set of patterns for a cocoon dress with pockets in the side seams includes (Figure 1):
patterns for the backs, fronts, sleeves and burlap pockets.
Stand-up and collar collars are not included in the pattern set, as they are a strip of fabric. Read about how to cut the “stand” and “collar” below in the description of cutting and sewing.
Consumption and choice of fabric for a dress
The cost for a “cocoon” dress with pockets in the side seams with a fabric width of 140 cm will be up to 150 cm, depending on the length of the sleeve and the size of the product.
Consumption with a fabric width of 180 cm will decrease to approximately 110 cm.
Only stretch fabrics are suitable for sewing this dress. You can use footer, fleece, jersey, and other knitwear.
Particular attention should be paid to the choice of size, since the dress of this model can be quite small in volume, closer to a turtleneck. But you can also sew a very loose “cocoon” to wear over a sweater.
Equipment you will need is a household sewing machine with an adjustable zigzag and a modern overlocker to make a knitted seam.
How to download and print patterns for this cocoon dress
How to buy an electronic pattern
How to print a life-size pattern at home on A4 sheets
How to choose a pattern size without taking measurements and using tables
Ready-made life-size patterns for children download for free
Buy and download this dress pattern
This is interesting: Pattern Dress with short sleeves
Sewing
Side seam pockets
For pockets, I make an indent of three cm slightly below the waist line both on the shelf and on the back. The indentation is 17 cm long.
First of all, we sew up the chest darts.
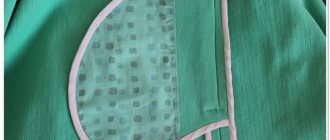
I cut out 4 identical pieces of burlap pockets at once. The straight side is 17 cm, the shape can be estimated by applying a brush.
I place the burlap against the ridge of the dress, face to face.
I sew all 4 pocket pieces in this way.
My dress was basted for fitting; I didn’t take out the basting before sewing.
I sew on the burlap, overcast, and iron the seam allowance. It is better to iron the seam allowance on the front in one direction, on the back in the other, so as not to get a protruding thickness.
I chip away at my pocket.
Side and shoulder seams
I stitch along the side seam, passing it through the pocket.
Close up of how the line goes.
I overlock the entire seam.
When I approach the corner with a knife, as in the photo below,
I fold the fabric to create a straight edge. And I continue to sew.
This is how it works.
I also join the shoulder seams. I iron the seams, press the pockets onto the shelf.
Sleeve
I gather the cuff of the sleeve (top) with a large stitch.
Sleeve seam.
I pin the sleeve with the armhole, sew it in and overcast it like all the other seams.
For the sleeve, I made a finished 5 cm cuff. Those. 12 cm without folding and with allowances. I measure the width using the sleeve pattern.
I sew on the patches, turn them over, and iron them.
Neck
I finish the neckline with bias tape. After the photo of the neck I will insert a video, it shows how to process the neck in this way
Rewind to 1:50.
Bottom of the dress
I fold the bottom twice and hem it.
The dress is ready. Here are some angles.
I wish you good luck and success.
Preparation of parts
- facing - 2 pcs.
- facings made of adhesive fabric - 2 pcs.
- valance (cut-off barrel) - 2 pcs.
- burlap - 4 pcs.
Turning details
Take the remaining fabric from the trousers, fold them in half with the right sides facing inwards and place the trousers with the pocket area on the fabric, the warp thread of the fabric should match the warp thread of the trousers. If the product has a check, strip or pile, then the facing is cut out in accordance with the direction of the pattern. Draw a chalk outline around the entrance to the pocket on the fabric, the width of the facing is 4.0 - 5.0 cm and cut out the facings.
If you are not comfortable cutting out the facings directly on the fabric, do it on paper first and then transfer it to the fabric.
Using facing parts, cut similar ones from adhesive fabric so that when worn, the pocket does not stretch and wear out.
Burlap details
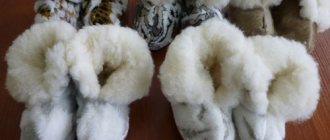
The fabric used for burlap is most often lining, sometimes cotton, for example, in jeans. The lighter the fabric, the less noticeable the burlap will be from the front side. The color of the burlap fabric can be different, it depends on the model and your personal preferences. In this case, a staple with a small flower is presented.
The burlap is cut along the warp thread, the depth of the burlap = the length of the brush + additional margin for freedom. Place your hand on fabric or paper and trace along the contour, taking into account the freedom of movement of your hand in your pocket. Your pocket can be any size and shape, it depends on your wishes. There should be 2 such parts per pocket in a mirror image. Add an allowance of 1.0 - 1.5 cm along the bottom of the burlap.
Cutting out the valance
To cut out the valance, use as a pattern the same piece from the pocket that was at the very beginning. Take suitable scraps from trousers, fold them in half with right sides inward, attach a piece from the pocket and trace it along the bottom edge, add 6.0 - 7.0 cm.
First way
This method of processing a pocket in a side seam is used in the case when the pocket is sewn separately, and then on the wrong side the edges of its flat part are sewn to the valance of the skirt on one side and the other.
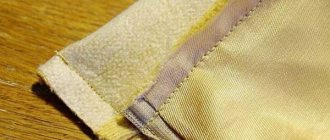
First, both edges of the pocket are stitched, and then two fabrics - the main and lining - are trimmed using an overlocker or the overlock foot of a sewing machine. Then the product is turned to the front side and the side edge is carefully ironed through a damp cotton cloth.
Pattern
To make a pattern correctly, you need to draw a template on paper. To do this, the pocket depth and width are measured. A rectangle is drawn. Don't forget to add 1 cm on each side for seams and overlock processing. From the long side, measure the entrance hole of the pocket in the side seam and add 4 cm in length. Then, using patterns, draw the bottom curve for the pocket. The top of the pocket will be flatter, and the bottom will be rounded.
In the photo above, the pattern is on the reverse side. Before sewing a pocket in the side seam of the dress, the pieces need to be turned so the rounded side is down. Sewing is done on the reverse side of the garment.
Processing burlap parts
Burlap top
Glue the facings with adhesive cloth. Take the burlap pieces, place the facing on top, matching the top edges, and trace the bottom edge of the facing onto the burlap. Then, from the resulting line on the burlap, mark the joining allowance: 0.7 X 2 = 1.4 cm, cut off the excess.
Connect the burlap with the facing along the convex-convex lines with pins and sew on a machine with a seam width of 0.7 cm.
Overcast the cut and press the seam towards the burlap.
Bottom of burlap
Overlock the lower (convex) edges of the valance using an overlocker. Place the valance on the front side of the burlap piece, matching the top and side cuts. Pin and machine stitch 0.1 cm from the overlock stitch, press the seams.
Modeling
Original basis
- Extend the pattern to the desired length. For example, I have 60 cm from the waist, length just below the knee.
- We widen the bottom by 4 - 5 cm, narrow the waist so that the side line approximately corresponds to our side line of the body and is beautifully shaped.
- Due to the fact that the “base is free”, it is better to slightly narrow the bottom of the armhole inward and lower it for freedom.
The side line of the back should be the same as the side line of the shelf. You can draw a side on the back and then transfer it to the shelf.
- We transfer the chest dart to the side seam.
- We widen the neck. Who cares, 3 cm is enough for me.
- I modify the sleeve to fit the armhole. In order to make it free, I lower the height of the rim by 2 cm.
Sleeve length 8 cm was found experimentally during fitting. Initially, I planned to go to the elbow, but during the fitting I decided to make it short with a cuff.
This is interesting: Dress pattern with pockets
Pocket assembly
Having cut out the parts, you can start creating the pocket.
- One half of the burlap with a valance is attached to the front half of the product, and the second to the back. In this case, you need to combine all the sections of the pocket.
- Stepping back 1 cm from the side or relief cut, you need to stitch along the front and then along the back half of the product.
- We connect the halves of the product with right sides facing each other, matching the lining parts and side seams. We fasten them together with pins.
- We sew the product along the cut (relief or side). Having reached the entrance to the pocket, you need to attach a bartack. This mode is found in most modern sewing machines.
- Next, we continuously stitch along the rounded sections of the lining. We put fasteners at the entrance border.
- Pocket processing is complete. It remains to iron along the front side of the product, as a result of which the burlap will be adjacent to the front half of the product.
As you can see, making such a pocket is actually much simpler than it seems at first glance. Even a novice seamstress can sew it.
But it is not only simplicity that makes this element so popular. The fact is that with proper tailoring and good ironing, it is possible to create a completely invisible pocket.