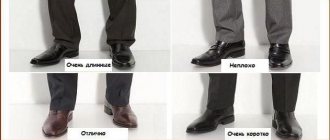
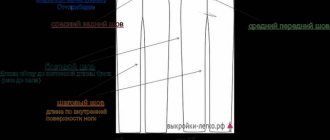
If you used our article How to make a pattern for women's trousers and are preparing to cut the trousers, then it's time to think about how to make the optimal layout of the pattern parts and calculate the fabric consumption.
Standard, tapered trousers for men and women can be cut from 120-130 cm of fabric, 150 cm wide. However, such consumption can be considered the norm only for small sizes, up to 44 inclusive. For the cut of loose-fitting trousers, this norm can be exactly doubled and 2.5-2.6 meters of fabric will be required. Let's take a closer look at how to economically cut trousers and accurately calculate the fabric consumption for trousers.
Layout and cutting of trouser patterns on fabric
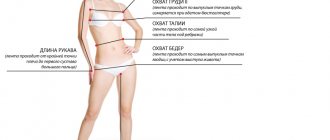
1. After constructing a drawing of the trousers, it is checked for coincidence of the control lines: bottom, knee, step, hip, waist. Check the measurements of SB and ST, taking into account their loose fit. Check the DPR measurement.
2. Before cutting begins, the fabric is decanted and only from the wrong side. Moreover, each type of fabric has its own processing method, since the shrinkage of different materials is not the same.
3. When cutting trousers, lay out the main parts of the front half of the trousers and the back half of the trousers on the main fabric, folded in half, face inward, so that the grain along the ironing line is preserved, and to save fabric, lay out the parts in a jack. The exception is fleecy fabrics.
After this, additional parts with shared threads are placed in the gaps as indicated in the modeling: yokes, valances, facings, flaps, belts.
4. To make sure that the direction of the grain thread of the main parts coincides with the pressing line, it is necessary to measure the distance from the edges of the fabric to the pressing line on the pattern in two or more places. By combining these points with a soap line, we get an ironing line on the fabric. If the fabric has a checkered stripe, then the ironing line is aligned with the selected stripe.
5. For fleecy fabrics (velvet, corduroy), the parts are laid out in one direction only. Most often, the pile goes from top to bottom, although the bright color is lost. Therefore, when placing the pile, you need to look at the fabric and the model.
6. The details of the patterns are pinned, outlined with soap, all control lines are marked and, having removed the pattern, they are drawn. After cutting, these lines are marked with spacer stitches or notches. The ironing line can be marked by ironing.
7. All allowances for parts when cutting are given as indicated in the diagram. An allowance of 2-3 cm along the seat line in the waist area is usually given in men's trousers, and in women's trousers when the pattern has not been adjusted and checked.
8. Baste and stitch the waist darts on the back half of the trousers and iron them towards the seat line.
9. Perform wet heat treatment
Relaxed trouser fit
Loose-fitting trousers differ from other models in that no matter how you twist the pattern pieces, you will not be able to fit them even in 1.5 fabric lengths. However, this norm applies to trousers with a full hem width measurement of over 60cm. However, it is better to immediately buy two lengths, taking into account all the allowances, and freely place both parts of the trouser pattern on one side (along the hem). Use the remaining large lunge folded in half to cut out the belt and other details.
Wet heat treatment of trousers (WHT)
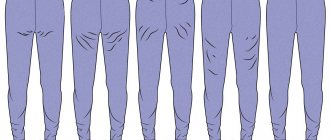
By wet heat treatment we mean pulling and ironing individual sections of trousers to give them a shape that matches the contour of the body. As a result of the OBE under the buttocks and below the knees, the trousers become ironed and their length is reduced. In the area of the calf muscle, the trousers, on the contrary, are pulled back and lengthened.
For skinny trousers, WTO is necessary to a greater extent than for loose-fitting trousers. It is better not to subject fabrics with stripes or checks to WTO, since ironing and pulling the fabric will disrupt the pattern. The arrow line along the front half of the trousers is ironed from the waist to the bottom, and along the back half of the trousers from the hip line to the bottom. WTO can be avoided on wide and short trousers (it is enough to iron the crease), as well as when using fabric made of cotton, silk, or viscose.
To make the fabric easy to iron and stretch, you can soak the ironing iron in different solutions:
- 0.5 liters of water + 2 tablespoons of ammonia + 1 tablespoon of vinegar essence or 3 tablespoons of vinegar + you can add 1-2 teaspoons of PVA;
- 0.5 liters of water + 1 tablespoon of vinegar essence or 3 tablespoons of vinegar;
- 0.5 liters of water + 1 tablespoon of PVA.
Note. Any of the solutions must first be checked on a piece of fabric to see if it is fading.
If there are darts in the trousers, then before the WTO, first sew them up, iron them well and iron them in the stops.
What will you need at work?
For both women's and men's trousers, you should choose the right material. Preference should be given to durable and beautiful fabrics. It is extremely important that the pants match harmoniously with other clothes. All matter can be divided into a couple of types:
- spring-summer. During this period, it is not recommended to use synthetic fabrics for sewing pants. This is due to the fact that they are not able to provide good air exchange. It is much better to give preference to linen, cotton and silk fabrics. These materials are fully ventilated and help avoid overheating;
- autumn-winter. It is recommended to sew trousers for this period using half-woolen or woolen fabrics. For example, jersey, crepe and gabardine would be an excellent solution. These fabrics have the ability to retain heat, are easy to drape and keep their shape.
Knitted or velor fabric is used to sew sports pants. If the clothes are intended for a celebration, the choice should be made on natural noble fabrics. For example, it is appropriate to use angora, cashmere and tweed. These materials provide maximum comfort, do not wrinkle and allow air to pass through well.
Info! The fabric should be selected taking into account its characteristic features. It is possible that it is prone to stretching or shrinking. To avoid making mistakes, you need to add about thirty centimeters to the length for subsequent processing.
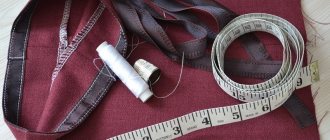
Also useful in this work are threads, a ruler and a measuring tape. In addition, you will need paper tape, as well as needles and soap. To create a trouser pattern, you need to prepare graph paper and pencils. In addition, you will not be able to do without scissors and a sewing machine. To simplify the process of sewing a product as much as possible, you can also prepare an overlocker.
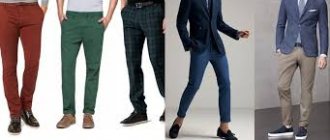
For classic trousers, it is optimal to choose fabrics in dark colors
Wet heat treatment of the front half of the trousers
1) Lightly iron the arrows of the left and right halves or mark with loose interfacing stitches.
2) Place the halves together face to face, pin together, aligning the control lines, darts and arrow lines.
3) Place the halves of the trousers on the table with the right or left up, but so that the side seams are laid towards themselves, and the waist is to the left or to the right.
4) The pull starts with side cuts in the area of the popliteal part (middle of the calf) from the knee line down. The bulge of tissue formed in the area of the calf muscle is tightened.
5) Unfold the front half of the trousers in incremental cuts and pull and tighten the area of the calf muscle in the same way.
6) The bulge in the hip area is slightly pressed only for stretchy fabric and steep hips. This stitching can be replaced with machine stitching along the seam allowance. If the fabric does not stretch or the thigh is flat, then the stitching is not done. If the thigh is very convex, then a pull is performed along the ironing line in the step area. The larger the thigh, the greater the draw.
7) If the fabric stretches and when cutting there is a wave along the bow line, then stitch in this area using a machine stitch.
8) Both halves of the trousers are turned to the other side and all operations:
- or repeat (for poorly stretchable fabric);
- or complement (for WTO average fabrics);
- or they don’t (for obedient fabrics).
9) After removing the pins, each front half of the trousers is folded separately along the fold with the wrong side inward, aligning all the reference lines.
10) Place one of the halves on the table with the cuts facing you and first lightly iron the ironing line.
11) The step and side cuts are aligned in the knee area so that there is no broken line. You can remove it by lightly pulling it back or by adjusting the arched line with scissors.
12) The ironing line is further tightened under the knee, and the side and step sections are further stretched. After this, when the final beautiful shape of the trouser leg appears, the ironing line is finally pressed firmly.
13) These operations are performed separately on the right and left halves, trying to make them the same. Then, these halves are finally checked for equality by placing them on top of each other.
How to cut trousers and prepare them for fitting
Home > We model and sew ourselves > How to cut trousers correctly
In this master class, I will introduce you in detail, using examples with photos and detailed descriptions, to the technology of sewing women's trousers.
Sewing trousers or a skirt with a yoke is more difficult than a model without this detail. That's why I chose this particular style for the master class. A simpler model, classic trousers without yokes and pockets, will be easier for you to sew yourself.
Part 1 – cutting, basting, preparing trousers for fitting.
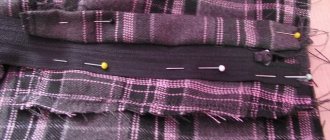
When cutting trousers, it is very important to follow the rule: the grain of the fabric and the grain line on the patterns of the front and back halves of the trousers must match - photos 1 and 3.
If you cut without preliminary two measurements of the distances (top of the pattern and bottom), from the lobe on the pattern to the edge of the fabric, then the finished product will be skewed along the inseam or outer seam. And the trousers look sloppy, with slanting creases. If the model has “arrows”, then after ironing they will be elongated.
Fabric calculation for trousers sizes 44-56.
Measure the exact length of the pants from the waist to the center front or side seam. Decide what shoes you will wear them with: high heels, mid heels or wedges. Measure the length and try on these shoes.
To the length of the trousers, if the model is without yokes and pockets, on a belt or facing, add 15-20 centimeters for allowances: 1.5 cm for the top edge, 5-6 cm for the hem (how to hem trousers), and 10-13 cm for width of the belt with allowances.
We buy 1.2-1.3 meters of fabric, with a width of 1.4-1.5 meters, if the client’s height is 160-170 cm, and the size is 44-48, depending on the style, on what shoes it is supposed to be worn with wear them, depending on the composition of the fabric.
Wool, cotton and linen shrink more when pre-ironing a piece of fabric at almost maximum temperature and steam. Viscose and all fabrics with synthetic fibers shrink less.
For models with pockets or yokes, it is advisable to add 30-40 rather than 20 cm to the length, depending on the width of the yokes - fabric is needed for 6 or 8 parts of the yokes, front and back.
If the back yoke is solid, as in my example, then 4 parts are cut out for the front and 2 for the back half of the trousers.
An additional 30-40 cm to the main length is also necessary if the fabric has a pattern that needs to be combined in detail.
As a rule, with a fabric width of 140 cm, you can cut out, without moving the parts, models of sizes 42-46, with a hip circumference of 84, 88 and 92 centimeters. But for size 46, with this width, it is necessary to place the patterns in different directions.
First make sure that the fabric allows you to do this. There are fabrics that change color depending on the direction of the pile. For example, velvet and corduroy. Almost all fabrics with pile need to be cut in only one direction - in the direction of the pile.
To determine how best to do this, apply the fabric to the figure in different lobar directions.
There are exceptions. For example, corduroy is perceived more brightly and beautifully if cut with the pile facing up. But the product, especially trousers, turns out to be impractical - the fabric quickly wears out.
Trousers of sizes 48-50, with a hip circumference of 96 and 100 centimeters, are cut out in the same length with a fabric width of 150 centimeters - photo 2. Patterns of sizes 52 are placed in different directions.
If your size is 54-56, then buy fabric by calculating its length using the formula: (pants length + 20 for allowances) + 0.5 of the first length. In order to position the patterns by “moving” them relative to each other.
For example, the “net” length is 100 cm.
+ 20 = 120 + 60 = 180 cm minimum
But usually, with these sizes, we buy two lengths of fabric. Of course, a lot of it remains unused. Therefore, we sew a set: trousers and a vest, adding another 60-70 cm to 180 cm, depending on the length of the vest.
How to cut trousers correctly.
Before cutting out, regardless of whether you made a trouser pattern yourself or use a ready-made one from fashion magazines, be sure to check how the front and back halves match at the control points. I make notches on both sides of each pattern at the knee and hip lines - photos 1 and 2.
When cutting, also make small notches on the fabric. When basting for fitting, they must match. If, for example, you shift the notch of the front half from the side seam, relative to the notch on the back half, a centimeter upward, and baste the crotch seam correctly, without displacement, then when you try on you will see an oblique crease in the front, going from top to bottom at the knee line.
In my example, striped wool trousers. Therefore, it is easier to cut out one strip at a time. But - each of the 4 parts separately, so that the split line coincides with the stripes.
If the fabric is one-color or with an abstract pattern, then in order not to make a mistake, do as shown in photo 3.
Lay out the pattern for the front or back half of the trousers on the fabric, folded in half, leaving room for an allowance of 2-3 cm.
Measure the distance from the seam line to the edge of the fabric or fold at the top of the pattern. Then - at the bottom. They must match. In my example, this distance is 26 cm.
Since the fabric width is not standard - 145 cm, and the trouser size is 48, I had to move the patterns, “raising” the front pattern 10 cm up relative to the back half pattern - photo 4.
Lay out the patterns on the fabric and carefully trace with chalk or thin soap, not forgetting to draw short lines at the notches on the knee and hip lines - fig. 6.
Standard seam allowance is 1.5-2 cm on the side and crotch seams, 5-7 cm on the hem and 1.5 cm on the top - photo 5
Depending on the model, cut out a belt or yokes. How to properly sew a belt or yoke to trousers or a skirt.
In order to accurately make notches on the fabric, fold each piece in half, aligning the short lines - photo 7. If the bottom line does not match, attach the pattern and check again - the fabric may have shifted during cutting.
After all the details of the trousers have been cut out, trace the pattern along the outline on the second half of the front - photo 8
Getting the trousers ready for fitting.
In order for the zipper to be sewn correctly and beautifully, I glue thermal fabric (adhesive - thick fabrics, non-woven fabric - light and summer) to part of the top of the front halves of the trousers - photo 9.
If you are sewing a simple model of trousers, without lining, pockets or yokes, then you can already baste them for fitting.
I usually make pockets before fitting, so that after it I can immediately sew the side seam. And yokes on the front halves, if the pattern has already been checked and fits exactly.
Lined trousers.
If in a model, for example, in winter wool trousers, it is necessary to make a lining on the front halves, then cut out these 2 parts along the cut out front halves, then shorten them by 5-10 centimeters. Overlay and stitch the bottom of the lining. Then baste to the front halves of the trousers along the contour, with the exception of the bottom - photo 10.
Attach the pattern and draw the seam lines. If you are sewing trousers with arrows, then I recommend drawing a line of arrows (lobar) and sweeping them with long stitches, additionally connecting the lining and the base - photo 10.
Then, if there are no yokes, connect the front and back halves of the trousers along the side seam line, aligning the notches, and baste. After this, sweep the step seams in the same way. When both halves of the trousers are seamed, align them along the seat seam, starting from the point where the crotch seams join - photos 11 and 12.
Getting ready to try on trousers with a yoke.
If the model has yokes only on the front halves of the trousers, then they can be basted and stitched immediately. If you are sewing this pattern for the first time, it is better to just baste.
The yokes hold their shape better if you pre-glue them with glue or non-woven fabric - photo 13.
I used this pattern for the first time, so first I basted the halves of the trousers along the side seams, starting 3 cm from the top - photo 14. And then I basted the front yoke - photo 15. To make fitting easier and the product more neat, baste yoke seam lines on the front side - photo 16.
If the model has yokes on the back halves of the trousers with a seam, then baste them in the same way as on the front halves, and then connect them along the middle seam.
This trouser model has a solid yoke at the back. Therefore, first the left and right halves of the trousers are basted along the seam of the seat, and then the back yoke is basted - photo 17.
After the yokes are basted, baste the side seam to the top - photos 18 and 19.
Baste the zipper - photos 20 and 21. Fold and baste the bottom of the trousers. All. The trousers are ready for fitting.
In the second part of this master class we will learn how to sew them correctly.
Site pages on social networks - subscribe to learn about new articles
lana-web.ru
Wet heat treatment of the back half of the trousers
1) Lightly iron the arrows of the left and right halves.
2) Place both halves face to face, pin down all the control lines of the knee, step, and hip.
3) Place the trousers on the table with the right or left side up, but with the cuts facing you.
4) To create a concavity in the area of the calf muscle, the step cuts are tightened, and to create a convexity along the arrows, a pull is performed.
5) The upper part of the step cut (knee area and above) is pulled back and ironed along the arrow.
After tightening the step cut of the back half of the trousers, make sure that its length is equal to the length of the step cut of the front half of the trousers.
6) Pull the seat seam. The guy is such that in the area of the largest recess (the area on which we sit) the seat line lengthens by 1-1.5-2-2.5 cm. It depends on the stretch of the fabric and the size of the pants.
Pulling back the seat line, the iron moves towards the waistline and slightly towards the buttocks, without disturbing the position of the trouser halves.
7) The resulting slack in the area under the gluteal folds is very well tightened, without affecting the bulge of the thigh.
8) Turn the trousers towards you with the side cuts and perform a small pull in the knee area, while simultaneously tightening the resulting slack in the knee area.
9) The area of the calf muscle along the side seam is ironed, then pulled along the ironing line.
10) If a bulge has formed in the area of the hip line, then it is ironed out or simply secured with machine stitching.
11) Both halves of the trousers are turned to the other side and all operations are either repeated, or slightly supplemented, or not performed, and only under the gluteal fold they are pressed as well as on the reverse side.
12) Remove the pins and fold each back half of the trousers along the arrow with the wrong side inward, while strictly aligning the line of the step and the knee.
Note. The pressing line in the back half of the trousers, depending on the drawing, is laid out starting from the knee line up to the waist - as it lies. An exception may be striped or checkered fabrics. Here the arrow follows these lines.
13) A slight pull is made along the ironing line in the area of the calf muscle, and the resulting or remaining slack in the area of the seams is ironed.
14) The knee area is tightened along the arrow, and pulled back at the seams.
15) Once again, press well under the gluteal fold.
16) Check the equality of both back halves of the trousers by placing them on top of each other, making sure to align the reference lines.
17) Finally iron the arrow lines, bringing each half to the desired shape.
Note. After the WTO, be sure to check the control measure of the DPR; it should be equal to the sum of the length of the bow line and the seat line. If a discrepancy occurs and the DPR measurement turns out to be smaller, then strengthen the guy line along the seat line.
10. Take off the trousers, do the first fitting, at which:
- clarify the overall fit of the trousers
- clarify the position of the ironing line
- clarify the position of the waist line, and if the waist needs to be lowered according to modeling, for example, by 1-5 cm, then it is better not to cut off the excess fabric first, but only add new interfacing stitches for sewing in the belt
- clarify the hemline (with shoes)
- location of darts and their depth
- location of pockets
11. After trying on the trousers, sweep out the trousers, if necessary, finally complete the WTO of all halves separately, check their equality and finally iron the ironing line.
12. Use adhesive pads to secure the pocket sewing area, allowances for the zipper, and secure the folds with a dowel.
13. Baste and stitch soft folds.
Note. If the trousers have a lining, then the soft folds and darts are sewn together.
14. Pockets are processed, if patch pockets are sewn, welt pockets are sewn.
15. Overlock the sections of the four halves of the trousers along the contours with the exception of the waist line (if the fabric is very loose, then overlock the waist line as well).
16. Baste the trousers and do a second fitting, at which you will finally clarify the waistline, hemline, general fit of the trousers, and check for any defects. After this, the trousers can be laid out and finishing details can be added.
17. Finish the zipper on the trousers and at the same time sew down the bow line.
18. Place the waist line in each half of the trousers either on a braid (edge), or with a fine stitch, or with an adhesive strip to secure it from stretching.
19. Prepare small parts: belt, valves, belt loops.
20. Adjust and prepare the bottom of the trousers for sewing the crotch and side seams. If you have a regular hem at the bottom, you can immediately glue the inside of the hem and its seam allowance, and if you have a hem with a cuff, you can glue it depending on the type of cuff.
21. Sew the side seams
Technology of sewing classic women's trousers
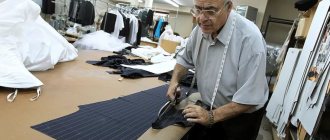
In this article we will analyze the technology of sewing classic women's trousers. Choice of fabric As a rule, classic trousers are made from suit fabrics: it can be broadcloth, tweed, cashmere, suit jacquard, etc., and the fabric must be dense enough to withstand frequent and strong ironing .
I chose a thick suiting fabric in melange color, the fabric contains artificial fiber containing wool. Fabric consumption will be from 2m. We will also need duplicating fabric (dublerin or non-woven fabric) - consumption from 30cm, lining for pockets - consumption from 30cm, a regular zipper 20cm long, matching and contrasting threads, as well as working tools. Pattern
To sew trousers, we will use a pattern of classic trousers with a tight or moderate fit (you can see how to create a trouser pattern in this article). Cutting the fabric Before cutting, be sure to decate. Let's fold our fabric in two layers, right side inward, and align along the edge. We place our paper trouser parts on the wrong side of the fabric as shown in the diagram, strictly observing the direction of the grain thread. We trace the patterns along the contour and add 1-1.5 cm to allowances along the waist lines, side and step cuts, and 2-4 cm along the bottom line. Along the line of the middle of the front half, we add allowances 3-5 cm wide and 20 cm long down from the waist line to the one-piece facing; under the facing, allowances along the bow line will be 1-1.5 cm. At the back half, along the middle line, the width of the allowance in the waist area is 2-3cm to adjust the pattern. We mark all control lines. If the fabric has a pile, then lay the front and back halves in the same direction, as shown in the photo. Be sure to follow the direction of the grain thread, which should run parallel to the center line of the parts (arrow). We cut out the parts and transfer the control lines to the second layer of fabric using copy stitches. Afterwards, be sure to mark all control lines on each part using spacer stitches or snares: the ironing line, the middle line, the hip line and the knee line. And so, we cut out two parts for the back halves of the trousers and two parts for the front halves. Sewing We sweep the waist darts of the back halves, stitch them, iron the seams and press the darts towards the line of the middle of the product. Now let's process the waist darts of the front halves: sweep, stitch and iron to the middle line. WTO Now we will carry out a wet-heat treatment of each part, ironing and pulling certain areas of the parts to form a shape close to the human figure. We lay out the front and back halves on the table and perform an OBE according to this scheme. Be careful, not all fabrics can be subjected to wet-heat treatment; You can read about how to correctly perform OBE of trousers in this article. In addition to giving shape, during wet-heat treatment, arrows are formed on each part, and after WTO, the front and rear halves look like this. First fitting After wet-heat treatment of the parts, we sweep the halves of the trousers along all sections and carry out the first fitting. During the fitting, we clarify the overall fit of the trousers, the ironing line (arrows), the waist line, the hem line, the position of the darts and pockets. After fitting, we will separate our halves, finally carry out the WTO, check the equality of all parts and finally iron the arrows. We duplicate the facing for the fastener on the wrong side of the product. If the fabric is not too dense, then the fold lines need to be reinforced with a dolikov. Processing of pockets The model of our trousers has only two side pockets with a detachable side. If your trouser model has other pockets, for example, on the back halves you will have framed pockets or patch pockets, then it is at this stage of sewing trousers that all pockets must be processed. To do this, we will mark the future pockets on the reverse side of the product. We cut out the details of the pockets and begin processing. You can see the technology for processing side pockets with a cutting barrel in this article. This is the pocket we got. To prevent the pocket from becoming skewed during the process of sewing trousers, it is necessary to baste its allowances to the allowances of the product along the waist line and the side cut, and the line of entry into the pocket must be basted. We overcast the allowances of all four halves along all sections, with the exception of the waist line. However, if the fabric frays too much, then the sections along the waist line also need to be overcast. Second fitting We again sweep the halves of the trousers along all the cuts and carry out the second fitting. Now let's clarify the final waistline, hemline, overall fit of the trousers, and check for any defects. Let's lay out the parts and continue sewing the product.
Clasp processing
We sweep and sew the front halves along the middle seam under the fastener. Iron the allowances. Now let's start processing the fastener. Our model has a classic zipper, which is located in the middle seam; see how to process such a fastener here. Connecting the side and step sections To prevent stretching of the fabric at the waist area, we will sew a line of small stitches on the allowances of the waist line. You can strengthen the waistline with an adhesive filler. On the wrong side of all four parts we glue the bottom line. If the fabric is too thick, then you only need to glue up to the hem line without allowances. We fold the front and back halves along the side cuts, right sides inward, strictly aligning the control lines, and cut off the cuts. We sweep the side cuts from the back half from the knee up and down. Iron the basting. From the side of the front half, using a pattern, draw a line along which the stitching line will run. We sew the side sections from the side of the front half, starting from the waist line down, while in the area from the knee line down, we pull the fabric well. Iron the seam on the edge on both sides, and then iron the seam allowances, slightly pulling the fabric. Now let’s connect the back and front halves along step-by-step cuts, folding the parts right sides to each other and strictly aligning the control lines. We sweep the step cuts from the side of the back half from the knee line up and down. And in the same way, we iron the basting, and from the side of the front half, using a pattern, we outline a stitching line. We sew the step sections from the side of the front half from the bottom up, pulling the fabric in the area from the knee line down. We iron the seams on both sides and, pulling, iron the allowances. Connecting the seat line From the wrong side we sweep away the line of the middle of the rear halves. Make it more convenient by putting one pant leg inside the other. After basting, we will carry out the third fitting. During the fitting, we determine the width of the trousers at the waist. While wearing trousers, you need to sit down and check your seat height. If the trousers are tight in the groin area or, conversely, are loose, then it is necessary to redo the crotch seams, releasing or taking in allowances. We sew the seam of the seat, starting from the waist line, pulling the fabric, finish stitching at the bow line, and then go back and sew a line exactly along the first line, also pulling the fabric. At the end we put a large bartack. We iron the seam on the edge on both sides, and iron the allowances without reaching the very bottom. The rest of the allowance remains on the edge. If the seam pulls, then it is necessary to tighten the allowances again. Processing the belt We cut out the belt detail, observing the direction of the grain thread. The length of the belt is equal to the length of the waistline in the trousers, taking into account the width of the slope at the fastener, plus seam allowances. The width of the belt is 7-8 cm plus seam allowances; if the belt is cut out of two parts, then its width is 3.5-4 cm plus seam allowances. On the wrong side we duplicate the belt detail without allowances. We sew the bottom edge. Fold the belt piece in half lengthwise, wrong side inward, iron the fold line and give the piece a semicircular shape, slightly ironing along the fold line. We baste the belt to the waist line of the trousers along its raw cut, folding the parts with their right sides facing each other. We sew the waistband, iron the seams, and press the allowances toward the waistband. Now turn the belt over, fold it in half with the right side inward, and connect the side sections of the belt, while the allowances of the upper and lower sections should be folded to the wrong side of the belt. We sew the side sections of the belt. We cut out the allowances in the corners and turn the belt right side out. Now we baste the belt from the wrong side of the product. You don’t have to fold the basted seam allowance inside the waistband, but baste it outwards, this will avoid excess thickness. We sew again from the front side of the product, placing a stitch in the chip of the seam of attaching the belt to the front side. Iron the seams. You can sew a button on the belt and make a loop for it, or make a hook, if desired. Along the bottom line, fold the allowances to the wrong side and iron the fold line. The allowances can be secured with a hand-made goat seam or with adhesive web. We carry out the final wet-heat treatment and our trousers are ready! In the end, I would like to add that my trousers turned out with a small defect, which I did not notice during all the fittings. And only in the photo did I see creases on the crotch seams of the back halves. I will tell you how to eliminate this and other defects that arise when sewing trousers in my next articles.
Handmade terminology
Terminology of machine operations
blogremaking.blogspot.com
Stitching side seams
1) Fold the zipper and the front half of the trousers face to face along the side seams, strictly aligning the control lines of the hip, step, knee and align the snares. Cut the sections not only along the control lines, but also in the spaces between them.
2) Sweep along the back half of the trousers from the knee up and down. The pins are removed and the basting is ironed.
3) It’s better to use a pattern and a ruler to draw a soap line on the side of the front half of the trousers along which the stitching will go. Scribble from the front half of the trousers:
- from the waist to the bottom of the trousers
- from the knee line up and down, pulling the fabric well
4) Iron the seam while pulling it back.
For an adjustment seam , baste along the back half of the trousers, stitch along the front half of the trousers. Press the seam on each side, pulling it apart. Iron both allowances towards the back half of the trousers, check the fabric flow from the face and iron here using an iron. On the front side of the trousers, at a distance of 0.1-0.5-0.7 cm from the inner seam, place a second finishing line, pulling the fabric well, iron.
22. If the trouser belt consists of two halves, then sew them separately to each half of the trousers and iron them. If the belt is cut in one piece, then it is sewn on at the end of sewing the trousers.
23. Stitch the crotch seams.
Proper processing of cuts
The best option is to use an overlocker. But if you don’t have such equipment, you can do it without it.
The most popular way to process fabric sections without an overlocker is the zigzag stitch. The seam should be made in such a way that it catches the edges of the fabric. It is recommended to make the stitch wide enough, with a high frequency, so that it captures the fabric as much as possible.
An even simpler but reliable way to protect the edges from fraying is a straight stitch with a hem. In this case, the edges of the cuts are placed on opposite sides of the seam, each of them is folded inward and ironed. A seam is made at a distance of 1 mm from the edge of the product.
If clothes are sewn from fabrics with a dense weave of threads, the free edges can be processed with special scissors with a zigzag blade. But such manipulation requires skill to ensure that the teeth along the edge of the product are even. In this case, it is best to lay the stitch at a distance of 0.5 cm from the edge of the product.