For cuffs that do not fasten well at the wrist, a cut is made in the lower part of the sleeve so that the arm can pass freely. It is very easy to fold or line the slits on the cuffs with strips. The treatment with a long strip running along both sides of the cut gives the sleeve a very neat appearance; the cut is not visible when the sleeve is buttoned up. The most difficult part of sewing is the cut, which is processed with a figured strip - in particular, such cuffs are made on men's shirts. Cuffs with a cut of this type are usually combined with other stitched details - shoulder straps, fastener strips, etc.
How to trim a sleeve cut with a hem
Both sides of such a cut are processed with a narrow double hem that fades to nothing. The hem is sewn on a machine, processing can be done very quickly. The hemmed front edge of the cut is folded over to the wrong side before stitching the cuff. When the sleeve is buttoned, one side of the slit covers the other, hiding the machine stitching.
- Cut the sleeve along the line marked on the pattern. On one side of the cut, iron 3 mm of fabric twice onto the wrong side, beveling the folded fabric to the top point (corner) of the cut. Pin and stitch. The folding of the other side of the cut is done in exactly the same way.
- Take the sleeve openings and fold them right sides together so that the 2 hemmed edges meet. Stitch a narrow, short, slightly curved “arrow” over the corner of the cut to reinforce it. Place the sides of the cut on the wrong side towards the corner (left). Iron the inside-out sleeve.
Preparation
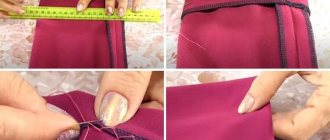
The cut should be processed before stitching the sleeve seam, while the entire piece remains flat. The marking of the cut is transferred to the fabric with a special marker or tailor's chalk, focusing on the pattern. The cut line should be perpendicular to the bottom line of the sleeve. The length of the incision itself is, on average, 7-8 cm.
The trim can be cut from the main fabric or you can use a plain fabric to match or, conversely, a contrasting one. Prepare a strip of fabric, cut at an angle of 45 degrees, twice as long as the height of the cut and the allowance of the sleeve part (if the amount of fabric allows, add another 1.5-2 cm). As for the width of the binding, this size should be 4 times the width of the finished edging (usually 5-6 mm, therefore, the binding needs to be cut 20-24 mm).
How to process a sleeve cut with a hem
Hemming a sleeve cut with a rectangular strip is the easiest way to process it. The cut edges of the strip can be folded and stitched to the sleeve after the cut has already been processed. The edges of the plank are also processed with a hem or a “zigzag” after it is cut out, and then stitched to the cut. In this case, there are no extra stitching lines on the front side of the sleeve.
- Fold 6 mm inside out from two long and one short edges of the rectangular facing strip and baste. Pin the placket over the sleeve cut line, right side in, and mark the cut location on it with a chalk or basting line.
- Start stitching from the edge of the sleeve, from the bottom, stitch 3 mm from the intended cut line, bevel to a cone 2 cm from the top point of the cut (corner). Turn in the opposite direction, making one stitch across the corner. Turn it the other way around and stitch along the other side of the cut.
- Make a cut between the two stitch lines. Turn the bar inside out. Move the seam slightly to the wrong side and iron it. Pin across the edge of the placket to the sleeve.
- Stitch the edges of the placket to the sleeve very close to the hem. At each corner, turn around and remove all the pins as you go. When finished, remove the basting and iron.
How to finish a sleeve cut with a facing and sew a cuff
We recently told you how to process a sleeve cut with a strap, and today we will reveal all the secrets of processing with a facing. This method of processing, in our opinion, looks more gentle and feminine. It’s up to you to decide which method is easier to sew! At the end we will tell you how to carefully sew a cuff: read carefully and until the end! 1. Cut out the fabric edging. In our case, the width of the edging is 2.5 cm. On the sleeve we cut a slit according to the marking.
2. Draw an auxiliary line at a distance of 1 cm from the edge cut.
3. Iron the seam allowance to the drawn line.
4. Fold the cut edge and sleeve cut right sides together. We turn the sides of the cut in different directions and turn them into a single line.
5. We lay the cut of the sleeve so that at the beginning it coincides with the cut of the edging, and in the center the stitch covers the cut of the sleeve by 2 mm. We sew the edging to the sleeve cut. The seam width is 0.5 cm. We check the quality of stitching on both sides. There should be no folds in the center of the cut.
6. We bend the edging around the cut. We sweep or pin the seam allowance so that the folded edge overlaps the stitching seam of the edging by 0.1-0.2 cm.
7. We sew a line along the edge of the edging on the front side of the sleeve. On the wrong side of the sleeve, the stitching should fall into the stitching seam of the edging.
Checking the quality of the stitching. Don't forget about wet-heat treatment.
8. Fold the sleeve cut right side inward, aligning the sides of the sleeve cut. At the top of the cut along the facing seam we stick a tailor's pin or use running stitches to secure the sides of the cut.
We stitch the corner at the top of the cut from the inside out.
9. Turn the side of the cut on the front of the sleeve to the wrong side, add folds and lay a fixing stitch or secure with tailor’s pins.
The processing of two sleeves must be done sequentially and the symmetry of the folds and edgings must be checked.
10. Cut out and duplicate the details of the cuffs.
11. Use the cuff pattern as a template for ironing the seam allowances. We bend the cuff allowance and iron it. In our case, the width of the allowance is 1 cm.
12. We bend the template around the cuff piece and iron it. Fold the second cuff allowance and iron it.
13. Remove the pattern. Such manipulations allow you to form an edging, which simplifies further processing.
14. Fold the cuff piece and the sleeve piece right sides together. Sew it down and place a stitch along the previously ironed line on the cuff. Iron the allowances to the cuff side.
15. Fold the cuff right side inward. We align the short cuts and grind them. If necessary, trim allowances.
16. Cover the cuff seam allowance with the free allowance on the inside of the cuff.
17. Turn the cuff inside out and straighten the corners.
18. We notice the inner cut of the cuff, overlapping the stitching seam of the cuff by 1 mm.
19. We sew a line along the outside of the cuff, capturing the inside. The stitch runs along the outside of the cuff at a distance of 1 mm from the edge of the cuff, or into the stitching seam of the cuff. We are holding the final WTO.
In our online store you can buy patterns for blouses and shirts, in sewing which this master class will be useful to you.
Find master classes on processing collars, fasteners, seam cuts and many others in the “Sewing Technology” section on our blog.
How to finish a sleeve cut with a long placket
Careful processing of the cut with a long, bias-cut, narrow strip is used on the sleeves of clothes made of any fabrics, including transparent ones. It is better not to use such treatment only on products made from thick, voluminous fabrics because the cut will be too tight and the bar will become puffy.
- For the placket, cut a strip of fabric 3 cm wide and equal to twice the length of the cut. Fold 6 mm along the long sections of the strip.
- Using a line with small stitches, sew 6 mm from the line of the future cut, bevelling it to a cone 2 cm from its top point (corner). Turn back and stitch across the corner. Turn around in the opposite direction and stitch along the other side of the cut. Using scissors, make a cut towards the very corner.
- Unfold one ironed side of the strip and pin it to the edge of the cut, right sides together. Align the reinforcement stitch with the pressed fold line of the placket. Baste by hand. Machine stitch along the outside of the reinforcement stitch.
- Remove the basting. Fold the other ironed side of the strip over to the wrong side. Align the ironed side with the line of the previous stitch. Pin it. Using a blind stitch, hand sew the pressed edge of the placket along the reinforcement stitch line on the reverse side. Smooth the finished cut.
Preparing parts
Each sleeve will require two additional parts - a placket and a facing. Some sources recommend cutting the facing on a bias, but since in this case it is used to process a straight cut, this is not necessary.
The dimensions of the parts will depend on the selected cut length (in our diagram it is set to 10 cm) and the width of the strip (in our case, 2.5 cm in finished form). The parts are cut out taking into account allowances at the bottom of the sleeve of 1.5 cm and allowances along the perimeter of the strap of 5-7 mm. The finished shape of the upper edge of the plank can also vary depending on the model - triangular, rectangular, rounded.
The processing is carried out before stitching the sleeve seams. A cutting line should be marked on the front side of each sleeve. Please note that the narrow facing should be closer to the seam of the sleeve, and the placket, accordingly, on the other side (as a result, they will be mirrored on the two sleeves).
Processing the cut on the sleeve
Tools and accessories: work box, product, iron.
Work sequence
Processing the cut by turning
- Cut out the facing along an oblique line (at an angle of 45° to the warp thread) with a width of 2.5 - 3.0 cm. Cut the fastener along the marked line. Finish the edge of the fastener with a closed edge edge stitch.
- Fold the clasp in the middle, secure the edge of the clasp with a double stitch.
- On the front side, fasten at the end of the fastener, and wet-heat treat the fastener on both sides.
Processing horizontal fastener
1. Mark the location of the fastener on the sleeve with two notches 0.7 - 1.0 cm long. The length of the notches depends on the width of the cuff seam.
2. Sew the fabric between the notches using a hem seam with a closed cut, either manually or using a sewing machine.
3. Along the bottom edge of the sleeve, lay 2 lines with long stitches and loose tension on the top thread: the first line at a distance of 0.5 - 0.6 cm from the edge, the second line at a distance of 0.5 cm from the first. Gather the lower section into gathers so that there are more of them in the back of the sleeve, near the fastener. Self-control
Check:
- length of fastener on both sleeves;
- precision and accuracy in processing fastener cuts.
Instruction card
Sleeve of a women's blouse in finished form
Of course, this is a very simplified method, there are others. But in this way, even a novice seamstress can quite simply and easily process the cut of a shirt sleeve. And this is what the cuff of a blouse looks like when buttoned, with the sleeve cut processed using this method.
In this video you will see how simply and at the same time beautifully you can process the neck of a dress. The so-called French method of processing the armhole or neckline with double bias tape. It can also be used to process sleeve cuts.
How to cut a shirt neckline
This diagram shows another way to make a sleeve cutout. This cutout is used, as a rule, for the sleeve of a men's factory-made shirt and for finishing the neck fastener. But we will not consider it, since the technology for processing a rectangular neckline is quite complex and is used in mass tailoring. I do not advise you to use this method; it is much easier and faster to do it according to the first scheme. The top photo clearly shows what this treatment will look like when finished.
Preparing the sleeve cut for processing
First of all, you need to mark the center line (H) with chalk, which you will then have to cut with scissors. You can choose any depth of cut, depending on the size of the shirt, blouse and sleeve width, but if you find it difficult to decide which one, you can measure the cut of the finished shirt.
Set aside 0.7 cm sections on both sides of the center line and connect them to the top point of the line dividing the cut in half. Prepare two strips (facings) 25 cm long. They must be cut along the grain thread. Choose the width of the facing at your discretion, but usually it is 2.5-3 cm. Cut the strips exactly in width so that when processing the facings they are of the same thickness, but the length can be added by 2-3 cm, and the excess can then be cut off. Now you are all ready to start processing the sleeve cut on your sewing machine.
Processing the sleeve cut
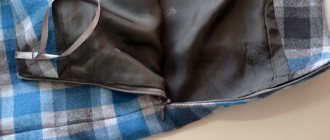
This photo shows how the facing will look finished inside the sleeve. Since this is a women's blouse, the finished facing length is 6-7cm.
To make it easier for you to attach the strips, first iron them in half with the wrong side inward. When processing the sleeve cut this way, it is a little difficult to stitch the facings. They need to be attached with an allowance along the edge - 0.7 cm, but only the allowance should gradually decrease, and at the end point of the cut it will be equal to 0.2 cm. You can baste the facing to the sleeve with threads if it is difficult for you to perform this operation.
To prevent seating of the shirt fabric, they need to be stitched along the shirt fabric, the facings should be located at the bottom. Sew the strips along the entire length, on both sides of the cut and iron them to one side.
Immediately fold the second part of the facing exactly half the width (0.7 cm) and fix it with an iron. All that remains is to make the finishing seam and the sleeve cut will be processed. Just pre-baste the hem with threads, making sure that its edge coincides with the edge of the already sewn side of the strip. Make a finishing stitch 1 - 2 mm and iron the finished sleeve cut.