In the East, the turban is considered traditionally a men's headdress. But it is becoming increasingly popular among women all over the world. And not by chance. This headdress is not only a stylish accessory, but also a warm and comfortable hat to wear, which, unlike the original, is easy to take off and put on. Making a turban is not difficult even for a novice craftswoman. Individual preferences and taste will help you choose a model, and a detailed diagram and description of a crochet turban will help make the process of creating an accessory quick and enjoyable.
Features of crocheting a turban
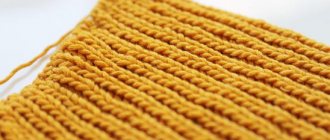
The crocheted turban hat in most models has a simple pattern; it is crocheted in the shape of a rectangle. You can even make it from an ordinary scarf. The rectangular fabric is folded in a special way, stitched, and often decorated with a brooch, resulting in a comfortable and stylish hat in the oriental style.
But there are also one-piece models, the manufacture of which requires precise measurements, otherwise the turban will not fit well on the head. In addition, such patterns usually use increasing and decreasing stitches, which requires attention.
If the needlewoman still has few skills, it is better to start with simple turbans. This will help make the knitting process enjoyable and gradually gain the missing experience so that you can later move on to more complex patterns.
Advantages of a knitted turban
This headdress perfectly covers the entire head, keeps it warm and looks stylish at the same time.
The shape of a turban has its own advantages that are incomparable to a regular hat:
- A turban visually makes the oval of the face ideal
- Enlarges the eyes
- Visually lifts the outer corners of the eyes
- Makes the look more open
- Emphasizes and lengthens the neck
A photo of a knitted turban on different women clearly shows how this headdress rejuvenates and makes the face more attractive. This is precisely why many people love the turban.
In addition, the headdress is easy to wear and care for. It is easy to remove and does not spoil the hairstyle. The turban is easy to wash and dries quickly.
What you need to knit a turban on your head
To crochet a turban hat, you need to select the model of the product, materials and tools that are necessary for the work. Be sure to take measurements.
Model selection
When choosing a model, it is important to determine for which season the product is knitted. A turban made with a tight knit is more suitable for winter. Models with openwork patterns are ideal for autumn. The decor is selected based on the color of the turban; there should not be too much of it. And, of course, the older the future owner, the stricter the headdress should be.
Important! It is more rational to make the decor on the turban removable, so that if necessary it can be easily replaced or removed.
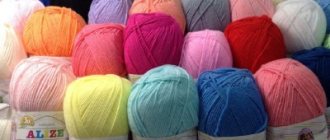
Yarn selection
This point is very important, since the appearance of the product and its wear resistance depend on it. You also need to consider how warm the turban will be.
- Season. Winter option - 100% wool or blended yarn with mohair, angora or alpaca. For the warm season - linen, cotton or viscose.
- Thickness. The density of the headdress depends on it. For dense patterns, yarn 200 m per 100 g is suitable, for openwork - 500 m per 100 g.
Important! Acrylic yarn is suitable for any season.
Hook selection
A high-quality and correctly selected tool guarantees ease of use and a good final result.
What criteria are used to choose a hook:
- Size. It is chosen depending on the thickness of the yarn. Refer to the yarn label for recommended hook number.
- Material. The hook must be strong so as not to break or deform during operation. Therefore, it is not recommended to choose plastic or aluminum hooks. A bamboo tool is pleasant to use, but a metal one would be a better option. Preferably with a plastic or rubber handle. The latter rubs your hand less during long-term use.
Important! When choosing a hook, you should pay attention to the working surface. There should be no nicks or roughness on it. Otherwise the thread will not slide along it.
The right choice of tools is the main key to a beautiful knitted product.
Product size
To determine the size of the future turban, you need to take two measurements using a centimeter tape. How to correctly measure the head circumference and depth of the product is shown in the diagram:
Types of turban
Many, seeing a beautiful girl in a stylish headdress, also wonder where to buy a knitted turban. However, in reality it is easier to knit it yourself or make it from a scarf.
There are several options for this headdress:
- Knitted or fabric stripe
- Twist braided hat
- A classic hat with a pattern in the form of a turban or grooves on the head
The simplest and at the same time stylish option is a scarf turban. At the same time, the canvas rises upward, which emphasizes the beauty of the eyes and neck. The classic hat with grooves does not look so impressive.
How to crochet a turban
The most original and easiest to make by craftswomen is considered to be a crocheted turban. It is universal and suits almost everyone. The proposed detailed descriptions with photos, diagrams, videos and master classes will help you choose an original model.
Crochet turban headband
The simplest, but no less fashionable headband is the turban. Even those needlewomen who are not yet very confident in holding a hook in their hand and do not work with complex patterns can do it.
You will need: yarn - 160 meters (for head volume 54-56 cm), hook 3.5, scissors, measuring tape, needle.
Technology:
- Crochet 23 air loops and one lifting loop.
- Knit one row with half double crochets according to the pattern.
- Unfold the fabric, knit two air loops (lift). Next is 1 front relief column according to the diagram.
- And 1 purl relief stitch according to the pattern.
- Alternate 2 front embossed stitches and 1 purl stitch until the end of the row. At the beginning and at the end of the row there should be 2 front relief columns.
- Unfold the knitting. Repeat the previous row until a fabric 20 cm long is knitted (another 18 rows).
- Divide the fabric in half, 11 stitches each (do not knit the purl relief stitch in the middle).
- Knit each half with the same pattern for another 10 cm (10 rows). Cut the threads at the end of the halves and fasten.
- In the second half, knit 1 more embossed stitch to return to the original number of stitches (23).
- Cross the knitted halves and knit with the same pattern, 23 stitches in each row for another 18 cm (18 rows).
- Having knitted 18 cm, cut the thread, leaving an end 25 cm long for gathering the edges of the product.
- Take a needle and carefully sew the edges.
The crocheted turban headband is ready.
If you can’t knit according to the description or some points remain unclear, you can use a detailed master class
A simple turban hat for beginners
What you will need:
- yarn (a skein of 100 g should contain 400 m of yarn or 50 g 200 m);
- hook No. 3;
- tape measure;
- scissors.
Get to work:
- Measure the circumference of your head, calculate the number of loops.
- Knit the required number of air loops.
- Knit the first row only with double crochets, on the forehead (strictly in the center) replace 12 double crochets with 12 chain stitches.
- Repeat step 3 3 rows in a row.
- The subsequent rows are only double crochets.
- At a sufficient height of the fabric, begin to round the bottom of the hat, evenly reducing the loops to 4.
- Pull the remaining 4 loops into 1, cut the thread and fasten.
- Place the decor in the center of the area connected by air loops, connecting all the chains with it.
If you don’t have enough experience yet, there is a simple knitting option
Openwork turban
The next model is a voluminous openwork turban hat made with crochet. Despite the pattern, if you choose a yarn with a pile, it will also be suitable for winter. You can crochet such a turban on your head using a step-by-step master class.
What you need
- yarn;
- hook;
- scissors;
- markers.
Abbreviations: B - air loop, BN - single crochet, CH - double crochet, SPIDER 4 - 4 elongated loops from one three rows below (also 6, 
Algorithm:
- Tie a ring of 5 V.
- Knit 11 BN. We knit in turning rows.
- Knit 3 rows in a row 1 B and 11 BN.
- Next, knit 1 B, 1 BN and SPIDER 4. Alternate 2 BN and SPIDER 4 until the row ends.
- Knit 3 rows 1 B, the rest BN.
- Next row 1 B and SPIDER 6, 2 BN, again SPIDER 6, skip a loop and so on until the end of the row.
- Knit 3 rows 1 B, the rest BN.
- Next row 1 B, 1 BN, SPIDER 8, skip 1, 3 BN, SPIDER 8 and so on until the end of the row.
- Knit 3 rows 1 B, the rest BN.
- Repeat rows 8 and 9 5 times.
- Knit 1 B, 10 BN, skip 1 and so on until the end of the row (reduce 3 loops in total)
- Knit two rows 1 B, the rest BN.
- Next row knit 1 B, 1 BN, SPIDER 7, 2 BN, SPIDER 7 and so on until the end of the row (4 more loops have decreased).
- Knit 3 rows of BN. Next row 1 B, 1 BN, SPIDER 6, 2 BN and so on until the end of the row.
- Next row 1 B, 7 DC, 2 DC together, 6 DC, 2 together to the end of the row.
- Knit two rows with BN.
- Next row 1 B, 1 BN, SPIDER 6 and so on until the end of the row.
- Divide the fabric into two parts, 1 B, 16 BN 3 rows in a row.
- Next 1 B, 1 DC, SPIDER 6, 2 DC to end of row.
- Alternate this row with 3 rows of BN 9 times.
- In the penultimate row, knit SPIDER 4 instead of SPIDER 6.
- The last row is only BN.
How to assemble a turban correctly is shown in the photo:
The product is ready. This crocheted head turban model is suitable for older women.
Turban hat
This crocheted turban model is interesting because it is crocheted like a regular headband, and the bottom of the hat is tied to it. This can be clearly seen in the photo:
An interesting option in the shape of a hat is suitable for late autumn
What you will need:
- 1 skein of yarn, you can use mixed yarn (160 g per 50 m);
- hook 3.5 mm;
- scissors;
- needle.
Process:
- Cast on a number of chain loops of length equal to the circumference of your head.
- Knit a row of half double crochets behind the back wall.
- Continue knitting in the same pattern until the fabric reaches 14 cm in height.
- Sew the resulting strip along the edges of the loop into a loop.
- Knit a smaller strip on 9 single crochets, 12 cm long.
- Sew the short sides, covering the seam on the large strip.
- The result is a bandage.
- Knit 30 chain stitches in half double crochets behind the back wall.
- Start increasing (36 stitches) with 2 half-stitches in each even row.
- Knit 15 cm without increases.
- Start decreasing in the same order.
- Sew the resulting crown to the headband.
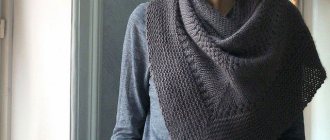
Eastern turban
This model is also very simple in terms of technology, it is made of rectangular fabric. Thanks to the embossed pattern and eye-catching brooch, it will not only be a comfortable and warm hat, but also a stylish accessory.
What you will need:
- wool or half-wool yarn (100 m in 50 g or 200 m in 100 g);
- hook 4, 5;
- marker;
- needle.
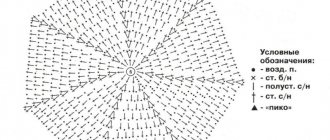
Important! Single crochets in this turban hat model are crocheted only behind the back wall (half-loop). The diagram below shows how to do this correctly.
Step-by-step instruction:
- Cast on a chain of 157 chain stitches.
- Knit a row of single crochets according to the pattern.
- Knit another 11 rows in this way. Total 12.
- In the 13th row, begin to round, decreasing the loops in each even row. Do not knit 1 loop 3 times, 2 loops 2 times and 3 loops 1 time.
- The result is a strip with rounded edges.
- Take a marker and mark the middle (preferably in the 2nd row).
- Fold the strip.
- Carefully sew a hole with a needle from the middle of the strip to the top of the head, sew the side seams and the back of the turban.
- Cut the thread, remove the ends on the wrong side.
- Decorate the hat with a brooch.
For those who find it difficult to crochet a turban according to the description, a detailed video tutorial is offered:
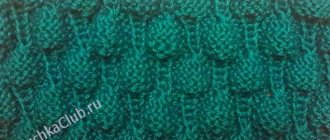
Volumetric turban
According to the manufacturing technique, it is identical to the eastern one. The volume in such a turban is achieved due to the pattern made in lush columns. The model is suitable even for cold winter.
What you will need:
- skein of yarn (100 g 300 m);
- hook 4;
- needle;
- scissors.
Process of creation:
- Cast on a chain of chain loops equal to the circumference of your head.
- Knit in lush stitches according to the pattern to the height of the fabric required for making the hat.
- Assemble the turban using a needle.
- Decorate with a brooch.
The voluminous crochet turban is ready.
A turban with leaves and a turban with an original crown
For those who are not afraid of difficulties, there are two more interesting models of crocheted turban hats with openwork elements in detailed MK videos:
Turban decoration
Finally, the turban can be decorated. This is a rather bright and stylish headdress, so additional accents will make it even more attractive.
- You can decorate a turban in the following ways:
- Brooch in the center
- Several rhinestones in the center
- Arrange beads or rhinestones in lines along the head
- Decorate the bottom edge of the turban with beads or lurex embroidery
Any decoration will suit this headdress, since the turban is beautiful in itself and will make any girl even more beautiful.
Tips from needlewomen
Some more useful information for those who decide to make a turban hat with their own hands:
- To ensure that the turban fits snugly to the head, measurements must be taken carefully.
- Add 2 cm to the head circumference so that after assembly the turban does not become narrow.
- Excessive decor on such a hat is not appropriate, since it itself is very impressive.
- Before starting knitting, you can make a small sample to subject it to WTO. This will show how the product behaves after washing and will help make adjustments in the calculations.
- You should not use sectionally dyed yarn for the turban, otherwise the shape and pattern of the product will be lost against the background of diversity.
- You can experiment with patterns, cross parts in different ways to create an exclusive model.
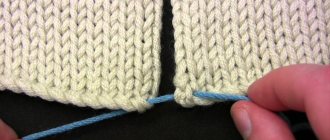
DIY knitted turban headband
Jersey turban headband. Photo source:
The principle of creating a fabric bandage is exactly the same. We need to cut a strip of fabric 20 cm wide + 2 cm for allowances. The length of the bandage depends on the head circumference and the stretchability of the fabric. For example, the head circumference is 48 cm. If the product is made of fabric with a small percentage of stretch (such as jersey), then for a tight fit it is enough to reduce the length by 2 cm. Do not forget to leave an allowance of 1 cm on each edge. It turns out that you need to cut a strip 22 cm wide and 48 cm long.
Cutting a strip of fabric
Sew and press seams
Turn it inside out and finish the ends of the bandage with a zig-zag stitch or with an overlocker.
Fold the fabric in half lengthwise, right side inward, and stitch. Iron the seam allowances. Turn it inside out. We sew the side ends with a zig-zag or overlock. We arrange the ends with an “accordion”, as in the case of a knitted headband, and sew a line. Turn it inside out and our turban is ready!
Laying the ends of the bandage
View from the inside
The knitted turban headband is ready!
Features of the product for enjoyable handicrafts
Turban is the headdress of Eastern men. The owner's well-being is assessed by its color and material. Over time, women began to use it, complementing it with precious stones and jewelry.
Historically, other names for the turban were formed:
- Amoma (imam) is intended for the highest clergy. Sheikhs and imams wear it.
- Dastor is a festive dress. It is used by representatives of the nobility and rulers.
- Futa is intended for the people. She dresses up as merchants, artisans, and ordinary city residents.
The hat is often called a turban. They wrap around the head almost identically. The length of the turban fabric is shorter, and its edge is even. This is the main difference between them.
In the photo there are knitted turbans and turbans:
turban turban
turban
turban
Another popular name is sultana.
For the convenience of European fashionistas, designers have come up with ready-made hats of identical shape. They are made from different materials according to the season.
| Type of turban | Peculiarities |
| Bandage | Easy to perform. Does not require a high level of skill from the knitter. To make it, you will need a minimum of actions: measuring the size of the head, choosing a pattern, calculating loops, and knitting density. It can be made in several versions. Tie the sample warmer in two layers. For a more decorative option, add rhinestones, beads, beads, brooches. The density depends on the type of yarn. You can use any. Her choice depends on the season and purpose of wear. A mandatory element is the weave of the fabric, a knot in the front. |
| Traditional turban hat | A more difficult option to implement. Covers the entire head. The set of actions for its manufacture is similar. Knitted in different patterns. In front is a traditional binding, knot. |
The turban went through a long historical path before its modified form was presented to us. Such a knitted product rightfully occupies a leading position in fashionable tops.