Cutting a robe from a terry towel
There is a model that can be made in literally half an hour. It doesn't even need a pattern. In this case, a children's robe with a hood is made very simply: a neck is cut out in the middle of the towel. The hood is stitched to the neckline. The difficulty in making this model may lie in its cutting.
If the master has imagination and time, you can not just use a towel with a ready-made pattern. Using the appliqué technique, it is easy to create an exclusive and creative outfit, which may become your child’s favorite attire.
To decorate an outfit, you need to take fabric of a different color and even a different texture, for example, satin or silk. Applique details are cut out of it - in this version it is the body of a dolphin and its light belly.
You can purchase a second towel in a light blue color and a smaller size. An animal figure and a hood are cut out of it.
Requirements for home clothes
Unlike the gowns worn by doctors and nurses, when choosing home clothes, they are usually guided by the following wishes:
- I would like convenience and practicality.
- The preferred materials for manufacturing are natural.
- Choose light home clothes according to your tastes.
- It is desirable that a variety of options be provided.
An important role is played by the fact that it should be suitable in a situation where you have to welcome unexpected guests. There are various styles that are suitable for any age: both a young girl and an old grandfather.
Instructions for sewing a robe from a towel
- The main towel is folded in half crosswise.
- A neckline is cut out in the center.
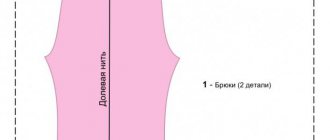
- A hood and a dolphin figure are cut out of a smaller towel. The proposed pattern will help with this. A children's robe with a hood will turn out beautiful if the fabric for the applique is not very thick.
- An overlay for the abdomen is cut out of a light, smooth, plain fabric.
- The figure of the dolphin itself is sewn onto the chest so that the hood seems to serve as a continuation - the head of the animal.
- Be sure to process the edge of the hood. It is recommended to do this either with a hem or use bias tape.
- The hood is then sewn to the neckline. A bed stitch should be used.
- The eyes and mouth of a dolphin are embroidered on the hood.
- The light belly is located in the third layer. It is sewn on top of an applique that imitates the body of a dolphin.
- The edge of the neckline without a hood at the front of the product is treated with bias tape.
- If desired, the master can make a belt for the robe. Or you can sew large buttons on the sides and sew loops.
Assembling finished parts of a dressing gown for a girl
For all products except the first, the sleeve facings are folded halfway and stitched along the bottom. When basting and stitching the seams of the sleeves and side parts, the stitching should not be interrupted.
First view
Be sure to pay attention to the edge of the hood - it must be processed . To do this, you can use bias tape or simply use a hem.
At the end, the hood is sewn with a bed seam to the neck of the main part of the robe.
Second type
The hood is sewn as described in the previous assembly. The sleeve, shoulder, back and side seams are sewn.
It is important to leave a small area to turn the waistband inside out after it is sewn on . Then you should iron the part and stitch along the contour. After this, you need to sew 2 belt loops and stitch them on the side seams near the waist.
Third type
This type of robe will have no shoulder seams . This means that only the sides and the hood should be sewn (how to process it is written in the first type of assembly). It is recommended to do this using a bed seam.
I would like to note that it is not necessary to carry out everything in strict accordance with the plan . Fantasy should not be limited to a couple of patterns from the article.
One-piece robe, flared at the bottom
If the span of the baby’s arms between the hands is not so large and fits into the width of the fabric, the following pattern will help to make such a model. The children's robe with a hood has no shoulder seams. Only the sidewalls are subject to stitching.
The model with contrasting lapels and large patch pockets looks very nice. But you can also sew a plain children’s robe with a hood. The pattern offered here can be used to sew garments of different sizes. It is only important to take into account the length of the product, the semi-circumference of the chest and the length of the sleeve.
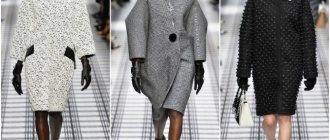
Choosing a style and fabric for a children's robe for a girl
Let's look at several styles of dressing gowns for children: from the simplest, which can be sewn in just an hour, to complex ones. Everything will depend on your taste and the wishes of the child.
Fabrics can also be very different. Both terry, “frote” fabric, and ordinary terry towels are suitable. Some models will require a certain type of material.
How much terry do you need to buy? It depends on the size of the robe and measurements. It is best to first make a paper pattern and calculate the amount of material required based on the obtained dimensions. Let’s say the width of the fabric is 150 centimeters, you will need about 200 for the length of the robe and sleeves, about 15 should be left for hems, indentations and seams, and about 20-30 for the strap, if it is present.
Creating a pattern for a one-piece robe with a straight silhouette
A cool outfit with ears on the hood will delight both the baby and his loved ones. It looks like a fancy dress, so it gives only positive emotions. And it’s so easy to sew this children’s robe with a hood yourself. The pattern for making this outfit is quite simple.
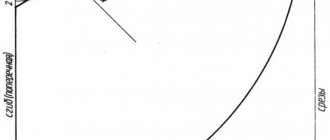
- You need to draw a rectangle with one side equal to half the length of the span between the hands (size B). The second side can be arbitrary - this is the width of the sleeve folded in half at the shoulder (size D). The rectangle is positioned so that the longer side is horizontal.
- The second rectangle is built perpendicular to the first, placing them one on top of the other with the letter “G”. One side of the figure is equal to the length of the robe (size A), the other is half the chest circumference plus 2 centimeters.
- Using an arc, the lateral axillary part is formed at the site of the internal right angle.
- From the top of the connection of two right angles of both rectangles (at the upper left point), 6 cm is laid to the right and 3 cm down. These marks are smoothly connected with an arc. This is the back neckline.
- From the same top, 7 cm is laid down and connected with an arc to the point 6 cm. This will be the front neckline. In the drawing this line is highlighted in red.
- A scent is formed at the front of any size. It is highlighted in the drawing with a red line.
Usually craftsmen make their own patterns for children's dressing gowns. The hood can be a rectangle folded across, stitched together with a “bag”. But you can use the patterns suggested here. Ears are used as decoration.
Children's robe: cutting and sewing
Your baby will learn to put on such a robe on his own, and very quickly - after all, there is not a single fastener on it, it is simply tied with a long and wide belt, also edged with bias tape made of madapolama. Sizes 74, 80, 86, 92, 98 Back length 44−48−52−56−60 cm. And if you would like to sew such a useful thing for yourself, follow the link you will find all the patterns of robes from Burda!
You will need
■ Knitted terry fabric 0.90−0.95−1.00−1.05−1.10 m wide 150 cm ■ Patterned madapolam fabric 0.70 m wide 114 cm for all sizes Recommended fabrics: light, softly draping terry fabrics , patterned cotton fabrics for edging. Allowances: Cut out all parts with allowances along the contours 1.5 cm wide.
Uncover
From knitted terry cloth: a) 2 shelves 44−48−52−56−60 cm long and 25−25.5−26−26.5−27 cm wide; b) backrest 44−48−52−56−60 cm long and 36−37−38−39−40 cm wide; c) 2 sleeves 35−36−37−38−39 cm wide and 12−15−18−21−24 cm long, finished 6−7.5−9-10.5−12 cm; d) 2 hood parts 24-25-26-27-28 cm long and 23 cm wide; e) 2 parts of a tied belt, 140 cm long and 5 cm wide; f) 2 pockets 13.5 cm long (of which 2.5 cm are facings of the upper sections) and 10 cm wide. Made of patterned madapolam fabric: g) bias tape for edging external sections (robe and belt) with a total length of 5 ,40−5.50−5.60−5.70−5.90 m 4 cm wide, including allowances.
Sewing
Step 1: sew seams on the shelves and back Place the shelves on the back, right side to right side, fold the side sections. Sew the shoulder sections from the side sections to a length of 11.5−12−12.5−13−13.5 cm (including allowances). Pin off the side cuts. From the shoulder seams down, measure 17.5−18−18.5−19−19.5 cm for the armholes, and put marks. Sew side seams from the marked marks to the bottom.
Step 2: Sew the Sleeves
Fold each sleeve right side inward, aligning the short sections. Stitch these edges together, but do not stitch the allowances along the upper and lower edges. Press seam allowances. Fold the sleeve to half its length with the wrong side inward, sweep away the open edges (stitching edges). Pin the sleeve to the armhole, aligning the sleeve seam with the side seam of the robe. Sew the sleeve, starting/ending the stitching at the combined seams, without securing the side seam allowances.
Step 3: Sew the Hood
Place the hood pieces right sides together, stitch along one longitudinal section (back seam) and then along one short section (top seam), rounding the corner. Cut the seam allowances to a width of 7 mm, overcast them together and press in one direction. Pin the hood to the upper edges of the front and back (right side to right side) and stitch, interrupting the stitching at the shoulder seams and not securing the shoulder seam allowances.
Step 4: Stitch
Overcast and press the allowances of the side seams, shoulder seams and hood seam. Sew the shelves and the hood on both sides of the hood stitching seam from the sides to the shoulder seams at a distance of 7 mm.
Step 5: Edging with bias tape
Cut off the allowances along the bottom edge of the robe, sides and hood. Sew the bias binding pieces into one long strip. Fold the bias tape in half lengthwise, right side out, and iron. Fold both longitudinal sections of the bias tape one by one towards the pressed fold and iron. Lay out the trim and pin it from the front side to the outer edges of the robe, starting/ending at one side seam. Place folds on the corners of the binding and tuck the ends of the binding. Cut off the remaining trim. Sew the binding at a distance of 1 cm (pressed fold). Turn the edging tape to the wrong side, going around the edges, tuck it in and baste it over the stitching seam. Sew the binding on the front side, securing the inner edge.
Step 6: Sew the Pockets
The bottom corners of each pocket are slightly rounded. Turn the one-piece facing of the top edge of the pocket to the wrong side and stitch at a distance of 2 cm. Iron the allowances along the bottom and side edges of the pocket to the wrong side. Pin the pocket to the shelf, the distance to the edge of the side is 13 cm, to the bottom edge - 6.5-9-11.5-14-16.5 cm. Stitch the pocket to the edge. Stitch the upper corners of the pocket along the perimeter of small triangles.
Step 7: Sew the Belt
Fold the details of the tied belt with the wrong sides together, cut off the allowances along the contours, and round the ends of the belt. Edge the sections of the belt with bias tape. Layout plans Knitted terry fabric 150 cm wide
Patterned madapolam fabric 114 cm wide
Fold the knitted terry cloth in half with the right side facing inward. Cut out the details of the bias tape from madapolam fabric laid out in one layer, the wrong side of the fabric lies at the top. Photo: burdastyle. The material was prepared by Elena Karpova.
Robe with yoke and sewn-in sleeves
Older girls already want to emphasize their femininity. Therefore, a model with a yoke will suit them. The shelves are slightly seated during stitching, which creates the effect of some pomp in the chest area.
This model requires some skill. But with enough care and attention, you can get a very decent children's bathrobe with a hood. The back pattern is placed on the fold of the folded fabric.
The shelves are also cut out after the fabric is folded with the right side inward. But in this case you should get 2 parts. The same goes for cutting sleeves and yokes.
Measurements required for the pattern
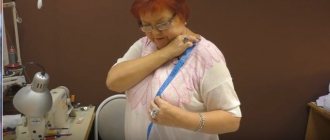
First you need to take all the necessary measurements .
- Neck circumference (NC).
- Shoulder length (HL).
- Back length to waist (BW).
- Front length to waist (accident).
- Product back length (DI).
- Armhole depth (HD).
- Armhole width (W).
- Hip circumference (H).
- Sleeve length (SL).
- Circumference height of head.
The quality of your work and the convenience of new clothes for your child will depend on the accuracy of the data in the future.
How to make a pattern
Let's consider the stages of completing the drawing required for cutting a children's robe.
Base for back and shelf
Help: the construction of the back and front is done in the same way at first, so you can draw the patterns for the front and back at once.
- On the paper along the edge we measure the DI and put points A and B. You need to measure so that there is at least 5-10 cm from the top edge of the paper to A.
- Divide the OB measurement by 4, then add 2 cm to the result.
- We measure the resulting number on paper from A and B perpendicular to the edge.
- We draw lines and put points B and D, respectively, we get segments AB and BG.
- We connect B and D using a ruler. You should get a rectangle.
- We add 0.5 cm to the DTS measurement and put the resulting value on the segment AB from A. Here we put point T1.
- The GP measure, having previously added 2 cm to it, must also be measured on the segment AB from A. This will be G1.
- From G1 and T1 we draw lines perpendicular to the segment AB to the segment VG and, accordingly, put G2 and T2.
- Then we divide the SH measurements by 2 and put the resulting result from G2 to G1G2 and call the point G3.
- Next, from G3 we draw a line parallel to segment AB to AB. We call the connection point the letter P.
- Divide the resulting segment G3P in half and place point P1.
- We connect P1 to G2 with a smooth concave line.
Further, the construction of patterns for the back and for the shelf differs.
Building the back
- To construct the back neckline, we will need an OSH measurement. We divide this measurement by 6 and then add 1 to the resulting number.
Important! Remember the obtained value, it will be useful to us when constructing the front neckline.
- We put the resulting value from A to AB and call it Ш1.
- From Ш1, perpendicular to line AB, measure 1-2 cm and place point Ш2.
Important! The size of the perpendicular depends on the child for whom the robe is sewn. The smaller the boy, the shorter this line.
- The segment Ш1Ш2 should not be inside the constructed rectangle ABCD, but on the outside.
- We connect Ш2 with A using a smooth concave arc.
- From P on segment PG3 we measure 1.5 cm and put P2.
- From Ш2 we draw a straight line through P2.
- Then we add 3 cm to the DP measurements and measure the resulting value on the line Ш2П2, starting from Ш2.
- We call the resulting point P3. P3 should be located after P2. We connect P3 to P1 with a smooth concave arc.
Building a shelf
- From T1 to A we set aside the road accident measurement, after adding 0.5 cm to it and call the point Ш3.
- If you measured everything correctly, then Ш3 will be located above A outside the rectangle ABCD.
- Next, from Ш3 we draw a parallel AB line.
- On this line we lay down the segment Ш3Ш4, equal to АШ1 (back pattern).
- From Ш3 down past A we measure 6 cm and place point Ш5.
- We connect Ш5 with Ш4 with a smooth curved arc.
- We draw a line further towards Ш4 along the segment Ш3Ш4. We also draw a line upward along the segment G3P. The lines must cross. We call the intersection point P4.
- From P4 down P4G3 we set aside 3.5 cm - it turns out P5.
- We connect Sh4 and P5 along a ruler and continue further from P5.
- On this line from Ш4 we lay a segment equal to Ш2П2 (back pattern) and put point P6.
- We connect P1 and P6 with a smooth curved arc.
Construction of the sleeve
- Add 3-4 cm to the OP measurement for a loose fit.
- Put the resulting value on paper, calling the segment P1P2.
- From P1 and P2, draw parallel lines down, equal to the DR measurement. Name the segments P1H1 and P2H2. The result will be a rectangle Р1Р2Н2Н1.
- We divide P1P2 and H1H2 in half and connect the division points to each other, calling them O1 and O2. You should get a segment O1O2 parallel to P1H1 and P2H2.
- From O1 down to O2 we measure the height of the sleeve rim - O3. We take this measurement from the back and front patterns. On the back, you need to measure the distance from P3 to the line G1G2, parallel to the segment PG3. And on the front, the distance P5 to the line G1G3, also parallel to the segment PG3.
- We add the resulting measurements together and then divide them in half. The resulting value will be the height of the sleeve edge.
- From O3 we draw a line parallel to the segment P1P2 to the right and left until it intersects with P1H1 and P2H2 - O4O5.
- We connect O1 with O4 and O5. Divide O1O4 in half - O6.
- From O6 towards P1 we set aside 1 cm and through this point we draw a curved arc from O1 to O4.
- Divide O1O5 into 4 equal parts and set aside 1 cm up from the first division point and 0.5 cm down from the third division point.
- Connect O1 to O5 through these points with a smooth convex-concave arc, intersecting the straight line O1O5 through the second point.
We sew a warm robe model from high-quality material without patterns
You will need:
- Large terry towel;
- A little fabric (about half a meter);
- A sweater or jacket that fits loosely on the child.
The production of a robe takes place in the following steps:
- Fold the towel in four layers;
- Place the sweater or jacket on the towel so that the central corner of the towel meets the middle of the neck;
- We retreat fifteen centimeters from the edges of the clothing and cut out the product, leaving the upper part uncut (shown in the figure);
- Next, you need to open the towel so that a two-layer letter T is formed;
- Cut the front panel in the middle;
- We make a triangular hood from two cut pieces of a towel;
- Sew the hood to the base of the robe;
- Sew the seams of the sleeves and sides of the robe;
- We make a belt from half a meter of loose fabric and use it to decorate the robe as desired.
- Before putting on, the robe must be washed and steamed well with a steam iron.
By following all the rules of cutting and sewing, making a children's robe is very simple. This process will not take much time and will bring a lot of pleasure from the result!
Construction of the backrest drawing:
AT = Dts = 23 cm; AN = product length (optional) = Dtk = 32 cm; AA1 = % Or3 + 2 (6) = 53: 4 + 2 (6) = 15.25 (19.25) cm; AA2 = 1.5 cm; AG = Vprz + 4 = 12.6 + 2 (4) = 14.6 (16.6) cm; AL = Ug A2G = 15.1: 2 = 7.55 cm; A2P = 1/4 Vprz - 2 = 12.6: 4 - 2 = 1.15 cm; AA3 = 1/5 Osh + 0.8 = 26.5: 5 + 0.8 = 6.1 cm; GG1 = Ug Shs + 2 (3.5) = 22:2 + 2 (3.5) = 13(14.5) cm; PP1 = GG1 = LL1; P1P2 = 0.75 1 cm; NN1 = TT1 = GG2 = AA1; P2P3 = 1 cm; AP3 = AP2; G2G3 = G3G4 = T1T2 = H1H2 = 2 cm; P3P = Drzap - 3 = 32 - 3 = 29 cm; PP1 = Ug Ozap + 4 (5) = 12.6: 2 + 4 (5) = 10 (11) cm.