HomeSewSew a cap for a newborn with your own hands
If you have become a happy mother, aunt or godmother, then a cap pattern for a newborn will come in handy for you. And you will learn how to make such beauty from our material.
A cap is the baby’s first clothing along with baby vests. It is necessary to maintain optimal body temperature, since the fontanelle on the head is a vulnerable place, especially to drafts and temperature changes. In addition, this wardrobe item can become a child’s first piece of jewelry.
The cap can be sewn or knitted with your own hands. This could be a great baby shower gift.
The most important thing is the materials from which the cap is made.
These are usually soft, hypoallergenic fabrics; cotton and jersey work well. They allow air to pass through, quickly evaporate moisture and do not chafe the skin. If you choose yarn, then special yarn for knitting children's clothing or cotton threads will do.
Romper and panties
Romper suits are the most important part of a child's wardrobe.
To sew summer pants, just take measurements from suit-sized rompers. The contour of the sliders is transferred to the fabric, folded in half with the wrong side up. In this case, it is important not to forget the additive for the seam allowance
Next, the front and back halves are sewn on the sides. After stitching, stitch the crotch seam
When processing, it is important to cut off excess fabric and also use a zigzag seam. If it is possible to make a neat stitch, it is better to use external seams
When the pants are ready, the upper part is folded up and stitched, leaving a hole for threading the elastic. The length of the elastic should be equal to the circumference of the baby’s tummy, from which 2 cm is subtracted. You can thread the elastic through using a pin. The ends are sewn together. You can also use ready-made patterns for children's clothing to sew unusual pants for your baby.
Size chart for newborn hats
The size of the headdress can be found out without measurements; approximate figures are known depending on the child’s age. Since the Soviet Union, children's things have been bought this way. Size chart based on child's age:
| Age (months) | Product size |
| 0 to 1 | 35 |
| 3 | 40 |
| 6 | 44 |
| 9 | 46 |
| 12 | 48 |
Using this table, you can buy hats and bonnets for children, but since there were no specific measurements, it is better to take products from stretchable fabrics. Because all babies have different head shapes. Modern doctors insist not to buy children's caps at all if the manufacturer relied on age and medical statistics when producing them. Below is how to sew a cap with your own hands.
How to take measurements correctly
Models of hats for men, women, children
Nowadays, hats made from this material are in fashion - on the street, in magazines there are countless options. Looking at them, you will notice that men, women and children have different fleece hats.
- The stronger half of humanity prefers to wear simple, tight-fitting models without unnecessary decoration with a lapel or its imitation . At the same time, men usually try to stick to a restrained color scheme, giving preference to black, gray, dark blue, and beige.
- Women and girls feel more free to choose colors and styles. Bright berets, turbans, hats with pom-poms, tight-fitting headdresses with colored appliqué are all acceptable. Although more discreet options are invariably in demand.
- Children love colorful things, and are happy to wear green, blue, light blue, yellow, and red hats. Models with ears , like those of a cat, a fox or a bear, are very popular now
Important! There are universal styles that suit everyone, regardless of gender and age.
These are, for example, sports models that fit tightly to the head; beanie hats. They are quite neutral and easier to combine with other wardrobe items.
This is interesting: Pattern Warm clothes for babies: details in the description
Knitted pattern
The cap can also be knitted from soft yarn or cotton threads. It is better to crochet a cap, so it will turn out thinner and more delicate. You can knit it both warm and “summer”, from thin threads.
Even a novice needlewoman can cope. The simplest cap is knitted from the back of the head in the round.
Circular pattern of a knitted cap:
To begin with, a chain of 15 air loops is knitted, which is closed into a ring with a connecting post. Next, double crochets are knitted in the circle with additions in each row according to pattern No. 2. As a result, there should be 96 loops in the outer row.
Read this: DIY Indian dance costume: selecting fabric and technique
Next, the cap is also knitted in the round in accordance with pattern No. 3, approximately 10 cm. Knitting is completed according to pattern No. 1 - this is the finishing of the cap, its edges.
For example, the edges of a cap can be knitted according to the following patterns:
The last final stage is to thread the tape into the first row of trim.
A beautiful and elegant cap is obtained if you knit it with “fans”.
For such a cap you need to take cotton threads (“Children’s cotton”) and a 2.5 mm hook. Knitting also begins in the circle, that is, from the back of the cap. We collect a chain of 10-15 air loops and close it into a ring. Next, it is knitted according to the pattern with single crochets and single crochets. The lower edge, i.e. the neck line, is not knitted with rapport.
The ties are also made from satin ribbon. You can decorate your knitting by knitting the outer rows with threads of a different color.
Here are a few more similar schemes:
Knitted elf hat
The fashionable elf hat is gaining popularity among young mothers. It is knitted on knitting needles with 2x2 elastic and has an original wedge that looks very cute on a child.
Due to the fact that the entire fabric is knitted with a 2x2 elastic band, the hat is elastic and fits the baby’s head well.
The description of the elf hat fits into several steps:
- Cast on a number of loops that are a multiple of 2;
- For yarn Krokha Troitskaya factory for the age of 0-3 months, cast on 94 loops;
- Leave one edge on both sides;
- Knit, alternating 2 purl, 2 knit 4 rows;
- On the fifth row, at the beginning and at the end of the row, perform 6 knits;
- Next 3 rows according to the pattern;
- In the next row, knit 6 at the beginning and end of the row;
- Then three rows according to the pattern;
- Repeat from point 5, gradually increasing the number of knit stitches by 2 in every fourth row;
- When the knit stitches on both sides meet in the middle of the fabric, begin casting off the stitches as follows: slip 1 edge stitch, knit two stitches together, turn the fabric over, slip one edge stitch and purl two stitches together. Repeat until the loops on the knitting needles run out.
- Cut the thread, make a knot and hide the tip with a needle.
Caps for newborns are knitted according to the same principle - elastic band, base with seams facing out, ties. The headdress should be as comfortable as possible, because the baby’s delicate skin can experience discomfort at the slightest irregularities.
The only place where you can use your imagination is in the pattern of knitting a pattern on the fabric of a hat. Openwork, cross knitting, braids, alternating garter stitch with stockinette stitch, jacquard - as the handicraft mother shows her imagination.
We sew an envelope-blanket for a newborn baby with patterns
The envelope is used primarily to discharge a child from the maternity hospital. I would like to dress up this little miracle on this significant day. There are different types of envelopes: an envelope is a blanket, an envelope is a sleeping bag. With mattress inserts, with and without zippers, warm and light. It all depends on the time of year and what function they will perform in the future. Let's consider a simple but original option.
Since the child grows rapidly in the first months, the envelope is not used for long. This model involves using the product as a blanket for a child.
We select the material:
- colored cotton - 1x1 m;
- fleece - 1.1x1.1 m;
- synthetic padding filler – 1x1 m;
- plain cotton - 05x1.1 m.
Using chalk and a ruler, mark 25x25 cm squares on colored cotton.
The bottom layer is fleece, the padding is on top, and the top layer is colored cotton. Pin around the perimeter.
We sew the product along the intended squares. Align the edges.
We process the edges of the blanket. To do this, cut a strip of fabric (also called trim) 5 cm wide. Iron one side. We make a bend of 1.5 cm. The second side remains flat. From the edge of the blanket, at a distance of 2.5 cm, attach a strip with the flat side. We stitch it.
We wrap the strip of fabric over the fleece side. Sew with large stitches using a needle. The thread will be approximately 2-3 mm from the edge of the strip (view from the front). You need to stitch between the hand seam and the edge of the binding.
We do the same as steps 5 and 6 on all sides of the product. We're done with the blanket.
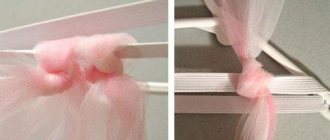
Since this is an envelope, it must be tied with something. You can, of course, use traditional tape, but you want originality. Let's make a bow-clasp. Let's take a piece of 26x10 cm. Fold it in half and stitch around the perimeter. We do not finish the line so that there is a small hole. We turn the product inside out through it.
Let's make a pillow. We fill the middle through the hole and stitch it.
We take a small strip of fabric, fold the edges and iron it. Let's sew.
We try the strip on the pillow. Select the volume. We stitch and dress.
We sew a ribbon. The length can be different, make it as you see fit. The width of the tape is about 10 cm. Therefore, we make a cut with a margin at the edges for turning. We bend the edge and iron it. Fold in half so that the folds match and iron again. Sew the folded sides together and stitch on the other edge.
We bend the edge to the inside and stitch it. On one side of the ribbon we sew a button, on the other we make a cut for a hole and sew it on. You can make several buttons so that you can adjust the volume.
We stretch the ribbon through the bow.
The original envelope is ready. Depending on the gender of the child, we choose the color of the bow; accordingly, the color of the trim should be the same. In our version, this is an envelope for a boy.
How to sew a cap with your own hands
Transfer the pattern pieces onto cotton fabric and cut out the pieces. There is no need to give allowances for the cut of this newborn cap, since they have already been taken into account when constructing the pattern drawing.
If you find it difficult to trace the contours of the parts on a light-colored fabric, you can pin together the paper pattern parts with the fabric and cut them out along the outline of the pattern.
When sewing children's clothing, the seams should be sewn on the front side so that rough joints do not cause skin irritation. Usually, the seams are closed with a backstitch, but if you have an overlocker, then a three-thread overlock stitch (on the front side) will completely replace such a seam. See Types of Machine Stitches.
The raw cut of the newborn's cap is closed with a seam in the hem, lace or crocheted. The bottom of the cap is slightly gathered and hemmed with a ribbon or a stripe that turns into a tie.
Video of a finished cap (Newsboy cap or Newsboy cap). In the description of the video there is a link to a site where the full technology for sewing this cap is given. The video is in English, but you can choose subtitles in any language.
Other articles:
DIY children's summer hat
This free master class provides a pattern for three sizes of a children's hat and a full description of how to sew a children's hat with your own hands.
Pattern of a baby vest for newborns In addition to a cap, a newborn baby will also need a baby vest. If you have a sewing machine and cotton fabric, you can try sewing it yourself.
Envelope for a newborn To make leaving the maternity hospital a more festive event, you can try sewing an envelope of an original shape instead of a blanket.
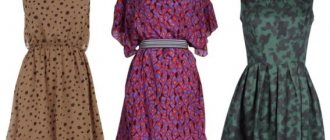
Sewing a dress with your own hands How to sew a dress with your own hands. Technology and sequence of sewing dresses for beginners.
How to make a pattern and other tips for beginners How to make a pattern, what tools are needed for this. These and many other tips for beginners.
How to hem a skirt Read this article if you don’t know how to hem a skirt, including chiffon ones. Finishing the bottom of the skirt with a hidden seam.
Layout of the cut of trousers and fabric consumption Trousers can be cut from 120-130 cm of fabric, 150 cm wide. However, for the cut of loose-fitting trousers, this norm can be exactly doubled.
How to sew a school apron As time passes and your child grows up, you will forget how to make a pattern for a cap or vest. New problems will appear, and for your grown daughter you will need to sew a school apron.
Half-sun - sewing and cutting The bias skirt pattern is very simple to construct, and any mother who has a sewing machine can sew it for her schoolgirl daughter with her own hands. We offer you a pattern for such a skirt and some tips on the technology of sewing a half-sun skirt.
Welt pocket - processing into a frame It is quite difficult to create a pattern for such products and you need experience to carefully and correctly make such a product. If you are going to sew trousers with a welt pocket, then in this article you will find some useful tips.
DIY pillow letters About how to make a pattern and sew pillow letters with your own hands. An experienced technologist will share the skill of sewing a pillow with you.
Tools and accessories
First you need to choose the right fabric. Main criteria: naturalness and quality. Cotton with a small amount of elastane is ideal. This will make the hat easy to put on and fit perfectly. The edge is finished with bias tape. It can be purchased at the store or cut out yourself from the same fabric. You can sew a knitted hat for a newborn using the pattern given in the article. To decorate the product, you can use various laces, ribbons, and appliqués.
The necessary tools can be found, perhaps, in every home. This is a needle, thread, several pins, and a sewing machine if available.
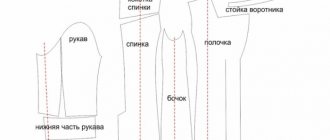
Constructing a drawing of a cap pattern
The standard model of a hat for a child is sewn from two parts. It is very easy to do, even a person without experience can do it. The pattern of a hat for a newborn can consist of three parts or more, but the complexity of the work will increase.
Building the bottom
Length of the bottom of the product. Make a right angle where point O will be the vertex. Next, the length of the bottom of the cap is canceled, about 10 cm.
Bottom width at top. From vertex O to the right, measure 5 cm and make point O2.
Bottom width. From line O1 to the right, measure 5 cm, make point O3. Connect measurements of O2 and O3 together. Next, divide line OO2 in half and mark O4. From O2 down, count 3 cm and make O5. Make 1.5 cm from O2 along the corner and place point O6. Then connect O4, O6, O5 with a straight line.
You might be interested in: How to properly sew curtain tapes to tulle and curtains
Crochet
Construction of the main part
Make a right angle and mark the vertex M.
Base length. From the top of M, measure 16 cm down and make point M1.
Base width. From point M to the right, lay 10 cm and make point M2. Since the width of the cap at the top is 2 cm greater than at the bottom, then count 12 cm to the right from place M1 and make point M3. Now connect M2 and M3 with a line. From point M3 up, make 2 cm and add point M4. Now M4 and M1 need to be connected.
The back of a child's cap
To pattern a baby cap for newborns, you need paper and a pencil.
Product with frill
You need to carefully draw a beautiful rectangle. It can be marked as ABSD, the vertical lines AD and BC will be of equal length 15 cm (half head circumference, and an additional 2 cm):. The horizontal lines AB and DS will be the width of the occipital lobe and also of the same size, 7 cm each
The horizontal lines AB and DS will be the width of the occipital lobe and also of the same size, 7 cm.
Line of the front and bottom of the cap
From line C you need to draw a segment CD and set aside 2 cm.
Connect points B and 1 (below). Connect point 1 (on the bottom line) to the place where it will be sewn on the product. This can be seen in the figure below.
Occipital part
A few tips from experienced needlewomen
If this is your first time starting to create a knitted product, then read the advice of experienced needlewomen. They will help you knit a warm and beautiful hat for a newborn:
- choose only soft and warm yarn;
- threads should not cause irritation;
- no need to knit the loops too tightly;
- use knitting needles size 2.5 or 3;
- It is best to give preference to a cap or hat with ears, since in it the child will not only be comfortable, but also very warm;
- To ensure that the hat fits snugly, make ties;
- You can sew a decoration to the hat at your discretion;
- Do not forget about the size - it must correspond to the volume of your head.
Knitting a hat for a newborn is quite simple. Detailed descriptions and diagrams will help beginning needlewomen create their own masterpiece. Please your child and knit him the most beautiful, warm and original hat.
Bouquet of diapers for newborns, master class
One of the attributes that will always be useful in a family with a baby is a diaper. Pampers are used to make a large number of different gifts for little suns: cakes, bouquets, strollers. Things to remember:
- Diapers are a product, an attribute of personal hygiene, so when creating your holiday gifts from them, you must perform all stages of the work with clean hands.
- Do not touch the inside of the diaper.
- All elements that will be directly in the bouquet must be disinfected.
- The finished holiday product should be packaged in transparent film.
Elements that are needed to create a bouquet of diapers:
- A pack of diapers (the more diapers you use, the more magnificent the bouquet will be). It’s better to take No. 2 right away, because children grow quickly. In order not to make a mistake when choosing a specific brand of diapers, it is advisable to ask the baby’s parents about the preferred brand and size of diapers.
- A vase, a foam ball of the required size (these materials can be purchased at a store that sells decorative elements).
- Elastic bands (it is better to choose transparent or neutral tones).
- Decorative wide ribbon with which the bouquet will be decorated.
- Wooden sticks, skewers.
- Decorative napkin with an interesting pattern.
Stages of creating a bouquet.
- Roll each diaper separately into a small roll.
- Secure each folded diaper with an elastic band. To make the elastic less noticeable, it is better to pull it not to the middle, but to the edge of the diaper.
- Insert wooden sticks into the finished rolls. Externally, this diaper resembles a flower bud.
- Next is to decorate the vase. To do this, paper is laid out inside the vase and a foam ball is placed inside. Instead of paper, baby towels, diapers, and other items of clothing are often used.
- Place the buds evenly into the ball.
- Use your imagination and decorate the bouquet with napkins and ribbons. The main task here is to cover the elastic bands that are on the diapers. The vase itself can be decorated with lace and ribbons (to attach ribbons to the vase, it is better to use double-sided tape).
- To dilute a bouquet of diapers with other color shades, you can also use vests, towels, and bibs to prepare buds. The technique for preparing buds from them is the same as for diapers.
Decorative finishing
The pattern of a hat for a newborn is very simple and allows you to experiment with finishing.
The easiest way to decorate a cap is with a fluffy frill made of lace or main fabric. This hat is more suitable for girls or newly born boys. You can use openwork sewing as fabric for a hat. The result is a festive option that can be used for christenings or photo shoots.
You can experiment with facing, because it is not at all necessary to do it using bias tape. You can also use contrasting fabrics or colored fabric with a large pattern. The ties can be made not only thin and almost invisible, but also, on the contrary, wide, which can be tied with a lush bow.
Any mother who has held a needle in her hand at least once can sew such a cap on her own. The pattern of a hat for a newborn is complicated only at first glance, and sewing will take no more than one hour. The result can always be different due to the variety of finishing and decor options.
Pattern of rompers for a newborn
Romper suits are very popular clothing for toddlers. There should be a lot of them, since the baby will often burp and defecate past the diaper. You will have to constantly change his clothes. How to sew rompers for a newborn with your own hands? Very simple, and most importantly, fast:
- Fold the fabric in half with the wrong side facing out.
- Attach the finished pattern and trace it with soap.
- Attach the pattern to the fabric using tailor's pins.
- Leave seam allowances of half a centimeter.
- Cut out the pattern pieces.
- Assemble the pattern pieces and baste.
- Sew the finished product by hand or using a machine stitch.
Pay special attention to the choice of fabric. It can be cotton fabric or flannel, flannel
DIY clothes for newborns have their own tailoring features.
Product modeling
The most comfortable vest is the one that has a good smell and fastens on the shoulder with a button or button. Any young mother knows this. Such a product will not come untied or slip, and the baby’s chest will always be covered. This pattern of a baby vest involves a double front flap. To get a product blank, you need to indicate in the drawing the required width of the shelf and the location of the fastener, and also draw the back separately so that it is easy to cut out the parts.
Another useful point to pay attention to is closed sleeves. Here you should make a special turn of the back of the sleeve cut to the wrong side (about 5 cm), and leave the front part according to the size of the template
The only thing is to add a few centimeters to the workpiece so that the child’s hand fits completely into the sleeve. After sewing, the lapel can be turned inside out and the exit from the sleeve can be closed to hide the baby’s hands. This design of the vest will be an excellent option for an active child who flaps his arms every now and then and may accidentally scratch his face with his nails.
Decorations for a baby hat
beads
It is also not recommended to decorate the cap with brooches made of non-ferrous metal, because the brooch can come unfastened and prick the child. In addition, the brooch increases the weight of the finished product and makes the cap uncomfortable for the child.
Sewing is a fun hobby for newborns. Making a baby cap will help a young mother take a break from everyday worries and remember the love for her baby. The same type of industrially produced children's hats cannot be compared with hand-made caps. The main thing is that the hat fits the child in size, and is also beautiful, comfortable and practical. Then the baby will certainly rejoice at the wonderful new thing.
Types of hats for babies
Expectant mothers prepare a trousseau for their babies in advance. A little man needs a lot of clothes, because the body’s thermoregulation has not yet been adjusted and is constantly at risk of hypothermia or overheating.
The wardrobe must have hats for every event: swimming, sleeping, walking in summer or winter, holidays, christenings, replaceable daily caps.
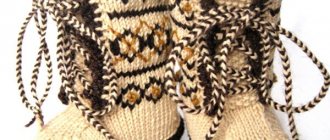
Baby hats knitted from yarn are perfect for a baby who is constantly spinning and exploring the world around him. Long ties will prevent the hat from coming off the baby's head and will reliably protect his ears from cold and wind.
According to the manufacturing technique, caps are:
- stitched;
- related.
According to the material:
- from fabric;
- from lace;
- from yarn;
- from felt.
About:
- baptismal;
- holidays;
- for sleep;
- for a walk;
- after swimming;
- for home.
When creating children's clothing, needlewomen always put their soul into it. Speaking about the cap, it is important to note that there are a lot of requirements for it.
It should not cause discomfort to the baby, itch, prick, be tight and uncomfortable, there should be no knots, thick seams, and large raised knitting is not suitable for it at all.
It is desirable that the style of the cap suits the child anatomically - does not slide down onto the forehead, covers the ears, does not puff up on the top of the head and slightly covers the back of the neck without squeezing it.
Bouquet for a newborn boy, photo
For a boy, you can make bouquets from clothes, toys, diapers. In this case, you should select things in white-blue, light green shades. One of the original gift options for a newborn boy can be a bicycle made from diapers and soft toys. To prepare such a gift you will need the following ingredients:
- soft toy (bear, bunny),
- decorative ribbons, elastic bands,
- diapers,
- diapers,
- scissors,
- rattles
The process of creating a bicycle for a newborn boy:
- You need to make two wheels from diapers. To do this, the diapers are folded in a circle and tied with rubber bands.
- After creating a circle of diapers, a small hole is made in the middle of the wheel. To prevent diapers from falling apart, the product can be tied with decorative ribbon.
- Take two rattles, wrap them in diapers, and secure with ribbons. Insert these rattles into the hole on the wheel. The wheels can be wrapped in towels to make them look more interesting and prevent them from falling apart.
- At the same time as the rattles, a diaper is inserted into one of the wheels, which will act as the basis for the steering wheel. The steering wheel itself is held on a bottle that is used to make a seat for a toy driver.
- Sliders are placed on top of the bicycle, the handlebars are made from the ends of a diaper, socks, and decorative tape.
- You can put a teddy bear on a bicycle and carefully attach it to the base of the gift.
What to consider when knitting a hat
To ensure that wearing the product does not harm the baby in any way, you should consider a number of points when starting to create a hat.
- It is important to choose yarn to which your newborn baby will not have irritation or allergic reactions. Merino wool works well; it is soft and does not itch. You can choose wool blend yarn mixed with acrylic.
- It is necessary to choose cap models that do not have seams that could rub and injure the delicate skin of a newborn.
- The cap should cover the ears, because at first it is very important to protect them carefully. The model can have ties, or without them, but with elongated “ears” like a helmet, or without both, but then it must fit deeply on the head.
In order not to make a mistake with the size of the product, in cases where the hat is knitted before childbirth or as a gift, and therefore it is not possible to measure the volume of the head, you can focus on the standards. As a rule, the volume of a newborn baby’s head varies from 33 to 35 cm; these data can be taken as a basis when knitting a hat for a newborn baby.
This is interesting: Hat pattern for babies (size 34-37)
Determining children's sizes
Before starting work, you should determine what exactly the mother is going to sew for the child.
When preparing clothes for future use, it is important to take into account that newborns grow very quickly, so there is simply no point in preparing a dozen caps and vests of the same size. Modern motherhood and diapers have been simplified, eliminating the need for parents to sew cloth diapers
For one newborn baby, 6-7 diapers, 3-4 vests and 2-3 caps of the same size will be enough.
To understand what size clothes your baby needs, you can use standard approaches to determining it. The following data is used for sewing:
- From birth to 1 month, the child's height is 50−56 cm. Chest girth is 36 cm, head girth is 33−35 cm. These measurements correspond to size 18.
- From 1 to 3 months, height is in the range of 56−62 cm, chest circumference is 40 cm, and head circumference is 35−40 cm. For these measurements, size 20 is suitable.
- 3-6 months: height 62-68 cm, chest circumference - 44 cm, head circumference - 40-42 cm. For these data, size 22 is suitable.
- From 6 to 9 months, the child grows to 68−74 cm, his chest circumference reaches 48 cm, and his head reaches 40−42 cm. Size 24.
- 12−18 months - the child reaches 74−80 cm, and his chest circumference is 52 cm. Head circumference is 44−46 cm. Size 26.
When sewing children's clothing, you should remember that measurements at each age fluctuate with a difference of several centimeters. These features depend on the weight and gender of the child. This fact should be taken into account if things are being prepared for future use.
How to knit an Elf hat for little boys and girls?
Why is the Elf hat considered easy to knit?
Because it is a connected rectangle folded in half. Back seam. That's all! You can knit it with any stitch you know. A description with a hat knitting pattern will be presented for a model that imitates a seam on the sides. The calculation for knitting an elf hat comes in three sizes:
- for newborns from 0 to 3 months (first digit);
- for an infant from 3 to 12 months (second digit);
- for a child from 1 to 2 years old (third digit).
What to do if you have other threads and need to make your own calculation? In the Elf hat model, the base length is not the circumference of the child’s head, but you need to measure the oval of the face. The first row of knitting is what will then be around the baby’s face.
Measure the distance from the bottom of one cheek to the other - using this measurement, calculate your number of loops for the hat. The number must be a multiple of 4, and there must be an odd number of such quadruples, taking into account the edge ones, so that the path of knit stitches goes exactly in the middle. Example: 4 x 13 = 52, which means we dial 52p.
Detailed diagram and description of the Elf cap:
Baby Wool yarn from Alize (40% wool, 40% acrylic, 20% bamboo) 175m / 50g - 1 skein. Knitting needles No. 3, 1 button.
The main pattern of the cap: two-by-two elastic (2 faces, 2 inside, on the wrong side - according to the pattern). Density: 36p. = 10cm (elastic band, slightly stretched).
We cast on the knitting needles 84/92/108 loops. 1st and 2nd rows: knit with an elastic band 2 x 2; R3: knit 6, then rib two by two on all stitches except the last six, knit 6; 4 and 5р: according to the drawing; R6: k8, rib 2 x 2, not reaching the last eight stitches, k8; 7 and 8р: according to the drawing; 9p: k10, rib two by two until 10p remains, k10; 11 and 12 rubles: according to the drawing
Continue knitting the hat, gradually every 3rd r. inserting an additional 2 knit stitches until the elastic is reduced to 2 loops in the very center. Fold the hat in half and carefully sew the back seam.
Executing the plank:
Cast on 10 stitches, and then knit 25 / 30 / 32 cm with a 1 x 1 elastic band. At this stage, you need to knit the hole for the button. This is done like this: in the middle of the row, knit two loops together and yarn over. Next r. knit as usual. After 37/40/42 cm, close the loops and sew the bar to the hat. Try on the button so that it is comfortable.
A blue or white Elf hat is often knitted for a boy. But for a girl, it can be made from a more delicate shade of yarn or in stripes. Another option: knit the first 2-4 rows with a bar with a thread of a different color. You can knit a ruffle from the edge of the cap, which is around the face. To do this, cast on loops (two loops from each edge loop), knit 4-6 r. facial stitch. Another row of elastic band one on one and close the loops. The more loops you cast on, the more magnificent the ruffle will be. Imagine!
The Elf hat is called not only the version that is presented, but also any children's model knitted with a rectangle and sewn at the back. You can use any pattern. For example, a garter knitting option:
What will be required for implementation?
The most important thing that needs to be done at the stage of preparation for the implementation of a business idea for sewing clothes for newborns is to draw up a competent business plan
It is important to understand that this is not just a solution to a standard problem, but the basis for all future activities on which the success of your enterprise will depend. If possible, contact financial and legal professionals
They will help you properly bypass bureaucratic obstacles. And a person who understands the clothing business will provide indispensable assistance and support in finding suppliers of raw materials and marketing finished goods.
Variations on the bonnet theme
A cap pattern for a newborn does not necessarily mean a cap with ties that fits close to the head. Many parents prefer to dress up their baby in knitted hats and caps. Cotton knitwear is suitable for such hats.
The pattern of such caps for babies is the simplest. You can build it like this:
- measure the circumference of the baby's head;
- measure the distance from the eyebrows through the crown to the neck;
- Divide the circumference of the head in half - this will be the width of the pattern;
- Divide the second size in half as well - this will be the height of the pattern;
- based on the data obtained, construct a rectangle, adding 1.5-2 centimeters for the freedom of fit;
- round the corners to fit the hat on the head;
- add 5-7 centimeters in length for a hem that will help adjust the size of the hat.
This cap is made from two layers of knitwear for softness. If the hat is two-layer, then the seams are hidden between the layers, and if it is single-layer, then if the baby is very tiny, then it is better to make the seams outward. And if the child already holds his head confidently enough, and his skin is already less delicate, then you can sew the hat according to all the rules - make the seams from the inside out. The pattern should be positioned so that the product stretches in width.
For a cap that will look cute on a baby, after starting to round the corners of the pattern, add an elongated tail. It allows you to adjust the size of the cap if you tie it in a knot without tightening it too much.
The cap pattern looks like this.
Line A-B shows the beginning of the straight section of the cap. When sewing a pattern, do not forget about the hem measuring 5-7 centimeters.
Knitting hats: patterns and descriptions 2021
Knit a hat for a woman, child, newborn -. Preparing yourself and your loved ones for the winter and autumn cold is very simple if you take proper care of it now. You can knit a men's hat - a helmet or a men's hat - earflaps with knitting or crochet, for girls - with cat ears, fashionable berets according to video tutorials (in Russian) for yourself, a doll, even a dog. For beginners, the article contains excellent diagrams and a description of the knitting process.
Knitted hats for babies
Knitted hat with knitting needles for a newborn baby or two-month-old baby: a hat like in the picture – a berry! The main color of the product is orange. You will need a little more green or light green for the “cutting”. To begin, dial 72 P. in orange, perform L.G. three circular R. 28 next R. knit with the “BLACKBERRY” pattern according to the pattern. After this - again L.G., where 1 R.: 5 P. orange, 1 P. - green. And so on until the end of the P., try to find green loops and place them between the removed P. from the “BLACKBERRY” pattern. In R. below - repeat the color pattern. The next two R.: 4 P. orange, 2 P. green. Next R.: 3 P. green (the last orange P. and the first green - together). There remain 3 green and 2 orange loops according to the pattern. Continue decreasing the orange color until it completely disappears from the canvas. Remove 12 P., next. R. – 6 P. knit in a circular row for another 2 centimeters. At this point, tighten the thread and put the work aside.
Knitted hat for a newborn with knitting needles with a description and diagram with your own hands. An irreplaceable item this winter! For this work we recommend using double thread. We take three colors: green, light green and gray. Gray - 72 P. - 20 R.L.G. (all I. and L.R. – L.P.). the next 20 R. - a pattern with “bumps” in a green tint. 3 R.L.G. the lightest yarn. In each 2 R. we evenly remove 8 P. In the next 2 R. - 2 P. Knit the fabric another 2 cm, after which the thread can be cut. Knitted hats and knitted items are good, but we cannot always find the exact size of the product. In this case, it’s better to crochet - there you can try on clothes while working in the process. We will not offer this option in this article, but the alternative should always be considered!
Knit a cap for a newborn - for the winter for boys
You can learn to knit a baby hat for a boy for the winter in a few hours. To do this, you need a good, understandable diagram and a clear description of the process itself. If you want, you can knit a set: a hat and scarves, booties, mittens - anything you want to dress your baby! Watch a few MK videos on knitting a cap for a newborn.
https://www.youtube.com/watch?v=l3Lun_zAmOg
And we will provide you with another model - a knitted baby hat for a newborn with funny ears - pompoms. Threads in two colors: blue and mint.
- Knit all rows with thread in two layers.
- Elastic band: 2 L.P. alternate 2 I.P.
- L.G. = L.R. – L.P., I.R. – I.P.
- Garter stitch: all L.P.
Blue tint 70 P. = 8 R. with elastic band. Alternating 2 blue R. and two mint ones - L.G. When there are 3 mint stripes - 2 R. with blue thread L.G. Fold the resulting fabric in half and make a seam from the center 8 centimeters. Fold the free sides again and sew them up. Make pompoms from blue thread.
Popular articles Kitchen accessory
Elf hat: knitting for children - video instructions
Also on our website you can find articles “knitting hats for women with descriptions and patterns for free.”
Subscribe to our channel or
Follow us on social media. networks!
How to choose a hat size for a child
When a child is very small, he is only a few months old, it is difficult to take him to clothing stores, so you need to buy hats according to your own measurements. Determining the size of a children's headdress is quite simple. It is recommended to use a centimeter, or, as a last resort, a thread that does not stretch. The centimeter must be applied to the most convex point of the head, and placed in front above the child’s eyebrows.
Pattern of a cap for a newborn
Do not tighten the tape, and if necessary, round the result up. The number that turns out will be the size of the headdress. For example, if the measurements give a result of 42 cm, then it is better to take the size of the product 43. When purchasing, you need to focus on the age of the baby.
Use of baby fabric
In the first years of life, the baby grows very quickly, so it is not advisable to buy many hats of the same size at once. Approximately every 2 months you need to take new products. Sometimes you can buy things to grow. For babies, size 44 is suitable, in six months you can safely buy 46, and in a year from 48 and above. These are averages and may vary for different babies because each person is different.
After one year, the size of the head will change, but not at a rapid rate. It is advisable to take measurements every six months and note changes. For sewing, regular knitwear is perfect, which is easy to care for. For the winter option, plush fabric is suitable, but in this case it is necessary to make a lining so that the headdress keeps its shape well.
Knitting a cap like Cinderella's
Manufacturing stages
The easiest way to understand how to knit a cap is with the simplest models - a cap with ears, in the form of a cap or a helmet. An openwork hat is a little more difficult to knit, but this model is perhaps the most popular. The principle of its creation is usually identical, but you can choose any lace pattern.
Winter hat-helmet for boys
You can knit this pattern for both a boy and a girl if you choose bright yarn. The headdress is well suited for winter as it covers the forehead, ears and neck. This is a double model with a knitted lining; it is often chosen for older children who walk outside with their feet. The model is quite complex, it has raglan loops, so if you have little experience in knitting, you should start with a simpler solution.
For a head circumference of 36 cm, take 400 g of yarn with a reserve, since the product will be double. Sequencing:
- Cast on 6 stitches on the knitting needles, knit the first row inside out, then increase to 13 stitches, two of which are edge stitches.
- All stitches are knitted purlwise, in addition, it is necessary to mark 5 raglan stitches, near which there will be increases.
- On each row of raglan stitches, there is an increase of two loops - one on each side. This is the base of the cap, it should be 4.5–5 cm.
Next, the product is knitted in regular garter stitch - knit stitches. For a baby up to three months, the height will be 12 cm. This is approximately 35 rows and 94 loops.
The next stage is the back of the helmet and ears:
- Leave approximately 40 stitches on the forehead, and from the back seam knit 27 stitches on each side.
- Next are decreases along the back seam by two loops, which affect the fit of the hat. At this stage, it is advisable to try on the product. On average, 4 rows of decreases are enough for babies.
- For the back and ears you will need about 20 rows, that is, after decreases you need to knit about 16 more.
Then, from the side of the face, connect the children's cap in a circle so that it looks like a knight's helmet. For this it is convenient to use smaller circular knitting needles. It turns out 40 loops from the forehead, 10 on the sides and 14 on the chin. The first row is knitted with purl stitches on the front side. Next, English elastic 1 × 1 - 6-7 rows. If you need to leave the helmet single, close the row; if not, leave the knitting needles.
Then comes work on the shirtfront:
- Cast on 14 knit stitches under the chin and knit 2-3 rows.
- Mark the raglan loops, leaving 15–16 loops on the forehead and 14 on the back and shoulders. Also 1 loop per raglan.
- Knit the product to the required length.
The second baby hat is knitted in the same way. In order to connect the outer side and the lining, combine raglan. They are connected with an elastic band, one loop is knitted, the second is removed from the knitting needle. Thus, all the loops are transferred to one knitting needle and all that remains is to close them. On the side of the face, knitting is completed in the same way. The helmet is ready. You can add patterns to the front using threads of a different color.
Cast on 6 loops
Join in a circle, knit one row Make the base of the hat Add yarn of a different color
Knit a garment of the required height in garter stitch
Make the back of the helmet and ears
Join a baby hat in the round Cast on 14 stitches and knit several rows
Knit the product to the required length
Model with ears
This pattern is also knitted for both girls and boys. But at the same time, it can be called universal, since it is suitable for a child of any age. The product will be beautiful and comfortable, since it has no seams.
To knit a hat with ears for newborns, start with 60 stitches in the Italian way:
- The first row is knitted with a 1 × 1 elastic band; it should be 2–3 cm.
- For the main fabric, it is advisable to take larger knitting needles; everything is knitted with facial loops. In this way, 30 rows are collected.
- Leave 28 loops for the central part and 19 for the side parts.
- From this moment, the occipital part should be gradually reduced so that by the end of the work there are 4 cm or 10 loops left along the central part. The principle is the same as when knitting heels on toes.
- When the decreases are made, you need to knit 2 cm of 1 × 1 elastic and make ties.
- To create them, it is most convenient to use a hook. With its help, 50 air loops are made, which is approximately 20 cm.
- Without turning, knit a row in the opposite direction with single crochets.
- Then you need to close the knitting to go to the other side of the hat and make a tie there. It is done according to a similar principle.
All that remains is to tie the ears, so you need to fold the cap so that the fold is at the beginning of the back of the headdress. To do this, count five loops to the side and five down from the corner on each side. Now they only need to be sewn up by connecting the extreme points. You will get small “triangles”.
Cast on 60 stitches
Knit 2-3 cm with an elastic band Take large knitting needles, knit 30 rows with knit stitches Divide the fabric into three parts Knit the hat further, gradually decreasing the loops
Knit 2 cm of elastic Crochet to make ties Close knitting, make a tie on the other side Count five loops to the side and down from the corner on each side Sew up, connecting the extreme points
Finished hat with ears
Cap
Another cute model for kids. It is extremely easy to do and even an inexperienced knitter can do it. Procedure:
- Cast on 45 stitches.
- Knit 27 rows with knit stitches.
- From the 28th row there are decreases, knitting two loops at a time - this will be the corner of the cap.
Such hats for newborn boys and girls are considered universal, and can be knitted in a few hours if you have experience.
Openwork
To knit an openwork cap, you need certain skills and a little perseverance. Algorithm of actions:
- Cast on 57 stitches.
- Knit the first 12 rows with a boucle pattern - this is the lapel of the product.
- Next, knit 7.5 cm of fabric with an “openwork squares” pattern.
- Now the rounding of the cap begins. The total number of loops must be divided by three - it turns out to be 19 each, the middle ones remain unchanged, the decrease in loops occurs at the outermost ones, as when decreasing the heel loops of a sock.
- The first 19 of them are “openwork squares”.
- The next 18 are boucle.
- Then 2 together - purl.
- There are 17 stitches in the next row; they need to be knitted in a boucle pattern.
Then everything is repeated. This results in 19 loops in the center along with the edge ones, and the side parts of the cap are gradually reduced, as a result there should be 19 loops left on the knitting needles. They need to be knitted with an elastic band, 2 together: 2 as one knit stitch, 2 as one purl stitch. For the lapel you need to pick up stitches and knit them in a boucle. It is tucked in, the side parts are knitted one loop at a time.
To complete the bonnet with knitting needles, you can use a crochet hook to make strings like on the model with ears - they will be thin and comfortable. If you want wide ones, you can make them with the same “boucle” on knitting needles. The pattern is knitted from air loops - the cap is ready with knitting needles.
Cast on 57 loops, knit 12 rows with a bouclé pattern, then with an openwork squares pattern. Make a rounding of the cap. Then repeat the procedure, make a lapel.
Make ties Decorate as desired
For low birth weight babies
Sometimes the baby is premature or simply underweight. Every mother who has given birth to such a child should know some of the nuances of choosing clothes for underweight children.
The requirements for clothing for small newborns are especially high, since regular-sized items will be too large for them and will cause discomfort. Things for a baby born prematurely are made exclusively from natural fabrics and do not have seams or knots in the area where the part comes into contact with the baby’s head and body. Products worn over the head are absolutely excluded.
In online stores you can find a wide range of products specially designed for this occasion. When the child reaches the sizes typical for ordinary children, you can switch to products of classic sizes.
Choosing yarn for knitting a cap
All yarn presented on the handicraft market is divided into two groups:
- natural;
- artificial (synthetic).
Natural threads include cotton, cashmere, bamboo, and wool. The yarn is good for knitting children's clothes, especially mohair. It gives the product airiness due to its light fluffy pile.
Natural animal hair has excellent thermal properties, is wear-resistant, and beautiful, but many modern children suffer from terrible allergies from contact with natural animal hair.
Therefore, they created synthetic yarn (acrylic, viscose, polyester), it is hypoallergenic and serves as a lifesaver for mothers of children with allergies.
Artificial thread is not inferior in warmth to natural thread, can be dyed well in any color and perfectly withstands the long service life of the product.
When making a choice in favor of one yarn or another, you need to be guided, first of all, by the well-being and comfort of the baby.
We sew a warm baby vest with our own hands with patterns
Regardless of the method of making clothes for a newborn (crocheting, knitting or sewing from fabric), you need to take into account the composition of the threads.
Of course, nothing can replace, in any respect, cotton flannel or chintz (100% cotton), which are ideal fabrics for sewing clothes for newborns.
As a rule, future parents purchase fabric for diapers in advance, and from the leftovers they can sew baby vests.
Conclusion, clothes for babies need to be made from soft fabric (chintz, flannel, cambric, bumazea, madapolama), try to purchase higher quality fabrics to eliminate the possibility of irritation on the baby’s body. Choose fabrics that have less color, as dyes are dangerous for the baby.
The pattern for a baby vest for babies over two months is shown in the photo below:
Measurements used:
- product length – 30 cm;
- half neck circumference – 12 cm;
- half chest circumference – 24 cm.
If you need smaller or larger size vests, then use the original formulas presented below:
- In accordance with the long vest - 30 cm, draw a rectangle ABCD with vertical lines AD and BC. Then the lines AB and CD will be 14 cm wide. This value includes 1/2 of the half-circumference of the chest with the addition of two centimeters for a loose fit (24: 2 + 2 = 14 cm).
- We cut out the back neckline: from point B to the left along line AB we measure 4 cm (1/3 of the half-circumference of the neck), then from point B down along line BC we measure 1 cm (for all sizes) and connect the resulting two points with a slightly concave line.
- We cut out the neckline in the front: from point B down along the line BC we measure 5 cm (1/3 of the semicircle of the neck + 1 cm).
- Sleeve length: from point A, draw 10-15 cm to the left along line AB and mark point P. Then measure the length of the baby’s arm and calculate the value; if you want a closed sleeve, then add 4-5 cm. It is better to make a spacious sleeve so as not to restrict the movements of the newborn.
- Sleeve width: from point P, draw a line down parallel to the AD line, until it reaches 11 cm. From the resulting point 11, draw a horizontal line to the right until it intersects with the AD line and place point P1.
- Bottom of the sleeve: from point 11 up we measure 1 cm along the line connecting points P and 11. From point P1 to the left we measure 2 cm along the line connecting points P1 and 11. From point P1 down along the line AD we put 3 cm (point 3) . We get the bottom of the sleeve by drawing a line through the resulting three points.
- Side seam: from point D we lead to the left along the line SD and set aside 2 cm (point 2). Connect this point to point 3.
- Bottom of the product: divide the SD line into two even parts and mark a point, then measure 1 cm from point 2 up along the side seam, then connect the two points.
The last steps are to determine the type and depth of the smell, as well as what kind of clasp you will choose yourself, since it is not necessary to cut out the smell, it is done directly on the fabric.
We study the pattern of a vest for newborns 0-2 months
The pattern for a baby vest pattern for newborns from 0 to two months is shown in the photo below:
This product is cut out without seam allowances, since they all face the front side.
To sew such a vest you need: approximately 26 cm of chintz with a width of 150 cm (you can sew four vests), for decoration - 40 cm of white stitching, threads to match the color of the product, a disappearing marker, scissors, pins, overlog.
The cut details of the vest are shown in the photo below:
Sequence of work:
- Fold the original fabric in half and apply the pattern pieces along the grain thread.
- We trace the outline along the front side using a disappearing marker.
- We cut out the elements of the product without seam allowances, and secure the strips of stitching in the center of the front side with pins.
- We sew the seams in the center. Then we fold the front elements with the back along the shoulder seams and stitch them with an overlock stitch.
- Using an overlog we process the lower section of the sleeve, with one seam we process both wraps along the back and the full neckline, the lower sections of the front and back. Then we fold the vest along the side seams and sew them and the sleeve seams with a continuous stitch.
- At the last stage, iron the product with a steamer. The vest is ready!
We sew in two versions
The sewing master class includes two cap options:
- Three-piece cap;
- A cap of two parts.
First, you need to take measurements of the child’s head, regardless of the type of cap. You need to know two measurements: the half-circumference of the head and the length from the forehead to the hollow on the back of the head (this is the length of the cap).
Head circumference is measured by the protruding parts of the forehead and back of the head. This value is divided into two - the half-circumference of the head.
Read this: Boho patterns: a detailed master class for beginner needlewomen
To work you will need:
- textile;
- pattern;
- threads;
- scissors;
- pins;
- pencil or piece of soap;
- sewing machine;
- lace and trim.
Pattern for a cap made of three parts:
You can print the pattern on a printer or carefully redraw it from the monitor by placing a sheet of paper on it.
Progress:
- Cut out the parts from the fabric. To do this, transfer the pattern details to the wrong side of the fabric with a pencil or soap. It should be noted that when sewing a cap, seam allowances are not taken into account: the parts are cut out exactly along the contours.
- We sew the side parts from the middle one, making the seams outward, that is, on the front side. This way they won't rub the baby's head. Then they can be decorated with lace. The seams can also be overlaid and folded to make them look neat.
- We process the side edges with a strip of fabric. To do this, we wrap the edge of the cap in a fairly wide strip of fabric, fold the edges of the strip and sew everything together.
- We also process the bottom edge and continue the strip in two directions as ties.
- We sew the ends of the ties several times and cut them close to the seam.
Read this: Richelieu embroidery for beginners: step by step we look at the main points
Pattern for a cap made of two parts:
Progress:
- We cut out the parts taking into account the fold line. You should end up with two parts.
- Sew the lace to the back of the head. We try to make the seam small.
- We combine the seam of the back part with the middle of the side part.
- We baste the parts to each other in a circle, and then stitch them on a typewriter.
- We slightly tuck the front edges, stitch so that the product fits well and keeps its shape, and sew on a strip of lace.
- We sew the inner seam with tape so that it does not rub against the baby’s head.
- We sew the ties along the bottom edge in the same way as we did for the three-piece cap. You can use satin ribbon.
It turns out to be a very elegant cap.
Fabric baby cap
In this master class you will learn how to sew a baby cap with your own hands.
To do this you will need the following materials:
- pattern paper;
- pencil;
- scissors;
- textile;
- bias tape;
- threads;
- needle;
- sewing machine.
For a cap, you can choose a natural fabric depending on the time of year for which it is intended - cotton, calico or flannel. Immediately fold it in half, inside out.
We draw templates, the dimensions of which are indicated in the photo so that you have an idea of what scale to print the pattern or draw. Accordingly, all sizes can be specifically selected to suit the head volume of a particular child.
At the fold, place a template on the fabric according to which you need to cut 2 blanks. The same number of templates need to be cut out for the bottom of the cap.
Please note that allowances do not need to be left along the entire contour. In the parts for the bottom we leave allowances along the rounded edge, and in the other part of the cap we leave only them at the bevel. The width of the allowances is 1 cm.
Now we connect these allowances from both parts along the contour. Since there were 2 pieces of blanks, there will also be 2 pieces of sour cream products. It's okay if one of the parts comes together a little during work.
If in the middle you notice that the strip may be too long compared to the length of the second part, then perform additional assembly to prevent this. The main thing is that the folds are evenly distributed.
As a result, we sew the parts along the same contour. We leave one as is, and turn the second outside.
We put them inside each other so that the front side is both inside and outside. The hat is made of two layers.
We sweep two layers along the contour. If suddenly the contour does not match, then you can trim it a little.
Now we baste bias tape along the contour of the solid strip.
For the remaining outline, we take 90 cm long binding. We baste it in the same way, leaving the ends of the same length, 30 cm each. We hide the edges of each end inward, and then baste it.
Sew on the binding using a sewing machine. Pay special attention to the places where the ribbons intersect each other, since you need to stitch the edge well in this place so that the binding does not slip out from under the top one.
You also need to secure the ends well.
- So, without spending a lot of time, we sewed a cap for the baby.
- antonininka (Antonina Mazur)
Source: https://lady-master.ru/odezhda-i-aksessuaryi/dlya-detey/chepchik-dlya-rebyonka-iz-tkani.html
Sewing
We fold the main circle and lace face to face, and place the drawstring on top with the front side as well. We make sure that the notches on the parts match. We start sewing the parts from the notch. If the work is done on a regular sewing machine, it would not hurt to additionally process the edge with a zigzag or special triangular scissors.
We iron the stitched drawstring and the seam to the center and lay a finishing line, retreating from the edge 0.1 cm. We turn the edges of the drawstring inward by 0.5 cm, iron and attach, leaving a small hole of 1.5 cm for threading the elastic.
In order not to make a mistake with the length of the elastic, we multiply the circumference of the cap by 0.7 and add 1-2 cm for the allowance. We insert the elastic into the cap and close the seam. At the end we connect the edges of the lace. To avoid unnecessary protruding seams, it is better to do this using a hand overlay stitch. All that remains is to iron the product and try it on the owner.
So we learned how to simply, easily and quickly sew a cap for an adult. Now everything is in your hands!
Useful tips for sewing fleece hats
- To create a truly comfortable and beautiful thing, you must always carefully think through the sewing process before starting work.
- Select materials and threads to match the color, think over the style, and carefully draw out the pattern. And then you are doomed to success.
- Fleece is relatively easy to work with. It is easy to cut, does not crumble, does not require special threads or complex sewing machine settings. A regular seam with a stitch length of 3-3.5 mm will work fine.
- Since this type of fabric has good elasticity, the edges must be pinned together before sewing them on a machine.
- Experienced craftswomen sometimes advise finishing all the seams with an overlocker. Then they will turn out more accurate.
A smart fleece hat will come in handy in any wardrobe.
Mink hats 2021: fashion trends
Short fur coat - what is it (photo)