Today's consumer, of which I include myself, gets bored with things faster than they can become unusable. Old socks and T-shirts are usually used as dishcloths, but what to do with high-quality and expensive jackets and down jackets?
Before introducing the reader to the ideas of remaking old jackets with your own hands, I will tell you about kurpacha.
The exotic word means rug-blanket-mattress. It came from Central Asia, where such a product has been a household item for centuries.
First, the master quilted a layer of cotton wool, first beating and fluffing the natural fiber. Then a cover made of silk, velvet or cotton was put on the resulting mattress for the upper, front half. The bottom surface of the cover was always cotton. A thin soft mattress was sometimes additionally stitched with threads.
They sat on kurpachi while eating and talking, and slept at night.
In Russian culture, the closest relative of kurpacha was quilted cotton blankets.
Such things are still preserved in Russian families and serve faithfully.
Here are some remakes of old jackets based on the kurpaca technique, hopefully they will inspire the readers.
Children's play and bedside mats
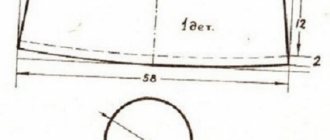
If the size and style of the down jacket allows, use the largest parts. For a small rug, the back of the product is enough.
Draw the desired shape with chalk and cut it out. It is better to seal the edges with braid or bias tape; a tied edge also looks good.
- If there are several jackets and they are small in size, for example, for children, overlap the pieces into fabric of the required size.
- Then cut out and sew a cover made of natural fabric from two identical halves, leaving an unsewn part of 20-25 cm.
- Place the voluminous piece inside the “bag” and sew up the hole.
- Now machine stitch or hand quilt the lines of the pattern.
Setting in sleeves
After the front, back and sleeves have been updated, you can begin to connect the sleeves to the product.
Find the centers on the sleeves, align them with the shoulder seams, and the sleeve seam with the side seams. Pin and tuck the sleeves into the armholes so that there is a slight fit at the top of the sleeves. This will provide the sleeves with a rise at the top and eliminate creases at the armholes. Sew the sleeves into the armholes on the sleeve side.
For mountaineering tourists
It happens that you have at your disposal not just a down jacket, but an entire mattress or duvet. Don't rush to waste this treasure on trivial pillows. Sew a real down sleeping bag!
In general, approach the issue creatively. Put the item in front of you and look closely at it: does this piece of outerwear inspire you to transform it into something beautiful? If not, take it to the trash or to a charity. Perhaps someone will be happy with such a gift - don’t be greedy.
Connection with lining
Connecting the lining to the sleeves
Turn the sleeves of the product inside out, align the seams of the sleeves with the seams of the sleeves on the lining. Connect the bottom of the sleeve lining to the sleeves of the product along the seam of the cuff, in a circle from the wrong side. Thus, the sections of the cuffs, the bottom of the sleeves and the bottom of the lining sleeves will be on the inside.
On the wrong side, secure the seam allowances connecting the sleeves with the lining to the vertical allowances inside the sleeve.
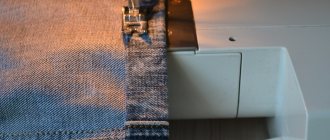
Bottom processing
Cut out the facing according to the shape of the bottom of the jacket from the finishing fabric, 4.0 cm wide.
Stitch the facing to the bottom of the lining, but before doing this, cut the lining along the shelves near the hems to a width of 3.0 cm and smoothly move the line to the bottom cut.
When connecting the facing with the edgings vertically, the facing should coincide with the bottom of the edgings and not interfere with the length of the lining on the shelves.
On the front side of the facing, lay a machine fluff. Continue the side seams on the lining along with the facing.
What is machine heaving? Refer to the dictionary: Terminology of machine work and Definition of basic sewing terms
Then connect the facing to the bottom of the product.
Other ideas
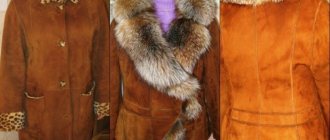
An old leather jacket gives you a huge variety of options for remaking:
- You can use it to make a vest, a children's jacket, gloves - both long and short, various thin or massive bracelets.
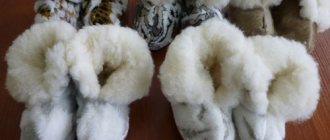
- A great option for remodeling is house slippers. Here you only need the insole and the front part of the shoe - the toe.
- Wallets, cases for phones and keys can be made the same for the whole family, and you only have to spend one evening doing needlework.
- From leather, cut into neat parts - petals, you can even make a beautiful flower panel.
Updating an old jacket
The most common problem with old items is abrasions, which most often appear on the elbows or at the entrance to the pocket. The easiest option is to disguise them with embroidery, applique or other material. If your old jacket still looks pretty decent, and you want a more spectacular transformation, then there are many options:
- When it comes to the “second” life of an old item, you should pay special attention to the various stripes. You can purchase them at a sewing store, cut them from other unwanted items, or create your own. It is better to place them on an old jacket in a chaotic order - on the shelf, on the back, on the sleeves.
Important! Appliqués of different sizes on different parts of denim clothing would be appropriate. To create a rock, punk or glam chic style, this is an ideal option.
- Another effective way to update an old item is to paint it. This can be done with both a textile jacket and a leather one. In the case of denim, even regular bleach will do. Dilute it in water, immerse part of the jacket in it, holding it suspended, and wait a certain time. This way you can get an interesting ombre effect on clothes. A leather jacket is transformed with the help of a special dye and a cotton sponge, which creates stylish abrasions on the sleeves or the main part of the product. Various inscriptions or prints applied to the fabric using stencils will also look great. It is better to make them using spray paint.
- Staves are one of the most popular materials for home remodeling. They can be used to decorate part of the sleeves, shoulders or back. Metallic accents would be appropriate even on the collar or cuffs, if any.
- If you are not a fan of punk style, then metal can be replaced with sparkles or crystals. They are sold in any specialized store. Such decor is usually sewn onto clothes in a certain order. Things that are completely embroidered with sequins look stylish—an old jacket will be unrecognizable. True, this is painstaking and long work, but the effect is worth it. You can also glue such elements - then you will need a special textile glue. When working with it, be careful, make sure that particles of the composition do not remain on the surface to be decorated, otherwise the product will end up looking sloppy.
- White lace inserts look great, especially on denim. You don't even need a sewing machine here. Using scissors, cut out a design of the desired shape, for example, in the shape of a heart, and sew a piece of lace fabric from the inside along the contour. Any other one here will also look quite appropriate.
With the help of stripes
Chevrons are a fashionable and effective element of decorating down jackets. Fabric stores have a wide range of products in different sizes, colors and themes. By showing your imagination, you can design several parts of a down jacket at once (for example, the front and back, or sleeves and pockets).
How to attach a patch to a product:
- Take a #7 sewing needle and thread #40 reinforced thread into the eye, matching the color of the down jacket. Attach a knot at the end.
- Attach the decor to the attachment point and secure it with one or more safety pins (depending on the size).
- Slightly bending the edge, sew the decor with small stitches 8-10 mm apart, alternately grabbing the top fabric and the wrong side of the patch.
- Once you have finished fixing the chevron, secure the thread with a loop to prevent it from unraveling.
Useful tips
Before deciding what can be sewn from an old jacket, it is worth taking on board tips on how to update such material. It all depends on what problems there are:
- You can give old material a presentable look using special dyes, which are sold in many stores in the form of aerosols. Before applying, the skin should be cleaned with a damp sponge and wait until the moisture dries completely.
- After wearing for a long time, cracks and abrasions appear on the leather. Getting rid of them is quite easy. Rub the damaged area with regular hand cream, and the result will not take long to arrive. Freshly peeled orange peel will perform the same function.
- Unknown stains can be removed by making a soap solution and adding a little ammonia to it. After treating the material with this composition, be sure to wipe it with cream or castor oil.
- Rust is removed using purified gasoline. It will also help get rid of oil or nitro paint stains. To do this, soak a sponge in fuel and gently work the stain with gentle movements, dissolving and erasing it.
- Ballpoint pen marks can be removed by mixing rubbing alcohol and acetic acid. It is better to work with this solution while wearing gloves to protect the skin of your hands.
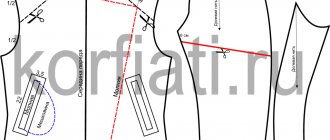
Reducing the width of the hood
The size of the hood is quite voluminous; when put on, it falls over the eyes and covers half of the face.
On the front side along the seams of the hood, pin the excess with pins and mark with chalk. Remove the pins.
Extend the hood panel down to the zipper, including a small zipper area.
Draw lines on the hood and lining, connecting the control marks. Mark the allowances, cut off the excess.
Connect the hood to the insert, including the lining.
To prevent the hood lining from sticking out on the front side inside the hood, use hand stitches to connect the allowances of the hood and the lining together in several places.
From the wrong side, sew the zipper to the hood at the insertion area.
Turn the hood right side out and sew the hood lining to the zipper.
You will find the hood pattern in the master class on sewing a children's parka jacket.
Replacing the fur cuff on the hood
Pull the fur away from the cuff.
Cut out the same piece from new fur, taking into account the direction of the pile.
Stitch the cuff with fur, leaving an opening along the seam. Turn the cuff right side out and secure the opening with blind stitches.
Updated hood:
Kurpacha - what is it?
The exotic word came to us from Central Asia. Kurpacha is a quilted mattress that simultaneously serves as a carpet, blanket, bed, and chair. People sit on it during meals at a low table, lay it on a trestle bed or the floor. We can say that in the east, mattresses replace furniture. They give the body real relaxation, create comfort and coziness.
The bright little thing seemed to have stepped out of the pages of the fairy tale “One Thousand and One Nights.” It has a centuries-old history. Kurpachy symbolizes the wealth and well-being of the family. Traditionally, they are sewn by hand from khan-atlas or panvelvet. For the back side, colorful cotton fabric is used. The filling is cotton, which is quilted, beaten and quilted again in a fabric cover.
Kurpacha's closest relatives are Russian quilts. Many families still use them to this day. Thanks to a special technique of execution, they serve faithfully for decades!
Using fur
The optimal and affordable way to update a product is to sew fur onto the pockets, sleeves or hood. Artificial and natural finishes are used for work. If the down jacket does not have a hood, the collar is trimmed like a coat.
Natural fur is attached to the product part manually using a needle with reinforced thread No. 40. The fur is cut from the inner side (reverse side). Use a blade or a utility knife. Artificial trim can be cut with ordinary scissors, but do it carefully - along the base of the material, so as not to cut off the fibers.
Using icons
An original badge or a spectacular brooch will become an exclusive detail of your winter look. The following icons will look appropriate on a casual down jacket:
- wooden ones are the hit of this season;
- handmade - a classic of the genre;
- with 3D embroidery - fashionable modern technologies;
- patches are signs of simplicity of style and comfort, freedom of thought and strength.
You can make a badge or brooch with your own hands, using your imagination and skills. The most unexpected materials are used for this:
- broken porcelain;
- pieces of aluminum, copper and other metals;
- fragments of leather, rubber;
- wool, silk threads and more.
Since there will be punctures on the down jacket after removing the badge, it is not recommended to attach such accessories in large quantities.