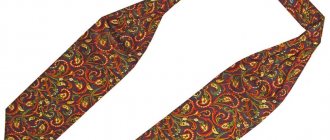
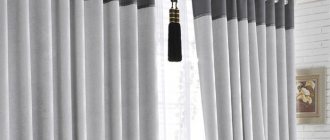
The right fabrics for an elastic tie
Before learning how to tie a children's tie, it is worth analyzing the fabrics suitable for its design.
The most convenient and practical options:
Advantage should be given to natural fabrics. On synthetic ones, the knot does not look so elegant, and when combined with an elastic band it will not look the best.
The next important point is choosing a tie in accordance with the season. For example, for the cold season, warm woolen models will be ideal, while in the summer, satin and silk accessories will be the best solution.
What is an elastic tie and how to make one
The most important secret of the children's tie model with an elastic band is that it does not need to be tied correctly, it is folded and sewn up, thus maintaining its shape. In addition, there is one more nuance - the material of the accessory is wrapped around the elastic band for strength. If we consider the folding mechanism step by step, it will look like this:
- The tie is placed inside out, and the elastic is placed on top of the fabric.
- Throw the tie over the elastic band towards you.
- The thin part is brought to the left and passed under the elastic band downwards.
- Tie a neat knot, pulling out the two ends.
- The lower parts of the knot are assembled in such a way that an inverted triangle is formed from the front part.
As you can see, the diagram is simple and clear, but most importantly, a tie folded in this way and secured with threads will not require re-laying even after washing.
Cutting and sewing diagram: step-by-step instructions
To sew a tie for a boy with an elastic band, you need to roughly divide the work into three stages. The first stage is making a pattern. The second is preparing fabric parts. The third is stitching the finished product. Consider a bow tie option.
They start with a pattern. It will be enough to prepare rectangles with dimensions of 8 × 13 cm, 11.5 × 22 cm and 13 × 23.5 cm. It is most convenient to work with the pattern on an ironing board, to the surface of which you can attach patterns with pins.
So, the next stage - the pattern of a tie for a dude boy is attached to the surface of the board on the fabric and carefully cut out. The output should be fabric rectangles. They start working with the largest part. It is folded lengthwise, ironed with an iron, smoothing the fold, straightened and folded again across so that the edge and fold lines coincide.
Features of elastic ties: what you need to know
The main feature, as already noted, is a securely fastened knot with an elastic band, which is additionally stitched. There are several nuances regarding the elastic band itself and its varieties. The step-by-step instructions described above assume that the tie will be secured with a regular elastic band. If desired, it can be replaced with a looped elastic band, which will need to be changed as it wears out. This is the simplest and most affordable fastening method.
A more complex method is using ribbons with special fasteners. Their advantage lies in the ability to regulate the length, and therefore the density of compression, depending on the diameter of the child’s neck as he grows.
Windsor
According to etiquette, the accessory should reach the belt buckle. If the child does not yet go to school or is in elementary school, this rule can be ignored. However, as the child grows up, he must master all the subtleties of business style clothing.
The photo shows a diagram of the technique for tying a tie with a Windsor knot:
A looped elastic band is the simplest fastening option, usually found on the cheapest jewelry. However, when the child grows up or the elastic wears out, it becomes more difficult to put on a tie (or it sags and dangles loosely around the neck).
In the cold season, ties of dark colors made of thick fabric are worn. Light, light jewelry is suitable for warm seasons.
Let's look at how to sew the most ordinary school tie with an elastic band.
The tie with Italian roots has an unusual shape, reminiscent of a breastplate that fencers once used. In combination with the right clothes, the accessory looks elegant, fashionable and noble, especially if you choose a classic fabric option - silk or satin - as the sewing material.
An unusual alternative to elastic: what do manufacturers offer?
It is important that a school tie is not only beautiful, but also practical and comfortable. That is why adult models with complex knots are not considered at school age. For little fashionistas, simplified versions of the “adult” accessory were invented - with elastic and more. In combination with a school uniform, it is allowed to use interesting models of ties with a zipper or, even simpler, with a clothespin.
The first option is that a young gentleman can easily put on/take off a tie with a zipper at any time, quickly and easily. Models of such accessories are sewn with a zipper along the axis, dividing them into two equal longitudinal parts, each of which can be detachably attached to a shirt. On the reverse side they are equipped with a button that allows you to fold the tie below the knot when fastening it. Externally, a tie with a zipper is no different from a standard one, but retains its original appearance throughout its entire service life.
Selection of design and material
A tie tied with a half-Windsor knot can be worn to important meetings or worn every day to work; it always looks stylish and elegant.
Untying a quarter knot is also easy, just loosen the loop, pull the end of the tie out of it and then do everything in the reverse order.
The tie consists of two parts - a finished knot and an elastic band sewn to it on both sides. Instead, there may be a thin braid that is fastened with a clasp or button at the back under the collar. This option is called a regatta. Its main advantage is that you don’t have to think every time about how best to tie a tie with an elastic band. Just fasten the clasp. This saves time and effort. The regatta is equally suitable for men and women. There are different options for tying tie knots:
Fold the resulting part lengthwise and stitch it.
Sometimes a tie is necessary as an element of a carnival or theatrical costume. This is exactly the kind of tie - bright, made of floral fabric - that we will sew in this master class.
Bearded questions: How to sew a tie with an elastic band for a boy
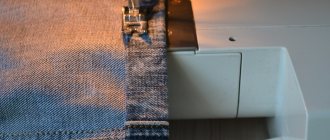
Now is the time to start creating the node. Fold the rectangular piece lengthwise and stitch it into a tube. Turn it inside out and iron it so that the seam is in the middle of one of the sides.
Fold the strip as shown in the photo and cut along the line.
We fold the main part of the tie and the “corner” with the right sides together and sew it together on a typewriter.
Turn it inside out, straighten it and iron it.
We cut the corners, turn them inside out and iron them.
Children are very active and not always neat. Since a boy may accidentally stain his tie, it is better to purchase an accessory made from a fabric that is easy to clean (such as cotton).
The photo shows a diagram for tying a bow tie:
Externally, a tie with an elastic band is practically no different from a regular self-knitted one, so the same basic rules apply here as when choosing a classic accessory.
How to tie a tie with an elastic band: looking brand new
Almost all men do not like tying ties, especially if you need to make a complex knot. Some don’t even want to learn this and ask their wives for help. In order not to encounter such a problem again, fashion designers came up with the idea of sewing elastic bands and fixing the decoration on them. To ensure that the accessory does not lose its appearance after washing, you need to know how to tie a tie with an elastic band.
Today we will see step-by-step instructions for attaching this decoration. Let's see how to choose the right fabric and why you need to pay attention to it. We will also look at some rules to consider when choosing a tie.
Bow tie with an elastic band: how to sew without a sewing machine
For several years now, “familylook” has not lost its relevance. It is very easy to choose the same dresses for mother and daughter. But for families with sons, choosing a stylish family look is much more difficult. This problem can be solved by one accessory that is easy to make with your own hands - a bow tie. Jeans, plain shirts and matching denim bow ties will help the whole family look stylish. This accessory can also be sewn from any trouser fabric, leather or satin.
What is an elastic tie?
This type of tie differs from others in that it is worn with an elastic band that is secured with threads. Instead of elastic, some people use elastic tape because it looks nicer. This method of fixation is used for butterflies.
You can also secure the accessory using ribbons, but this is a more complicated option. The headband is used by those men who do not like to constantly tie heavy knots or simply do not know how to do it. Some parents tie their children's ties this way, as they might come undone at school. Step-by-step instructions will help you make any knot and secure it.
The easiest way to tie a tie
When it comes to more complex knots, it is better, in addition to the text instructions, to also watch a video on how to tie a fashionable tie step by step. It's easy to find on the Internet.
Of the variety of knots, about 20 of which are known, it is worth choosing not only those that you can tie yourself, but also those that are suitable for a particular person. There are simple rules for this:
Once tied, the wide end should cover the waist belt buckle. This is a step-by-step instruction on how to tie a narrow or wide tie in the easiest way. Of course, it will take practice. It is advisable to practice in front of a mirror. The knot must be tightened as tightly as possible so that there are no unnecessary folds, and try to remove distortions.
It doesn’t matter which side the wide end will initially hang on. The main thing is to follow the general sequence of actions and remember that the wide part always overlaps the narrow one.
2. Cut a piece of tape 30 cm long and 3 cm wide.
3. Burn the edges of the ribbons. It turns out that there are 2 long ribbons and one small piece.
So, the classic look is quite complex and is necessary for real men, but it’s still worth familiarizing yourself with the bow tie pattern.
4. Form a bow from a wide satin ribbon and pin it with a pin. Combine the cuts with an overlap.
How to tie a tie with an elastic band step by step (photo)
If you give yourself enough time, then any man can tie a tie with an elastic band. The main thing is to carefully follow the instructions step by step. For adult men and for children, the principle of tying a knot is the same, it all depends on what kind of knot you want. Step-by-step instructions will be shown below. This knot is called Windsor.
A headband tie looks exactly the same as a regular one, so there are a few things to consider when choosing one:
- Seasonality . Don't wear the same accessory for a whole year. Choose different materials for each season.
- The accessory must be the correct size . For boys, the tip of the jewelry should not reach the belt buckle. The man himself adjusts the length, taking into account the characteristics of his build and height.
- The costume must be the same fabric as the decoration.
- Pay attention to the color scheme . Buy a universal tie that will go with any outfit.
These are just some tips, but they greatly influence the image of a man or boy.
Repair without a needle
Tape for gluing fabric will help out if a defect appears on a beautiful trousers or shirt. Cut out a small piece of tape and apply it from the wrong side to the hole, having previously pulled its edges together. Cover the tape with a cloth and sprinkle with water. Heat the iron and press the soleplate against the patch for 10 seconds. Ready! Turn it inside out and admire the result.
In this way, you can repair holes in fabric burned from cigarettes, including outerwear: jackets, parkas, coats.
Choosing a material for a children's tie
Before you learn how to tie a school tie, you need to decide on the choice of fabric. If you buy good fabric, then your decoration will not come undone. It is best to give preference to:
Only on natural fabrics will the knot look beautiful, especially if there is an elastic band. Also pay attention to the season; in cold weather it is better to wear thick accessories, and vice versa in summer. A correctly selected accessory makes a child an intellectual.
Preparing to make a tie
If a classic tie made of jacquard silk or satin can be purchased ready-made, then a fancy, unique one can be easily made by yourself.
Bearded questions: What width of tie is in fashion now?
rukikryki.ru
blogspot.com
Thin ties can be knitted, in general, in any way and give a lot of scope for creativity. When choosing beautiful extravagant knots, how to properly tie a thin tie step by step, pictures will help you figure it out better than text.
There is a test for the correct tying of the knot described above. It consists in the fact that when untying you need to pull the thin end out of it, and then pull the wide part. The knot should unravel without effort. If it remains, then a mistake was made when tying.
The node described is most often called simple. But there is another name for it: Kent. Ideal for ties of any style (except butterfly), to any style of clothing.
How to properly tie a school tie with an elastic band: instructions with photos
Before tying the knot, try the length of the elastic around your baby's neck. It should not be too loose, as the tie will not fit tightly to the neck. At the same time, do not tighten the headband too much so as not to cause discomfort to the boy. Some make special adjustments so that the accessory can be loosened or tightened.
Interestingly, a schoolboy's tie does not need to be tied regularly; it is enough to fold it once and sew it up. This will help fix the shape.
Let's see how to tie a tie with an elastic band, step by step instructions.
- Place the product face down on the table and place the headband on top, in the middle of the fabric.
- Throw the thin end of the accessory over the headband towards you.
- Bring the small end to the left, going under the rim down.
- Tie a knot by pulling the two ends out.
- Shape the knot so that there is a nice triangle on the front side.
- Iron the decoration so that there are no wrinkled parts.
Having made a small tie on the headband, you need to sew the knot with thread. Thanks to this, even after washing, the decoration does not require re-correction of shape. To learn how to tie a tie with an elastic band, you can look at the photo for step-by-step instructions.
Types of Bow Ties
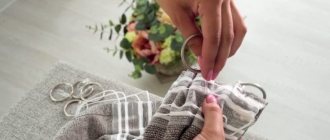
7. Flash by . I’ll write right away that the way it’s done, and these are small stitches, is not very beautiful. It would be more correct to pierce 4 times, pull and sew. Why? Because I ended up with asymmetrical folds, but I need to make one central depression and 2 mounds on the sides. If there are 6 punctures, then there will be 3 mounds and 2 depressions (look more closely at the picture of purchased butterflies above). Ideally, fold the pleats by hand and secure them with a needle and thread.
To create a butterfly bow from a ribbon you will need: • satin ribbon, 5 cm wide and 30 cm long; • satin ribbon with polka dots, 2.5 cm wide and 22-25 cm long; • needle, thread, scissors; • hairpin or elastic band.
• Classic is a long, curly tie that must be tied around the neck. • Readymade – They are pre-sewn. They only need to be secured to the shirt with a special clip or using ties that are hidden under the collar.
The bow tie is sewn from a piece of fabric measuring 11x11 cm and for a jumper measuring 3.5x5.5 cm. See the sequence of sewing a bow tie from fabric (with video) here.
How to properly tie a children's tie with an elastic band: step-by-step instructions
An elastic tie is lightweight elegance for kids. Its advantages are obvious. The student can tie the accessory without outside interference. In addition, during the day the item will not cause a feeling of discomfort; you will not have to constantly adjust it. An elastic tie is easy to care for. However, in force majeure situations, if a thing comes undone, you need to have an idea of how to fix it correctly.
Tying school step by step instructions
Parents of a little boy need to worry about choosing a tie in advance. Today, many schools have a strict dress code, according to which students must wear specially cut clothes and accessories. It is very important for parents to know how to tie a school tie and teach their child.
The school tie is laconic and elegant. It not only complements the image, but also gives it responsibility. Sometimes this accessory comes undone or simply needs to be loosened as the student grows and changes.
Not a single school holiday is complete without the use of this small accessory. If for some reason the tie comes undone, the following diagram with photos will help you tie a school tie step by step:
- Lay the item out with the wrong side up and place an elastic band in the middle;
- Fold the item so that it goes around the latch;
- Draw the thin part from left to right around the bulky part and move it back with the end to the left and begin tying a school tie with an elastic band correctly;
- Circle the elastic from bottom to top and pull out the end of the narrow part of the accessory, the seam will be on the outside. You will get another knot on the other side;
- Pull the wide part down and adjust the knots. A triangle is formed on the outside. Sew the corners on the wrong side with thread;
- Do everything carefully;
- You should end up with a small knot;
- The accessory position has been corrected.
How to sew a bow tie with an elastic band without a sewing machine
We sew the base piece “inside out” along its length, turn the sewn piece inside out, fold it so that the seam is in the middle and iron it.
The second step is to sew the workpiece along the width, while the previous seam should be on the outside.
When you have a ring, turn it inside out with all the seams. The “width” seam should be placed in the center of the product and ironed well.
Let's start making the bow tie jumper. We sew the corresponding piece of fabric with the seam facing outwards on the wrong side.
The workpiece should also be turned with the seam inside.
Note: This is easier to do with a pencil or pen. Place the sewn tube onto the base and carefully turn it inside out.
Place the jumper seam in the center and press it flat.
Attach the workpiece to the base and measure what diameter the ring needs and sew it so that the seam can be hidden inside. Then carefully fold the base and place it on the center of the jumper.
The elastic can be sewn directly to the back of the jumper or pulled through it.
Sew the elastic with the seam facing inward.
We hide the elastic seam under the jumper.
Author: Ekaterina Vishnevetskaya
Did you like the article? Share information on social networks:
Source
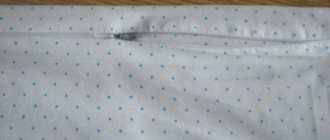
Correctly tie a short zipper for a child: photo
The zip tie was first used by yachtsmen. They didn't have time to tie this attribute, so they sewed a zipper on the back. This accessory is usually worn by office workers. It is also suitable for schoolchildren for daily wear.
This zipper accessory is elastic and easy to secure. Models for different professions are available for sale.
The zipper on this item can be active, or it can be decorative. In the first case, its shade is identical to the shade of the accessory and the zipper is practically invisible, in the second, it is deliberately highlighted.
A zipper divides the item into two halves, which are fixed on the shirt. If the zipper is closed, the tie looks traditional. A knot is not tied on the accessory. It is an imitation with a latch that is easy to fasten.
To wear such a pattern to a boy for school, he will need a special shirt. To fasten it, use the zipper on the tie.
The accessory node is located under the shirt collar and is a pentagon. The knot takes up the entire space between the edges of the collar and extends beyond their boundaries, which allows you to keep the corners of the collar in one position.
A tie is an integral part of a school suit. You can’t come to a matinee or school assembly without this accessory. But at the same time, this attribute should not create inconvenience when worn. Correcting the position of an item should not violate the integrity of the image. A zip tie helps solve this problem.
Beautiful for girls with an elastic band
Not only boys, but also girls must follow the dress code in schools. A silk stripe makes the look more stylish and emphasizes the girl’s fragility. There are several ways to tie a girl's tie for school.
Traditionally, a “small knot” is used to secure a tie for a girl going to school. It is done like this:
- The accessory is laid out on the shoulders with the seam down. The narrow part should be on the right, the wide part on the left;
- the bulky part is threaded under the narrow part to the right;
- slightly above the place of threading, near the wide part, the thing is bent. The wrong side should be on the outside;
- a piece of the volumetric part is threaded in front of the narrow part of the accessory;
- as a result, a ring is formed into which the volumetric part must be threaded;
- try to make the knot looser on the narrow part of the accessory and pass the wide part into it.
A Wismar knot is often used to secure a woman's tie.
Follow these steps to carefully tie your baby's tie step by step:
- throw the item over your shoulders. The wide half should be 30 centimeters lower than the narrow half;
- cross the parts of the accessory so that the wide half overlaps the narrow one. Pass the bulky part under the narrow one and pull it to the top through the created loop;
- Re-thread the wide end through the narrow end. As a result, a loop is formed on one side. The action must be repeated in the opposite part;
- lift the wide half and bring its end into the resulting loop. Tighten both halves;
- the node is ready. Gently adjust it, make it more symmetrical.
An elastic tie is an easy-to-wear accessory for schoolchildren. You don't need to waste time learning how to tie it. Other advantages of the accessory include: ease of taking off and putting on, practicality. The item is suitable for both everyday wear and special occasions.