What is the most important thing in sewing bed linen? Of course, this includes the choice of fabric, correct calculation and cutting, but the most important thing is the technological processing of all parts of the set. And here I am giving a master class: sewing a duvet cover in different ways. In this article, we only consider the duvet cover processing technology. You can see how to sew a bedding set in full here. And in this article I will present three ways to process cuts in a duvet cover. You can not only read about it, but watch how to sew a duvet cover video .
What fabric is best to make bed linen from?
The most popular fabric for sewing bed linen is cotton. It is natural and inexpensive. In the minds of many, there is a stereotype that calico, satin and teak are also cotton. But it turns out that these names only indicate the method of weaving threads. And today calico can be made from anything, including pure polyester, so before purchasing you need to pay attention to the composition of the fabric.
Cotton bed linen
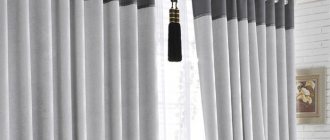
Linen fabrics are natural and durable. Perhaps their only drawback is their high price. This fabric is often used to make snow-white bed linen for luxury hotels. If the goal is to create an expensive interior without synthetic shine and tasteless gilding, then linen will most likely be chosen as a textile.
Snow-white bed linen
By the way, in the USA, plain linen bed linen, without flowers or other decorations, is very popular, so if you want to create an interior in the American style, then this kind of textile would be appropriate.
White bed in the interior
Mixed fabrics are created from several materials at once, most often it is a mixture of natural fabric and polyester. Thanks to synthetic fibers, the fabric wrinkles less and becomes more wear-resistant, but such fabric becomes electrified, is less breathable and absorbs moisture less well.
Nowadays, ready-made bedding sets with 3D printing or designs created specifically for them are very popular. Such fabrics are also available for free sale, which means you can sew a beautiful bed with a pattern yourself.
Bed fabric with butterflies
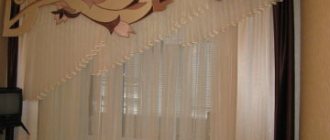
The pattern on bed linen fabric can be oriented along the longitudinal or transverse thread. Such fabric as in the photo above has a standard width, in this case 220 cm, and it needs to be dialed “wide”. And from such fabric as in the photo below you can sew using both longitudinal and transverse threads.
Bed fabric with a cherry blossom pattern
As a rule, bed linen material is sold in rolls 150 or 220 cm wide, and if you need to sew a set of bed linen of non-standard sizes, it will be easiest to work with fabric with a small or abstract pattern, for example, such as in the photo below.
Bed with an abstract pattern
How to cut bedding to size correctly?
Sewing beautiful bed linen begins with correct measurements. It is better to measure bedding and make calculations yourself, since the sizes of mattresses, blankets and pillows are non-standard. Manufacturers of ready-made sets sew them in different sizes; to learn more about the standard sizes of bed linen and their possible variations, read this article. And here we will tell you how to cut your bed linen yourself.
Buying is good, but sewing is better!
Measure the width and length of the pillows, blanket and mattress. To avoid forgetting anything, take a piece of paper, draw rectangles to symbolize them, and then write down the results of your measurements on it. We will calculate the sizes of pillowcases, sheets and duvet covers for each item separately.
Duvet cover
- Multiply the width of the blanket by 2, because the duvet cover will be on both sides
- Then you need to add 5-7 cm seam allowances to the length and width of the blanket
- It often happens that a new bed fits perfectly only until the first wash, and then shrinks and looks sloppy. Therefore, we will also add an allowance for shrinkage of the fabric of 4% of its width and length. This shrinkage allowance should only be made for natural cotton, because synthetics do not shrink
Self-sewn linen will be original and non-standard
Sheet
- Add twice the height of the mattress to the length and width of the sheet (this should only be done if the mattress rises above the bed)
- Add a seam allowance of 3 cm in length and width
- Add an allowance to the free edge (10 cm in length and 30-40 cm in width)
- And lastly, we will also add an allowance for shrinkage of the fabric, 4% each of the length and width
Pillowcase
- If the pillow has a square shape, multiply the length of the pillow by 2, since the pillowcase will be on both sides of the pillow
- Add 25-30 cm to the resulting length for the fold, which will hold the pillow
- Add 5-7 cm to the width and length for the seams
- Add another 3 cm to the length and width so that the pillowcase is free
All these details can be oriented on the fabric as shown in the picture below. Please note that it is better to calculate the dimensions yourself.
An example of how to cut bed linen
Fabric 1.5 meters wide is only suitable for sewing children's and single bed linen. For a one-and-a-half-size or larger bed, fabric 2.2 meters wide is suitable. Rolls of bedding material are usually produced in this width.
Sew a duvet cover
With a duvet cover everything is quite simple and easy. We will need that part of the material that you cut out to fit the baby blanket. However, if the patterns given above did not help, then the easiest option to correctly measure the size of the fabric for a duvet cover is to fold it in half and in this form cut off a piece of material the size of a blanket.
Don't forget about the seam margins and leave about 2 cm on each free edge.
When the duvet cover fabric is ready to use, already folded in half, it should be stitched along all the free edges. For strength and reliability, it is recommended to use overlock or zag-zag seams.
Important! On the side that is comfortable for you, do not forget to leave a hole into which you will insert the blanket into the duvet cover.
The hole for threading the blanket is usually made about 30-40 cm and its edges are carefully stitched inward, to the wrong side.
The duvet cover is ready. All that remains is to turn it right side out, straighten it and straighten it well, especially in the corners.
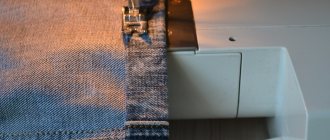
Seams for bed linen
For sewing duvet covers and pillowcases, a bed stitch is used, which is sometimes also called a backstitch. This seam is dense to the touch and very durable, so the bed linen can be safely washed in any mode of the washing machine, nothing will happen to it.
Covering seam
This is what a linen seam looks like from the front side, and from the back side two white lines will be visible. The same seams are used when sewing jeans. And the technology for creating a sewing seam is as follows:
- Place two pieces of fabric facing each other
- Move the top fabric sideways by 5-7 mm so that a strip of the bottom fabric is visible
- We wrap this strip and sew it
- We unfold the parts so that they are facing us with the wrong side and the seam is in the middle
- Fold the seam to the left and sew it to the fabric
- The bed stitch is ready!
Bed stitch
Ideally, the seam allowances for the top and bottom pieces should be different. For the upper part, this allowance should be equal to the seam width (5-7 mm), and for the lower part, the allowance should be equal to two seam widths and another 2-3 mm (total 12-20 mm). But when it comes to bed linen, an error of 1-2 cm is unnoticeable, and the parts that are sewn with a bed seam can be cut to the same size.
VIDEO: Sewing seam
To sew a sheet, as well as the free edges of a pillowcase and duvet cover, use a hem stitch with a closed cut.
Closed hem seam
Materials
First of all, we need to decide what we will use to create children's bedding. For kids, the ideal option is cotton. It is pleasant to the body, leads in breathability and hygroscopicity, does not electrify, does not cause allergies or irritation and, most importantly, is easy to care for and can even withstand boiling.
Types of cotton fabrics:
- Calico is the most popular type of material among industrial manufacturers. Available in a density of 110-145 g/m2, the optimal thickness is 120. The smoothness of calico varies greatly, it must be assessed by touch. The weave is quite loose, so it conducts air and removes moisture better than others.
- Poplin is a competitor to calico that is rapidly gaining fans. It differs in that it consists of thin warp threads and thick weft threads, so that the fabric is opaque to light, more flexible, flowing, and lighter. Available in different thicknesses, but the optimal surface density is 115-120 g/m2.
- Satin is a material that is smooth almost like satin, due to the fact that the weft comes to the surface through 4-5 warp threads. The canvas is very dense both to the touch and to light through, the optimal thickness is 120 g/m2 for regular and about 200 for jacquard.
Important! Do not take chintz under any circumstances: it is too thin and the threads are twisted too poorly; such a set will lose its attractiveness after a couple of washes.
Personally, I recommend taking poplin if you are afraid that the slight roughness of calico will be unpleasant for your baby. There is no point in overpaying for satin, especially since it requires gentle washing so that the fabric does not lose its shine.
How to sew a duvet cover with your own hands: instructions, master class
This will be a simple duvet cover with a zipper in the side seam to insert the blanket
1. Take a piece of fabric for a duvet cover, in our case, its size is 2.2 meters wide and 4 meters long
2. We begin to sew the duvet cover with a slightly simplified version of the linen seam. This seam is inferior in strength to the sewing seam, which we discussed above, but is also quite strong
Simplified bed stitch
3. Fold the fabric for the duvet cover in half, right side out and, starting from the corner, begin to sew a long side seam
We sew a duvet cover with our own hands: sew the side seam
At the beginning and end of each line, be sure to make “tacks”, passing the machine back and forth several times over the same place
4. Cut off the protruding threads
5. After this, we turn the future duvet cover inside out and make another seam, so that our first seam and the edges of the fabric are inside
Making the second line of the double seam
6. Determine the place where the zipper should be and fix it with pins, as in the photo. The front part of the zipper should be in contact with the front part of the zipper. And at the moment of sewing, the zipper should lie inside out.
We fasten the hidden zipper with studs
7. Sew the zipper with a horizontal seam, first to one and then to the second side of the future slot.
Sew a zipper to the duvet cover
Be sure to unzip the zipper a little before sewing it on, otherwise the duvet cover will be impossible to turn outward.
8. We sew the ends of the duvet cover with a regular stitch; a double stitch is not needed here, since there is a factory edge.
9. The duvet cover is ready.
Finished duvet cover with zipper
VIDEO: How to sew a duvet cover (part 1)?
VIDEO: How to sew a duvet cover (part 2)?
How to sew a pillowcase using a bed stitch?
1. Our pillowcase size is 50 by 70 cm. We take a piece of fabric intended for it, which is 73 cm wide and 143 cm long (with a seam allowance of 3 cm)
2. We make a hem seam on one side of the fabric, the length of which is 73 cm. This is necessary to trim the edge of the pillowcase flap
3. We bend the part intended to hold the pillow, and then fold the fabric in half, as shown in the photo below
We sew a pillowcase with our own hands
IMPORTANT: The width of the pillowcase valve can be from 15 to 30 cm, and the larger it is, the more securely it will hold the pillow
4. We sew the side edges of the pillowcase with a double seam: first we combine the parts so that they face us, and make a stitch near the very edge, then we turn the pillowcase inside out, straighten the corners well using scissors or another thin object, and make another stitch
How to sew a pillowcase: make the second line of the bed seam
5. The pillowcase is ready
Finished pillowcase
VIDEO: How to sew a pillowcase?
Let's start with the pillowcase
It won’t be too difficult to deal with a pillowcase. Make sure once again that its dimensions match the baby pillow and start sewing.
To do this, we need, by analogy with a duvet cover, to fold the fabric in half, mark the size of the pillow on the folded area, but there is no need to rush to cut anything yet. On the side of one free edge we need to leave a fabric about 20-30 cm long. In the future, this will be the valve of our pillow so that it does not fall out of the pillowcase and looks aesthetically pleasing.
We fold the cut material with the front side inward and the backside, respectively, outward, and leave our valve on the outside. We sew the edges of the future pillowcase and sew the edges of the flap separately, having previously folded them. Turn the pillowcase right side out, turn the valve the other way around, and tuck it in. Voila: the pillowcase is ready.
How to properly sew a sheet with an elastic band?
A sheet with an elastic band is convenient because it never moves or wrinkles, but it is a little more difficult to sew. The pattern will be something like this:
Fitted sheet pattern
Another difficulty is that fabric 2.2 meters wide is only enough for a one-and-a-half bed with a width of no more than 1.5 meters. If the bed is wider, then you need to look for a wider fabric. And the technology for sewing a sheet with an elastic band is as follows:
- We cut the fabric as in the diagram. Don't forget to leave 1 cm seam allowances (they are marked in green)
- Sew the corners of the sheet with a bed stitch
- We process the edge of the sheet: we make a wide seam in the hem (about 1.5 cm wide).
- We insert the elastic into the seam that has formed along the edge of the sheet. The elastic band is suitable for regular underwear, 0.7 cm thick. The length of the elastic band for the sheet is taken one meter less than the perimeter of the mattress
VIDEO: How to sew a baby sheet with an elastic band?
How to sew beautiful bed linen with lace?
There are usually no problems with sewing lace. The lace strips do not fall apart, and it is enough to secure them with a regular line stitch.
We sew a bed with lace
Using lace, you can decorate not only the edges, but also the middle of the duvet cover by purchasing a piece of guipure for this.
Bed with lace
Secret Advisers
I ’ll share two of my little secrets that extend the life of your duvet cover.
When sewing two parts of a duvet cover together from the end side, I do this:
- I place the stitch connecting the parts of the duvet cover on top, at a distance of 1.0 cm from the edge of the duvet cover. I do not bring the machine stitching to the corners of the duvet cover by 5-6 cm. Then: there are no difficulties due to the thickness of the seam when sewing, dust does not get into the corners when washing the product, it is easy to turn it inside out.
- At the end of the stitch, before the slot, I smoothly turn the stitch 90 degrees and secure the seam. With this method, there is no critical point for the fabric to tear when tucking the blanket.
How to sew baby bedding correctly?
Children's bedding is sewn using the same technology as bedding for adults: be sure to use linen seams, the sheet can be made with an elastic band, and the duvet cover with a hidden zipper.
INTERESTING: On sale there are special zippers for bed linen without “dogs”
Boy's bedding
Children's bedding with drawings should appeal to kids.
How to properly sew bedding for a newborn?
For a baby, it is better to choose a soft fleecy fabric, such as flannel. It is soft and feels warm to the touch, which means there will be less chance that the baby will cry when he is put into the crib. A bedding set for a newborn may include the following items:
- sheet with elastic band
- duvet cover
- pillowcase
A pillowcase, like a pillow, is not needed for a newborn, but the child will grow up quickly and it will come in handy later.
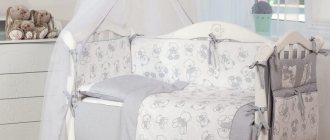
A sheet with an elastic band for a playpen
Children's bedding can be supplemented with bumpers made of the same fabric; this article is devoted to how to sew bumpers.
How to sew bedding for a newborn
We sew bumpers for the crib
This fabric device will help protect your baby from drafts, noise and impacts on the bed bars.
We will need a piece of cotton fabric, filler (sintepon, foam rubber).
To sew bumpers into a bed for a newborn, we will need fabric 550 cm long and 110 cm wide. The optimal thickness of the filler is about a centimeter. Before cutting out, wash the material, let it dry and iron it thoroughly.
We mark the material in accordance with the proposed pattern. Although, in fact, you can measure the crib and immediately mark the measurements taken on the material. We first measure the baby’s crib, because its size may be non-standard.
We sew, sewing in the frill at the same time. In this case, we leave one edge of the product unsewn. If desired, you can omit the frill. For the frill, choose a harmonizing color (you can use ribbon) or just take the leftover material for the frill.
Cutting out the filler
We mark the foam rubber (sintepon) with a felt-tip pen or pencil. We cut out the drawn pattern using scissors. Remember: the size of the filler should be slightly smaller than the fabric part, about half a centimeter on each side.
Filling the side
For the convenience of filling the headboard, you do not need to cut the foam rubber exactly to the size of the part; you can cut it vertically into two parts. This will make it easier to insert it into the side, but the cover will need an additional seam.
The sidewall, like the headboard, is best divided into two pieces. It is easier to insert the filling into the side through the bottom unsewn seam than through the narrow side seams. We sew up the bottom seam of the side.
Tip: To make it easier to use, it is better to stitch the bottom seam of the side panel on your hands. Such a seam is easier to rip open in order to change the filling or wash it.
We decorate the sides with ribbons. At the same time, such ribbons will act as ties that will attach the side panel to the rods. To make it easier to mark the places where the ribbons will be sewn, it is recommended to attach the part to the crib and mark these places with chalk. If the crib is not at hand, it is best to attach ribbons in the middle of the side and in the corners.
For convenience, you can sew a couple more separate halves, approximately equal to half of the large sidewall. Such pieces can be placed as a double headboard to create additional protection for a child's head or placed on the side of the crib. Alternatively, you can put them in the chest of drawers, and then use them for changing clothes or swaddling the baby in the crib.
How to sew beautiful bed linen: double and 1/5 bedroom set?
Before sewing bed linen, it is better to take measurements, because everyone’s mattresses, and especially blankets, are different. But for better guidance, we provide two diagrams that show how you can place a sheet, duvet cover and pillowcases on the fabric.
Patterns of single and double bed linen
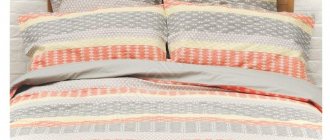
Sometimes, to make beautiful bed linen, fabrics with different patterns are combined.
Beautiful bed linen made of fabric with different patterns
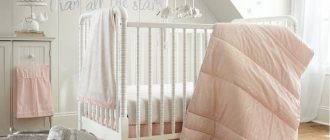
Thanks to the rich color, bed linen with a minimum of patterns can look beautiful and laconic.
Laconic double bed linen set
Floral fabric seems too simple, but it can look very formal.
Floral bed linen
Measure seven times, cut once
Now that we have the material, it would seem that we can start cutting and sewing, but first of all the fabric needs to be “decorated”. To put it simply, the material should be washed, allowed to dry and be sure to be ironed with a hot iron so that it shrinks before starting, and does not treacherously turn the entire sewn set into a small misunderstanding after the work has been done. When all this is done, you can start cutting.
Even if there is enough fabric, it would be more correct to place the bedding elements so that half of the material does not later go into the trash as scraps and awkward pieces. Therefore, the diagram below shows how convenient it is to cut out all the elements of bed linen on your material at once.
We draw the contours on the material with chalk, carefully measure everything with a ruler and cut it with scissors.
How to sew a beautiful Euro bed linen set?
Euro bedding sets include a wide sheet, so it is convenient to sew them from fabric no less than 260 cm wide. The pillows in such sets are rectangular in shape. Duvet covers can be sewn taking into account the size of the blanket, according to the diagram given at the beginning of the article.
Euro bedding set
Fabric with patterns that resemble paintings looks great, but it is easier to sew from fabric with small patterns, and such a bed sometimes looks no worse.
How to sew a Euro bed linen set
Sometimes a combination of plain fabric and fabric with a pattern looks beautiful.
We sew a bed from two types of fabric