Share on social media networks:
Different curtains are chosen for window frames. Recently, blinds have been considered fashionable, but roller blinds look much more attractive and more stylish. With their help you can adjust the lighting in the room. These curtains protect the room from the sun and give an original look to any room. Leroy Merlin sells a wide selection of unique products for different rooms. After purchasing, you need to assemble the roller blinds.
Step-by-step instructions for assembling roller blinds
You can assemble curtains directly on a windowsill or table without any special tools or equipment, but this process requires care and precision. The sequence of operations for the most common open roller blinds is as follows:
- combine the right mounting bracket and the shaft control mechanism into one unit, connecting the plastic parts until they click;
- perform a similar operation with the left bracket, paying attention to the convenience of the location of the chain mechanism (it can be located either to the right or to the left of the plane of the blade);
- connect the left and right units to the shaft (should fit into the shaft splines without effort);
- insert the guide rings for the fishing line into the ends of the weighting material that secures the lower edge of the canvas.
When assembled, the canvas is rolled into a roll.
The material used ranges from completely transparent to dense. Even a beginner can perform these simple operations and assemble the curtain. All that remains is to install it on the window.
The package includes the required components, fasteners and instructions with pictures.
Note! You can find out all the nuances of assembling a roller blind of a specific model by using the included step-by-step instructions or by reading the recommendations on the manufacturer’s website.
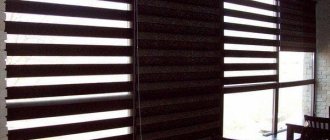
“Day and Night” or “Zebra”: characteristics
These new generation roller blinds provide good protection from sunlight. They combine the structure and design of both regular blinds and curtains. They consist of a double blade and are controlled using a chain mechanism.
The curtain fabric “Day-Night” is made of textile material combining transparent and opaque stripes
Suitable for plastic and wooden windows. The design of roller blinds “Day and Night” is similar to blinds with dark and light horizontal stripes, which are alternately connected to each other. They have a Teflon coating that protects the surface from the accumulation of dust and other deposits.
The dark stripes are made of dense, natural and synthetic polyester material. Light stripes are made from a plain mesh fabric with a matte, glitter or patterned finish.
For the Zebra roller blind, three options for its use are available - maximum darkening, partial darkening and full room illumination
The curtain is controlled using a chain mechanism. To dim the flow of light, you need to slightly move the stripes. If the dark stripes overlap the light ones, then the window will be completely closed.
How to clean roller blinds “Day and Night”
With regular care, the day night inspire roller blind retains its quality and presentation for many years. A regular dry cloth is suitable for cleaning dust.
Important! Do not use a vacuum cleaner, which can damage the material, pull in the chain mechanism and damage it. Detergents containing chlorine can negatively affect the color and structure of the material. A damp sponge is only suitable for cleaning greasy stains.
If stains cannot be cleaned “dry”, you can try wet cleaning with soapy water.
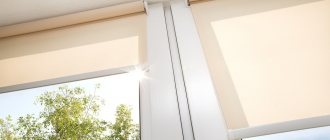
Installation of roller blinds on plastic windows
Installation of roller blinds on plastic windows is carried out using double-sided tape or self-tapping screws. In the first case, working surfaces should be thoroughly degreased.
Installation can be in the window opening, on the frame or simply on the sash. The last method is most often chosen.
In any instructions for installing roller blinds on plastic windows, the first and most important operation is marking the mounting points on the window frame. It is recommended to place the assembled curtain at the top of the frame and mark the location of the brackets with a pencil.
The installation process may vary slightly depending on the model.
All that remains is to fix the roller blind in the chosen place. For this:
- Brackets are attached to the frame (without drive mechanisms);
- drive mechanisms assembled with a shaft and a wound cloth are inserted into the brackets (until it clicks);
- Line tensioners are installed in the lower part of the frame;
- the upper ends of the fishing line are fixed in brackets, passed through rings on the weighting material and inserted into tensioners, forming guides for moving the web.
In the open position, the curtain fabric is wound onto the shaft; when closed, the curtain falls down thanks to the weight strip.
Sequencing
Roller blinds consist of many parts and you need to connect them correctly to hang the curtain. Some products are equipped with an additional fastening system used to open the window.
Step by step work process:
- First you need to assemble the bracket. To do this, you need to find the elements of its components.
- After this, you need to fix all the parts in the bracket until they click.
- Now apply double sided tape to the bracket area. When installing curtains with screw supports, this area is not covered.
- The fastener should be connected to the pads until it clicks if the device uses screws rather than tape.
- Now all that remains is to insert the shaft into the right bracket and secure the left one.
- Lower the roll and mark the location of the lock.
How to disassemble roller blinds
To completely disassemble the curtains, you need to loosen and pull out the guide line from the tensioners and disconnect the brackets from the frame by tearing them off the double-sided tape or unscrewing the screws. After dismantling, you can change individual curtain components or install a new structure.
It is recommended to attach the curtain to the sash based on the width of the material.
Note! Double-sided tape is used only once; to re-fix the brackets, you will have to completely remove the old tape and thoroughly degrease the surfaces to be joined. Repeated unscrewing of screws negatively affects the strength of the fastening.
When installing curtains on glazing beads, the length of the screw should not exceed the depth of the glazing bead, otherwise the glass unit may be damaged.
Appearance
Blackout plain curtains have even colors and light tones. Such canvases are suitable for any interior style and window size.
Roller blinds can be combined with regular curtains
The designer version has beautiful patterns or designs. Here you need to have experience and taste to choose the right curtains for a specific room design.
How to remove roller blinds from a plastic window for washing
In order to remove the fabric for washing, it is absolutely not necessary to completely dismantle and disassemble the curtain. It is enough to disconnect the guide line and pull out the drive mechanism along with the shaft and the curtain. To do this, you need to lightly press the screwdriver onto the latch, which ensures that the two parts snap together.
Roller blinds, often used in modern interior design, are easy to care for and use.
Note! After washing, the curtain should be lightly ironed, but under no circumstances should it be wrung out.
Eco-friendly solution from Inspire
The modern market is replete with manufacturers of roller blinds and the range of products is quite wide. The product of the Czech company Inspire deserves attention. The high price of this product is justified by the fact that the curtains are made from natural materials. Due to their environmental friendliness and decent quality, they are very popular among buyers around the world.
In the modern world, ecology plays an important role in the lives of each of us: Inspire took care of this aspect of our lives when creating its mini-curtains
The “Mini” series of blackout roller blinds is available in a wide variety of colors, so it’s easy to choose the right shade for a specific design. In addition, they stand out for their heat-resistant and light-proof qualities.
What are the mistakes when installing and assembling roller blinds?
One of the common mistakes when installing roller blinds is the discrepancy between the type of fastener and the actual load and temperature conditions. Therefore, it is recommended to use double tape only for fastening lightweight structures in rooms with relatively stable temperature and humidity.
Mini-curtains are usually installed directly on the window sash using double-sided tape.
The vast majority of curtains have all components made of plastic, not metal. Therefore, you should not make significant efforts when assembling the curtains. If the parts do not fit together, it is better to double-check that the installation is correct rather than try to connect them by force.
They are very convenient and suitable for decorating any windows.
Errors in marking the installation locations of the mounting brackets lead to the fact that the curtain does not completely cover the sash or window, which completely eliminates all its advantages.
The level of light transmission of the canvases is selected depending on the location of the windows in the room.
Method without drilling
If you need to install blinds without the risk of damage, you should use the installation method without drilling. This option is considered the most harmless. In addition, it is quite simple and accessible, with the result that literally anyone has the ability to overcome the work, and it does not take much time.
Installation without drilling is carried out using a special construction adhesive or tape. Today, dozens of similar substances are presented for sale, differing in their own cost and characteristics. You need to stop getting cheap compounds and choose the best and most reliable type, which guarantees reliable fixation.
When choosing between tape and glue, they operate on their own individual preferences. As practice demonstrates, both substances are optimal provided that a high-quality base is chosen, which will have excellent adhesive properties. Installation in this case can be carried out either on the plane of the wall, ceiling or on the frame.
The choice of method depends on your decision, and also on the originality of the assembly and installation of the device. In each case, strengthening the substance without drilling with the support of high-quality construction adhesive or double-sided adhesive tape is the easiest, most reliable and fastest method.
Installation of cassette structures
Cassette roller blinds with U-shaped guides merge with the window profile
Operating procedure
- Remove the curtain and accessories from the packaging.
- Degrease the glazing bead and profile using the alcohol wipes included in the kit or a rag soaked in alcohol.
- Remove the protective film from the U-shaped profile and, pressing firmly, glue it onto the vertical beads.
- Remove the back of the box from the protective film.
- Release 10–15 cm of fabric from the box.
- Bring the box to the upper profile of the frame, thread the ends of the plumb line into the guides.
- Glue the box to the frame.
- Remove the box from the glued fastening corners. Press the corners firmly against the profile for security.
- Place the box in place.
- Attach limiters to the chain to allow the curtain to fully open and close.
- Hang a decorative weight on the bottom loop of the chain.
Installing roller blinds yourself at home or in the office is not that difficult. It will be much more difficult to choose from a huge variety of fabrics suitable for the interior.
Larisa Chaika
Which folding mechanism to choose
Manufacturers of window accessories typically offer standard systems that include manual chain mechanisms, or more innovative automated systems. The latter are somewhat burdensome for the pocket, so there is a “Solomon solution” - semi-automatic roller shutters.
Gradually, a spring mechanism is gaining more and more popularity, which allows you to adjust the level of installation of the canvas with one pull. This system is especially suitable for families with small children because it does not expose them to the risk of injury from the sudden lowering of the roller shutter or chain. The “smart” system is characterized by ease of installation in two stages. Installation of a self-folding mechanism allows you to quickly open the window towards the light without causing any noise.
Installation of horizontal blinds in the overlay
We measure the width and height of the window opening; the blinds should exceed it in these indicators by at least 3 cm or more.
If the blinds are mounted on the ceiling, measure the distance from the ceiling to the window sill.
Read also: The soil in the greenhouse has turned green, what to do
If the window is flush with the wall, the handle may get in the way when opening, so you will have to use brackets. Make sure that they do not touch the mechanisms inside the cornice.
The tools you will need are a hammer drill or a drill and a screwdriver.
- We fix the brackets at the required height.
- Installing the cornice
- We mount the control handle.
- Checking the result
Special cases
Models of roller blinds differ from each other not only in color or material (fabric, non-woven), but also in design. There are also differences between windows - what to do if your case is non-standard?
What to do if the rolls have guides?
We have already described in detail about decorative models with guides in the “Installation with clips” section. Small narrow curtains, installed directly to the shutter, often have fishing lines along which they ride, as if on rails. The guides provide a tighter fit and prevent the curtains from sagging when necessary to open for ventilation.
There is nothing complicated in installing such a structure - a tensioner is attached to the bottom, a fishing line is inserted into it and tightened. The main thing is not to forget to thread all the necessary accessories into the fishing line before doing this.
Important! Tensioners are installed on opening windows using clips. For stationary ones, they are screwed on with self-tapping screws.
What about sliding windows?
There are 2 options for mounting on sliding double-glazed windows (these are often installed on balconies and loggias):
- Install in any way only on “outer” frames that do not fit under the rest.
- Mount to the wall above a window or ceiling in any desired location.