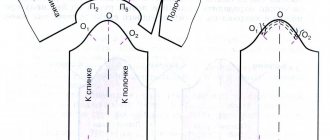
Before you start sewing any product, you should first take the necessary measurements and create a basic pattern.
The basic dress pattern that we will consider today can be used to model all kinds of dresses, blouses, jackets and even coats.
As an example, the calculation and construction of a basic dress pattern will be made on a figure with the following measurements:
| Dimensional sign | Designation | Size(cm) |
| Neck semicircle | SSH | 17,5 |
| Half chest girth first | SG1 | 44,5 |
| Half chest girth second | SG2 | 43 |
| Half chest girth third | SG3 | 42,5 |
| Waist semicircle | ST | 34 |
| Semicircle of hips | SB | 47 |
| Hips height | WB | 18 |
| Back Waist Length | DTS | 39,5 |
| Length of the product | Diz | 100 |
| Back width | Shs | 16,5 |
| Armhole height | VPr | 19 |
| Shoulder length | DPl | 12 |
| Back shoulder tilt | NPC | 40 |
| Chest height | VG | 25 |
| Chest width first | SHG1 | 18 |
| Chest width second | SHG2 | 16,5 |
| Distance between the centers of the mammary glands | RC | 9 |
| Dart solution level | URV | 7,5 |
| Shoulder tilt in front | NPP | 23,5 |
| Front Waist Length | Road accident | 43 |
The measurements taken from the figure are not yet the dimensions of the parts of the product, especially since they are taken the same way for all types of clothing. Therefore, when constructing a drawing of the base, in addition to the measurements taken, allowances for loose fit are taken into account, by which it is necessary to expand the details of the product in certain measurement areas.
The increase is not a constant value, it does not depend on the size of the figure and changes in accordance with the direction of fashion, the purpose of the clothing, the properties of the fabric, etc.
The increase provides freedom of breathing, movement or serves to create the silhouette of clothing.
A fitted (fitted) silhouette emphasizes the waistline, a straight silhouette hides the shape of the figure, a semi-fluttered silhouette slightly emphasizes them, a loose silhouette creates a flying shape, extended from the shoulder line or armhole, forming a tail.
Table of allowances for loose fit (SO)
| Silhouette | SG1 | Shs | SHG1 | ST | SB | VPr |
| Adjoined | 0,5-1 | 0,6-0,8 | 0 | 1-1,5 | 0,5-1 | 1,5 |
| Semi-adjacent | 1,5-2 | 0,8-1 | 0-0,3 | 2-3 | 1-1,5 | 2 |
| Straight | 2,5-3 | 1-1,5 | 0,5-0,8 | 4-5 | 2-3 | 2,5 |
| Free | 3,5 | 1,5-2 | 0,8-1,5 | by model | ||
Dresses with symmetrical and asymmetrical hemlines
The lower part of the product is designed with a uniform length for the front and back, but you can also make a spectacular asymmetrical hem. On the front side it will be shorter. In both cases, you should start from the base pattern, modeling the front and back. To get lush folds, you need to increase the angle of inclination when moving the parts apart on the back. The bottom must be rounded, and the armhole and neckline must be deepened (and on the front too).
When constructing the front, the chest dart is transferred to the waist. Its new position is determined so that the “triangle” is directed to the highest point of the chest. To create an additional flare, add 4 cm to the bottom of the front and back. The side lines are drawn in straight segments. The facing along the neckline and armholes is re-cut to a width of about 3 cm.
The model with an asymmetrical hemline is designed on the basis of the previous one.
- Extend the line on the side in front.
- Align the side lines along the front and back.
- Lengthen the back along the central axis.
- Tape the seams on the sides by 20-25 mm.
- Cut out two parts for the back and the front, where the fold is made (a one-piece facing along the neckline and armholes is done separately).
The front and front lengths on the finished product will differ by approximately 20 cm.
svyatayashop.com
Taking measurements
The basis of the dress is built once according to one’s own measurements, and then, using modeling, the detailed features of the product are created. A drawing of an accurate pattern will help emphasize the advantages of the figure and hide the flaws.
To create a basic design, it is necessary to remove a certain number of dimensional characteristics from the figure, using a measuring tape and mathematical calculations, convert them into segments of the required length, laying them down on the plane of the paper.
Required dimensional characteristics:
OG-chest girth. This measurement is taken along the convex areas of the front of the chest.- CG-center of the chest or 9SHG. This measurement is the length between the breasts, measured between.
- OT-waist circumference. The measuring tape is placed around the narrowest part of the body, above the hips.
- Hip circumference. Measurements are taken from the most convex places of the thigh, taking into account the sides and stomach.
- ШС-back width. Measure horizontally passing in the area of the shoulder blades.
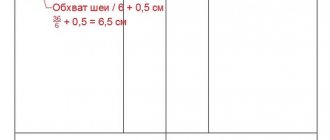
- OSH-neck girth. The circumference of the neck is measured where the tape passes along the jugular zone and spine.
- ШП - armhole width. The circumference of the arm along the edge of the shoulder along the armpit.
- DP - shoulder length. The size of the shoulder line itself, the size is counted from the neck to the end of the shoulder joint.
- DI is the length of the dress. Measured along the back, from the seventh cervical vertebra to the expected length of the product.
- DST - back length to waist. They change according to the DI principle, the end result is the waistline.
- DPT - front length to waist. The size indicator is taken from the junction of the shoulder and neck lines, along the protruding areas of the chest to the waist.
In order to clearly present the principle of constructing and carrying out calculations, we should consider an example with standard numbers.
In this case, the basic dimensional characteristics of women's size 48:
- OG=96.
- SG=48.
- CG=9.5.
- OT=76.
- ST=38.
- OB=106.
- SB=53.
- ShS=36.
- OR=36.
- ShP=12.5.
- DP=13.5.
- CI=110.
- DSt=38.
- DPt=43.
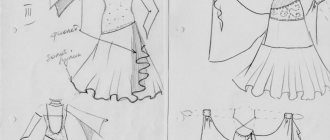
Modeling based on a basic pattern
The resulting dress, a sheath with a straight silhouette, can be transformed and modeled. A similar designation of points and details of how to make a pattern for beginners can be found in Muller’s method.
Almost all elements of the dress can be modeled, here are some of them:
- Front neckline, collar design.
- Converting undercuts into cut-off yokes, raised seams, undercuts.
- Width and length of the product at the bottom.
- Modeling the sleeves and armholes of the dress, determining the length and features.
- Fastener location (zipper, buttons, hooks).
If the basic pattern is created, then you can make any model of a blouse, sweater, jacket and even coat from it.
Only the allowances for freedom of fit change, which the craftsmen know and use in design. They are necessary to create maximum comfort when walking.