Required body measurements:
I'm giving my sizes as an example, you will have yours. Sometimes some calculations are more clear based on these dimensions.
- Half bust - Bust 77 cm/2 = 38.5 cm;
- Neck circumference - 36 cm;
- The length of the vest along the back, vertically from the base of the neck (from the seventh cervical vertebra) to the desired length is 47 cm;
- Length of the back to the waist, vertically from the seventh cervical vertebra to the waist - 35 cm;
- The depth of the neckline, in front vertically from the depression between the collarbones to the desired depth of the v-neck, is 9 cm;
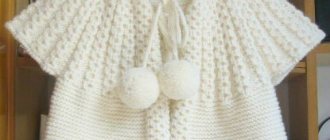
This is interesting: Pattern for children's vest (age from 2 to 6 years)
Knitting methods
Nowadays it’s easy to find various patterns and descriptions of sleeveless vests for girls with knitting needles - to do this, just go to the Internet and look at any thematic site. Nevertheless, there are several basic options for creating children's vests, which differ in the way they are knitted:
- Knitting a sleeveless vest with an openwork or relief pattern (most suitable for experienced needlewomen).
- Creating a product with dense satin stitch (suitable for beginner craftswomen).
- Creating a vest with added ornament.
- Using several types of knitting and different materials at the same time.
However, no matter what kind of sleeveless vest model you make, it is worth remembering that they all consist of at least two main parts - the front and back parts, which are connected at the end of the work. For beginner needlewomen, a simple knitting option that uses the purl and stockinette technique is best suited.
Drawing
RectangleWidth = Half bust plus an increase of 3-5 cm. Length = Measured length of the vest across the back. |
ArmholeI draw a vertical line through the middle of the rectangle. I set the depth of the armhole down from the top line. Armhole depth = Half bust / 3 + 6 cm. From the middle in both directions I set aside half the width of the armhole. Armhole width = Half bust / 4 + 2 cm. |
Neck and back shoulderFirst I draw the neck as usual. 1.5 cm sprout height, sprout width = neck circumference /6 + 0.5 cm I lower 2 cm along the armhole line and draw a line through this point from the top of the back neckline. Everyone’s shoulder slopes are different, so the 2 cm descent is the initial one; during the fitting, it can be adjusted by lowering or, conversely, raising the shoulder line. I lower the neck line by 2 cm - this will be the neck of the vest. I measure the length of the shoulder 6.5 cm. |
Neck and shelf shoulderFrom the right top of the rectangle I set aside the width of the neck of the shelf, the same as on the back. Vertical armhole down 2 cm. I connect the received dots. From the neckline point down the shoulder, 2 cm is the neckline point of the vest. From two further than 6.5 cm is the shoulder of the vest. I design the neckline. |
| Armhole line. |
ClaspThe extension beyond the middle of the shelf is 1.5 cm. The bottom can be customized as desired. |
DartsI draw the vertical lines of the darts through the middle of the front and back. I take the width of the darts as 1.5 cm, 7.5 mm in both directions. If necessary, you can narrow the side seam at the waist and widen it at the hips. Hemming and facing of the back neckline |
| Adding details The dart can be pulled out into the armhole. I take a point approximately in the middle of the armhole. I cut the pattern. When cutting, I don’t forget about the allowances. At the bottom I give an allowance of 3 cm, all the rest 1 cm. For fitting, you can take allowances of 2 - 2.5 cm. |
Good luck
You may also be interested
Final finishing
The vest is ready, now all that remains is to clean it of chalk lines, threads and iron it. Then we insert the cord into the hood and thread the end switches.
Executing the application
But that is not all! On the back I decided to make an interesting appliqué in the shape of a cat’s face. Such a small thing, but it’s already original and pleasing to the soul!
Building a pattern for a school vest
The vest pattern for girls was developed based on numerous requests from readers, especially for young schoolgirls. We publish a developed pattern for size 32, but using this technology it is very easy to model a vest for any size.
Building a basic pattern
To create a pattern, you need to take children's measurements
in our case we use a model with the following measures:
- Back length to waist – 28 cm
- Length of back to hips – about 38 cm
- Shoulder length – 10 cm
- Half neck circumference – 14 cm
- Half chest circumference – 32 cm
- Half waist circumference – 30 cm
- Armhole depth – 16.5 cm (How to measure the armhole depth, see paragraph 8)
Meshing
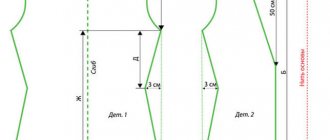
When constructing the pattern for the base of the vest, we will use the measurements that we took. From point A, set the length down to the hips according to the measurement, to the right - 1/2 of the chest circumference + 3 cm for a loose fit - point A1. From point A down, measure the length of your back to your waist, and draw a horizontal waist line.
From point A downwards, set the depth of the armhole according to the measurement, draw a horizontal line for the armhole. Divide AA1 in half and draw a vertical line from the division point (point G2) up and down.
Armhole width. Calculate the width of the armhole using the formula: 1/4 of the half-circumference of the chest according to the measurement plus 1 cm for all sizes = 32/4 + 1 = 9 cm. Set aside 4.5 cm to the right and left of point G2 - points G and G1 are obtained. From these points, raise perpendiculars upward - points P and P1 are obtained.
Back neckline. From point A to the right, set aside 5.2 cm (1/3 of the half-circumference of the neck according to the measurement + 0.5 cm) = 14/3 + 0.5 = 5.2 cm. Set aside 1.5 cm upward for all sizes. Using the pattern, draw the back neckline.
Shoulder line. From point P, set aside 1.5 cm downwards, and through this point draw a shoulder line as long as measured.
Back armhole cutout. Divide the PG into 3 equal parts, draw an armhole line along the pattern as shown in Fig. 1.
Front neckline. From point A1, set aside 2 cm upward - lifting the shelf. From point 2 down and to the left, set aside 5.2 cm (1/3 of the half-circumference of the neck according to the measurement +0.5 cm) = 14/3+0.5=5.2 cm. Draw the front neckline according to the pattern.
Front shoulder tilt. From point P1, put 1 cm down. Through point 1, draw a front shoulder line of length according to measurement.
Front armhole cutout. Divide P1G1 in half, draw the armhole line along the pattern as shown in Fig. 1.
The side line of the vest. Along the waistline to the right and left, set aside 1.5 cm - side darts. Draw new lines: front and back sides.
IMPORTANT! Check your waist circumference according to the drawing and measurements. According to the drawing, the waist circumference should be 1-2 cm larger.
Fig.1. Pattern-basis of a vest for a girl
Vest style modeling
Modeling of a vest style for a girl is given in Fig. 2. Pattern of a vest for a girl - modeling. If the difference between the chest and waist circumference is insignificant, do not make darts in raised seams(!).
Rice. 2. Pattern modeling
A vest for a girl is modeled according to the same principles as a vest for a boy. For a detailed description, see Pattern of a vest for a boy.
See also:
- School uniform pattern for a boy
- School uniform pattern for girls
- Boy's trouser pattern
- Pattern of a shirt for a boy
- Pattern for the base of a dress for a girl
Related materials:
How to calculate the number of loops
Despite the fact that knitting a vest for a girl is not as complicated a process as knitting a sweater or overalls, it is also important to take into account certain nuances. Before starting the process, it is very important to calculate the required number of loops to cast on. The fact is that if there are more loops than necessary, the sleeveless vest will turn out shapeless and will simply hang on the girl. And vice versa, if the loops are missing, then the item will turn out to be too tight and will not look good on the child.
Therefore, before starting work it is very important to make the correct calculations. Here you will need two main indicators:
- The child's chest circumference, where X cm is an unknown number that equals the chest circumference.
- The length of the product sample, knitted in advance, where N is a known number that is equal to the number of loops of the sleeveless shirt sample.
Since X is the desired number, it must be determined. To do this, the identity of the child’s chest circumference and the size of the previously knitted sample should be divided by the number of loops that were required to create the product sample. The result obtained will be the number of stitches that will need to be cast on in the process of knitting the vest.
It is very important to take into account one important point here: since vests are not knitted entirely, but in two separate parts, which then need to be combined into a single composition, the first number in the formula, denoted by the letter X, must first be divided in half.
Knitting the pattern is very important, as is adding 2-3 extra stitches from the front of the vest, since in little girls the chest size is always slightly wider than the back size. If you follow the rules for calculating the number of loops, you will be able to knit exactly the size of a sleeveless vest that will fit perfectly on your child.
Children's vest: choosing fabric
Before buying fabric, decide on the length of the vest, and then add 5 cm to it - this will be the amount of fabric you need for the front side and the same amount you need for the lining. Choose medium-density fabric for the vest: cotton, denim or corduroy, suit fabrics , fine wool. You can make a traditional lining from silk, viscose or satin, but you can also use the same type of fabric as the facing. Our example uses denim for the front and thick striped cotton for the lining.
Match the threads and buttons to the fabric you have already purchased. You can also sew a completely reversible vest - buy twice as many buttons (with holes, not on the leg!) and sew them in pairs from the front and back at the same time.
We used a T-shirt for the sample, but it can also be a shirt, as long as the item is the right size.
So, let's sew a children's vest!
Constructing a pattern
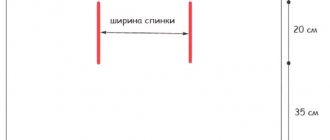
Lay out a sheet of paper on a flat surface. Place a T-shirt folded in half on it.
Trace the line of the armhole and neckline with a pencil, and also mark the vertical lines of the middle of the part and the side seam.
Take off your T-shirt. Measure the desired depth of the cutout and move the mark to the line of the middle of the part and connect it to the left extreme point of the shoulder. Draw the desired silhouette of the bottom of the vest at the required distance from the shoulder. Cut out the pattern, notching it so that it is convenient to mark the fabric for cutting out both the front and back.
Uncover
The sewing technology used in this master class requires a seam in the middle of the back in the lining fabric. A seam along the back on the front is optional, and you can cut out the back in one solid piece.
From the main fabric (for the front side):
- 2 back pieces; to cut out the second pattern, turn it over and mirror it.
- 2 front pieces (vest panels), to cut out the second pattern, turn it over and mirror it.
From lining fabric:
- 2 back pieces; to cut out the second pattern, turn it over and mirror it.
- 2 front pieces (vest panels), to cut out the second pattern, turn it over and mirror it.
Progress
- vest details
- buttons
- thread, pins and scissors
Sew the back pieces from the main fabric in the center. Sew the back pieces from the lining fabric - leave part of the seam open in the middle, about 10cm. Press seam allowances to the sides.
Fold the parts of the back and shelves from the main and lining fabric in pairs with the right side inward. Pin and stitch around the perimeter, leaving the side and shoulder seams open.
Cut the allowances at the armholes with scissors, 2-3mm short of the seam, cut the allowances at the corners at an angle.
Turn out the sides of the vest and iron them.
Insert the fronts into the open side seams of the back and match the shoulder and side seams.
Pin all layers together and sew shoulder and side seams.
Turn the vest inside out through the open area in the center seam of the back lining.
Iron the vest well.
Mark the location for the loops and sew them by hand or by machine. Sew buttons.
What you need for sewing
In order to sew a school or everyday vest for a girl with our own hands, we will need the following:
- fabric for the top and material for the lining;
- sewing machine;
- scissors for cutting;
- paper to make a pattern;
- threads, needles;
- buttons or other fasteners.
ADVICE . Don't forget about decorative elements. Rhinestones, buttons, stones, and appliqués work well.
Required materials and tools
To make a good and beautiful knitted children's vest for a girl, you should prepare in advance all the materials necessary for the work. Therefore, you need to make sure that you have the following tools at hand:
- Knitting needles. The size of the knitting needles depends on the exact thickness and density of the product you plan to create. It is best to purchase at least two sets of knitting needles of different diameters.
- To sew the resulting parts together, you will need a hook - they are the easiest to pull through loops. However, an ordinary thick needle may be suitable for these purposes.
- Yarn for knitting - this material is selected individually based on the preferences of the needlewoman. Yarn type and color can be completely different. However, if you plan to make a winter sleeveless vest, then it is best to purchase natural woolen threads, while for the summer version, lycra or acrylic are most suitable.
- You will definitely need sharp scissors to cut off the remaining threads.
- Measuring tape for measuring the dimensions of a product and taking measurements of a child.
Having prepared everything you need, you can begin to study the diagrams with a detailed description of the process of creating sleeveless vests for girls. In fact, there are a lot of options for creating a product. However, below will be presented the fastest and easiest ways to knit sleeveless vests.