What do you need to sew a fur coat with your own hands?
The main thing is the material for work:
- Natural fur can be purchased in specialized stores or from hunters in the form of individual skins. Working with this material requires certain specialized knowledge and is one of the most difficult areas in sewing.
- Faux fur can be found in almost any fabric store. Working with it is much easier than with its natural analogue. This material is much cheaper in price, and it is not so scary to spoil it; it is sold in the form of a single piece, like regular fabric.
- Old fur fabrics, for example in the form of a fur coat and vest, which can be converted into a new fur coat. In this case, you need to understand that if there are abrasions and unsightly places on the material, they will have to be removed.
- Lining material. Satin or satin is often used as a lining for a fur coat; they are usually inexpensive. The product is given a rich look due to its smooth shiny surface, and these materials are very wear-resistant and retain their shape well during use.
In addition to the material itself, to create a fur coat with your own hands you will need the following equipment:
- Tailor's sharpened scissors or furrier's knife, the second option is preferable when working with natural fur.
- Clothespins are also needed for working with natural fur.
- Hammer with a soft silicone head or wrapped in cloth.
- Chalk, soap or gel ballpoint pen in a bright color.
- Metal long ruler.
- Safety pins.
- Small nails (when working with natural fur).
- Tape measure.
- A punch for installing accessories and attachments for it.
- Furrier's needles for machines, having three edges or gypsy needles.
- Comb.
- Thimble.
- The fittings are decorative and functional.
This is interesting: Felt Mask Pattern
Materials for making crafts
There are so many handmade masterpieces out there, you never know what you might need for them. Pieces of leather from an old, unwanted bag can be used just as well as from gloves or high-top boots. Jewelry from past years will provide a variety of accessories: brooches, beads, rings and earrings, all of which will serve to create something new.
Typically, nylon ribbons, braid, lace, beads, beads, as well as decorative buttons and rhinestones are excellent for creating flowers.
All of the above is a small amount of materials that can be used in your needlework; you can use anything in your work, and most importantly, what you like.
Finding a template and taking measurements
The first step is to create a fur coat pattern made from natural fur. Or search for a pattern for a pattern in open sources, for example, in fashion magazines. In order for the pattern of a fur coat made of natural fur to be successful and the product to fit well, focus on the outerwear you already have, for example, a jacket or coat.
To ensure that your future fur coat suits your body type, find out the following parameters:
- chest height;
- waist and chest circumference;
- shoulder and back length.
There will be a table where you got the pattern from - choose the appropriate size. To cut out all the parts evenly, transfer them to paper. When you start cutting, do not forget to mark the places where joining and stitching will subsequently take place.
Leather processing
For relief on the petals, various options and instructions for making patterns on the skin are used.
The first option is cold stamping, a simpler method that is better suited for patterns around the edges of the element. The process involves extruding a design by cutting through a blank placed on it.
- What does a sword mean to a man?
A variety of engraver attachments for every taste and color
- A still life with roses will delight you longer than fresh flowers
The second option is hot stamping, it will require a number of dies, during which they will be exposed to high temperatures. The metal stamp is heated and pressed against the skin, thereby performing embossing.
How to connect fur parts? It's easy to do!
1) The stitch on a sewing machine (regular, not furrier’s) is laid in the direction of the pile (from top to bottom). Perpendicular to the stitching, the parts can be joined with long pins, manually, to avoid displacement.
2) If you plan to sew pieces with long pile, use scissors to tuck it inside. Then sew the parts to each other, and at the end, remove the lint from the front side with a darning needle and fluff the lint.
3) How are allowances processed? The pile on the allowances of the parts must be cut off; to do this, straighten the allowances in different directions. The edges of the lint-free allowances must be sewn to the product from the inside out using an over-the-edge seam. Processing the bottom of faux fur products can be done manually using cross stitches. There is no need to iron the folded bottom edge. It is better to process the edges of products made of thick, long-pile fur by machine - trim them with a facing made of lining material.
Ironing
It is better not to iron faux fur at all, but if ironing cannot be avoided, then do it correctly: only from the wrong side, with light pressure and on a soft backing, which can be an unnecessary piece of the same fur. And remember the main rule: before ironing faux fur, you must test it on an unnecessary piece of fur!
Fabrics with a fleecy surface: properties and care for them
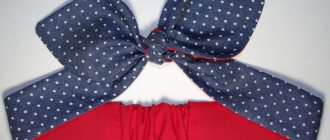
Fur coat Burda Style 12/2018 #108B, photo: VIC/UNSPLASH
We sew a short fur coat from faux fur
For sewing you need 2 meters of fur material (according to your taste and color) and the same amount of fabric for the lining. Main stages of work:
- We form a pattern and cut the fabric according to the design;
- We cut out two shelves, a back and sleeves;
- We connect the back and front shelves by forming a shoulder seam;
- We fix the sleeves with pins and carefully sew them in;
- We make side seams along the body and seams at the bottom of the sleeve;
- We duplicate the process with lining fabric;
- We sew the seams of the main and lining material around the neck, front and central parts of the fur coat;
Important ! At this stage, leave the lower part unstitched, then turn the fur coat inside out and finish the job.
- We sew the sleeves with an allowance of 2-2.5 cm;
- The fur coat is ready.
Attention ! If desired, you can install fittings at the stage of connecting the base material with the lining.
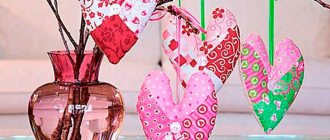
Flower made from natural materials
Leather is a very popular material that requires a careful and confident approach. Experienced needlewomen create romantic compositions from this material: roses, chrysanthemums, daisies and many other types. Such bouquets are complemented with patterns of ribbons made using the kanzashi technique, and sometimes from corrugated paper.
If this is your first time encountering something like this, then refer to the instructions on how to properly make the craft you have chosen.
The main process will be that it is necessary to cut out parts of the flower from leather, according to a pre-made or printed template, give them the desired shape, and also create stamens and other parts of the artificial flower. After becoming familiar with the process and trying everything out in practice, you will be able to master the technique of creating flowers of varying complexity.
Pattern of a fur coat with a stand-up collar
The model is of medium length, slightly widened towards the bottom. Both natural and faux fur can be used for sewing. In total, you need about 2.5 meters of base and lining material, fittings, and decorative elements (if desired).
Attention ! All parts of the top must have the same pile direction. Paired parts should mirror the pattern. When working with faux fur, we cut only the woven part; when working with natural fur, we cut the inner part. We don't touch the pile.
Main stages of work:
- Cut out 2 shelves, back, collar, 2 sleeve parts;
- Duplicate the details for selection. In this case, the length of the hem at the bottom increases by 6-10 cm;
- According to the markings, cut the shelves into 2 parts. The upper part is cut separately;
Important ! Pay attention to the allowances: shoulder, side, vertical seams of the sleeve, at the stand - 1 cm, at the bottom of the sleeve and fur coat - 4 cm.
- The layout of the patterns when working with faux fur is slightly different.
- We connect the upper shoulder seam: the shelves and the back of the back;
- We sew in the sleeves and sew the remaining parts;
- We form the lining according to the pattern;
- We connect the parts, install the fittings, turn the fur coat inside out and sew the bottom.
This is interesting: Pattern of a fur coat or fur coat
LiveInternetLiveInternet
What a variety of faux fur there is now! You walk into a fabric store and your eyes widen.
Here you can find imitation of expensive natural fur of mink, raccoon, marten, muskrat, fox and even monkey, or smooth-haired fur for foal, calf, seal, etc.
Faux fur is dyed or stuffed onto the surface of the pile to look like leopard, tiger, lynx, and various types of haircuts are used.
Well, how can you resist making yourself something made of faux fur ? I couldn’t pass by, especially since clothes, even if made from artificial fur, are in fashion now.
I’ll soon show you and tell you about some new things, so I recommend subscribing to blog updates here so you don’t miss anything interesting.
By the way, the New Year holidays are approaching, which means that many mothers will be puzzled about how and what to make a carnival costume from ? If your costume involves imitation of a forest animal or a domestic cat, then you will not find better artificial fur for sewing a carnival costume of this kind.
First, let's get acquainted with some rules for cutting, sewing and caring for faux fur, and only after that let's start sewing the product, be it a fur vest or a cape for a carnival costume .
Faux fur consists of a base (ground) and a brushed cut. There are : woven, knitted, stitched, glued fur and fur obtained by gluing fibers in an electrostatic field.
Based on the length of the pile, they are classified into long-pile, short-pile and medium-length pile.
Disadvantages of artificial fur: electrification, reduced hygroscopicity and vapor permeability, the pile has a tendency to roll, artificial fur is inferior in heat protection to natural fur.
Advantages: cost-effectiveness, lightness, ease of care, breathable base, one-piece fabric, variety of textures and colors, relevance for different ages. An undeniable plus in favor of the “Greens” is that no living creature suffers during the production of artificial fur!
Cut out the faux fur.
Choose the simplest pattern Cutting faux fur must be done in accordance with the direction of the pile! And this is understandable - if you suddenly! cut the part against the pile, then when stitching it will immediately attract attention by the damaged appearance of the product.
If in long-haired fur the direction of the pile is determined visually , that is, you can immediately see where the fur fibers are directed, then in short-haired fur you can determine the direction of the pile by running your fingertips along the surface of the faux fur - the pile lies smoothly in the direction of the pile .
The pile of the finished product should be directed from top to bottom, although there may be exceptions - it's up to you to decide.
Cutting fur with short pile can be done in two layers, carefully pinning the paper patterns.
Cut fur with long pile The ideal option is when you have two paired pattern pieces - 2 front pieces, 2 sleeves, etc., so as not to accidentally get confused and cut out two identical pieces (for example, 2 left shelves). And it’s more convenient to regulate the layout of the patterns, which is best done before purchasing fur in order to calculate the consumption.
Cutting can be done with a thin blade (razor), a special leather knife, a stationery knife or the tips of scissors with sharp blades, cutting only the base and carefully moving the cut edges apart.
To prevent fur fluffs from scattering throughout the room, you can immediately remove them with a damp cloth or vacuum cleaner.
Tip: when working with faux fur, you may need a respirator, because lint has the treacherous ability to fly into all the wrong places.
Marking.
Markings on the base of the faux fur can be done with tailor's chalk, a soft pencil (be careful with bright colors!), or my favorite method - soap.
Depending on the substrate, transfer the markings using traditional methods (using carbon paper, but not with a serrated roller, a carbon snare, or slapping). Or cut out the product at once with allowances of the same width.
Ironing.
Faux fur can be ironed, but carefully, only from the wrong side!
From experience, I will say that it is better to do this on a soft substrate, using an iron with a steam humidifier ( be sure to check on an unnecessary piece, it happens that under the influence of steam and heat, the woven base shrinks or becomes deformed, then you need to discard the steam! ), Is the heating medium? even less.
Sewing.
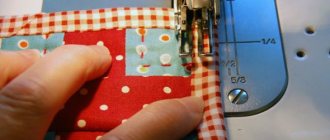
Sew in the direction of the pile, avoiding misalignment of parts. To do this, cleave them with long (up to 48 mm) pins, inserting the pins perpendicular to the seam.
Before work, adjust the thread tension of the sewing machine (gradually loosen the presser foot and thread tension until the stitching becomes uniform), insert a needle No. 75 - 100 (depending on the thickness and quality of the fur) and suitable threads.
It is better to use universal polyester or cotton polyester. And for finishing stitching and buttonhole sewing - flexible or universal finishing thread in two folds. Sewing density: approximately 10 - 12 stitches per 2.5 cm
Before connecting the parts , tuck the lint inside the parts, avoiding any protruding lint.
Faux fur parts can be joined using the usual types of seams (stitched, patched, butt), depending on the thickness of the fur, the length of the pile, as well as the load that the seams carry when wearing clothes.
The stitch stitch is suitable for sewing short fur. It can also be used for other fur, after trimming off the excess lint from the seam allowances.
The butt seam is used more often for sewing long faux fur on a knitted base. Such a seam does not create thickness and is not visible from the front side, since it is completely covered with fur.
Butt stitching or even using a simple overlocker, you can sew seams that do not bear much stress when worn (for example, the middle seam of a collar).
There are many different options for processing faux fur , for example, if the base of the fur is made to look like suede or leather, then you can sew the parts with the seam facing out, leaving seam allowances with open cuts.
The edges of such a product can also be processed in the following way: by peeling off the “suede” from the fur by about 10-15 mm, cutting off the fur, tucking it in and stitching the “suede”.
You can process the sections of the bottom, neckline and armholes with edging, or you can leave them unprocessed at all, it all depends on the quality of the fur (flowability, appearance, base) and your desire.
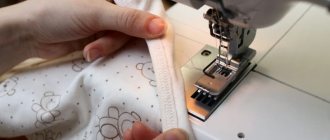
After joining , remove any lint caught in the seam using the blunt end of a needle or by gently combing the seam from the right side (you can use a fine-tooth comb or even a dog comb).
Loops.
On products made from short-haired fur, you can make slotted loops, but for long-haired fur it is better to abandon them in favor of hinged loops, hooks or buttons.
Caring for faux fur products.
Nowadays, faux fur undergoes such careful processing that it can even be washed. But…
Under no circumstances should it be exposed to high temperatures! And, of course, you need to pre-wash the unnecessary piece of fur before the “main” wash.
If possible, it is better to dry clean faux fur products, especially long-pile fur.
Well, we sorted it out a little, right? In fact, sewing faux fur products is not as difficult as it seems at first glance; when you try, you will understand it.
But you still need to know the basic techniques and methods of cutting, sewing and caring for faux fur
Soon I will share with you information on the practical application of these recommendations, stay tuned for the releases!
With wishes of good luck, Elena Krasovskaya! https://shjem-krasivo.ru/
About the technology of sewing a fur coat or sheepskin coat using a pattern
Sewing fur products begins with preparing the pattern. For sewing, you can use a ready-made pattern for a fur coat or sheepskin coat, or you can borrow a drawing from the Internet. But it’s not difficult to make a pattern yourself.
Basic Rules:
- Each cut piece must match in the direction of the pile.
- Parts of each part must be mirrored;
- Symmetrical design in detail is required;
- Only the base of the fur is subject to cutting (the pile is not cut).
Cutting a fur coat begins with modeling the back (1 part) and the shelves (2 parts). A sleeve pattern is created (they can be single-seam, straight or flared). And then the collar or hood is cut out. A collar pattern, for example, for a mink coat is not difficult to construct. The hood will require diligence.
You may be interested in this: Patterning and sewing beautiful clothes for small dogs
About sewing a children's fur coat
The material from which fur coats for children are made is inexpensive fur, in the shape of a rabbit, squirrel or cowtail. Sewing a small fur coat is not a painstaking and time-consuming process. Of course, there are features. For example, the width of the sleeves - they should be tailored taking into account the child’s mobility. But the width is normal, not “flying”, so that the baby does not freeze. The length is also averaged.
The pattern is initially made from thick fabric and is pre-basted. The “preliminary model” is tried on the child. And only taking into account the shortcomings and their corrections can the pattern be transferred to fur fabric. It should be noted that higher quality fur is used to sew sleeves and collars. Seam allowance is allowed at least 0.4 mm. You should leave up to 2-3 cm for the hem. Next, the process of sewing the product, which includes:
- sewing fasteners;
- stitching of side seams;
- lining hem;
- sewing shoulder seams;
- sewing on the finished collar;
- sewing in sleeves (together with lining).
A wonderful fur coat for the baby is ready. It's safe to say that your baby will be warm in winter.
How to calculate the required footage for sewing the desired fur coat?
In order to calculate the correct footage for sewing a fur coat, you need to take into account several parameters:
1. Product length. Determined from the top point of the shoulder to the desired length of the product.
2. Sleeve length. Determined from the shoulder point to the desired sleeve length.
3. Product type. If the fur coat is supposed to have a straight or slightly flared silhouette, then with the width of the fur fabric (147-150 cm) from size 42-48, one length of the product will be sufficient. If the size is more than 50 and above, you will need two lengths of the product. Also, if the fur coat is supposed to have a very flared silhouette or a wrap, then in this case, two lengths of the product will be required for any size.
4. The presence of such structural details as a collar, hood, belt will also require additional footage of fur fabric. Approximately from 0.5 m-0.8 m, taking into account individual wishes for the proportions of the parts themselves. Fur coats are rarely trimmed. More often, the lining with or without insulation is cut out right to the edge of the side, and the fur is tucked in. Less common is a narrow brim, for example, made of suede. If the lining is made of the main fabric, then it is better that it is one-piece - there are fewer seams. Details such as patch pockets usually do not require additional footage, since they can be cut out from the lunges during the general cutting of the product.
5. Allowances for processing seams, shrinkage of the fabric (in the case of a knitted base). Approximately from 10-20 cm.
6. Combination of fur. If some parts of the product are supposed to be made from different types of fur, then the footage for each part is calculated separately. When calculating, the height of the part is usually taken.
What related materials will also need to be included when sewing a fur coat:
1. Lining fabric. The required yardage of lining fabric requires only two values: product length + sleeve length. Recommendation: for the most comfortable wearing of a fur coat, it is recommended to choose lining fabrics with 100% viscose content (twill). It is better not to use a synthetic composition to avoid the formation of a static discharge.
2. Insulating material (if you want to further insulate your fur coat). You can buy special insulation for eco-fur coats from us: Insulation
Recommendation: any insulation with windproof impregnation insulates the product without giving it additional volume. You can also use an insulating lining made of 100% wool. For example, soft woolen knitwear or soft cloth are perfect as a warm lining.
3. Accessories. The choice of buttons, hooks and other decorative details is an individual choice and has no special recommendations.
Preparing the skins
This is perhaps the most important stage in cutting a fur coat from natural fur. Its further quality directly depends on the preparation of materials. Be as careful as possible.
Cut the skin using a furrier's knife. Try not to damage the pile. Carefully get rid of everything unnecessary: head, paws and tail. Then the defective areas of the flesh and pile are eliminated. Leave two to four centimeters as reserve for the hem areas.
The skins are laid skin side down for about an hour. Before this, they are carefully moistened so that water does not get on the fur. Next, they are turned over, stretched flat, and the edges are secured with thin nails or staples.
After the skins have dried, they are placed on the pattern. All fibers should be directed in one direction, and fur shades should be combined with each other. The skins are pricked and then the excess is cut off from the skin.
Creating an artificial flower
Most often, it will be more convenient to refer to a ready-made master class on how to make a leather craft.
To perform the technique you will need:
- A stationery knife, its ability to quickly replace a dull blade is perfect for working with leather;
- A wide metal ruler, it will be most convenient to use, and most importantly safer;
- A support on which to cut the leather, such as a cutting board;
- Scissors, it is best to use tailor's scissors that cut leather;
- French knife, it is used to thin the skin, this process is called cheffing;
- Bulbs, with their use, will be given a three-dimensional shape and wavy lines will be created;
- Punch-tubes and hole-punch-tongs, thanks to them, holes are made along the edges and in the central part of the elements of the future flower.
How to choose a quality case
Covers made of cotton, velvet and spunbond
The first thing you should pay attention to is the size. The fur coat should be placed freely in it, without folds or bends of the fur. See how the side insert is made. The longer the fur, the wider it should be. The length should also correspond to the length of the fur item and even slightly exceed it. There should be 10 to 15 cm of free space at the bottom, so it is better to purchase a long cover. Standard length available:
Read more: DIY chair headrest
It is important that the anti-moth cover is made from natural fabric. Give preference to cotton or linen. They will provide maximum air access, but at the same time the fabrics are dense enough to make the product dense and durable. Sometimes non-woven polypropylene material is used, which also allows free air circulation. The classic color is black or brown, for white fur – blue.
The zipper must be sewn along the entire length. Manufacturers of cases provide special reinforcement to provide protection against ruptures, which most often occur in the lightning area.