We sew the placket of a shirt or blouse. Detailed photo-MK.
We sew the placket of a shirt or blouse. Detailed photo-MK.
SOURCE
Men's shirts, like women's blouses, are made with one-piece or sewn-on panels. How to sew such a strip correctly? It's quite simple. The width of the plank is usually about 3cm when finished and is not reinforced with adhesive pads or thermal fabric. However, if the material is very thin - chiffon, stretch chiffon, organza, etc., in order to make loops easier, it is recommended to reinforce the bar with a special thermal fabric for thin materials. This thermal fabric usually comes in two colors - light beige and black, is easy to glue and is practically invisible through the transparent thin fabric. In this post you will find two options for sewing trims: cut-off and one-piece. 1. How to sew a cut-off shirt placket The width of the finished placket is 3cm, therefore, you need to cut out 2 pieces of the placket, each of which is 6cm wide and a length equal to the length of the blouse from the neckline to the bottom (in the middle of the front). Allowances on the longitudinal sides of the plank are 1 cm. Description of work: Pin and stitch the shoulder sections of the shirt. Fold and baste the shoulder seam allowances of the shirt. Topstitch the shoulder seam allowances of the shirt to the edge. This is what the finished shoulder seam looks like with the seam allowances processed (wrong side of the shirt). Fold the cutting strip of the shirt in half with the wrong side inward and iron it. Place a basting along the fold using contrasting threads (the fold of the shirt placket). Place the shirt placket with the right side on the front side of the shirt, align the edges and baste along the allowances, stitch. Remove the basting and iron the allowances onto the shirt placket. Fold and baste the open edge of the plank as shown in the photo. Turn the shirt placket along the fold to the wrong side and baste. Make sure that the strip covers the seam made earlier. The seam remains inside the strip and is not visible. Sew the placket according to the basting from the front side of the shirt to the edge, at the same time attaching the folded edge of the shirt placket to the wrong side. Topstitch the shirt placket along the outside in the same way. After the shirt strips are ready, you can begin making the stand-up collar. Read how to make a stand-up collar here. 2. How to sew a one-piece placket A one-piece shirt placket is cut out together with the middle front, adding 4.5 cm to it per placket. Description of work: Fold the one-piece blouse placket along the intended line, tucking in the blouse placket allowance, baste from the wrong side along the placket allowance, and stitch. Sew the placket from the middle of the product close to the seam. Then start making the collar.
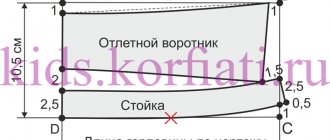
Clasp bar
PATTERN AND CUTTING Lay out the front pattern with a fold on the work surface on a sheet of paper. Along the fold line, draw a strip of strip 3-4 cm wide (in finished form); when cut from fabric, the strip will be 6-8 cm wide, respectively. Mark the places for loops and buttons on the fastener strip at the required intervals. For 5 buttons, place the top mark 1 cm below the neckline, the bottom mark 11 cm above the bottom edge. Measure the distance between the top and bottom marks, divide the resulting value by 5. Measure 5 segments and place marks. Also place alignment marks on the corner of the neck of the front and the front edge of the front, on the fastener bar - on the corner of the neck and the edge of the stitching to the front. For us, these are marks No. 4. When cutting along the fold of the front, as well as along one of the sides of the placket, add a seam allowance of 1.5 cm. Do not forget also about the neck and hem allowances on the shelves and on the fastener placket according to the sewing instructions.
You need to cut out 2 parts of the shelf and 2 parts with the fold of the fastener bar. Place the fastener strip pattern on the fabric with the same thread direction as the shelves - along the edge of the fabric. GASKET Half of each fastener bar (lengthwise) must be reinforced with a gasket.
Fold the gasket in half with the adhesive side facing inward. Fold the cut fastener strips along the fold line with the right side inward, pin them together, and attach them to the gasket. On the gasket around the part along all cuts, except for the fold, mark allowances 1.5 cm wide. Cut out one piece of the gasket and cut it exactly in half lengthwise. Iron the spacer to the wrong side half the width of the fabric fastener bar.
SEWING
Pin each strap of the fastener and stitch it to the front, right side to right side, the allowances on the short sections of the strap protrude beyond the neck and bottom edge of the blouse. Sew the bar. Press the seam allowances onto the placket. Iron the seam allowance along the other longitudinal section of the strip to the wrong side. Fold the plank along the fold line with the right side facing inward. Sew short sections at the ends of the plank. Cut the seam allowances close to the seams. Turn the bar inside out and iron it. Pin the inner half of the strip over the topstitch seam. Sew the strip along the contour to the edge.
Loops and buttons On the right fastener bar, use “magic” tailor’s chalk to mark the loops, as on a pattern. Sew over the loops. Sew buttons to the left placket according to the loops.
Ready! Using the blouson pattern (top, T-shirt, T-shirt) you have sewn a classic and always relevant blouse.
Photo: Stefan Denk.
LiveInternetLiveInternet
I receive many letters with questions about the technology of sewing certain elements of doll clothes. And finally I decided that it would be easier to make a post on this topic than to explain everything anew every time. I will do similar MKs as needed. Write if you are interested in MK on specific issues, what you would like to learn to sew. Today we will make a fastener for a polo shirt. Such strips are also typical for the Russian kosovorotka (only shifted relative to class=”aligncenter” width=”1600″ height=”1200″[/img]
On the wrong side of the shelf, mark the middle:
Glue the intended place with a strip of serpyanka (dublirin, non-woven fabric) with a width slightly larger than the width of the strap and a length slightly longer than the expected length of the fastener. Make markings: center of the fastener, width and length.
Fold two strips of fabric for the strip (6 cm wide) in half lengthwise and glue one side with sickle tape. If the fabric is very thin, then you can glue both strips entirely.
Why is the width of the strip part 6 cm: (2 cm - width of the strip + 1 cm for the seam) x 2, i.e. ironed in half - 3 cm.
Iron the strips in half:
Place the slats, cut side down, on the front of the shelf, exactly in the center. Baste or pin with pins (I always stick the pins perpendicular to the future stitch, so that the needle does not break when working on the machine, and I stitch directly along the pins). Please note: the straps protrude slightly beyond the edge of the neckline, this is important because... when you turn them inside out, you can trim them as you need.
We will sew the line along the wrong side of the marked side.
IMPORTANT:
The beauty and accuracy of your fastener depends on this stage. End the stitch exactly on the transverse marking line.
How to make markings: the finished width of the plank will be 2 cm, which means there should be exactly 2 cm between the vertical marking lines! Choose the length based on how many buttons you plan to fasten your shirt with and the frequency of button placement.
From the wrong side, very carefully cut the shelf piece along the center line, without reaching the end like this. Carefully! Do not damage the plank parts!
Turn the stitched parts inside out. If you did everything correctly it should look like this (face):
Did you notice? The plank fit exactly the width. Check which side your fastener is on (men's or women's shirt); if you make a mistake, simply swap the position of the straps. This can only be done now! I have a shirt for a doll - men, so everything is correct - on the right side.
Turn it to the wrong side again:
Now we need to secure the ends of the planks. We bend the strips like this and see a triangle:
Let's add a line:
Let's see. If everything is in order, we overcast the strips, stitch around the perimeter and cut to the shape of the neck:
All we have to do is mark the loops, baste them and sew on the buttons.
IMPORTANT:
The hinges on the slats
always
vertical!
Ready! I hope everything was clear. If you have questions, ask, I will answer. Thanks to everyone who had the patience to get to the end.

We kindly request: when copying materials, a link to my authorship is required!
We are expanding our collection of buttons on shirts. Today – a placket fastener on a polo shirt with a slit, stitched from the inside out.
From the front side we see only the cut. A very nice version of polo and very easy to do.
You need to process the fastener at the very first stage of sewing, because it will be convenient to process the knot this way. Determine the length of the future cut, for example, 15 cm.
what we need additionally:
- blank for the strip 10 cm wide, length equal to the length of the cut plus 3 cm.
- strip of non-woven fabric for duplicating the strap 3 cm * strap length
The execution is really simple, easier than a regular plank. But be prepared to do everything very carefully!
I mark the line of the middle front of the shirt. Let's agree that we make the clasp on the “female” side. If you need a men's shirt, then do the layout in a mirror way.
So, the line of the middle of the shelf is a red mark. The next mark is 3 cm to the right on the front side. This is our future cut for the bar.
I prefer to protect the cuts from falling off and reinforce the place of the future cut with a thin strip of dublerin (4mm) - from the inside out, of course.
Now let’s align the plank “face to face” with the shelf along the cut lines (red basting).
If you are doing the female version of the fastener, then do this. as shown in the diagram: to the left of the cut is 3.5 cm, to the right is 6.5 cm of the width of the strip. if male, then vice versa.
Dear blog readers! I apologize because I completed the master class and mixed up the layout order. Remember: on the left is the narrow part of the bar. and on the right it is wide. That's right!
Otherwise, the operation is performed in full accordance with this master class.
Now we will make two parallel lines along the future cut: the first line with a stitch width of no more than 1.5 mm, to the end of the cut, corner, raise the foot and unroll the sewing. Sew a second stitch to the top of the fastener. The width between lines is no more than 3-4 mm.
Let's make a cut between the lines, not reaching 1 mm from the corner.
Next we work on the wrong side of the shelf.
Sweep and iron the narrow side of the strip along the cut. Turn up the seam allowance by 0.5 cm.
The width of the finished plank in this situation is about 2.8 -2.9 mm.
Sew the folded seam allowance from the wrong side to the level of the end of the fastener. Not completely, because we still have to turn the bar.
Now let's design the second part of the plank. Let's turn it in 2.8-2.9 cm (the width of the first plank). Let's form the bar and turn up the seam allowance.
It is worth basting the allowance so that the wrong side of the strip protrudes 1 mm above the outside. The fingers feel it well.
Now let’s sew the seam allowance on the front side.
All we have to do is tuck the tail of the strip on the wrong side, baste for neatness and stitch. The operation is completed.
Here is an example of making a fastener on a shirt dress. Of course, I didn’t mix up the layout and did the fastening correctly. I wish the same for you!The dress was made as part of the new online course Dress. I invite everyone who wants to sew cool dresses to my course.