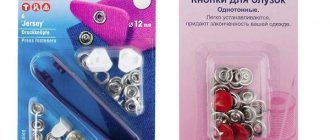
One of the decorations in clothes is beautiful accessories. These are various eyelets, blocks, buttons, zippers, etc. They not only visually decorate the product, but also have a functional meaning. Sometimes people encounter problems when the button has torn through the fabric and fallen out or stopped fastening. There is a question about replacing it. You can always go to a workshop or atelier, where, using special equipment, professionals will replace the broken part. It's easier, but also more expensive, and it will take some time.
If you don’t have time to run around the studio and look for a master with the necessary tools, then you can try to perform the process at home. But here, too, not everything is so simple. At home, installing buttons on clothes yourself can end in disaster, because this task requires training and skills. Strong physical effort can damage both the fabric and the fittings themselves.
In the article we will look at how to install a button on clothing, what needs to be prepared for this process, and how to perform this operation step by step. We will also give advice to novice seamstresses who want to use buttons in their work, and we will recommend equipment to make their work easier.
Types of buttons
First, let's look at what types of buttons there are. Indeed, depending on the fittings, various methods of its installation are provided.
- The O-shaped (or ring) button, as the name implies, has the shape of a ring.
- S-shaped (aka “Alpha”) are spring-type buttons. They come either sewn on or with tubes for fastening.
- Shirt. It consists not of one pin, but of several spikes. Such buttons are attached to thin fabrics or knitted and knitted items. Often used for children's things.
- Magnetic. This is a self-fastening fitting with magnetic fixation. You can often find such buttons on wallets and bags.
- Koburnaya. In this case, when installing the button on clothing, a screw design of two elements is used. It is screwed into leather jackets, bags, belts with a screwdriver, and is also used in a holster (hence its name).
- Klyamernaya or block. The lid has a ring fastening. If the button is fastened, you can see the second side fastener in the center.
Types of buttons
To install a rivet in a denim product, first of all, it is worth determining its type and diameter. Today there are several options for accessories for such clothing. When choosing it, you should take into account the size of the existing loop.
Buttons are different. It all depends on the type of fastening and the stud on which the button stands. The optimal solution for everyday wear is a button with an aluminum shank. This metal is durable and resistant. It is much easier to work with than steel products.
With round cut
A common option is buttons, complemented by a round notch.
All metal with smooth base
Often there are all-metal buttons that have a smooth base.
Smooth metal hollow inside
Another popular option is a smooth rod. It is often left empty.
Why do you need a punch?
This is a necessary item when installing a button on clothing. Even if you are not a professional seamstress, but simply decided to change the button on things yourself, you still need to purchase a punch or at least find a replacement for it. It is used to make a neat hole in the fabric. If you pick at it with scissors, it will just be an uneven hole, over time it will stretch and the button will fly out. Using a punch, this can be done, firstly, quickly and accurately, and secondly, in a minimal size. The pin of the button should be pulled firmly onto the fabric.
If the fabric has split edges, then the hole made by the punch must be lubricated with glue, then the edges will not crumble and the button will be firmly fixed in the hole. You can use adhesive fabric.
If you decide to take up sewing professionally, then it won’t hurt you to purchase a device for installing buttons on clothes, as in the photo above. This 11-piece set consists of a base plate and various sized punches. This purchase will significantly speed up the process of installing buttons on clothes at home. If you have a one-time installation job, then instead of a punch you can use a steel knitting needle. If the fabric is split or knitted, then the knitting needle needs to be heated over a fire.
How to remove a broken button
It happens that during wearing, the installed product breaks along with the clothes: how to remove the button in this case is discussed below:
- First you need to prepare the tools: you will need a straight screwdriver, pliers, an awl, a file and a chisel;
- Before removing the fittings, it is necessary to grind off the head of the rivet with a file;
- Care must be taken during the procedure to prevent damage to fingers and clothing;
- Having dealt with the head, you need to bend the metal teeth and pull out the rod.
Now, knowing all the nuances of installing accessories on clothes - how to install a rivet and how to remove it - you can safely go shopping for a variety of buttons, blocks and eyelets to add beautiful decorative elements to your wardrobe.
Cutting the button using scissors
Rules for removing a button
Step-by-step instruction
After a punch has made a neat hole in the marked area, the button is threaded through. A fixation ring is placed on top. Be sure to check that it is positioned away from you along the convex edge of the button.
Then you need to place the product on a dense surface. This could be a wooden block or a rubber gasket. Do not use a metal base, as it can deform the surface of the button when struck by a punch. And this doesn’t suit us at all.
The punch is inserted into the leg of the button and, by pressing, it is divided into parts (usually four). They should lie on the fixation ring. All that remains is to press these metal petals into the fabric with a hammer. To do this, use a hammer, but be careful. There is no need for brute physical force here, as you can damage the button. A little effort will be enough.
Just in case, buy a few extra barrels, in case you won’t be able to carefully hammer in the pin petals the first time, and they will break. This kind of problem is not uncommon for beginning craftsmen.
Instructions for replacing the button
To install a new fastener, you need to perform several steps:
- Dismantle the old one if it is out of order.
- Use an old hole or make a new one.
- Insert a button into the hole.
- Put on the fixation ring.
- Use a flat surface to install the fastener.
- Divide it into four parts with a punch.
- Roll the petals with a hammer.
It is worth having several spare buttons so that you have something to replace damaged ones, since the pin petals often break.
Removing the old button
The process of removing an old, failed push-button fastener is simple, but it is important not to damage the fabric.
You should prepare a pair of pliers and a knife whose blade does not bend.
Procedure:
- At the bottom of the fastener, carefully place the blade of a knife between the button and the material from the underside of the product and bend the metal edge.
- Do the same on the front of the garment, symmetrically to the back.
- The edge should be bent so that you can grab it with pliers.
- On both sides of the fabric, grab the folded edges with pliers and, using a little force, separate the two parts.
- To remove the upper part, use pliers to grab its front and back parts and, twisting, separate it.
Gluing the front part
To attach the front part, perform a series of sequential actions:
- Prepare a wooden plank.
- Make a hole for the fastener using a thick awl or punch.
- Insert the button cylinder into the prepared hole.
- Place the spring part on top.
- Roll the edge using a tapered awl.
To avoid rapid fraying of the edges on synthetic fabric or the formation of torn edges, the awl is heated over a fire before piercing the fabric.
Assembly of the reverse part
To assemble the lower part, you need to prepare a small device. It is a board with a hole slightly larger in size than the part. The tool used is a hammer with a flat striking surface.
The order of the operation is as follows:
- Make a hole using an awl or punch.
- Insert the button into the notch.
- Pass the fabric into the second part of the reverse part.
- Combine both parts.
- Connect the parts with a gentle blow of a hammer.
See also
Why does a washing machine take a long time to wash, the reasons for the breakdown and how to fix it
Installing shirt buttons
This type of button is considered the simplest. Here, the main tool for installing buttons on clothes will be pliers. The installation process is similar to the previous option, only the punch needs a larger diameter.
The front parts are installed first, then the internal parts. After marking with a simple pencil, the crown of the button is pierced into the fabric. Then the product is laid on a wooden beam and the inside is hammered with little effort.
The second part of the button has an S-shaped pin. To hammer in this part, it will no longer be possible to use a wooden beam, except perhaps to drill a hole in it. Usually, when installing buttons on clothes at home, use a nut of the appropriate diameter.
Fastening tape
There are three types of this braid: for a butt fastener - braid with hooks and loops, for an overlap fastener - braid with buttons and Velcro contact tape.
HOOK AND LOOP BRAND (8) consists of two parts, sewn under the edges of the fastener on the wrong side of the product, while the hooks should be covered by the edge of the fabric. The loops may extend slightly beyond the edge and must line up exactly with the hooks.
BAND WITH BUTTONS (9) consists of two parts: one with the upper parts of the buttons, the other with the lower parts. The braid with the upper parts of the buttons is sewn on the wrong side of the upper edge of the fastener, the braid with the lower parts of the buttons is sewn on the front side of the lower edge of the fastener. In this case, you need to ensure that the parts of the button match.
VELCRO CONTACT TAPE (10) also consists of two parts: one part of the tape has a grippy surface and is sewn onto the front side of the lower edge of the fastener. The other part of the braid has a fleecy surface and is sewn onto the wrong side of the upper edge of the fastener.
Repairing a damaged button
If you had an incident when installing a shirt button and something went wrong, do not despair. The good thing about these buttons is that they can be removed and reused. To do this, you need to straighten the teeth of the crown and remove it freely from the fabric. You can remove the button with a flat screwdriver or knife. You can straighten the ends of the crown using pliers or small pliers.
Once the teeth are aligned, the button can be reused. This method is also applicable in cases where the button is intact, but the fabric in this place is torn. Then, after carefully removing and restoring the button, it can be installed back on the product, just in a different place.
Installing a denim button using available tools.
And milla-sidelnikova.com is in touch with you again!
We continue to learn how to install denim buttons manually, at home, using improvised means and tools.
We have already learned how to install a denim button on a double leg (with two spikes) (the second link in the block of links below in the article).
And we already know that there are several types of denim buttons (the first link in the link block below in the article). And when installing denim buttons, each one needs its own approach.
Denim buttons. Kinds.
How to put a button on jeans using special tools?
Installing a denim button using available tools.
How to change a button on jeans?
But they all have a lot in common.
1. The hardest thing about installing denim buttons is that many of them have a convex or concave top shape. This can become an insurmountable obstacle. Indeed, with the inevitable blows to the button with a hammer, these forms may change, and not for the better.
What can be done in this situation?
- Do not buy such buttons.
- If purchased, take them to a specialized workshop to install them.
- If the bulges are insignificant, you can dig out a recess under them, for example, under a small pebble-decoration in the center of a button, in the wooden surface of a block on which it is desirable to install all the denim buttons.
- You yourself, those friends or relatives who have been sewing clothes for a long time, may have accumulated the remains of special devices for installing buttons, eyelets, rivets, etc.
Here you can use them.
2. As I already wrote in this article, when choosing denim buttons it is better to take a set at once - a button + a stud.
But what to do if it did happen that this couple turned out to be from different “classes”?
It's easier with denim buttons with central holes on the surface of the button. (Read below in the article).
But with buttons without central holes on the surface, you can do this. In the place marked for the button, you need to measure with a toothpick, at the same time, the depth of the hole in the leg of the button and the thickness of the product on which the button is installed. (The toothpick is inserted through the hole made in the material, and at the same time into the hole on the button stem).
And then this measurement needs to be compared with the length of the nail. If it is longer than necessary, it can be cut off (bited off) with side cutters or
pliers.
Or you can put a spacer under the nail on the wrong side,
cut from something unnecessary and plastic.
3. But the first thing you need to do when attaching any denim buttons to a finished garment is to decide and mark the future location of the button(s).
4. Then, despite the fact that some of the nails that are paired with a denim button have a fairly sharp edge, it is simply necessary to make a puncture in the material so that the nail does not cause puffs. The puncture can be made with an awl, nail, thick needle, etc.
Since some nail rods are quite wide, sometimes it is better to make a hole for them with a punch.
5. All types of nails, all denim buttons without exception, are inserted into the hole in the material from the wrong side,
and the button itself is adjusted to the stud on the front.
6. The button will be installed correctly and evenly if any type of stud fits into the hole of all jeans buttons without exception in a strictly vertical line.
How to install denim buttons on a fixed and broken leg without a through center hole on the surface?
7. To install denim buttons with fixed and broken stem, and without center hole,
All that remains is to hit the head of the nail with a hammer! .
If someone knows, has done it, it’s like hammering a nail into something. Only this must be done without “fanaticism”, and literally in one or two blows to the head of the button stud.
Everything, denim buttons without a central hole, on a fixed and on a broken leg, are installed.
How to install denim buttons on a fixed and broken leg with a through central hole?
8. To install denim buttons with a fixed and broken stem, with a central hole, on the finished garment,
You also need to insert a nail into the hole in the material from the wrong side of the product. And if it is a nail with a circular notch, then all that remains is to hammer it in and the button will be attached to the garment, just like buttons without central holes (see above in the article).
If these are smooth all-metal or hollow tubular nails and they easily fit into the hole on the leg, then you just need to insert them there.
If it’s difficult, you can push them slightly there with a hammer.
And now, as I said above in the article, you can see whether the stud is sticking out above the surface of the button, whether the stud needs to be shortened, or leave everything as it is. (See the article above on how to shorten a carnation.)
9. Now you need to secure the nail in the button. To do this, on the wrong side, under the head of the button stud, you need to place something flat, metal. For example, a hammer. And from the front side, from above, directly into the central hole of the denim button, you need to insert a bolt of suitable diameter and
With a few blows of a hammer on the nail, flatten its top. It will spread out in the hole of the button, and thereby secure itself there.
That's it, the denim buttons on a fixed and broken leg with a central hole are installed.
10. But it’s so easy, only cloves with a cone-shaped top are flattened.
If the carnation is smooth, with a tube-shaped top
then its top must first be “turned around” by hitting something like a dowel (or something similar) with a cone-shaped end.
And when the top of the tube spreads out to the sides with its petals, then you can hit the bolt with a hammer into the hole of the button to secure the nail.
Having installed several currently existing types of denim buttons, we can draw an unambiguous conclusion.
The easiest way to attach a flat denim button to a finished product at home is without a central hole and on a nail with a circular notch.
Therefore, if there is a choice and the opportunity to “use” just such a button, with such a stud, then it would be best to opt for them.
The buttons on jeans are subject to the most significant stress. And that’s why many people are interested in how to replace a button on jeans. The next blog article will be devoted to this burning issue.
And for today, good luck to everyone and goodbye! Sincerely, Milla Sidelnikova!
Press for installing buttons on clothes
The best assistant when sewing clothes with buttons is a special press. It consists of an upper and lower stand and a set of screw-on attachments. A punch is screwed into the upper part of the press, and a stand for the punch is screwed into the lower part. This press is used for different fabrics, both thin and thick, even leather belts. You can purchase different attachments; they are sold separately. It is advisable to sign them immediately so as not to confuse the size. Each set is designed for a specific button size.
Using this device to install buttons on clothes is easy. Let's take a closer look at how to do this:
- We install the attachments - screw the top one in until it stops, but not too zealously, and simply insert the bottom one into the round groove of the press.
- Since there are two sets of attachments for installing Alpha buttons, they are installed alternately for one and the other pair (such buttons consist of four parts).
- Nozzles are selected according to the size of the button. Typically, the most commonly used punches are purchased - 2, 4 and 6 mm.
- It is important to correctly mark all the holes and punch them in advance with a punch; it is recommended to do this with a piece of reinforcing fabric.
- When all the holes are punched, the nozzles are replaced, and then work continues with the fittings. Advice: it is better to punch holes of a smaller diameter. The button pin must be pulled firmly through it, otherwise the button will subsequently fall out.
Hooks and loops
Hooks and loops are always used there. where it is necessary to fasten the fastener firmly, but not noticeably from the front side of the product. The clasp is made on double-folded material reinforced with interlining.
Hooks and loops come in different sizes and colors - black and nickel plated (silver). Most hooks have two types of loops: a straight flat loop for an overlap fastener and a round loop for joining the edges of a butt fastener.
ON LAPED EDGES
The hook is sewn on the wrong side of the top edge of the clasp, and the flat loop is sewn on the right side of the bottom edge of the clasp. Hooks and loops are sewn with frequent overlock or loop stitches, while sewing on the hook, do not bring the needle to the front side (1).
For fastenings on the waistbands of skirts or trousers, there are especially strong hooks and loops of various widths (2).
AT THE EDGES OF THE CLAPES BUTT
Hooks and loops are sewn onto the wrong side of the product, with the end of the hook located almost at the very edge of the fastener, and the loop protrudes slightly beyond the edge. The needle punctures should not be visible on the front side of the fabric (3).
To fasten the waistband of the skirt, it is recommended to use a strong and wide hook and loop (4).
Procedure
Here's what you need to do:
- First, a hole is punched in both the fabric and the pad (if there is one).
- We replace the punch with an attachment for the eyelets.
- A part of the button is placed on the lower part of the press with the pin facing up. We place the fabric on top with the wrong side up, aligning the hole with the pin. If necessary, either a piece of fabric or a reinforcing plastic ring is added.
- A counter washer is placed on top. Its concave side should point down.
- We press gently and smoothly on the handle of the press. In this case, the pin is flared. The button is firmly installed on the fabric.
How to change a rivet on a jacket with your own hands?
Correctly riveting, then removing and replacing, attaching and repairing a new rivet is a matter of certain dexterity and skill. However, in order to install it carefully and perform all technological manipulations, you need to acquire a set of special tools. Even removing a rivet requires as much care and precision as installing it, especially if you plan to use the removed fittings in the future. In this case, without a special device, equipment and skill at home, it will not be possible to remove the fittings without damaging the rivet and the fabric adjacent to it.
If you do not plan to use the fittings in the future, then it is enough to “cut off” the head of the rivet using a hammer, anvil or knife, and then install new fittings using the method described above.
Important! You may also need information about what to do if the hooks on your fur coat come undone.
Forceps
If you want to purchase a machine for installing buttons on clothes, it is best to use tongs. This is a very useful tool that will greatly facilitate the work of a seamstress. As professionals advise, there is no need to save on such a product. Cheap tongs often have handles that break. Typically, attachments for various buttons are sold in the kit for this tool.
The appearance of the tongs differs greatly from different manufacturers, but the method of use is similar.
The handles of the tongs have a lock. When starting to work with such a tool, you need to squeeze the handles and remove the lock. Places for buttons are marked in the fabric and holes are made with a punch. Then the button is inserted into it with the head facing up and the tongs are compressed. You need to press smoothly, but all the way.
Types of accessories
Garment accessories include the following parts:
- Buttons.
- Hooks.
- Loops.
- Lightning.
- Blocks.
- Textile Velcro fasteners.
- Holniten are metal rivets. Most often used in denim clothing to secure stitching.
- Buckles.
- Eyelets. Durable metal or plastic fasteners are mainly used in leather goods.
- Rivets. There are utilitarian rivets - those that are used for clamping, fastening and fastening, and decorative ones. Very often, sewing accessories in clothing combine both roles.
Important! All types of fittings are made from different materials. Often, their quality determines how convenient and comfortable a particular item will be worn. In addition, any accessories are designed to rivet and decorate clothes, even if we are talking about such an ordinary detail as a button.
The most popular materials for making fasteners and fasteners:
- Metal.
- Ceramics.
- Plastic.
Important! Most often, sewing accessories are made from a combination of these materials in order to combine practicality and beauty in a single item. Read a detailed review about which fastener is best to choose for a dress, skirt, or jacket.
If the part is not selected correctly, that is, without taking into account the characteristics of the fabric or leather, then the fittings simply will not cope with their functions. Then you will have to change the details on your clothes yourself so as not to throw expensive things into the far corners of your wardrobe.
Helpful information
In order to ensure that the back and front parts of the button match exactly and wrinkles do not form on the clothing, you need to accurately mark the installation locations of the individual elements. Some people use the following method: install the lower parts first, and lubricate the pin with chalk. By aligning the edges of the clothing, the chalk leaves a mark in the right place. After this, it is easy to find the desired point for the upper parts.
Some people don't like this technique. They use a different way of marking. Craftsmen measure the distance with a pencil or use a self-disappearing marker. In this option, the upper front elements are installed first, and only then the lower ones.
In the article, we looked in detail at different ways to install buttons at home. We hope that the tips will help you complete this type of work quickly and efficiently.
What to do if there is no spare button
If you don’t want to look for a new rivet, and don’t have the means to turn to professional craftsmen, it is permissible to use an ordinary button instead of special fittings. It is recommended to ensure that it matches the style of the jeans and matches the diameter of the loop.
To carry out the procedure, you should perform the following steps:
- First of all, it is recommended to remove the old rivet.
- After this, the hole from it should be carefully mended. This should leave no unsightly holes.
- Sew a button next to it. It is best to use fittings on a leg.
Sometimes this type of fastener is fixed much more securely and looks much more attractive compared to standard metal rivets.
See also
How to quickly get rid of centipedes in a house or apartment