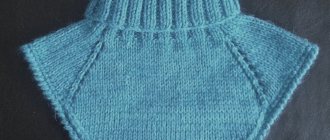
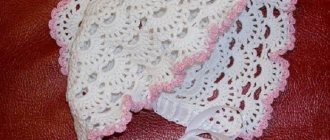
Crochet women's hat in 3 hours
A master class on knitting a simple hat was prepared by Elizaveta Dranichnikova.
Necessary materials:
1. Yarn (acrylic or wool) – 1 skein (100g/150m). 2. Hook No. 3. 3. Pompom (can be taken from any old hat).
Loops used for the pattern: - air loop; - single crochet; - half double crochet; - connecting loop.
So, take some yarn. If your yarn is too thin (such as acrylic), then it is better to knit in two threads. It all depends on what season you will wear the hat: spring or winter. Now we will knit an elastic band. Crochet a chain of 12 chain stitches.
Now we make one air loop for lifting and knit a row with single crochets behind the back wall. Having knitted a row, we turn the product over and again pick up one air loop for lifting and also knit with single crochets behind the back wall.
We continue knitting until the length of the elastic is exactly the same as the circumference of your head. I got about 62 rows.
Next, fold the elastic in half and connect the edges of the elastic. We knit them together with connecting loops.
After the edges of the elastic are connected, we knit 1 row along the entire length of the circumference with single crochets. It turns out one loop in one row. When the row is completed, we begin the next one by making one air loop for lifting. We begin to knit the main pattern. In the second loop of the previous row we knit a single crochet, then two air loops and again a single crochet in the same loop. Next, we skip one stitch of the previous row and knit into the next loop in exactly the same way: single crochet, two chain loops, single crochet….. In the second row we continue knitting according to the main pattern, only now we knit double stitches under two chain loops of the previous row.
• DO NOT FORGET TO DO 2 CHAIN LOOPES AT THE BEGINNING OF THE ROW FOR LIFTING.
Using this pattern we knit the main height of the hat (this is approximately 15 rows of the main pattern).
In the 16th row we begin to decrease: to do this, again cast on two air loops for lifting at the beginning of the row. Then we continue knitting in the same way as the previous rows, only now we make one air loop between the stitches instead of two. That is: we skip one loop, in the next 1 single crochet, 1 air loop, 1 single crochet. We knit the 17th row exactly like 16th.
In the 18th and 19th rows we continue decreasing. Exactly the same pattern, only without any air loops between the columns.
Row 20: knit with single crochets through one loop: single crochet, skip a loop and again single crochet in the next one. Row 21: same as row 20. Row 22: decrease in every 6 stitches. We knit 5 single crochet stitches, from the sixth stitch we simply pull out a loop without knitting. We knit it in the seventh column. Row 23: similar to row 22, only decrease through 4 stitches. Row 24: Decrease through 3 stitches. Row 25: Decrease through 2 stitches.
Tighten the crown with a connecting loop.
Sew on the pompom. Unscrew the rubber band.
Our women's hat is ready!
How to take measurements
To ensure that a crocheted hat fits well and is comfortable to wear, you need to take two measurements:
- head circumference (HC) - pass the tape over the eyebrows, ears on both sides and along the most protruding point on the back of the head;
- height (depth) – measured from ear to ear through the crown.
Next, simple calculations are made. If the hat is size 54 (OG - 54 cm), then you first need to prepare a sample of 15 single crochets or double crochets 10 x 10 cm (15 x 54: 10 = 81). Accordingly, for a size 54 hat you need to cast on 81 loops.
The height is calculated as follows - OG: 3.14: 2 (54: 3.14: 2 = 8.5 cm). Next, take the number of centimeters when measuring from ear to ear, divide it in half and subtract the result of the first calculations: 41: 2 - 8.5 = 12. Thus, a 12-centimeter hat is knitted without decreasing, then you need to start making decreases.
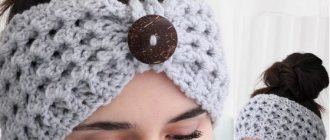
Lush hat with a “Bumps” pattern
The main headdress has been the hat for many years. You can buy it in a store, or you can knit it yourself. And in this master class by Anna we will crochet a hat using the “Bumps” pattern.
To knit a hat we will need:
- Yarn (white, purple);
- Hook;
- Pompon;
- Needle.
First we need to prepare the base for knitting the cap pattern. To do this, we measure the head and select the number of loops required to circumference the head. The number of loops must be a multiple of two, since the pattern repeat is two loops.
When the required number of loops has been cast, we connect the end and beginning of the chain with a connecting stitch.
We do the first three lifting loops. We will do them in each new row.
And now we knit a row with double crochets. One column per loop.
Let's move on to knitting the pattern. At the beginning of the row we make three loops and yarn over. Insert the hook between the posts and pull the working thread through, catching it with the hook.
We won't knit it. Let's repeat this action three more times.
Now we will knit all the loops on the hook, including the yarn overs with one loop. And we’ll make one aerial one.
We have our first bump.
Now we will skip one loop at the base of the hat and, having made a yarn over, insert the hook into the second loop. Grab the thread and pull it out. Let's repeat this action four more times. That is, each cone should have five undone double crochets.
And again we will knit all the loops on the hook together and make an air stitch.
And so we knit until the end of the row in a circle.
We will knit the next row in exactly the same way, only we will knit the cones between the cones of the previous row.
We knit four or five rows. And then add purple yarn. Now we will knit a little differently.
We also knit cones and the cones of the new row will also be located between the cones of the previous row.
But now each bump will consist of two undone double crochets, because now we are knitting in two threads.
Next we knit all the rows in the same way. We try on a hat from time to time. We need to knit until we knit up from the ear about ten centimeters. And then we will need to reduce the knitting, narrow it.
And we will reduce it like this.
To decrease one cone, we will knit one undone double crochet between the cones of the previous row, and we will make the second one between the next two cones.
And we'll knit them together.
In each row we will make six decreases until the hole at the top becomes very small. Then we'll just pull it off. Reductions can be made anywhere.
After the hole in the hat is closed, we will sew a pompom to it. You can take a white pompom, or you can take a purple one.
This is how you make a crochet hat!
Selection of knitting technique and density
There are several techniques in crocheting. Beginning craftswomen are recommended to use simple patterns. These include:
- knitting in the round - when the central element is made, and the main part of the hat is knitted around it;
- openwork knitting - creating light, elegant patterns for summer hats;
- fillet knitting - all kinds of meshes from loops.
To crochet a tight hat for the cold season, it is enough to know how to make air loops (VP), single crochets (SC), double crochets (SC), half-columns (PS), connecting stitches (SS). Knitting patterns for such products are easy to read. Stylish design and ease of execution are an ideal combination for beginning craftswomen, when they are afraid to take on more labor-intensive work.
For summer openwork hats, the patterns are a little more complicated, but learning to read them will not be difficult if you understand and knit according to the proposed pattern at least once. To determine the knitting density, before starting work you need to make a sample with the pattern given in the description.
Openwork
In a circle Sirloin
Pink hat with leaves pattern
The time for beautiful warm hats continues, so today we will knit a hat with the “Leaves” pattern. Due to the pattern, the hat will be very dense and warm. Description of the work step by step and pattern diagram from Anna.
For knitting we will need:
- Pink yarn;
- Hook 3 mm;
- Scissors.
We will knit the hat from the bottom, so we will start with the elastic. We need to cast on a chain of air loops, the number of which will be a multiple of 8. We try it on the head and equate it to a number that will be divisible by 8.
So, we dialed the chain.
We knit a row of dcs.
Now we will knit an elastic band from concave (ВССН) and convex (ВП.ССН) columns.
Concave double crochet (BCSN)
Convex double crochet (VYP.SSN)
At the beginning of the row we make 3 VPs and in the next loop we knit 1 convex stitch. In the next loop we will make a concave column. So we will alternate until the end of the row.
We knit several such rows. It depends on the desired height of the elastic band of the cap.
In the new row we will begin to knit leaves.
We make 3 VP at the beginning of the row.
In the next 6 loops we knit 1 dc.
And we knit into a new loop like this: 1 Dc, VP, 1 Dc here.
Next, in 7 loops we knit 1 Dc, and in the 8th loop we knit 1 Dc, VP and another Dc. So we knit until the end. 7 dc, then 1 dc, VP and 1 dc.
This is our pattern report.
Knitted to the end, connected in 3 VPs. We made 3 PP and made 2 concave double crochets (BCCH).
And then we perform 1 convex double crochet (VYP.Dc)
Then again 3 BCCH.
We have reached our slingshot.
We knit 1 ISS.Dc. Then under the VP of the bottom row we knit 1 Dc, VP And 1 more Dc. And another 1 EX.Dc in the second part of the slingshot.
So knitting continues until the end. We are expanding our leaves.
The next rows will be no different. We will also expand our leaves, and between them we will knit 3 BCDC, 1 DR.DC, 3 BCDC.
Only in each row the number of OUT.DCS on the leaves will increase by 2 times. Under the VP we always knit 1 dc, 1 ch and another 1 dc.
We knit this way until the leaf consists of 8 ISS.Dc.
So, now the leaf needs to be narrowed. To do this, as usual, we knit 3 BC, 1 DR.DC, 3 BC.
But now we are knitting 1 YO.Dc, but we are knitting only the yarn over. Leave 2 loops on the hook. Next, we knit another 1 ISS.Dc not completely. Leave 3 loops on the hook.
Now we knit all the loops on the hook, pulling the working thread through them.
Next, we knit according to the pattern up to the last 2 ISS.DCS of the leaf. We knit them, just like the first 2.
Then everything is repeated.
In the next rows the knitting will be similar. We knit 3 BC, 1 DR.DC, 3 BC. We knit the first 2 and last 2 columns of leaves together in each row. We knit this way until the leaf consists of 1 ISS.Dc.
Next we knit 1 row according to the pattern.
Now in the new row we need to start forming leaves, but they will now be in the place where we knitted a single SCH in each row.
That is, we knit 3 BCCH at the beginning of row. And then we knit 1 OUT.Dc, 1 VP and 1 more OUT.Dc here.
Next, 3 BCCH, 1 OUT.DCC in the place where the leaves were in the previous rows. Next 3 BCCH and again 1 OUT.CCH, 1 VP and 1 OUT.CCH.
We knit like this until the end of this row.
Next we knit in the same way as we knitted the first leaves. That is, all rows up to this row need to be repeated.
Don’t forget, when the top of the sheets consists of 1 OUT.Dc, you need to knit 1 row according to the pattern.
Now we will narrow the cap.
To do this, at the beginning of the row we perform 2 VP. Then we knit 1 BCDC only in the 2nd BCDC of the previous row. That is, we simply skip columns 1 and 3. Next we knit 1 ISS.DC. And again we skip 1 and 3 BCCH of the previous row and knit only in the 2nd. So until the end.
There are 2 VPs in the new row. Next, we knit only in OUT.DCS, 1 OUT.DCS.
We knit 1 row of EX.DC.
Now leave the thread straight and cut it. Pass the thread under the loops and pull off the cap. We bring the tail to the left side and secure it.
A beautiful warm hat is ready!
Model selection
With chunky knitting you can choose from so many different options. It all depends on taste and what patterns you are used to knitting. I settled on a fairly popular model - the Mongolian hat. The choice fell on it because it looks universal: it can be knitted for both women and men.
The peculiarity of the hat is that it is quite tall. This is necessary to form the gate. This way your ears will be additionally protected from the wind. Those who don’t like this style don’t have to tuck it up. Toward the top, the cap narrows sharply, forming a clear tip.
Another feature of the model is that it consists of several wedges. They can be knitted individually and then sewn together. I preferred the second option - I knitted the hat from thick yarn in one piece. This is what it looked like when the last step was stitching it together.
Blue hat with elastic band
Before the cold weather, many begin to warm themselves: hats, mittens and other accessories and clothing are purchased first. And if you know how to crochet, then you can knit a hat yourself, for example, something like this, which will please both yourself and those around you. This model is universal and, depending on the color, can become a women's, men's, or children's accessory.
To create such a knitted hat you need:
- a ball of wool blend yarn (wool, acrylic, thickness of at least 250 m per 100 grams);
- hook;
- scissors.
As you can see, nothing special. We will start with an elastic band, and the elastic band will be crocheted across, so at first glance it will be a little difficult to distinguish it from an elastic band with knitting needles. However, this elastic band has less stretch and is a little tighter than knitting.
So, we knit the first row of 15 chain stitches using single crochets. Then we turn the knitting over and knit it back, also in single crochets, but we knit it behind the column itself, with a raised concave column. Each time we alternate rows with simple and embossed columns and get a finished elastic band:
Wrong side:
We connect both ends with a hook (you can also use a needle) with connecting columns:
After this, you can proceed to the pattern itself. Making a chain loop and a single crochet:
Then an air loop and another column (in the hole between the elastic columns):
We continue like this until the end of the row. In the next row we knit a column under the arch of the air loop, and in place of the column we knit an air loop. The pattern is very simple but effective:
We knit to the desired height, and then proceed to shortening the loops. They are also simple to perform. First, between every 9th and 10th stitch, an air loop is not knitted:
In the next row we get rid of the air loops between the 7th and 8th columns, then between the 5th and 6th:
And so on until only single crochets remain. After which you need to knit a few more rows, shortening the stitches (knit 2 stitches with one top):
The remaining 10-12 columns can simply be tied together with a thread:
and pull the end inside out.
The hat is ready:
If desired, it can be supplemented with a pompom.
Hat made of bulky yarn for the winter
Many girls and women love small, neat hats. But in the winter cold you need to dress warmly. An excellent solution for this case is knitting from bulky wool yarn. The headdress will look stylish with fur coats and down jackets.
Size: 56-57 cm You will need: - two types of yarn 1 - from Lana Grossa: Famoso dark gray (45% wool, 55% polyacrylic, 38m/50g) - 100 grams; – 2 – Uno gray-black (52% wool, 48% polyacrylic, 65met/50gr) – 50 grams; – hook No. 12.
Density: 5 p. = 10 cm
Crochet hat description:
- Start at the top of the cap with two chain stitches using thread #1. In the 1st circular row, knit 6 columns of b/n into the second chain stitch.
- In the 2nd r. continue with the same stitch and double the stitches (=12 stitches). At 3 p.m. double after 1 p. (=18 p.). In the 4th - after 2 p. (=24 p.).
- From 5 to 14 p.m. knit without additions. Finish with a row of connecting posts.
- Use yarn number 2 to make a pompom.
Source: Filati magazine
Warm pink hat
When knitting a hat with a beautiful pattern, several types of stitches are used. The main fabric is knitted with embossed purl columns, and lush columns create vertical decorative lines. The band is knitted with single crochets, the last row is knitted in a crawfish step.
Materials and tools:
The bulky yarn used for this work is 50% wool, 50% acrylic. Hook No. 3.5 for the main work and a thin hook for tying the tails. Scissors.
Abbreviations used in the text:
VP – air loop;
runway – air lift loop;
PS – lush column;
RLS – single crochet;
Dc - double crochet.
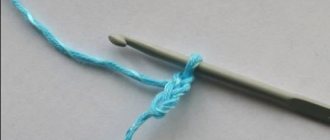
We start knitting the product from the center. Making an amigurumi ring . It was invented by Japanese knitters for small knitted amigurumi toys. We call it a sliding or magic ring : we lay the thread so that the end of the thread is in the palm of our hand, and we wrap the working thread around the index finger (away from ourselves), insert the hook into the resulting ring, pick up the working thread and, pulling out a loop into the ring, knit an air loop. The ring is fixed and work can begin.
1 row. We begin to knit lush columns into the resulting ring. For the first lush column we knit 2 runways. Then we make a yarn over and insert the hook into the ring. We pick up the thread and pull the loop to the height of the first two lifting air loops. Yarn over the hook again, insert the hook into the ring and pull out another loop. And once again we make a yarn over and pull out a loop. On the hook, in addition to the second lifting loop, three yarn overs and three loops were formed, pulled out from the ring. We knit them all together in one step. We fix the lush column 1 VP.
We begin to knit the next lush column,** pulling a loop out of the ring, then yarn over** and repeat this technique three more times. There should be 3 yarn overs and 4 loops on the hook. We knit them in one step. You need to knit 8 puffy stitches on the ring. Between them we knit one air loop. We close the row with a connecting loop into the second lifting air loop. Tighten the ring by pulling the free end.
2nd row. Using a connecting loop, we pass to the top of the lush column of the previous row. Pull a loop on the hook from the top and make a yarn over. We repeat this technique until 4 loops and three yarn overs are formed on the hook. We knit them in one step, knit 1 VP and from the same top we knit another lush column.
Between pairs of lush stitches we knit one regular double crochet. Next, from the top of the next lush column we knit two lush columns. We close the row with a connecting loop at the top of the first lush column. 8 pairs of lush columns formed in the row. One DC is knitted between pairs.
We complete the row with a connecting loop from the beginning of the row to the top of the fluffy column.
3rd row . Using a connecting loop, we go into the distance between two lush columns knitted from one PS. From this point we knit two lush columns. Next, on one double crochet of the previous row, we knit two purl relief stitches, they are also called concave in contrast to the front convex ones. We do it this way: yarn over, insert the hook from the wrong side to the right of the DC.
Place the hook in front of the post and pick up the working thread to the left of the hook. We stretch the thread in front of the column, bring it to the wrong side and knit a dc.
Next we knit **2 PS and two purl relief stitches**. Repeat the pattern until the end of the row. We complete the row with a connecting loop from the beginning of the row to the top of the fluffy column.
4 row . Using a connecting loop, we go into the distance between two lush columns. We knit two PS over the PS of the previous row.
On two embossed columns we knit three embossed purl columns. On the first stitch we knit one purl stitch, on the second we knit two embossed stitches. Eight wedges are already clearly visible.
In each wedge we add one column, which means 8 columns are added in a row.
5 row . Using a connecting loop, we go into the distance between two lush columns. We knit two PS over the PS of the previous row. In the previous row we knitted three embossed purl stitches. In the fifth row we knit two purl relief stitches on the third stitch.
One column is added to each wedge. We complete the row with a connecting loop at the top of the fluffy column.
6 row . Add one purl relief stitch around the last purl relief stitch in each wedge, for a row of 8 stitches. Thus, we knit to the desired size of the bottom.
7th row. You can determine the diameter of the bottom by dividing the head size by 3.14. From the resulting value we subtract 1.5 - 2 cm, taking into account the stretchability of the knitted fabric. The diameter of the bottom for a baby hat is 15 cm. For size 57, the diameter can be 18-19 cm. You need to take into account the volume of yarn and the thickness of the hook.
8 row. In this row I got the desired bottom diameter size.
In each wedge I knitted seven purl relief stitches.
We knit the height of the cap without any additions.
We knit another 9 rows or as many as you want.
Having received the required height, we begin to knit the band with single crochets.
We knit 7 sc above the embossed columns and two sc above the fluffy columns. Having knitted sc 3-4 rows, we knit the final row in a crawfish step.
The hat is ready.
The master class was prepared by Svetlana Chalkina.
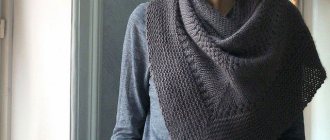
Methods of knitting hats
Hand-knitted hats are classified according to different criteria:
- Season – warm winter hats, demi-season items and delicate handmade items for summer days.
- Age indicator - children's clothes, youth, women's and ladies' hats.
- Gender specifications – female and male models, as well as unisex (suitable for everyone). This is a cap, a stocking cap, a skullcap, a Rastaman with dreadlocks.
Important! Today there are many people on the streets who show absolute bad taste in their choice of hats. Pensioners often wear youth hats with a fur pompom or beanie hats made of bright yarn, but ladies' hats are more suitable for them. For a teenage girl, a grandmother can knit a turban, a “cockerel” or a large beret “on one side”, focusing on her taste and experience of her youth.
Children's cat hats and owl hats are models for children, and not for their mothers, who are well over 40. Not everyone suits fashionable styles, even if they are correctly selected based on age and gender. Not everyone will suit a French beret, a scarf-hood, a bonnet or a winter Panama hat.
Stylists claim that hats with ears or pompoms are no longer “trendy” headdresses. The general passion for outdated styles can only be justified by the fact that “other things don’t suit” or there is nothing else.
Otherwise, there are no restrictions on the choice of model, be it a turner hat or a beret.
Classic styles are current:
- warm takori hat (English elastic with double lapel);
- cap (gavroche, cap, beret with a visor of moderate volume);
- berets of different volumes, with or without a band;
- knitted sleep cap with wide elastic band;
- beanie hat (for youth only);
- a knitted hat with hard sides pulled down (like a Panama hat);
- double stocking cap (worn with a crease at the back of the head);
- a snood scarf with 2 turns, which is worn with the other half on the head.
Among the neutral models worn by adherents of the classics, one can recall hats with a lapel - for men and women. This is a warm accessory that is firmly entrenched in modern fashion.
Ushankas, which can be lined with fur on the lapel and folding ears, are comfortable products that suit almost everyone.
Knitted hats with Scandinavian patterns and large plaits with elastic are an all-time trend. Today, models with different shapes of protruding crowns are popular, but the fashion for them is already passing.
For middle-aged and older women, stylists recommend voluminous berets and cross-knit hats with large braids. “Boyarki” and pill caps with a rigid base look good.
Hats of various styles, including knitted ones - for middle-aged women, the style and width of the sides are selected individually.
With a chess pattern (squares)
In this master class we will knit a hat with a three-dimensional “chess” pattern.
This method of knitting does not take much time and does not require special skills. Even a beginner knitter can handle it.
For knitting we need:
- Brown and white yarn;
- Hook;
- Scissors.
Our hat will be a single color, but it can be made in 2 colors. This way the pattern will be more pronounced.
We will knit from top to bottom.
Let's make a sliding loop and knit 8 half double crochets into it. Tighten the sliding loop.
We connect the part into a ring with a connecting loop.
In the new row we will increase the number of our loops. To do this, we will knit with an increase in each loop of the ring.
Next 1 row with an increase through 1 loop.
1 more row with an increase every 2 loops.
Next, we knit as many rows with an increase as needed in size. We make increases simply: in each row we move the place of increase by 1 loop. That is, if last time we added every 2 loops, then in the new row we will add every 3 loops.
And in the next row after 4 and so on.
As a result, we will get a circle like this.
Now we make 2 VPs and knit 2 RLS (embossed front stitch), 1 in each loop.
Then we knit 2 RICE (relief purl stitch)
Next again 2 radars, 2 fig. So we alternate until the end of the row.
Make 2 VPs and repeat the entire previous row 2 more times.
The new series will be different, but not much.
We do 2 VP.
And now we start the row with 2 figs. That is, where we have 2 radars, we knit 2 RICE in this row.
Then we knit 3 radars into 3 rices of the bottom row.
Then we alternate until the end.
That is, now, where we had LRS, we knit RICE and vice versa.
We knit the row to the end.
Repeat the previous row 2 more times.
And then we knit the first 3 rows again. That is, we start again with the LRS.
So we will alternate these 6 rows of 3 identical ones until the cap reaches the desired length.
The hat is ready. All we have to do is make the binding. You can take yarn of any color that will go with brown. In this case, white thread was used.
We join from behind with a white thread and cast on 3 VP. Next we knit 2 or more rows of CC1H.
Our hat is ready!
Types of patterns for knitting hats
The most comfortable knitted hats are knitted in an elastic knit. These include different types of elastic bands, textured patterns and voluminous strands against the backdrop of purl rows.
Important! If you have little experience, it’s better to practice on simple models first.
Women's models are quite diverse, they can be made using any technique:
- Tunisian long crochet;
- including enterlak (inclined squares with knitting needles);
- freeform (rows are knitted randomly in different directions, changing color and pattern);
- brioche (knitted with two threads).
Children's products should impress with their charm. For kids, products in the shape of animal faces, hats with ears, and simply warm products that tightly frame the child’s face are suitable.
It is important to take into account that children grow quickly, so for your son or daughter you can choose a style with a lapel, knitted with a fluffy elastic band. A winter hat should be deep, partially covering the ears.
Advice! Choose warm, “non-biting” yarn in bright colors and decorate with a pompom. See suitable knitting and crochet patterns for baby hats.
Hat with flower
Natalya Vereziy's story on how to crochet a women's hat (with a flower):
“I want to share my experience of crocheting a women’s hat. I bought two types of thread, one angora and the other cotton.
So, let's start knitting a hat. For me, it’s better to start knitting a hat from the headband; to do this, I cast on a chain with a length equal to the circumference of the head. Next, I connect the chain into a ring, while making sure that the chain does not twist. Having connected the chain, we continue to knit in a circle with single crochets until the headband of the hat reaches approximately 8 - 10 centimeters in width. Next we proceed to knitting the pattern, which we knit according to the following pattern.
We knit according to the pattern until the hat reaches the desired height. I determined the height by regular fitting. Having put on the hat, we try to connect its edges on the top of the head; if everything is connected, then the height is sufficient.
The result of the work is like this.
Next, turn the hat inside out and sew its edges together in the shape of a star, as seen in the photo.
When the hat is turned right side out, the seam will look like the following photo.
The hat is ready, all that remains is to decorate it a little, you can sew on buttons or decorate it with stones, I decided to knit a flower.
Flower diagram.
In the pattern, you need to take into account that the sixth row is knitted in the second layer, tying from the wrong side to the third row. As a result, the flower turns out to be voluminous.
Using a needle, sew the flower to the hat.
This is how I crocheted a hat with a flower. It turned out to be a very budget option.
See also:
Spring-autumn crochet hats
In order not to forget the page address and share with friends, add it to your social network:
More interesting:
Tags: Knitted hats, DIY hats
Attention! It is better to write urgent questions in the comments on the website (form at the bottom of the page) or, better yet, directly by email. There are no notifications about comments from the VKontakte form! This form is more for feedback. 
Discussion: 5 comments
- Lydia:
January 15, 2015 at 2:25 pmOnce upon a time I crocheted, I’ll try to remember, maybe I can knit a hat for my daughter, thank you.
Answer
- Tatiana:
January 15, 2015 at 6:46 pm
What a gorgeous flower!!! Very beautiful. I also really love hats with large flowers on the side.