Elegant ribbon bows have become indispensable accessories at any special occasion. Strict and frivolous, simple and magnificent - they set a special festive mood. They are used as decoration for toys, gifts, hair or everyday wear.
We bring to your attention a selection of interesting options for creating bows using various techniques.
Satin ribbon bow on hands
Satin ribbons are the most favorite and affordable material.
And we suggest starting with them. If you are new to this business, first you should learn how to tie a beautiful bow from a ready-made ribbon on your hands. This is very easy to do. This is a very simple tying technique. And we will help you: carefully follow this step-by-step video tutorial. A little time, attention, and you will definitely succeed!
How to starch satin ribbon?
To starch satin ribbon, you will need starch and water.
The proportions are as follows: for one tbsp. spoon of starch, take one glass of water. First, dissolve the starch in about a third of a glass of cold water. Place the remaining water on the stove to heat. As soon as it boils, pour the dissolved starch into it in a very thin stream. Stirring constantly, cook for 5 minutes.
Remove from heat, cool slightly and add ribbon to mixture. Hold for about 20 minutes. Then squeeze, dry and iron through paper.
Now you can make a bow from a ribbon, it will wrinkle less and keep its shape well!
Materials for work
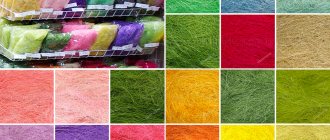
For fashionable bows, ribbons of different sizes made from various materials are useful. But the most popular ones are: nylon, rep and satin.
Lace ribbons are also often used. This kind of accessories looks elegant and expensive. You can also make it from silk, tulle, chiffon and velvet decorative ribbons.
Used as decoration:
- beads;
- glitter;
- rhinestones;
- beads;
- pearls;
- tulle;
- unusual buttons.
The stores provide a wide selection of ready-made centers for bows of various shapes, made from different materials. There you can stock up on metal machines, rubber bands and other auxiliary materials that will be useful in the process.
Satin ribbons
The most popular material for making elegant bows is satin. This shiny and smooth fabric is highly valued by needlewomen.
Satin ribbons have a number of advantages. They are beautiful and bright. This material is durable, which is why the products last a long time and do not lose their presentation. The color range is very diverse, with many tones and shades. The price of the atlas is affordable to all buyers, which makes it very popular.
The main drawback is the friability, so the edges of the product are burned with a flame. The size of the ribbons ranges from 3 millimeters to 10 centimeters.
Satin ribbons are used in almost all types of needlework. They are used to create decorative decorations for souvenirs, gift sets and wedding cars, and make hairpins and bows. They decorate clothes and soft toys.
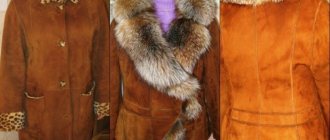
Rep ribbons
This type of tape is a strip of polyester fabric with a transverse rib. Their width varies from 0.6 to 5 centimeters.
Ribbons made from rep fabric are characterized by increased strength and rigidity. Compared to satin, they hold their shape well, so the products are not damaged as much. But the price also differs significantly.
Thanks to these features, this material is popular among creative people. They are used in various types of needlework.
Widely used for making bows, decorating clothes and scrapbooking. Florists also like to decorate bouquets with grosgrain ribbons. They give them a unique look.
Nylon tapes
Nylon is made from synthetic fibers, so it is quite durable and elastic. Due to the affordable prices, ribbons made from this material are as affordable as possible for consumers.
Their widespread use allows creative people to express their imagination and experiment. Lush bows made of nylon ribbons are popular among schoolgirls.
Beautifully tie a small bow on your fingers
If you don't know how to tie a ribbon bow on your fingers, these photos will help you with that. There is nothing complicated here either. Of course, you need to practice a little at first, but then you will do it with ease.
This cute little bow can be used to decorate your hair, clothes or handbag. In addition, this is the fastest way to beautifully tie a bow from a satin ribbon. In our pictures you can see everything in more detail.
Classic style
The most popular is a bow made of satin ribbon in a classic style. It is used for interior decoration and clothing. With such a product you can decorate a modest gift, after which it will look more attractive, solemn and elegant. The main thing is to choose the right color scheme.
How to make a bow from a satin ribbon:
Take a tape, the length of which should be approximately 20 centimeters.- Burn its edges with a lighter.
- Fold in half. The smooth side should be on the inside.
- Fold the edges over to the outside again.
- Take the product so that the loop in each hand is at the top, and the bend between them is at the bottom.
- Cross the folded pieces at the front to create a ring underneath.
- Pass one loop through this ring and then tie it off.
Scheme for tying a double mini bow on a fork
Charming little bows made of satin ribbons can be tied with your own hands in a very unusual way - using a real cutlery - a fork! Do not be surprised. These baby bows will decorate a funny card, a doll's hairstyle or clothes, an elastic band or a hairpin for little girls.
A master class on how to make them is presented in our photos.
And you can even tie a very tiny bow on a comb!
Manufacturing technology
In order to assemble a beautiful bow from a satin ribbon with your own hands, you need a minimum amount of materials and tools. When completing a master class on how to make a bow from a satin ribbon, there are practically no questions left. The main materials for work are:
- Hot-melt gun or special glue.
- Ruler.
- Threads with a needle.
- Scissors.
- Lighter for scorching.
Manufacturing technologies vary depending on the purpose of the product. A bow can have the following purpose:
- Festive - for holiday packaging.
- Double - attached to a hairpin or headband.
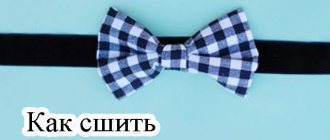
- Bow tie (formal) - for an important business meeting.
- Elegant and magnificent (kanzashi) - for matinees and holidays in preschool institutions.
- Small, made with a fork - necessary for decorating small items and cards.
You can make a bow in the shape of a flower. This decoration is perfect for:
- Curtains indoors.
- Prom, evening or wedding dress.
- Furniture in the interior.
- Pendants for the neck or an original bracelet for the hand.
- Elegant sweaters and blouses.
- Stylish handbag.
- Beautifully styled hair.
Classic school bow made of nylon ribbon
Classics will always be in fashion. It is appropriate in any case. The same applies to wide bows, especially school ones. What hairstyle do you associate with the holiday of first-graders on September 1, last bell or graduation? Right! With big white bows on her head!
We suggest you do just that. It is very elegant and voluminous. Perfect for decorating ponytails and braids. Read about how to do it step by step in our material below.
Before you begin, prepare a piece of nylon tape that is not too short. The optimal length is about one meter. And the width should be at least ten centimeters.
- To begin with, you need to take our ribbon and bend it very carefully in half. And then be sure to pin the free edges together with pins.
- The edges on the sides need to be scorched with a match or lighter. Do this quickly so as not to burn the entire product. Then pin these edges together too.
- To this edge where you sewed the two ends together, sew any hair tie of your choice.
- Now sew along the fold line with strong threads.
- Remove the pins and carefully roll and pull the ribbon.
- Form a fluffy bow by hand and sew it carefully again with a needle and thread.
Interestingly, the classic way of tying a bow is also called French. And therefore, dear readers, you should not look for a French bow, this is ours, familiar and beloved - classic!
How to make satin ribbon bows: step-by-step instructions
Satin ribbons are the most popular material for creating small masterpieces. Smooth, shiny, relatively inexpensive ribbons have always attracted the attention of needlewomen from all over the world. The material has found application in a variety of creative fields, not with the exception of steel and decorations based on various types of bows.
To create accessories, you can use ribbons of different widths, but it all depends on the chosen design and execution technique. Let's start with the simplest types.
The simplest classic bow
The basic bow that any beginner should learn to make is presented below. For it, you can take either a narrow or a very wide ribbon - it will work from any one.
Work process:
- Fold the ribbon by placing the two halves over the index fingers of both hands.
- Cross the halves and insert one into the other.
- Tighten the product. Ready!
You can make a chic decoration based on such a bow. It will be enough just to fill it with waterproof glue or shiny acrylic varnish, then attach the rings to which the chain will be fastened.
The same bow will not be difficult to tie on a fork; with its help it will turn out more neat and even (although you can create a very beautiful accessory on your fingers). There is also a limitation for such an “assistant” - it is useful only when creating very small bows; for larger products you will have to resort to the traditional method.
Double tape
The double bow is made in a slightly different way from the previous one. For it, two rings made of tape and a separately created center, obtained by sealing the edges, are useful.
Fold the two rings in the middle and sew or glue them so that their sides touch. After this, the middle is closed with a pre-made part. The design can be attached to a hairpin or elastic band.
Note! For this accessory, you need to take a medium or wide ribbon; such beauty will not come out of a thin, narrow material. If your choice goes to a width of 2.5-5 cm, then this will be the ideal solution.
A variation of such a bow of two ribbons can be this analogue: in this case, two rings are superimposed with their centers on top of each other. You can also experiment with colors - for example, create a red or green bow, or even combine one or more shades in one product.
Advice! Try to make more than two layers, take ribbons of different widths and textures. Thus, from one pattern for creating a bow, you can create a wide variety of accessories.
Multi-layered puffy bow
A great option for schoolgirls and more. This bow can easily be placed on a hairpin or comb to attach to your hair. It is based on the two simple bows discussed earlier.
To fold one, you'll need to make a base of two overlapping layers. The ribbons folded in this way will form the back part. The front one is similar to the simplest first bow. At the end they need to be connected using glue or thread. Everything is held together by a central piece.
This way you can get more voluminous accessories, like the white bow shown below. There is one difference here - the basis is not two layers, but three.
Romantic and sophisticated, this addition to the image will delight any graduate who wants to indulge in nostalgia. But this option, unlike jewelry for girls, is more mature and feminine, which is exactly what is needed in such cases.
Twisted bow of 3-4 ribbons
A very beautiful bow that is well suited for head decoration. To do this, three or four (or even more) pieces of ribbon of the same width but different lengths need to be sewn together with an infinity sign and placed one inside the other. Design the middle as in a few microns earlier.
Bow using grosgrain ribbon
We have already figured out how bows are made from satin and nylon ribbons, now it’s time to understand how a bow is made from grosgrain ribbons. Here, as in previous versions, there can be a large number of compositions. Let's consider one of the types of bows.
You will need:
- Two rep ribbons 20 millimeters wide and 12 centimeters long
- Needles and threads
- Rubber
Step-by-step instruction:
- Take a ribbon of a pre-prepared size and singe the edges with a lighter.
- Adjust so that the end is at the center of the tape.
- We do the same with the second edge of the tape.
- It turns out two small bows that are connected together with a thread.
- Pull them together and wrap them with thread several times to secure them.
- You get a bow to which you should glue an elastic band and you're done.
If you want a more magnificent bow, you should add satin ribbons to the composition and do the same in a double or triple version, it all depends on your wishes. There can be many options and compositions, it all depends on your imagination. Choose different ribbons, different colors and combine them to your taste. You can also try to create new technologies for folding petals and get new flowers for bows. There can be an unlimited number of options in this creativity. Nowadays, you can purchase a variety of materials and blanks for decoration, allowing your imagination to run wild.
You can make hair bows, brooches and bows to decorate gift boxes. You can please not only yourself, but also your loved ones by giving them a gift in the form of a bow made by your own hands. Believe me, you will not only surprise your loved ones, but will also greatly delight you with your surprise.
Remember, the main thing is to enjoy the process of making bows and everything will work out!
The perfect lush bow in 15 minutes
Master Class
We cut off four pieces of satin: the two largest ones are the same length, another one is smaller and another very short one (we use it as a jumper).
We sew or glue together the short sides of first one long and then one middle strip. It turns out two rings as in the photo below:
Fold them in half, seams down, and place the smaller piece on top of the larger piece. Sew or glue in the center.
Lightly gather the bow in the center:
We fold the remaining short piece along the long sides inward to the middle, like this:
Carefully wrap the jumper around the bow with the second long strip inserted at the bottom:
We sew or glue the jumper.
To make the bow look neater, cut off the bottom of the “tails” diagonally. In the case of a satin ribbon, you can carefully process the cuts using a lighter.
The bow is ready! If you want to make it even more magnificent, make three or even four rings, the main thing is that each next one is slightly smaller than the previous one;)
Assembling flowers from nylon
A nylon flower is assembled in almost the same way as a fabric flower. The main difference is that to make leaves and petals you will need to make a wire frame and then stretch the nylon over it. To secure, the nylon is wrapped with thread, and the stem is treated with floral paper or tape. To create the base of a petal or leaf, you need to wrap a special template or any other round object with wire, and then give the wire frame the proper shape. Imagine and experiment!
Elegant bow
Sometimes, instead of the pomp and glossy sheen of satin ribbons, modest elegance is required. Bows made from grosgrain ribbons look serious, with a claim to solidity. Small accessories made from grosgrain ribbons are used to decorate business suits, hats, bags, and, of course, hair. Rep tapes are denser in structure, can take and hold their shape, and have a matte, corrugated surface.
Step-by-step master class:
- Prepare two small pieces of grosgrain ribbon of any color. The length of the cuts depends on the size of the future bow.
- Form each ribbon into a ring and place them on top of each other.
- On the rings, lying crosswise one on top of the other, place the third piece in a horizontal position.
- Apply a drop of glue to the middle and stitch all three strips.
- Prepare two more pieces of tape. One is small in size for wrapping the workpiece in the center, the second is slightly longer than the rings, process the edges in the shape of a tick.
- Wrap a small piece around the bow in the middle and secure with glue.
- Sew a long piece with finished edges to the back.
A piece of ribbon with scalloped edges transforms a simple bow into an original accessory, giving it volume and completeness. The edges, decorated with teeth or an oblique line, make the craft ready.
Elegant classic
A simple but beautiful bow can be made in just a couple of minutes. It is based on the classic technique of making bows. To work you will need tape, sewing thread or hot glue.
A simple master class includes the following steps:
- Take a small piece of ribbon of any color.
- Alternately place the tape on both ends over your index finger, forming loops.
- Insert one loop into the other and tighten.
- The bow is ready.
The front and back sides of satin ribbons are different. When creating loops, you need to make sure that the front side is on the outside. It has a glossy effect, a calm shine, the reverse side is faded and dull.
Materials you will need
To make jewelry from nylon, there are special devices, textiles, as well as ready-made decorative elements. All this can be purchased at craft stores.
Composition of nylon flowers as home interior decoration
Thanks to the rich variety of handicraft products, few people in modern realities make flowers from nylon tights. This method has several disadvantages: insufficient strength and elasticity of the fabric, a small variety of colors and textures, as well as size: the resulting cuts from tights do not always allow you to complete the composition.
Capron
The main material for floral decoration is nylon fabric. This material is created in textile factories specifically for this type of needlework. During its production, the tension of the nylon on the frame and the bending of the products are taken into account, so the nylon fabric is strong and durable, but at the same time it is thin and transparent. Nylon is produced in several versions (plain, multi-colored, openwork, with glitter, etc.).
As a rule, nylon flowers are created from standard size textile fabrics, but when creating large floral decorations it is possible to use giant nylon.
Floral nylon
Note! The special nylon for creativity stretches well. This avoids deformation of the petals when it is pulled onto the frame.
Wire
The basis of the product is a special pliable wire. Thanks to it, the structure is stable and durable, and at the same time, the frame of the product is quite flexible - this allows you to give the desired shape to the entire composition.
What kind of wire is needed for nylon flowers and stems - its thickness, stiffness and texture - depends on what it will be used for. When creating petals, flexible and thin wire is used, and for stems, hard and thick wire is used. A variety of wire surfaces (fluffy, paper-braided or lint-free) will allow you to achieve the desired effect without much difficulty.
You might be interested in Sewing sleeves into the armholes of dresses, jackets or coats for beginners
Floral wire
Special devices and tools
To work, you need to prepare tools that will help make the creative process easier and more enjoyable:
- Scissors. Sharp manicure scissors are ideal for working with nylon.
- Pliers or wire cutters. Necessary for cutting and bending wire.
- Nylon threads. With their help, the nylon is secured to the frame of the product, and also the parts of the composition are connected to each other.
- Sample. For the base, special sets of plastic cylinders or available materials that have a cylindrical shape (bottles, batteries, tubes, etc.) are suitable.
- Floral tape. It is used when decorating wire, fastening and decorating visible joints and other minor flaws. The elastic and durable tape has an adhesive surface, which eliminates the need for glue when wrapping.
Tools and accessories for work
Dior
- You can roll up such a bow without using any auxiliary tools. To fix the resulting structure you need textile glue. After work, the excess is carefully removed with a napkin.
- Fold a piece of fabric in half.
- Apply glue at the joint, smooth out any irregularities.
- Wrap a ribbon of a contrasting color around the junction, securing the ends at the back
The finished product can be used as a gift or as costume decor. If you attach a metal ring, this elegant accessory can easily turn into an original keychain.
Polka dot bows for school
Materials:
- ribbon width 2.5 cm, color white and polka dots,
- lace 2 cm wide,
- middle
Let's make a simple bow from polka dot ribbon and lace. Even a novice craftswoman can make such a bow. Cut 3 pieces of white ribbon. 22 cm each, polka dots 3 pcs. 24 cm each. We sew all the segments.
- We will put and sew lace on one white one. From the rest we will make bows: from white - double, from polka dot ribbons - triple.
- We put bows on top of each other. First with polka dots, white on it, with lace on top. Sew all layers together. We attach the center and elastic band to a felt patch with a diameter of 2-2.5 cm. I got not only school bows, but also a tie.
Materials for making flowers from nylon
Capron
There is a special nylon for flowers on sale (single-color, multi-color (usually two- or three-color), as well as a single-color nylon for flowers with glitter).
Plain nylon for flowers
Two-color nylon for flowers
As a rule, nylon is sold in lengths. The average length of the segment is from 50 to 80 centimeters. The elasticity of nylon should be taken into account - it is generally accepted that the length of the stretched segment is from one and a half to two and a half meters.
To create flowers from nylon it is not at all necessary to buy nylon in the store. If you have damaged or unnecessary tights, knee socks or socks lying around, use them. To give the desired shade, white or flesh-colored nylon can be tinted with acrylic paint.
Wire
In addition to nylon, you will need two different types of wire. The first one is rigid wire for constructing the stems. It is used by florists when creating compositions from artificial flowers. Rigid wire, in turn, is also divided into two types: plastic-coated wire and paper-wrapped wire. The length of the wire segment is from 30 to 80 centimeters. Standard sizes are 30, 40, 60, 80 cm, but others are also available, for example, 46 or 75 cm.
Floral wire for stems
To construct the petals you will need flexible wire of different shades. Sold either in pieces of 80 centimeters or by the meter. Wire marking: numbers from 18 (thick wire) to 30 (thin wire).
Wire No. 22
Templates for modeling flowers
The standard set of templates for creating nylon flowers consists of 8 plastic cylinders, differing in diameter.
Templates for flowers made of plastic
| Pattern number | Diameter, cm |
| 1 | 1,7 |
| 2 | 2,1 |
| 3 | 2,5 |
| 4 | 3,2 |
| 5 | 4 |
| 6 | 5 |
| 7 | 6,4 |
| 8 | 7,5 |
| Pattern number | Wire number |
| 1, 2, 3 | 26-30 |
| 3, 4, 5, 6 | 24 |
| 5, 6, 7, 8 | 22 |
| 8 | 18-20 |
The data in the table below is provided by the manufacturer. You will have to check the reliability of the data in practice, but this table will help you get a rough idea of the amount of material you need.
| Template number and diameter | Number of petals made of wire 80 cm long | Number of petals from a 2.1 m length (stretched) | Number of petals from a 2.5 m length (stretched) |
| Template No. 3 - 2.5 cm | 7 | 105 | 125 |
| Template No. 4 - 3.2 cm | 6 | 58 | 71 |
| Template No. 5 - 4 cm | 5 | 45 | 55 |
| Template No. 6 - 5 cm | 4 | 29 | 35 |
| Template No. 7 - 6.4 cm | 3 | 21 | 27 |
| Template No. 8 - 7.5 cm | 2 | 13 | 16 |
Tape or corrugated paper
As a rule, when creating flowers, green tape is used. It is with its help that flowers and leaves are attached to the stems. Brown tape is used in modeling trunks and branches in the art of bonsai.
Chinese craftsmen recommend not storing the tape in a dry room - when exposed to dry air, it loses its beneficial properties (stickiness). In order to restore them, it will be enough to put the tape in a bag with a damp towel and leave it overnight.
Stamens
Stamens are a very important element in flower design. You can make stamens with your own hands from threads and stale, or you can purchase ready-made plastic stamens. Usually the set of ready-made stamens also includes pistils.
Leaves and sepals
To make the work faster and easier, and to make the flowers look more naturalistic, use ready-made leaves and sepals for flowers in your work.
Artificial leaves for roses or chrysanthemums can be found in any specialty store.
Tools
The most important thing is the tools. Without them, you will not be able to put the flower together. You will need pliers and round nose pliers, scissors and a glue gun. In addition, threads to match the color of nylon and cotton wool.
How to make a “Spring” bow
This craft can be created either in one color or in two colors. You can attach it to a hairpin, headband, bracelet, etc. You can also make it from a St. George ribbon for May 9th. It will turn out simply amazing!
What you will need:
- silk ribbons of pink and olive shades 2.5 cm wide;
- a small piece of brocade ribbon 0.6 cm wide;
- threads, needle;
- universal glue or glue gun;
- ruler;
- pins;
- scissors.
Step 1
- Cut 50 cm from a 2.5 cm wide roll of pink ribbon.
- Fold this piece in half, wrong side up. Iron the fold line well.
- Also, squeeze both ends of the tape with your fingers in the middle, wrong side up.
- Fold one end of the ribbon with the wrong side up towards the center line, exactly along the previously formed folds. Pin it with a pin.
- In the same way, fold the second edge of the tape towards the middle. Pin it with a pin.
- Fold the craft in half. Iron the tops well.
- Turn back. Turn it over.
- Fold the left edge toward the center. Position it so that the intersection of the two bottom strips is level with the top point of the ironed line. Pin it with a pin.
- Repeat on the other side.
- Now take a needle and thread. Tie a knot. Sew the central part of the craft with small stitches. Don't cut the thread.
- Pull the thread towards you and tighten the center of the craft. Additionally, wrap it with several turns. Secure the thread and cut. You've done the top part.
Step 2
- Cut 3 pieces, each 12cm long, from a 2.5cm wide olive satin ribbon.
- Take one piece and fold either edge in half, wrong side up.
- Stepping back 1.5 cm from the top, cut a corner diagonally. Start from the middle, moving to the extreme points.
- Repeat on the other side. Follow these directions closely and your ribbons will be neatly and symmetrically cut.
- Trim the remaining pieces in the same way.
- Now place all 3 pieces exactly on top of each other.
- Take a needle and thread. Tie a knot. Sew the center portion of the pieces with one stitch, securing them all together. Cut the thread.
- Now unwrap the pieces. Arrange them so that their sides form rays, like a drawn star.
- Secure the central part of the figure with a pin. Sew it with a needle and thread.
- Pull the thread towards you. Pull the center section. Additionally, wrap it with several turns of thread.
- You have made the lower part.
Step 3
- Place the top piece on the bottom piece. Connect them together using several turns of thread.
- Cut a small piece of golden-colored brocade ribbon, 0.6 cm wide. Melt its ends with a lighter.
- Wrap this piece around the central part, periodically coating it with glue on the back side. Secure the end to the back of the craft. Ready!
And if you make this bow from a ribbon of the same color, it will turn out something like this.
Rep decorations
You can also make your own hair decoration from grosgrain ribbons. To do this you will need the following items:
- Scrunchy.
- Needle and thread.
- There are 2 rep ribbons, the length of which will be 12 cm and the width - 2 cm.
The stages of work are very simple. They must be done sequentially like this:
- Finish the edges of the ribbons with a lighter. After this, fold the strip so that one edge is tucked towards the center.
- Do the same with the second edge.
- The resulting small bows must be connected to each other. This is done by stitching.
- After this, the bows are tightly attracted to each other and wrapped with thread several times. The thread is well fixed.
- Next you need to sew or glue an elastic band or hair clip.
Large bow made of satin ribbons in the shape of a flower
For work we prepare:
- wide satin ribbon (for this bow a width of 8 cm is used, less can be used) -150 cm;
- scissors;
- threads;
- a needle;
- beads or rhinestones;
- pin-brooch for the core;
- felt;
- glue gun
Master Class
Option one
We fold the long ribbon into an accordion and tie it in the center with matching thread.
We turn out each loop and carefully straighten it. We sew large rhinestones or beads between the loops.
Option two
More complicated, but more careful.
Cut the ribbon into 29 equal pieces. It is advisable to take a satin ribbon with a rigid edging - this way the bow will keep its shape better!
Next, take a piece, fold it in half, placing one edge of the tape on the other. Sew or glue the edges. Repeat the same with the remaining ribbons.
Next, we sew the parts into four flowers of 9, 8, 7 and 5 petals.
Cut out a base circle from thick felt.
Apply glue and glue the flowers one by one, starting with the largest and ending with the smallest.
We decorate the middle with a brooch or beads.
Bow using nylon ribbon
These bows are incredibly beautiful and elegant. They can be worn in everyday life and as a festive decoration. What is needed to make bows?
You will need:
- Nylon ribbon, 8 centimeters wide
- Satin ribbon 5 centimeters wide
- Rubber band
- Braid
- Needle and thread
- Gun, glue sticks
Step-by-step instruction:
- Cut the ribbons into equal strips. We fold both tapes in half. To prevent the edges from fraying, lightly scorch it with a lighter.
- We fold the nylon ribbon, move the edge by the width of the edge, about two millimeters from the edge, and sew it on the bend with small stitches along the entire length.
- We tighten the ribbon and get a flower; we bend the edges of the ribbon and hem it closer to the center.
- We fold the satin ribbon so that the ends meet in the center and stitch it. Then we tighten the thread and get a bow.
- Using glue or thread, we connect the satin bow with the nylon one so that the first one is at the bottom.
- We tighten the braid and glue it to the center of the finished flower.
- In the center we place a bead or rhinestones for decoration.
- On the back side of the flower, we attach an elastic band that matches it in color.
- The bow is ready to use
Luxurious lush bow with your own hands
For work we prepare:
- satin ribbon (the larger the bow needed, the longer and wider the ribbon);
- alligator clips, paper clips or clips;
- thread;
- a needle;
- glue gun;
- base for hairpins;
- cardboard;
- pencil;
- scissors;
- candle for processing cuts.
Master Class
First we make a template - cut out a square from cardboard. The larger the square, the larger the bow. We cut a long narrow notch in the center (about 5 mm wide).
We position the satin ribbon as shown in the photo, secure it with a clamp and trim the end so that it is slightly longer than the edge of the template.
We wrap the ribbon as shown in the photo and fix it. After completing three turns, we trim the tip.
We take a needle and thread and pull the needle out through the notch in the template. We sew all three turns with a “forward needle” seam and remove the ribbon from the template.
Gather the bow in the center.
We tighten the thread so that we can fix the base for the hairpin underneath it. If necessary, we perform a few more neat fixing stitches.
We take a narrow ribbon, wrap the bow in the center and use hot glue to fix it on the back side, while simultaneously masking the fixing seam underneath.
The bow is ready!
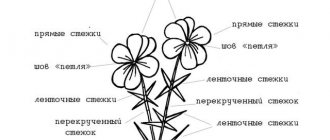
Using the kanzashi technique
Recently, this technique has become especially popular among needlewomen because of its unusual nature. Using the kanzashi technique, you can make a cute voluminous bow from satin ribbons, even for beginners:
- First, let's decide on the materials. Since we work using the kanzashi technique, in addition to tape, we will also need wire.
- We cut off the required amount of material and place it on a table or any other flat surface.
- We form two loops from the material. We overlap the edges of the tape and fold them in the middle. We hold the center with our finger so that our workpiece does not lose its shape.
- We wrap the center of the bow tightly with wire. To prevent the wire from spoiling the look, we disguise it with a thin tape.
- Adhering to the same sequence of actions, we make other preparations. To achieve splendor, we place the blanks on top of each other.
Two-color and gift item
Using ribbons of two different colors you can create an elegant and stylish decoration. This technology is suitable even for beginners. This product can be used to decorate a stylish elegant dress and a beautifully styled hairstyle. It is necessary to prepare a wide and thin piece of tape, each 15 cm long.
Step-by-step instructions for creating DIY ribbon bows:
- First you need to measure the tape of the required size.
- Place one on top of the other and roll it into a ring.
- It is necessary to connect the product blank with glue, and then iron it.
- Tie a narrow ribbon in the center of the bow to cover where the ends meet. You should get a knot.
- The ends need to be cut and glued.
- If you decorate the gift box with a handmade bow, it will look much better. Depending on the situation, it can be made lush and voluminous or modest but elegant.
This option is very simple and easy to make if you follow the instructions:
- You need to take a tape up to 2 meters long.
- It should be wound around the open palm of your left hand, and then carefully removed.
- The end must remain free.
- On one side of the workpiece you need to cut off both corners, approximately 5 millimeters.
- To ensure that the tape does not unravel when cut, it must be carefully burned.
- The same procedure must be done on the second side.
- Next, the workpiece must be aligned so that the cut parts are connected in the center.
- The ribbons should be tied with the free end.
- After this, each petal is straightened to give shape and volume.
A self-created lush bow can please a young girl if it is a decoration on a holiday box or woven into a beautiful hairstyle.
In order to make such a bow, you need to have 6 pieces of ribbon 5 cm wide and 12 cm long, as well as 6 blanks 3 cm wide and 11 cm long. Each one will need to be burned carefully around the edges so as not to unravel. Additional materials will be a piece of feta, small beads and thin elegant braid.
How to make a beautiful bow from a ribbon step by step:
- First, take the wider pieces and fold them in half.
- After this, sequentially assemble onto one thread, pull together well and secure.
- Repeat the same manipulations for narrow segments.
- Cut a circle of feta, the diameter of which should be approximately 4 centimeters, and then glue a large blank to it.
- Take a thin braid, the length of which should be 12 centimeters. You need 6 such pieces. Fold each into a ring.
- Place it on the petals and glue them on the front side.
- Fix the product on top with a narrow variation.
- Pour a small amount of glue onto a piece of fabric with a diameter of 1 centimeter.
- Place the beads tightly in a circle and cut out.
- Place the decor in the center and secure with glue.
Using a fork you can make a small decoration for a card. The process should include the following steps:
- You need to take a fork in your left hand.
- Loop a small ribbon over it so that the edges are on the right.
- Next you need to throw the far end behind the fork over the lower front end.
- To do this, it needs to be brought out between the teeth in the center and brought out from behind.
- The other end must be inserted into the same hole, only from above.
- After this, you need to turn the fork over and tie both ends with two knots.
- Remove the resulting decoration from the fork and trim the ends. To prevent them from blooming, they need to be carefully scorched.
Strict bow
A strict stylish bow can be tied for a celebration or business meeting. It will perfectly decorate a handbag, gift or dress. To make the product look more elegant, it is important to choose the right color scheme. To create a beautiful bow from a satin ribbon with your own hands, you need to have the following set of tools and materials:
- Ribbon in three shades.
- Glue.
- Scissors.
This bow is very quick and easy to make. To do it, you need to follow the following scheme:
- The tape should be 18 cm long and 3 cm wide.
- Roll it up to form a ring and glue the edges together.
- Fold the resulting ring so that the seam is in the middle at the bottom.
- Gently iron the workpiece.
- Next, you need to take a second ribbon of a different shade with a length of 7 cm and a width of 3 cm.
- Wrap a ring across the workpiece and secure well using glue.
- The next one should be a thin ribbon, which has a contrasting shade with the previous one. Its length is also 7 centimeters. It should be wrapped around the previous ring in the center. Glue and iron well.
How to beautifully tie bows on September 1
The most popular hair decoration for September 1st is a bow.
You can tie it in one of 3 ways:
- pleated bow;
- 4 petals;
- luxurious flower.
For option 1 you will need a wide ribbon and an elastic band.
- The hair is gathered together and tied with an elastic band.
- Then the hair is wrapped with a ribbon, one edge of the ribbon is left long, the other short.
- The long end is folded several times and tied with the short one. The bow is ready.
The “4 petals” bow is made like this:
- the collected hair is wrapped in a ribbon and tied in a single knot, the ends of the ribbon should be the same;
- loops are made from the tails and tied with a classic bow;
- the remaining ends are also folded and tied.
Before creating the next hairstyle, the tape must be prepared:
- sew the tape along the center;
- assemble with an accordion;
- shape the ribbon into a bow or flower and sew.
Attach the bow to the elastic band, gather the hair together, and tie it with an elastic band.
Wide ribbon bow
A bow made from a wide plain ribbon will look very beautiful and original if a narrow stripe with an ornament runs along the center line along the entire length.
Scheme for creating a bow:
- spread a wide strip of tape on the table;
- along the middle line and along the edges, attach a narrow bright stripe or a stripe with a pattern with hidden stitches;
- wrap the completed strip of fabric around your hand;
- tie;
- remove from hand and straighten.