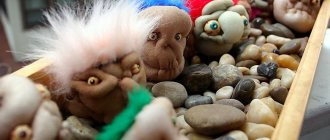
Craftswomen all over the world make toys from nylon tights, and even exhibitions are held in Russia! This is an excellent interior decoration that you can make yourself. Here you will find step-by-step instructions with recommendations and descriptions.
- Head and face
Toys made from nylon tights: ideas for creativity
Original doll
Nylon tights are not only clothing, but also an excellent material for beautiful and unusual crafts. Why nylon? The answer is extremely simple. Based on it, you can easily make all the fine details on the toy, giving it realism. The fabric is very elastic, and this is the most important advantage in such crafts, since you can easily deform the workpiece and carefully trim it. There is no need to embroider a lot on the toy; you can simply give it shape with auxiliary parts. If you approach your work with special diligence and perseverance, you can create a wonderful interior element for your home or a wonderful gift for family and friends.
Crafts from children's tights
In any home where there are children, there will always be several pairs of tights that the child has outgrown. They can be given a second life in different ways.
Sometimes it happens that almost new tights become too small for a child. They are easy to find use for. By cutting off the bottom, you can get both socks and leggings for home. Skilled needlewomen use tights to make practical children's hats, decorated with rhinestones and embroidery.
Bright children's tights can be cut into long strips and crocheted into a rug or bag for toys.
If you wish, you can make different pom-poms from worn-out tights. Pompoms, in turn, are convenient to use for making unusual rugs and children's toys. They can decorate interior items.
It’s also easy and convenient to sew different toys from children’s tights. Children can also be involved in this activity. It’s not at all difficult to sew a funny caterpillar, cats, a funny doll or baby doll.
It’s very easy to make a cheerful New Year’s snowman from white tights.
- Cut off the middle part of the leg of the tights.
- Pull the hole on one side using thread and needle. When performing this operation, you must carefully collect all the loops on the thread.
- Fill with padding made of soft non-woven material.
- Sew up the hole at the top.
- Tie it in two places with a strong thread, thus forming a snowman.
- Mark the eyes with black thread and mark the orange carrot nose.
- You can sew a bright cap on the toy’s head.
You can also use a children's sock for this craft. You can sew a gnome, Santa Claus and Snow Maiden in this way.
It is convenient to use children's tights for sewing decorative pillows and small ottomans. A creative approach will help you spend time usefully and make practical and original things.
Required materials and tools
To create a doll with your own hands from tights you will need:
- plastic bottle (any size at your discretion);
- strong wire that can be bent by hand (aluminum or copper);
- scissors;
- PVA glue;
- nylon tights (pre-boiled);
- a set of flesh-colored needles and threads;
- multi-colored scraps of fabric to create clothes for dolls;
- filling for dolls (sintepon, holofiber, synthetic fluff);
- knitting threads (they are needed to make hair for future dolls);
- acrylic paints;
- small buttons.
Materials and tools
Preparatory stage
First you need to take the right tights. In theory, any will do, but it is more convenient to work with those that contain more than 3% latex in the composition. It will also be better if the fabric is matte, without glitter.
When the tights are found, they need to be “cooked”:
- Dissolve 10 tablets of activated carbon in five liters of water. Before this, they can be crushed in a mortar. By the way, it is better to take more expensive coal - it contains fewer impurities. In some cases, it is recommended to use bleach, such as “Whiteness”. It does not darken the fabric, but rather makes it even lighter. Be careful, it will turn the black nylon dirty orange, which is not suitable for a doll.
- When the water boils, put the straightened tights in there. Boil them for 6 minutes.
- Afterwards you need to take them out and rinse them immediately. It is better to do this under a strong stream from the shower.
- Now dilute the conditioner in cold water and wet the nylon. When they become softer, dry them.
It is worth considering that after this treatment, the color will become slightly darker.
Selection of padding polyester
Creating stocking dolls is similar in appearance to sculpting, so the following requirements for padding polyester are given:
- Softness. Rigid padding polyester is very difficult to mold. Due to this, it may not be possible to fold it in the desired direction.
- Ability to recover. Sintepon, especially hard ones, practically does not return to its previous shape.
- Elasticity.
In addition, over time, padding polyester can become sticky if it is not stored correctly.
Tools and materials
And so, now you need to prepare the remaining materials and tools. In addition to padding polyester and nylon, you will need:
- Good mood, but still a creative process.
- Wire. It is better to take a soft copper rod with a cross-section of 1.5 millimeters.
- Plastic bottle 1.5-2 liters.
- Scissors.
- PVA.
- Thin sewing needles.
- Threads.
- Fabric for doll clothes.
- Thick cotton yarn to make hair.
- Eyes. It's better to buy ready-made ones.
Preparation of nylon
Before you start making a doll from nylon and padding polyester, you need to process the main material - nylon. First you need to learn how to boil tights. This gives the nylon greater elasticity and softness.
Step-by-step description of actions:
- Add 500 mg of bleach per liter of water. The pan with the solution must be placed on low heat.
- Tights must be dipped into the solution and boiled, stirring them in boiling water for 15 minutes.
- The color will change over time, so after 15 minutes of cooking they will have a pinkish tint to yellow.
- It is necessary to remove the contents, place them in another container and rinse with running water and conditioner (for softness). Let it sit for 15 minutes.
- Gently squeeze and then dry the tights. The result is lighter, softer and more elastic tights, ready for further use.
Note! In order for the color to be evenly distributed, it is advisable to cook only one pair of tights, maximum two. It all depends on the frequency of stirring and the concentration of bleach in the water.
Preparation of material
For crafts, it is better to choose new matte nylon hosiery without adding latex (or its content should not exceed 3%).
To make the fabric stronger, denser and not “give” snags, the tights should be boiled in a solution of water and bleach (about 200 ml of bleach for 1 liter of water), stirring continuously.
Whiteness can be replaced with activated carbon tablets. Since the products change color during the cooking process (unstable dye is washed out), the boiling time depends on the desired shade.
Then, to restore elasticity, the tights are rinsed in clean water and then left for several minutes in a container with fabric softener.
The texture is painted with aniline dyes. To get the desired shade, you will first have to experiment with dyes until you get the optimal color.
The quality of the stuffing determines the density of the crafts and how they will keep their shape. Therefore, choose a material with springy fibers (sintepon, padding polyester, holofiber). You can check the elasticity of the canvas by simply squeezing it in your hand.
How to make a doll from nylon tights and a plastic bottle
A doll made from nylon tights and a plastic bottle is one of the main ways to make a toy. For beginners, the bottle will help determine the shape of the doll.
You might be interested in this: Making your own craft from pompoms - a thread dog
DIY pantyhose dolls step by step instructions:
- You should cut the plastic bottle into two parts. One will serve as a model for the head, and the second for the body.
- Wrap most of the bottle with padding polyester. The material should fit tightly to the bottle.
- Pull tights over the bottle. The size of the tights should be enough, but you need to pull them on carefully.
- Roll out a relatively small ball and place it under the nylon.
- Tie off the part of the tights that will get in the way in the future. Pierce the upper part of the nose with a needle and, tightening the thread, create a bridge of the nose.
- Pierce one side of the nose from the top to create a nostril.
- Do the same actions with the second nostril, see if you get the same result as in the picture.
- Make the wings of the nose by inserting a needle through the left and right nostril.
- To make the shape of your nose more natural, do several of these manipulations.
- Pull the upper part of the nylon a little and put a little padding polyester in the place where the forehead will be located. Then tie the top of the tights again.
- Pull up the bottom of the tights to carefully push the stuffing into the intended place for the cheeks of the future doll.
- Do the same actions with the chin of the toy to create a full face shape.
- Pierce the approximate location of the beginning of the mouth in the left corner and move to the right corner. The mouth will be expressive.
- Tighten your lips a little to make them more realistic and beautiful.
- Apply drawstrings to highlight the shape of the cheeks.
- The chin is also an important element of the toy’s face; it needs to be highlighted in the same way as the cheeks.
- The doll's eyes can be purchased at a hardware store or taken from an old doll. You can also make your own from plaster.
- Use PVA glue to glue the eyes to the face.
- Now you need to make the eyebrows. To do this, you will have to pick up the needle and thread again.
- The left and right eyebrows should be brought together with a few stitches.
- Now you can paint the doll. To do this more carefully, it is better to use cosmetics.
- Pull the remaining end of the nylon tights onto a thread and pass it inside the bottle.
- Pull the upper end of the tights from the body through the neck of a plastic bottle.
- Tighten both edges of the nylon.
- The rest of the decor is up to taste and color. The basis for the hair is knitting threads, and the finished wig can be sewn or attached at your discretion.
- Make a hand blank from wire and wrap it with the available material. Put tights on the doll’s hands in the same way as on the bottle earlier. Sew the arms to the body.
- Clothes for the doll depend on the imagination of the performer.
- The doll is ready. You can put it in any place in the house, the main thing is that it always pleases you with its appearance.
Doll made from nylon tights
Secrets of tightening the face and shaping the doll's facial expressions
To gain experience, a novice needlewoman needs to practice a lot. A beautiful toy is always nice to look at, but it costs time. You can simplify your work by learning the little secrets of making the doll more lively and realistic.
Note! It is recommended to watch Irina Starkova’s video and learn all the subtleties of the formation of facial expressions.
Doll face with different facial expressions
Pops
Dolls made from tights received this comic name because of the outstanding size of their butt and face. The trick to the craft technique is that the feet, butt, hands and head are attached on top of the clothes.
Master class on making nylon dolls in pictures
A step-by-step MK in pictures will help you learn more about the technique of making dolls with your own hands from tights.
Step 1 – preparing a plastic bottle Step 2 – wrap the bottle with padding polyester
Step 3 – pull the tights over the bottle
Step 4 – place a small padding polyester ball under the nylon Step 5 – design the nose
Step 6
Step 7
Step 8
Step 9 Step 10
Step 11
Step 12
Step 13
Step 14 – forehead design
Step 15 – shaping the cheeks
Step 16 – chin design Step 17 – mouth design
Step 18 – shaping the lips
Step 19 Step 20
Step 21 – cheek tightening Step 22
Step 23
Step 24 Step 25 – doll eyes
Step 26 – glue the eyes with PVA
Step 27 – eyebrow shaping
Step 28 Step 29 Step 30
Step 31 – coloring the doll Step 32 – place the end of the tights inside the bottle
Step 33 – pull the upper end of the tights through the neck of the bottle Step 34 – tighten both edges of the tights Step 35 – hair for the doll
Step 36 – making hands Step 37 – sewing clothes for the doll
Step 38 – dressing up the doll
How can you use old tights?
If the tights are torn and have arrows, they can be successfully used in the countryside and at home in a variety of ways.
- As a cloth for wiping dust, shoes, and removing animal hair from clothes. It is very good to clean glossy surfaces, glass, and tiles with tights.
- Use a broom as a cover to prevent it from getting covered in straw
- For storing onions and garlic
- Like an attachment on a vacuum cleaner. If some small and necessary thing is lost on the floor, so that it can be found, but not sucked into the vacuum cleaner, you can stretch a piece of nylon fabric over it, which will act as a catcher
- Like tow for insulating windows. Foam rubber, which is often used to plug cracks in windows that have not been replaced with metal-plastic ones, soon begins to rot or crumble. Tights rolled into a tube retain heat perfectly, do not sweat and can last for years
- For painting surfaces. If the paint in the can is lumpy, or debris has gotten into it, it can be saved. All this heterogeneity will remain inside if you put nylon tights on the neck of the jar. They will let the paint through, but not the rubbish. Also, dyeing can be done with the tights themselves, then the texture of the surface will be very interesting
- Make a sieve. You can sift flour through it, drain pasta, squeeze out cottage cheese. Tights are even used for brewing tea so that tea leaves do not fall into portioned cups. You can also filter whitewash chalk solution, wallpaper glue, etc. through a sieve made from tights.
- Tie up the tomatoes. Summer residents have long been accustomed to using tights in such an unusual way. They are cut into strips, which subsequently play the role of strong and elastic ropes
- As patches for mosquito nets or instead of mosquito nets altogether
- Like chopiki. If the socket for the screw needs to be strengthened and a chopper is not at hand, you can insert a nylon flap into the hole made in the surface and melt it. The screw will hold perfectly
You can use old nylon tights to lift up tomatoes.
A vacuum cleaner attachment made from old tights. Bow net made from old tights.
IMPORTANT: Obviously, reused nylon tights must be clean. They need to be washed with powder at a minimum. For some types of needlework they are even boiled
If you have imagination and desire, there is no need to rush to throw away your old, tattered nylon tights. Very beautiful interior items are made from them, such as:
- decorative pillows
- flowerpot
- rugs
- furniture covers
- decorative bottle ladies
- lamp shades
- vases
- part time for pens and pencils
- butterflies
- baskets for sewing, toys, other household items
- photo frames
Decorative bottle from old tights.
A rug made from old tights. Butterflies from old tights.
Pillow toy made from old tights.
Flower from old tights. Lampshade made from old tights.
Chair cover made from old tights.
Dress made from old tights.
A toy box made from old tights.
IMPORTANT: A needlewoman’s imagination can go so far that old tights can be turned into an elegant cocktail dress
Butt made of nylon tights
The name of the doll exactly matches its description. It will decorate the interior and bring a lot of laughter to everyone who sees it.
You might be interested in this: Making a briefcase for a doll yourself
Master class on how to make a butt from nylon
Making a doll begins with the face:
- Foam rubber or any other material used as a filler must be disassembled into several parts. Decide on the size of the head, nose, chin, lips and cheeks.
- Then, starting from the head, put the raw materials into already prepared nylon tights (preferably stockings). Determine the location of the nose. Place cheeks on the sides. There should be a lump of foam rubber under your nose for your lips.
- Pull off the tights and wrap the thread around the hole so that the foam does not come out. You should get a blank for the head, like a ball on a string. The remaining nylon can be trimmed so that it does not interfere with work in the future.
- To start tightening your face, you need to take a needle and thread and secure the thread to the resulting “tail”.
- You should start tightening from the nose. To do this, you need to press the lump with your nose with your fingers and bring the needle forward.
- Make several ties for the proposed bridge of the nose. When the bridge of the nose is ready, make nostrils for the doll.
- Pierce the area for the wings of the nose and remove the needle in the cheek area. Next, move the needle up, the shape of the cheeks should be immediately visible. Make a small indent and bring the needle out in the same way, but downwards and secure the drawstring with a knot.
- Do the same with the second cheek, first passing the needle to the other corner of the mouth.
- By the way, about the corners of the mouth. While the cheeks are being tightened, they will already be visible, so there is no need to determine the size of the lips.
- Stretch the thread from left to right so that the doll’s smile is visible. It must be remembered that the thread must be sufficiently taut.
- Squeeze your face with your hands to secure the tie over your cheeks. Step back a little to thread the needle under the middle of the toy's lower lip.
- Again, make a small indent to go up to the upper lip. Step back a little and move the needle onto the bridge of your nose.
- Pierce the bridge of the nose itself and pierce the product from the back, secure all the ties on the face with knots.
- Cut the thread.
- It is important not to forget to glue the eyes in place.
- The final touch is the doll's makeup. The color and shape of eyebrows, shadows, blush on the cheeks and lipstick are at your discretion. The same applies to the wig.
Important! When working with the nostrils, for greater expressiveness, you need to make several ties just above the holes from the nostrils themselves, so that they do not have a round shape, but a more elongated one, like a real nose.
The design of the most important thing of this toy – butts:
- To do this, make a ball of padding polyester and place it in a nylon.
- Just like with the face, simply tie the resulting “ball” with a thread. And since this is a part of the body where there is no nose, eyes and mouth, then you won’t have to put anything else in except round foam rubber.
- Attach a thread and a needle to the tail. Next, simply wrap the ball in half with thread so that it is divided in two. These will be the buttocks.
- Pierce the base (the same “tail”), press the buttocks to tighten and do the same as in the third step. This way you can give the “soft spot” a shape. The bulge of the butt will depend on the number of tightening steps performed.
You might be interested in this Toy bee for a child in kindergarten, we make it ourselves
The doll also cannot do without other parts of the body.
Making hands:
- You don’t need to think long about how to make a doll’s palm - just bend its model from wire.
- Wrap it tightly with foam rubber and place it in a nylon.
Legs:
- For the feet, make small blanks from padding polyester: five balls for the toes and the foot itself.
- Accordingly, sequentially place the toes and the foot itself in the nylon.
- Fasten the thread to the place where the entire structure is tied.
- Bring the thread to the thumb, more precisely to its hollow, from where it grows.
- Throw the thread back and tighten at the cleavage.
- The remaining fingers are embroidered using the same technique as the first. In this case, it is necessary to make small indents so that the fingers do not merge into one whole.
- When the last toe is formed, the needle should be pierced to the side, indented towards the big toe upwards and the needle should be brought out in the center of the foot.
- Pull tightly and secure the thread at the base with a knot.
Next, you can sew clothes from any materials you like, sew ready-made arms, legs and head to the body.
Pop doll
How to make a pop doll can be seen in the video at the link
.
Manufacturing instructions
When creating such a product, it does not matter at all whether you have experience in similar work or not. A detailed master class describes how to make a doll step by step. If you strictly follow the instructions and techniques, the craft will turn out beautiful and will delight its owner every day.
Head and face
In all the work, this stage is considered the most difficult. The expression of the future doll depends on how correctly the stitches and tightening of the face are done. It is important to remember that all knots and thread fixation are carried out from the back of the head.
Step-by-step instructions for making a doll head:
- You need to take a padding polyester and wrap it with nylon. Next, tighten the resulting ball with thread and remove the excess.
- Using a needle and thread, make a hole for the eyes. Leave the knots on the reverse side.
- Using drawstrings, form the nose of the toy from nylon tights. Bring the threads inside out and fix them there.
- Using a large needle, highlight the cheeks and make lines for the mouth and chin. When these areas are formed, you need to adjust the padding polyester and bring the drawstrings to the back of the head.
- Sew or glue eyes onto the face, draw eyebrows.
- Using highlighter or shadows, highlight the line of the nose, lips, tint the eyes, cheeks.
The doll's head is ready. To make your face kind and smiling, you need to lift the corners of your lips and highlight your cheeks. During the work, you need to try to prevent the appearance of creases, as they make the expression look senile and tired.
Torso
The body of dolls from nylon tights is made in one of the following ways: using wire, a bottle frame or without third-party reinforcements. The simplest method is stuffing. To create a body, it is recommended to use flesh-colored tights. Algorithm of actions:
- the first step is to make a pattern of the desired size on paper and cut it out;
- then carefully transfer the pattern to nylon;
- Next, we sew the elements together, after which we turn the base inside out so that the stitches are not visible;
- Finally, you need to fill the body of the future doll with padding polyester with your own hands and sew up the hole.
If a bottle or wire frame is used, sewing is carried out in the same way. Only in this case is a reinforcing device installed inside the base, after which the body is filled with padding polyester. A body with a frame holds its shape better, but a stuffed doll made from nylon socks is softer and more pleasant to the touch.
Before adding filler to the base, you need to fluff it well so that it becomes more voluminous.
Upper and lower limbs
A do-it-yourself doll can have fixed or moving limbs. The second option is more complex, but this craft will look better. If you are performing such a toy for the first time, you can choose a simple option. All that is needed in this case is to draw a pattern, fasten the elements and fill the resulting base with filler. If the decision is made to make movable limbs, the hands and feet are made separately.
Making master class:
- From the wire you need to make the base of the palms with fingers.
- Wrap the resulting frame with padding polyester. The layer should be thin.
- Stretch the fabric of a nylon sock over the part, and use strings to separate the fingers.
- Trim excess material with threads.
- Attach the brushes to the base of the handles.
- Finally, highlight the stitches and folds with dark shadows, due to which the fingers will be more pronounced.
In the same way, the master makes feet using wire, padding polyester and tights. Subsequently, the legs with handles are fixed to other parts with threads. In order for the hands and feet to remain mobile, they should not be pulled too tightly towards the other elements.
Hair
How beautiful homemade dolls will look depends not only on the facial expression, but also on the hair. If she wants to have long hair or braids, she will need to make a wig. It can be sewn or placed on the head using glue. In any case, the hair should not be removed. The production of a wig is carried out according to the following algorithm:
- First you need to cut the hair from the yarn.
- Afterwards, wrap the head of the toy with cling film, which will prevent the wig from sticking.
- Next, wrap the upper part with gauze and secure it to the “skull” with stitches. The procedure is carried out very carefully, otherwise the “face” can be ruined.
- Apply a strip of glue on the back of the head to the gauze, then press the hairs tightly to it. Next, apply glue in rows over the entire head and fix other strands of hair.
- In the forehead area, carefully glue short hairs that serve as bangs.
When the wig is ready, you need to cut the stitches and remove it, then remove the cling film from the face and sew it back. To make a doll made of nylon and padding polyester look more unusual, you can give her a hairstyle.
Assembly
This stage is the most exciting. Depending on the facial expressions, each toy already has its own character and specific appearance features. After all the elements are fixed, the craft will take on its own life. Technique:
- Handles and legs need to be sewn to the body. If the hands and feet were made separately, fix them too. For work, it is recommended to use flesh-colored threads so that they are not noticeable.
- After this, put on the sewn outfit on the body. It can be removable, or it can be fixed.
- Next, attach the head to the body - at this stage the work can be considered completed. All that remains to be done is to straighten the toy.
At the end, you need to remove the protruding threads and disguise the connecting seams. For this, ordinary shadows or paint are used. In order not to spoil the head with other parts of the body, they need to be sewn together without tightening the thread too much.
Tumbler dolls
Tumbler dolls are cute and miniature toys made of nylon. Working on them is great practice for beginners because you don't have to worry too much about them. To create dolls, any thickness of nylon and even socks will do. They are made according to the same principle as described in the section “How to make a doll from nylon tights and a plastic bottle.”
Tumbler doll
Nylon doll in one hour
With this master class you can easily and quickly make a doll from stockings. It will appeal to those who are sewing such a toy for the first time.
- You will need a nylon stocking. You can cut off the toe part of the tights. We stuff it with soft (preferably white) syndepon and sew up the edge.
- To form the neck, you need to stitch with a needle in a circle and tighten. We tighten the neck area with a thick thread.
- We do the legs in the same way. We sew small circles from the bottom with an overcast stitch and tighten them. You get two convex balls.
- The arms can be made similarly to the legs or sewn separately.
- We stick a needle from below and pull it out in the navel area. We make several loops and pull out the needle at the bottom. Fasten the thread to the seam. This is how the navel turns out.
- When the body is ready, it is necessary to give the doll distinctive facial features.
- The nose is shaped the same way as the legs, only smaller.
- Select areas on the sides for the ears. We pinch with our fingers and sew several loops. You get ears.
- Sew on beady eyes. Using black thread, we make several loops, outlining eyelashes and eyebrows.
- We make several loops with red thread, indicating the mouth. Or you can draw with a permanent marker.
- Let's do a hairstyle for our doll. The hair can be made from thick yarn, textured fabric or from the edge of tights, covering the top of the head with a cap.
- We sew clothes for the doll. It is made from any fabric. The cheeks can be powdered with a pinkish tone. It all depends on your imagination.
It is necessary to work with nylon material carefully. Adjust the thread tension so as not to damage the fabric or make it tight. When stitching, it is better to use a thin needle.
Frame dolls made of nylon tights
These stocking dolls can differ only in their sizes. In frame toys, the emphasis is placed not only on the head, but also on other parts of the body. The word “frame” in the doll’s name speaks for itself.
How to design a face is described in detail in the sections above. Now you should learn how to make the basis for the doll - its frame. First you need to draw a layout that will help you determine the size of the toy.
Model of the future toy
For the frame, the wire must be sufficiently flexible and dense: it should not break from the tension between two nails.
Wire for frame
The result is a very stable structure, and you can bend the wire with pliers if you want to make the doll stand or sit in different poses.
The frame can be given different shapes
Attaching the head to the frame
The wire frame should be wrapped in padding polyester and the tights should be carefully pulled on.
Frame wrapped with padding polyester
All that remains is to sew the details on the body and the body of the doll is ready.
Wireframe policeman
An additional convenience in a frame doll is the ability to change clothes, since they will not be sewn to the head, arms or torso.
Homemade toys made from tights will bring joy and delight from what you have made with your own hands. You can try to make Kuzya the brownie, baby doll, and soldier in a similar way and add these wonderful products to your own collection of dolls.
How to make a baby doll from nylon?
This is a baby toy: used both independently and as a pendant.
To sew it, you need to take:
- nylon sock;
- knitted sock;
- padding polyester;
- beads for eyes;
- pins;
- black and flesh threads;
- glue and scissors.
Master class - how to sew baby doll toys from tights:
- The nylon sock needs to be cut off, setting aside its blind part for now.
- The filling is wrapped in a rectangle and a “sausage” is made.
- The padding polyester fits precisely into the cut sock.
- The upper part of the sock is sewn up - this is the tip.
- In the part of the sock where there is an elastic band, you need to fold it and sew it up too. There will be legs.
- The sausage is tied with a thread, dividing the doll into a head and a body.
- The back of the body is pulled together to form a blank.
- Now you can shape the face. Pins are located in place of the facial features.
- Next, exactly as shown in the photographs, you need to make indentations using pins. Each eye and each nose should “return” to pulling the back of the neck.
- The face is already planned. Next you need to work with black thread, embroider eyelashes and eyebrows. The thread is attached to the top of the head.
- The needle is brought to the place where the eyebrows are. Embroidering begins.
- For the arms and legs, take the blind part of the sock. All elements are stuffed with filler and stitched together.
- Baby doll clothes are made from a knitted sock. The ball handles and nose are sewn on, the knitted sock is wrapped under the collar.
- A cap is made from the other part of the sock. It can be rolled up at the bottom and worn tightly. You can sew a pompom to the hat.
- The eyes are decorated with beads, the cheeks are flushed - the baby doll is ready!
How to sew a monkey from tights?
A monkey stocking doll is a symbol of the year and just a cute toy for children. She is made like an anthropomorphic doll.
- Making a wire frame
- Wrap the frame with double-sided adhesive tape, then the padding polyester will stick to it well
- Wrap the frame with synthetic padding and secure it with winding threads
- Follow the instructions above to make monkey hands.
- They form the monkey’s head and use stitches to decorate its face.
- Shape the body of the toy
- Connect body parts together
- Sew clothes for a monkey
Monkey frame. Monkey stuffing.
Making a monkey's face. Monkey made from old tights.
IMPORTANT: If desired, you can use fur to create fur for the monkey