How to make buttonholes on a sewing machine without special tools
There is a very simple way in which you will learn how to make buttonholes on a sewing machine without a special function and a buttonhole foot. In this master class we will talk about this.
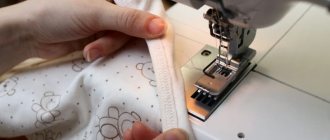
How to make a buttonhole using a special foot
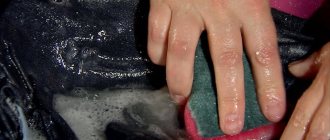
Most often, the loops on the clasp of a product are processed at the last moment, when the entire product is almost ready. It is important to remember that the locations of the loops must be duplicated, for example, using adhesive doublerin. It is advisable to choose dublerin of a non-contrasting color relative to the color of the fabric of the product.
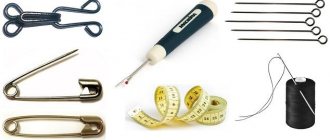
You will need:
- tailor's pins for medium fabrics;
- tailor's pins for thin fabrics;
- small scissors;
- ruler;
- Disappearing marker for fine line fabric.
Step 1. Marking
Determine the width of future loops. The loop is usually made several millimeters longer than the diameter of the button.
Button diameter is 2.7 cm, selected loop width is 3.0 cm.
Mark the position of all the loops at the site of the future fastener. Using a washable marker, draw a loop frame that is 3.0 cm long and approximately 0.5 cm wide.
If you don't have a fine marker, you can mark the frame using marking stitches.
Baste the layers of fabric in the fastener area or pin them with tailor's pins.
Place pins for thin fabrics on the loop frame, pinning them along the short sides, this will ensure convenience and accuracy when processing the loop frame on a sewing machine.
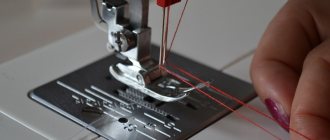
Step 2. Frame
This operation is performed on a sewing machine.
Settings: straight line, 1.5mm stitch length.
According to the markings, stitch the frame with a line with a short stitch: the length of the stitch on the long sides of the loop frame is limited by pins, in the area of the short sides of the loop frame it is better to count the number of stitches, it should be the same on all short sides of all loops, this will ensure maximum accuracy of the loops.
Hinge frame. It is better NOT to remove the pins located on the short sides of the loop frame at this stage.
Step 3. Long sides of the loop
At this stage, the long sides of the loop are processed in a tight zigzag.
Settings: zigzag stitch, stitch length ~2.5 mm, zigzag density ~0.4 mm.
The zigzag must be laid along the long side of the loop so that the stitches lie on both sides of the laid stitch that forms the loop frame. Length guidelines are pins.
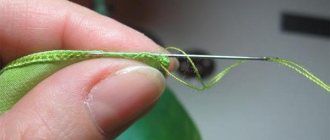
How to process a slotted loop by hand
Step 4. Short sides of the loop
At this stage, the loop frame is closed - the short sides are processed in a tight zigzag.
Settings: zigzag stitch, stitch length ~6.0 mm, minimum zigzag density ~0.2 mm.
On a test sample, it is better to pre-select the stitch length to process the short edge of the loop. The stitch should cover the width of the loop. The machine foot is located exactly in the center of the loop, and the short side is clearly under the needle.
To close the width of the loop, you need to make about 10 stitches back and forth, making point tacks at the beginning and end of the operation.
The loop frame is stitched, you can remove all the pins and markings.
Iron the loop area.
Step 5. Final processing
All that remains is to cut the loops. This operation can be conveniently performed using small and sharp scissors. It is very important not to touch the zigzag threads when cutting through.
Carefully trim the excess threads inside the loop, cutting out any excess threads.
Ready!
Sewing school: cut-out loops for frames
How to easily and easily sew a button on a leg
To make it more convenient to sew on a button, forming a small “leg,” you can use a sewing machine needle: place the thick part of the needle under the button, and inject the sharp part into the fabric.
This way, under the button, the space necessary to form the “leg” will be created, and the needle will not need to be held, because she holds onto the fabric herself.
Once the stitches securing the button are completed, the machine needle can be removed and the threads under the button wrapped several times to form a “shank.”
10 unusual ways to sew on a button
Now everything is ready!
Author of the master class and photo: Daria Tabatchikova
By training, Daria is a PR specialist and economist, but several years ago she devoted herself entirely to her favorite activity - sewing.
She learned to sew from magazines, books and using the Internet; she also has sewing courses, but Daria considers herself self-taught. She loves to study specialized literature on sewing from different years and countries, and then apply the acquired knowledge in practice.
At the end of 2021, Daria became the winner of a holiday competition from BurdaStyle.ru.
She runs her own Instagram page and VKontakte group.
Material prepared by Yulia Dekanova
Materials and tools:
- A finished part in which you need to make a loop (the waistband of pants or the placket of a shirt)
- The right size button
- Thread ripper
- Tailor's pin
- Automatic buttonhole foot from a Janome machine (included in the standard set of “spare parts” for modern machines)
It is also better to stock up on a test piece of fabric on which you can practice. This fabric should be the same density as that used for sewing the entire product. In addition, the fabric will need to be folded as many times as there are layers in the prepared part (in the placket of a shirt or the waistband of pants).
Automatic buttonhole sewing
One of the great advantages of modern computer-controlled machines is the automatic buttonhole function. Moreover, every self-respecting machine offers not just one type of hinge, but many.
This is the range of hinges on my Astralux 7900
Loops differ in width, the presence of an eye in the front side of the loop, and the type of fastening at the ends of the loop.
Not all of these types of loops are equally useful. Typically, simple rectangular buttonholes (46 and 47) and eyelet buttonholes (48,49) are used for outerwear. Note. The “eye” is needed so that the button stem can fit into it.
But you need to understand that although a household sewing machine produces a buttonhole “with an eye,” it will only be an imitation of an eye loop made on industrial semi-automatic buttonhole machines. On a household sewing machine, the loop is sewn with a zigzag, and on an industrial semi-automatic machine with a special chain stitch, so it turns out to be more convex and voluminous.
Automatic buttonhole sewing is done using a special foot.
A button is placed at the back of the foot.
The size of the buttonhole depends on the size of the button. The size of the loop is equal to the diameter of the button plus 3mm so that the button fits freely through the loop. The larger the button, the larger the gap between the size of the button and the loop should be.
The foot is attached in the standard way - through an adapter using the foot attachment rod.
The main part of the foot does not move; to secure it in a motionless state, a special lever is used, which must be lowered before you start sewing a buttonhole. Without this lever, the buttonhole will not be sewn; the machine will sew in one place.
The movement of the fabric begins not from the worker, but towards the worker, so we lay the fabric so that the intended beginning of the loop coincides with the marking on the foot.
The loop is sewn in stages.
My machine first sews a straight stitch along the left side of the buttonhole, then sews a zigzag stitch on top of that straight stitch. Next, perform a straight stitch along the right side of the loop and a back tack. Then he overcasts the right side of the buttonhole and the front tack. At the end, he performs a spot tack and raises the needle to the upper position.
Cutting the loop is done manually with a ripper, small sharp scissors, or a special loop cutting tool.
In order not to accidentally cut excess with the ripper, a tailor's pin should be inserted into the end of the loop.
The automatic buttonhole foot allows you to sew buttonholes with gimp thread. To do this, you need to fasten the frame thread to the foot. The overcasting process is carried out in a standard manner.
After overcasting, the ends of the frame threads can be simply trimmed or hidden between layers of fabric using a needle.
Finally, checklist for automatic buttonhole sewing
- Mark the position of the loop on the fabric.
- On the automatic buttonhole foot, pull out the button holder plate and insert a button there.
- Install the presser foot.
- Pass the top thread through the hole in the foot and pull it back under it.
- Select the required loop configuration. Set the desired stitch parameters.
- Place the product under the foot so that the starting point of the loop on the fabric and on the foot coincide
- Lower the paw. Make sure there is no gap on the front of the foot, otherwise the front of the buttonhole may move.
- Lower the needle to its lowest position.
- Lower the buttonhole lever by the tab on the foot.
- Begin stitching, gently holding the product with your hand
- After finishing the stitching, raise the presser foot and move the items to sew a new buttonhole.
- After sewing the buttonholes, cut the fabric between the sides of the buttonholes
PS Automatic buttonhole sewing is only possible on computer controlled machines.
In describing the stitching process, I proceeded from the capabilities of my Astralux 7900 machine. For other brands of machines, some things may differ from what is described in the article, but the general principle will remain the same.
DO YOU THINK THIS WOULD BE USEFUL FOR YOUR FRIENDS? SHARE WITH THEM ON SOCIAL NETWORKS!
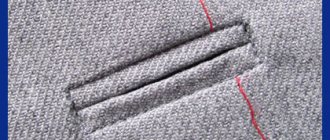
Slit loops.
And again we are in touch with you, dear sewing lovers, blog milla-sidelnikova.com. Hello!
The clasp is the most important element of any model. I personally treat the clasp with special trepidation. And when the time comes to make welt loops, I always tense up internally. Will it work this time? And, despite the fact that during my life I have made a countless number of such loops, and every time I still doubt whether they will turn out neat, whether they will not be crooked, as in that proverb “One eye on the Caucasus, and the other on Arzamas”...
Today's post will be about how to make a slotted buttonhole on a machine.
It’s good in sewing factories, I inserted it into the machine and “zhik zhik zhik – take away what’s ready”...
Manufacturers of modern sewing machines have made an amazing gift to sewing lovers by giving us the ability to make cut-out buttonholes on their sewing machines.
It is very good when your household sewing machine has among the working stitches the function of making loops in automatic or semi-automatic mode. This will give your product a completely professional finish.
Types of slotted loops.
You can make different loops on different machines, from different manufacturers. For example, these are: 1) a loop made with a cross (a loop for beautiful elastic fabrics (decorative loop)); 2) a rounded loop with a longitudinal fastening (a loop for shirts, blouses and any other clothing; 3) an ornamental loop (a decorative loop for shirts, blouses and any other clothing).
The more types of buttonholes your sewing machine can make, the more creative options you have.
The most common ones performed by modern sewing machines are: 1) a linen buttonhole for blouses, shirts, bed linen, and 2) a buttonhole with an eye for jackets, outerwear or trousers.
There will be no problems with making these types of loops if you have instructions for the machine.
But even if your sewing machine is not replete with such functions, having only a zigzag stitch at your disposal, you can also make a slotted loop.
How to make buttonholes on a household machine manually?
To find a place where the slotted loop will “settle”, you need to follow a number of very simple rules.
- On women's models, the loops should be on the right shelf (if the clasp is on the front).
- Vertical slotted loops are placed strictly along the grain thread. Horizontal along the weft thread (perpendicular to the line of the middle of the front). 1/3 of the loop length extends beyond the line of the middle front to the edge of the fastener, 2/3 beyond the line of the middle front to the side seam.
- The first (top) loop is placed at a distance equal to the diameter of the button from the neck line.
- You definitely need to calculate it so that there is a loop + button on the chest line.
- The distance between the loops depends on the size and number of buttons (according to the model).
- We decide what the loops will be:
- Loop length.
- Loop width.
- Loop stitch density.
All these values depend on the size and shape of the buttons, as well as the texture of the fabric we are working with. The length, width of the loops and stitch density are determined experimentally.
Well, we’ve taken everything into account, marked it out, decided on the permanent residence of the loop, now we proceed directly to making a slotted loop for the button.
Along the line between the two marks (loop length), there will be a cut (entry for the button). Leaving a strip 1 - 1.5 mm wide along the cut line, we place the needle in the corner between the line of the middle of the loop (shelf) and the intended segment (on the right side).
We sew a line with a zigzag seam. We lay the line close to the next transverse mark and stop in the far right corner.
We turn 180 degrees.
We increase the width of the zigzag stitch without changing the density of the stitches, and make the first loop tack. The width of the tack is equal to the width of the 2 sides of the loop + 1-1.5 mm allocated for the cut.
When finishing the fastening, leave the needle in the lower left corner (remember, we turned 180⁰). We stop and again change the width of the zigzag seam to the previous one, without changing its density. Sew the left side of the loop and leave the needle in the material at the far left point.
We turn 180 degrees.
Again we change the width of the zigzag seam, without changing its density, and make the loop tack similar to the previous one. We stop at the far bottom right corner.
You can fasten the loop stitches by bringing the ends of the stitch threads to the wrong side, and then knit them and cut off the excess, or by zeroing out all the dimensions, “dance” in place with a needle.
Voila! The loop is ready!
All that remains is to open the “door” for the button and cut the loop. Of course, if you have a special knife - a ripper for such cases, then there is nothing to talk about. And if not, then cut the loop with small sharp scissors, a blade, a scalpel (yes, you can use a scalpel for such a thing), placing something hard under the material - cardboard, a ruler, a board, etc., so as not to damage the table. And in order not to damage the loop fastenings, pins are stuck in front of them.
And in conclusion, a few words about which side is better or more correct to start making a loop from the right or left (for vertical loops).
It is better to start from top to bottom (along the part on which the fastener is made), no matter to the left or right of the future entrance (cut) to the loop. Because this way, you start going along the edge of the fastener down and the entire product, sleeves, back, left front, collar, etc. is located to the left of the machine, and you can control the situation. Nothing bothers you. The zigzag seam, that is, the side of the loop, should be smoother.
And having turned 180 degrees, you will already have a landmark, a path along which you should go back up. And the entire product, which is now located to the right of the machine, will no longer interfere with the stitching (making loops).
Buttons are sewn along the middle line of the front, “with an eye” on the completed loops.
It would seem that there is nothing difficult about making a slotted loop. Moreover, an entire article is dedicated to its production. But depending on how we approach their implementation, slotted loops can either decorate the product or hopelessly disfigure it. I think such a publication will not be superfluous to replenish the knowledge base of sewing lovers.
All the best to everyone! Sincerely, Milla Sidelnikova!