The ability to make a blind seam on a sewing machine has helped out every good housewife more than once. Most often, this type of seam is done manually, due to the fact that not every woman knows how to use all the available capabilities of a sewing machine. But in fact, there is nothing complicated about it. This article will help you learn how to sew with a blind stitch without ruining your favorite item.
What is a blind seam?
A blind seam is a type of seam that is designed to seamlessly connect different elements of fabric to each other. The secret of a hidden seam is that it is hidden between several layers of fabric. The technology for processing material on a sewing machine in this way is quite simple, but it is still worth taking some sewing lessons. It is possible that not everyone will be able to create a perfectly straight seam the first time, so during training it is better to use unnecessary scraps of cotton fabric.
Needle requirements
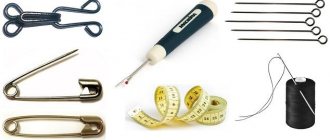
Experienced needlewomen choose short, sharp needles. With such needles it is convenient to pick up a certain number of threads or make a stitch of the desired length. The needle should be thin, sharp, with a narrow eye. A small ear is necessary so that there are no visible punctures on dense tissues.
Dull needles with defects and rust cannot be used for work. You won't be able to pick up 1-2 threads with a dull needle. Needles with rust can damage fabric, break threads, or leave ties.
Where are hidden seams used?
Before learning how to sew with a blind stitch, you should find out in what cases it is used. Basically, this type of seam is used to process the lower part of the product, which was sewn from thin material such as cotton, chintz, linen, etc. Very often it is also used to adjust trousers, skirts or dresses. For the housewife, this seam will be indispensable if minor repairs of the product are required on its front side.
Types of sewing machines
Modern sewing machines come in three types: electromechanical, electronic and computer-controlled machines. The most affordable of them, financially, are electromechanical models, in other words manual. They are not suitable for production purposes or for working with dense materials. For example, if you need to repair a coat, then a manual sewing machine may not be able to cope with this task, because... most often they have a lightweight mechanism. The most popular models of electromechanical devices can perform about twenty types of seams, including hidden ones. A foot for a blind seam is usually included with the household appliance, otherwise it can be purchased at a specialty store.
Electronic models are controlled by an electronic microprocessor, which sets the necessary modes of the sewing machine. It also helps control the needle, which makes working with seams that are difficult to make by hand several times easier. In addition to the blind seam, electronic sewing machines are capable of performing a huge variety of decorative finishing stitches, as well as combining them with each other.
Computer controlled sewing machines are luxury household appliances. They are very expensive, but the functionality of such devices is very impressive. When working with a computerized machine, there is practically no limitation on the complexity of the seam to be performed. Such models have two modes: sewing and sewing-embroidery. At the time of purchase, dozens of embroidery samples are usually already included in the device’s computer system, but if the standard sketches do not suit the buyer, he can easily download the embroidery patterns he likes via the Internet. It is clear that for such an advanced model there is no question of how to make a hidden seam, but not every housewife can afford to acquire such a device. And, in fact, such a machine is not useful for minor repairs and one-time adjustments of things.
Secrets of a seamstress
The blind seam must be mastered to achieve the following goals:
- be able to process the bottom of a product made from thin fabric;
- hem trousers;
- finish making a soft toy;
- fasten the sleeves of the blouse;
- perform minor repairs on an expensive product if the damage is on the front side.
Blind seams can be made manually, or by installing a special foot and selecting a mode, they can be done on a sewing machine.
How to make a blind seam by hand, what do you need to know for this?
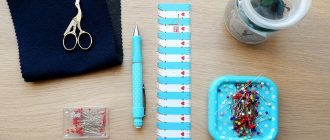
If you don’t have on hand threads that match the color of the workpiece, scissors for cutting threads, a relatively thin needle optimally selected for the thickness of the thread, and an iron, a blind seam may not work. When working of this nature, the thread is threaded into the needle in 1 addition.
If the fabric is thin and transparent, then you will have to do without a knot:
- Before starting work, the edges of the product must be overcast. How it will be done, overlock or manually, does not matter. You can even go over it with special glue. The main thing is that the threads do not fall off during work;
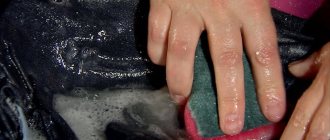
- The edge of the product needs to be bent by 5-8 mm. It is better to sweep the fold and additionally iron it so that the fabric does not move out when hemming;
- The hem is performed again, by the same amount. Will be ironed again;
- The needle is inserted closer to the edge of the hem, inserted inside, and then withdrawn between the main part of the hem and the hem. You should not pull the thread too hard, there is no knot on it, it can stretch out;
- The first stitches - 2-3 - are laid close to each other, they secure the thread.
If the knot is still tied, then it must be carefully hidden between the edge being processed and the hem.
The distance between stitches should be no more than 7 mm, but 3-5 is better. During punctures, 1 thread of the product is captured.
A hand-made blind hem seam is similar in stitch pattern to the so-called “goat”. Its stitches form a cross on the front side, and parallel lines on the back side. But on the front side, with a hidden seam, the stitches are not visible, since the minimum number of threads is caught.
How to finish sewing or repairing bulky items
When sewing soft toys, repairing down jackets and pillows, it is impossible to do without the skills of making a hidden seam.
The thread is inserted into the needle in one fold, a small knot is tied on it:
- The needle is inserted into the open hole in the fold from the wrong side;
- The knot should remain in the fold on the wrong side;
- Next, the needle moves into the fold of the opposite side or part;
- 1-2 threads are caught, the stitch is tightened;
- The process is repeated: the needle is inserted into the fold of the seam of the first part from which sewing began. In the same way, a pair of threads is grabbed, the needle is withdrawn, the thread is pulled, and the stitch density is checked;
- The stitches are repeated until the end of the seam.
After the seam is sewn along its entire length, the thread is secured using small frequent stitches and cut short with scissors.
If the thread is bitten off or broken, the entire stitch may become pulled together and the work will have to be repeated.
We use a sewing machine
The easiest way to sew with a blind stitch is on a computer-controlled machine. The computer itself will set the program.
The seamstress only needs to prepare the product for work and put on a special foot – R:
- The edge of the product is processed in the same way as for making a hand seam. That is, the edge is overlaid and ironed;
- You can overcast the edge not with an overlocker, but with an overlock stitch - it is included in the program;
- The width of the hem is marked and the stitching line is marked. The hem is always wider than the distance from the edge of the product to the stitching. When making a blind seam on a computer sewing machine, you must retreat from the edge of the hem by at least 0.7-1 cm. This distance should be less than the width of the hem;
- The line selected is the one in which the needle occupies a central position. The regulator is set to the middle position;
- Along the first marked line, the fabric pieces are folded back to back, along the second - face to face;
- The punctures must fall exactly into the fold of the fabric.
On a computer-controlled machine, blind stitching is performed in a zigzag pattern in 1 mm increments. The needle for this type of seam is selected thin, the threads must match the color of the fabric.
In the program, you can select 1 of 2 functions: hem stitch or free sleeve. A seam made in this way will be invisible on loose fabrics. On smooth ones it is slightly visible. After finishing work, the product must be ironed.
Algorithm for performing blind stitching on an electric sewing machine
Fabric preparation is carried out in exactly the same way as when making a blind seam manually and when sewing it on a computer-controlled machine:
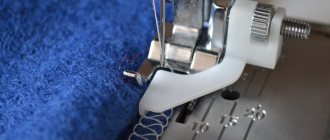
- Install a foot for making a blind seam with an adjustable limiter width function. This foot is called L. The screw, which is attached to the foot, moves the stopper during operation, and there is no need to adjust the position of the needle;
- The machine is set to zigzag mode with missing “Christmas trees”;
- The stitch for hemming is selected, the needle is set to the central position;
- Adjustment of the limiter screw is performed manually;
- The stitching should run along the very edge of the hem;
- You need to stitch so that the needle catches the minimum number of threads on the fold.
After finishing the work, the product must be ironed, as in other cases.
- When making a blind seam by hand, you need to select a thread number less than that required for sewing fabric of this type;
- The thickness of the thread should correspond to the thickness of the needle;
- You only need to choose a sharp needle, even if the fabric has a loose structure, otherwise you won’t be able to grab 1-2 threads.
In an electric sewing machine, in order for the stitching to be practically invisible, you can thread a fishing line as the top thread. The product must be positioned so that the fishing line is on the front side
When working with thin fabric, this advice cannot be implemented, but if you have to hem things with dense textures, such a solution is optimal.
Blind stitch on a sewing machine: preparing the product
Before you begin fitting the product, you need to prepare it. Let's say you need to shorten a new skirt. How to prepare it so as not to spoil the new thing? Based on the rules that sewing lessons teach us, the preparation of the product is carried out in the following sequence:
- Open the existing hem seam. This can be done using a steamer or nail scissors. If you plan to shorten the product to a significant length, you can simply cut off its lower part.
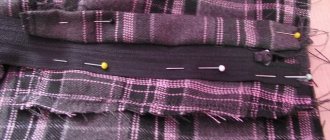
- Determine the length of the product with a hidden seam. To do this, you just need to try on the item to be shortened, tuck it to the desired level and secure the excess fabric with pins. Making straight marks on your own is quite difficult, so get someone's help.
- Make notes. After trying on, you need to draw a straight, even line with chalk or a pencil along the entire perimeter of the product in place of the attached pins.
- Determine the width of the hidden seam and make the appropriate marks. For example, if you want the seam width to be three centimeters, then draw a straight, even line at the same distance from the edge of the product.
- Trim off excess fabric. The cutting line should be at a distance of at least two and a half centimeters from the bottom mark.
- Fold the bottom of the product and iron the bend. If you left exactly two and a half centimeters of fabric under the first marked line, then you need to wrap half of this length inside and iron it thoroughly.
- Fold the edge of the product along the middle mark so that the hidden seam will go through, and secure it with pins. The remaining lines should be at the same level, only one inside and the other outside the product.
- Unfold the hem along the line above the edge of the product and secure with pins. At this stage, the bottom line should also be visible, and below it the smoothed edge of the product.
- Iron the lapel and remove the pins. In principle, you can leave the pins; they will not interfere with the movement of the sewing machine.
Additional Tips
To ensure that the finished product has a finished look when creating hardware invisible stitching, use these recommendations:
- When choosing threads, give preference to those that are thinner than necessary for stitching this fabric.
- The needles must be very sharp and thin.
- When hemming light fabrics, you can use a thin fishing line for the upper thread. It will be invisible even from the outside.
Of course, processing the bottom of a product using a special attachment requires a lot of training. But believe me, it's worth it. Products processed in this way will differ more favorably from those that were hemmed by hand. And any skill requires time to acquire certain skills.
Preparing the sewing machine
If you have a good sewing machine for your home, then there is no need to manually adjust things. But before you use it, you also need to prepare it. This process consists of three simple steps:
- Take out the hidden seam foot. If it was not included with the household appliance, the foot can be purchased at any specialized store.
- Attach the hidden hem foot to the sewing machine. To do this, use the operating instructions for your device.
- Set the appropriate mode. In electromechanical sewing machines, the stitch switch is usually located on the front side of the device. A blind seam is indicated by two stitches located away from the main seam.
Now the device is ready for use, you can safely make a blind seam. Using a machine, the sewing process will go much faster and with better quality than blind stitching done by hand.
Invisible external seam, clothing repair MK video in detail
How to sew clothes from the front side
If you have a seam torn and it is impossible to quickly sew it up from the inside out, because... there is no access, for example, the lining is in the way.
Photo 1
It is very easy to sew up a torn area. In addition, no lines need to be drawn. The seam line on the fabric will be visible by itself, it has already been created by machine stitching, iron and time (photo 1)
Photo 2 Photo 3
Using a needle, carefully “open” the seam further (photo 2, photo 3). This will release the threads of the remaining seam. Tie them together with 2 knots, thereby securing the remaining seam. Remove the threads from the fabric inside out. Do the same with the opposite side of the opened seam.
Take a thread that matches the color. Thread it through a needle. Make a knot at one end of the thread and leave the other end of the thread hanging freely. For the photo, I deliberately took a thread of a contrasting color to show that the seam would be invisible.
On the right side of the product, strictly opposite the thread exit from the left half of the seam, make a puncture with a needle and thread on the wrong side and immediately on the front side, also strictly along the seam line. Stitch length is about 1 mm. Pull the thread to the front side (photo 5, photo 6). Tighten the thread so that the halves of the rupture of the product are connected.
Then, on the left side of the product, strictly opposite the thread exit from the right half, make the same puncture 1 mm long (photo 7). Pull the thread and needle to the front side.
Photo 7
On the right side of the product (photo, make a puncture with a stitch length of 1 mm strictly opposite the thread exit from the left half of the product. As in photos 5 and 6.
So we continue to sew until the end of the gap. At the end of the break, make a securing puncture, or tie the working thread with the opened threads of the product into 2 knots. Cut off the ends of the threads.
Finished seam (photo 11). The needle indicates the starting point of the seam.
This is what the puncture sites look like (photo 12). Demonstration photo.
By copying and posting materials and photographs from this site on your own, you are violating copyright. Please make a link to this site.
How to sew with a blind seam?
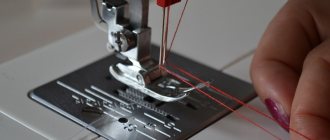
After the preparation process is completed, you can proceed directly to sewing. The product is placed under the foot with the wrong side, and the fold of the future stitch should be aligned with the guide of the machine foot. The main thing when making a blind seam on a sewing machine is not to rush. Otherwise, the seam will turn out uneven and the finished product will look untidy. The material must be held carefully so that the bend of the seam is located directly under the vertical plate. When finished, be sure to check the product for missing stitches. If there are such people, it's not scary. Just redo the places where the machine did not stitch the bottom part of the fitted item properly. When your work is done, remove the remaining pins and press the blind seam.
How to make a blind seam without a special foot?
If your sewing machine does not come with a presser foot, and the item needs to be urgently repaired, there is a way out! Even with a standard foot you can make a high-quality hidden seam. To do this you need to do the following:
- insert slats;
- place the material under the foot with the wrong side;
- make five straight stitches;
- Sew one stitch so that it catches the bend;
- Continue sewing in the same manner until the edge of the product is completely finished.
Correct length for different models
There are general rules for determining the length for different types of trousers. It depends on what kind of shoes are worn with clothes. The recommended norm is to the center point of the heel (for women). Men's shoes must be completely visible. You should also consider the style of the model.
| Women's pants | For straight models, the length to the middle of the heel is recommended. Wide pants should partially cover your shoes. For tapered models, the optimal length is ankle-length. Flared trousers should be to the floor. Sports - slightly expose the leg above the ankle. |
| Male models | Classic trousers partially cover the heel. With tapered ones, the top of the shoe should be visible. |
The table above will help you determine how to hem your pants. If the length of the product you just purchased does not meet the recommended standards, it must be adjusted. It is recommended to do this yourself, according to the instructions for beginner tailors, or in an atelier. Pants for a child or teenager (for example, a school uniform) should be shortened so that the seams can then be easily and neatly rip out; children grow up quickly.
Male models
Women's pants