What is a hidden seam and why is it needed? A blind stitch is an invisible stitch that is an absolutely universal assistant if you need to hand sew a couple of parts.
For example, trousers, children's toys, pillows, products with filler. By carefully processing the edges with a thin cloth, you will be able to successfully sew the above items. If you don’t look for a specially wired place, then it’s quite difficult to find it.
Features of a hidden seam
The peculiarity of the seam is that it actually exists, but it is not visible. The stealth effect is achieved with practice. To begin with, use fabrics with pronounced textures, where the weaving threads are visible. It can be cotton, linen, woolen fabric.
There are 2 ways to use the blind stitch:
- For hemming the product (purl blind stitch). In this case, you need to sew so that no stitches are visible on the front side. The stitches vary in length, and on the face fabric the needle only catches 1-2 threads.
- For connecting two parts (front blind seam). The cut edges of the parts are folded inside out, and the thread is passed into the folds of the parts. If the color of the thread is chosen exactly to match the product, the seam becomes almost invisible. The stitches on both sides are equal in length.
If there is no hole, but there is abrasion
To eliminate this problem, you will need a sewing machine, threads that match the fabric in color and tone:
- Place the jeans with the inside out.
- Fold the edge where the fabric has frayed.
- Using a sewing machine, carefully patch the fray, leaving a small, inconspicuous seam in this place.
The problem can be removed without having a sewing machine at hand. Then you need to make a “back-needle” seam at the very base of the folded fabric. You should definitely secure the seam: do it a couple of times and tie a knot at the end.
On the butt
How to mend a hole in jeans inconspicuously by hand and by machine is discussed below. The technique for placing a patch on the buttocks is identical to those described earlier.
Where is it used?
A blind seam by hand (photos are presented step by step later in the article) is easy to do. It has several purposes. The main function is to connect two parts.
The main uses of a blind seam are described in the table:
| Where is it used? | Blind seam type |
| Clothes repair (suturing rips, cuts, loose seams) | Facial connecting |
| Making toys (sewing parts of arms, legs, heads, ears, stitching seams) | Facial connecting |
| Hemming bottoms (jeans, trousers, skirts, blouses) | Purl hem |
| Making clothes (sewing sleeves, lining) | Facial connecting |
| Manufacturing of products using patchwork and quilling techniques (folding the edges of the product, processing decorative elements) | Purl hem |
How to make the perfect invisible seam by hand?
To learn how to make a blind seam, you need to have suitable threads, needles and follow the basic rules for its implementation.
Secrets of the perfect blind seam:
- Work must be done in comfortable conditions with good lighting.
- The working thread is matched close in color to the fabric of the product. If it is not possible to choose a color, then use black thread for dark fabrics, and white thread for light ones.
- The needle is thin, sharp, short with a small eye.
- The sections of the parts to be sewn are folded inside out. They should have clear edges on the folds. If necessary, the folds can be ironed with an iron.
- The folds of the parts must be held firmly with your fingers so that they do not move relative to each other. You can pin the seam.
- When stitching, the stitches should go exactly to the edge and have the same pitch (2-5 mm). The needle must be pulled out exactly from the edge of the fold.
- The thread connecting the parts must run strictly perpendicular to the folds.
- When sewing, pick up the threads of each part separately, and do not try to pass the needle into 2 fabrics at once. It will take more time, but the seam will be perfect.
- At the beginning of the seam, the needle must be inserted from the inside out to hide the knot.
- The seam is completed by securing the thread by threading it into the loop made and tightening.
Questions and answers
Why an invisible seam turn out sloppy and crooked?
This happens if you are in a hurry. Please note that allowances must be ironed. The folds meet the machine seam. Then small stitches are made. They must be placed on the same mowing line. It is also important to choose the right needle and thread.
Hidden, invisible or hidden seam. close the hole. It's easy to sew by hand!
How to choose the right thread and needle for a blind seam?
The thread and needle should be thinner than the fabric. It is important that the needle is sharp and can capture individual threads. The thread should be strong and untwisted. Color – transparent or similar to the product. An invisible seam is made using only one thread!
How to make invisible seam without a needle and thread?
READ Make a septic tank in a private house
This repair method is used as a critical method for small cuts and holes in the fabric. Buy a special thermal tape to match the color of the product. A patch is cut out of it and installed on the wrong side. The repair area is covered with a cloth from above and slightly moistened with water. The final step is ironing the patch with a hot iron.
An invisible seam can be done either by hand or with a sewing machine. In everyday life, the 1st option is more needed. It will be even faster to sew up the hole by hand. Having mastered the easy technique, you can hem your pants, mend a seam that has come apart, patch a hole inconspicuously, sew a Tilda doll or a pillow. If you make small and careful stitches, the line will truly be invisible.
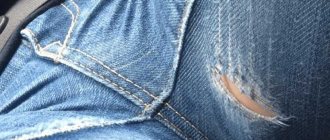
Patch between legs
The surface of jeans between the legs wears out very quickly, so one of the effective ways to repair it is to apply a patch. This way the jeans will last longer.
How to disguise a hole in jeans with patches
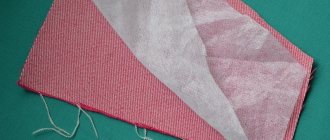
Patches come with or without hot-melt adhesive backing. The first ones just need to be applied to the clothes, covered with gauze on top and run with a hot iron for 30–50 seconds.
Sew on patches without a base by choosing the appropriate thread color. Attach the patch to the jeans and secure with stationery pins for security.
You can attach the patches by machine or by hand, as shown in this
Thread requirements
The main element of a hidden seam is the working thread.
When working, it is important to consider the following nuances:
- The threads should be very close in color to the fabric, or completely match it.
- The thread should be straight and not twisted. Twisted thread will tangle and create loops, which will slow down your work.
- The thread must be strong. It is better to opt for synthetic materials. In addition to strength, they also do not shrink.
- Transparent monofilament is suitable for processing any product, but working with it requires experience.
- The working thread should not be longer than 50-60 cm. A thread of this length does not form loops and does not get tangled.
Needle requirements
Experienced needlewomen choose short, sharp needles. With such needles it is convenient to pick up a certain number of threads or make a stitch of the desired length. The needle should be thin, sharp, with a narrow eye. A small ear is necessary so that there are no visible punctures on dense tissues.
Dull needles with defects and rust cannot be used for work. You won't be able to pick up 1-2 threads with a dull needle. Needles with rust can damage fabric, break threads, or leave ties.
Hole in a knitted T-shirt
It is not difficult to put a hole in thin cotton knitwear. It’s all the more unpleasant when it shows off in a prominent place of your favorite thing. In such cases, repairs are usually made with simple threads using a hidden seam. But even then, “terry” threads often remain the front
To sew up a hole on a T-shirt as discreetly as possible, use a thin (beaded) needle and thread made from chiffon, organza or waste nylon tights:
- Pull the thread out of the fabric and thread it into the needle. For convenience, we use a thread threader. We do not tie a knot.
- We quilt on the right side of the fabric, inserting the needle into the knitted loops. To prevent eye pain, turn on a bright light and arm yourself with a magnifying lens.
- Connect the opposite edges of the hole.
- At the end, we bring the needle to the wrong side and collect the missing loops.
- We fasten with stitches, not with a knot.
- Upon completion of the work, we go over the seam with an iron from the inside out to fix it and not accidentally tighten it in the future.
Preparing to sew
The work of making a blind seam puts a lot of strain on the eyes, requires concentration and takes a lot of time. In addition, you need to constantly hold the product in a certain position for accurate stitching.
Therefore, it is necessary to prepare a comfortable, well-lit workplace. The most practical thing is a table with a lamp. Working at a desk will help preserve your vision and posture. But sitting on a chair for a long time is uncomfortable. Therefore, you can set up a workplace on an armchair or sofa, placing a floor lamp nearby.
The place for hand sewing should be organized so that the necessary tools are at hand: threads, pins, needles, scissors.
The light is installed in such a way that the rays are directed from above on the left side and completely illuminate the work space. Sunlight quickly tires the eyes. However, it should not be completely ruled out. The best option is a comfortable combination of artificial and natural lighting.
In addition to thread and needle for sewing, you may need:
- Iron (for smoothing seams).
- Ruler and chalk (to mark the seam line).
- Tailor's pins.
- Magnifier.
- Scissors.
Step-by-step diagrams for laying hand-blind seams
With a simple seam you can easily sew up and repair clothes, bend trousers or a skirt to the desired length and sew a toy.
A blind seam by hand (step-by-step photos and tips for implementation are described later in the text) is done according to the same pattern. But depending on where it is used, some nuances may arise.
For hemming jeans
Often the leg length of jeans is inappropriate. And if a simple hem is not suitable, you can adjust the length and hem the bottom using a blind seam. Folding the bottom of jeans is not difficult, thanks to the looseness and thickness of the fabric. Even a beginner can cope with this task.
The next master class offers a scheme for shortening jeans while maintaining the factory hem.
To work you will need:
- jeans;
- ruler;
- chalk;
- sharp scissors;
- iron;
- strong threads to match the product (for black jeans, take black, for blue jeans, white);
- tailor's pins;
- sharp needle.
Progress:
- Place the jeans in front of you, right side out.
- From the top edge of the factory hem, measure the distance by which you want to shorten the jeans. Draw lines on both legs on both sides.
- Align the drawn lines with the top lines of the factory seams and lay a running stitch along them from the wrong side. Pin the fold formed on the inside with sewing pins.
- Fold the factory trim inward and press the resulting fold.
- Take the pant leg so that the folds of the parts to be sewn face up.
- Insert the thread from the wrong side and start making a blind seam. Make stitches 2-3 mm in size, insert and remove the needle strictly from the edge of the folded fabric.
- After each stitch, tighten the thread so that the seam is tight.
- Having completed the seam, secure the thread, bring it inside out and cut it off.
- Cut off the fold formed on the wrong side with scissors, leaving an allowance of 0.7 - 1 cm. Finish the cut with an overcast stitch.
- Press the bottom seam of the trouser leg.
For hemming other types of trousers
Hemming dress pants requires care and patience. Beginner seamstresses are advised to first practice on pieces of fabric of the same texture. The work is painstaking and requires time and patience.
A blind seam by hand (step-by-step photos and a description of the work are presented later in the article) is performed from the wrong side. The stitches need to be laid one after another, and not try to immediately grab two parts of the fabric being sewn. You need to be especially careful when picking up the threads on the front fabric so that the working thread is not visible from the outside.
To work you need scissors, chalk, a needle and thread of the desired color.
Progress:
- First, you need to measure the length by which you want to shorten the trousers, draw a line, leave an allowance of 3.5 cm and cut off the bottom of the trouser leg.
- Finish the cut edge with an overlock stitch or overcast stitch.
- Sew the trouser tape along the drawn line on the front side using two machine lines. The top edge of the tape should coincide with the drawn line. When machine stitching, slightly stretch the fabric and tape, avoiding the fabric of the trousers from bunching up.
- Fold the bottom edge to the wrong side so that the edge of the trouser tape protrudes 0.1-0.2 cm, and secure the fold with pins.
- Turn the pants inside out. Fold the bottom of the trousers right side out so that the folded edge of the trouser leg and the overlocked edge are on top.
- Start sewing a blind seam on the right side. Insert the needle and under the overlock stitch, make a stitch (no more than 0.2 cm), bring the needle back, pull the thread. After 0.5 - 0.7 cm, use a needle to pry 1-2 threads of the trouser leg fabric on the fold and pull the thread through.
- Continue working, constantly pulling the thread slightly. The stitching should be laid evenly, tightly, but without tightening.
- Complete the circle and secure the thread.
This method can also be used to fold the bottom of jeans if there is no need to maintain the factory seam. A sewn grosgrain ribbon will protect the edge of the trouser leg from abrasion.
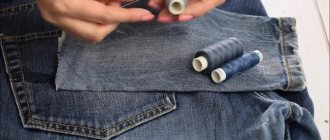
To attach a patch
To sew on a patch, machine stitching is often used, especially if the hole is in a place subject to physical stress (abrasion, tension).
A blind seam made by hand can be used to sew on a decorative patch, or to repair a hole in an inconspicuous place, following the step-by-step recommendations in the photo. To do this, you need to select a piece of fabric and thread of the same color.
Blind stitch by hand to secure the patch.
In this way, you can repair children's denim clothing, which allows the use of decorative elements, stripes, and appliqués.
Method for creating a blind seam on the front side:
- Cut a patch from the fabric, larger than the tear in the clothing.
- Place it on the wrong side and secure with pins or a running stitch.
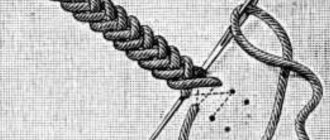
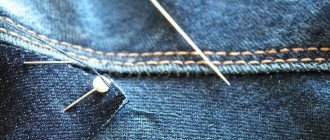
- On the front side, start sewing a chain stitch, which looks like a chain of loops.
- When making a chain stitch in this case, the needle must be inserted into the fabric very close to the place where it came out. Make short stitches, do not tighten the thread.
- After making the last stitch, remove the loop and pull the working thread. All loops should stretch out and small, invisible stitches should remain on the surface of the product.
Another technique that is often used in clothing design is applying decorative patches to the elbows of jackets. In this case, the patch is sewn on the front side.
The main point is the correct preparation of the patch. Its edges should be evenly folded to the wrong side. It's better to do this with an iron. The finished patch is pinned in the right place and sewn with very small hidden stitches. The more carefully the patch is sewn, the more natural the repaired product will look.
The method of sewing patches on the front side can be used to attach fabric appliqués and stripes to clothing.
To fix holes in jackets and other clothing
When a cut or hole in a jacket cannot be covered with a decorative sticker, there is only one option left - sew it up with a blind stitch. Often the edges of the fabric are very thin.
To avoid repeated tearing in the same place, it is recommended to strengthen the fabric from the inside out by gluing it with a special thermal tape.
Follow the instructions below:
- Work from the front side. Do not fold the edges inward, but draw a line along which the stitches will be laid, 0.3 cm from the edge.
- Using a strong thread that matches the garment, begin making small stitches according to a hidden seam pattern, without tightening the thread, allowing it to lie on the surface of the item being sewn in parallel rows. Make stitches 1-2 mm long, bring the thread perpendicular to the stitch line and insert it into the fabric on the opposite side in the same place.
- Finish the seam, carefully begin to pull the thread, pulling the edges of the hole together. Try to make the seam as tight as possible without deforming it. Bring the working thread to the wrong side and fasten.
- Level the surface of the seam by ironing it through the fabric.
For repairing soft toys
Children's toys often tear and come apart at the seams. They are easy to repair if you master the skill of making a hidden seam. A blind seam by hand (photos are presented step by step later in the article) is performed using the facial method. This means that the work is carried out from the front side, the edges of the seam cuts are bent inward.
If the part to be sewn has a hole, it must first be tightened. To do this, make a simple stitch along the edge with the needle forward, tighten the thread, while tightening the hole. Secure the tightened hole with several cross stitches. Connect the parts of the toy using a hidden seam.
When repairing a simple straight seam, you need to tuck the edges of the parts inside the toy and use a strong thread to match the material to make stitches for a hidden seam.
For shoe repair
The principle of joining shoe parts is the same as when sewing fabrics. The work is carried out from the front side with a thin sharp needle. The peculiarity of shoe seams is their density and small stitch size.
Loose seams on leather shoes can be easily sewn together using the factory-pierced holes as a guide. To do this, you need to insert the needle into the gap between two adjacent holes. Having brought the needle out, insert it into the nearest hole on the opposite side of the seam.
The seams on textile shoes are made according to the classic hidden seam pattern. The thread is inserted one by one into the edges of the parts to be sewn. For sewing, it is recommended to use durable synthetic thread.
For sewing together parts in patchwork products
To hem the edges of the product, sew on facings and process decorative elements in patchwork, use a straight blind stitch. To create a less noticeable seam, craftswomen use silk threads.
Lovers of the patchwork technique have their own subtleties when it comes to making a hidden seam. For example, they secure the thread not with a simple knot, but with two small stitches laid crosswise. And the main part of the stitch is hidden inside the hem fabric, bringing the needle out only to pick up 2 threads of the front fabric of the product.
How to sew trouser tape on a sewing machine
Before I talk in detail about the hidden seam, I want to briefly explain how to sew on a trouser tape. The ribbon is adjusted using a sewing machine using two lines. It is not necessary to baste it, the main thing is to tension it correctly when sewing. Otherwise, the tape can either tighten the bottom of the trouser leg, or, on the contrary, stretch it and this defect cannot be corrected with an iron.
It is difficult to explain in words the degree of tension on the tape; this requires practice. But the general idea is this. If the tape is loose, the hem of the pant leg will be wavy. And vice versa, if it is overtightened, it is narrowed. It is best to pull the tape and fabric lightly at the same time with a little force. Just so that the tape is evenly applied to the fabric without deforming it. Never do this as your last operation. Better put it off for the next day. A careless hem at the bottom of the product will ruin its entire appearance. Moreover, an inexperienced seamstress sometimes has to redo this work more than once.
Tips for making a blind hem
Beginning needlewomen may be interested in the following tips on sewing and creating a blind seam:
- A blind seam can be used to sew and fold any type of fabric. For convenience, choose a needle of a size that is convenient for making small stitches.
- Fabrics with a loose structure and variegated colors are easier to sew with an invisible seam than dense, thin, plain fabrics.
- The stitch width depends on the type of product. The tighter the parts need to be sewn, the smaller the stitch pitch.
- You can discreetly hem the bottom of a skirt or trousers using colorless monofilament thread.
- For ease of sewing, the length of the thread should be no more than 60 cm. Long threads will tangle and form loops.
- To easily thread the thread into a narrow eye, you need to cut it at an angle. No need to tear off the thread or bite it with your teeth.
- It is important to securely fasten the thread at the beginning and end of the seam. First, a knot is made, or 2 stitches crosswise. Finally, the thread is threaded through the loop made and tightened into a knot.
- The ends of the threads are hidden on the wrong side.
- When bending or stitching 2 parts, you need to fit the bottom fabric so that the seam does not move or become deformed.
A hidden seam is an indispensable companion for seamstresses and needlewomen. Hand stitching does not require special knowledge, but its perfection is achieved with experience. By following simple step-by-step diagrams and photos, you can learn how to make a hidden seam, which will help you independently repair clothes, toys, shorten jeans or hem a skirt.
Author: Maria Andryukova
Sew with an invisible seam on a machine
Even a novice seamstress can create an invisible seam using a sewing machine. You just need to know a few nuances. To figure out how to sew without a seam using a sewing machine, you need to prepare the right tools and make the appropriate settings for the device itself. This particularly applies to the paw.
Correct foot
Careful preparation of the instrument is also necessary. In addition to choosing a presser foot, it is worth performing a standard check of the device for functionality. Next, you can begin to consider the settings that are made for example on a Janome sewing machine:
You might be interested in this: How to sew a denim skirt on your own Setting up the device
The instructions on how to sew two parts of fabric with an invisible seam on a sewing machine consist of performing the following steps:
Blind stitch 2 types, how to sew up TROUSERS, PANTS, a HOLE in the seam (Hand stitches)
- Fold the fabric as desired and iron it well. Then the lapel of this part is carried out. A clear line remains on the canvas along which the stitching will be formed.
- Next, the material is laid. Here it is worth using a certain pattern so that the seam is accurate and hidden. The diagram is presented below.
- When making the seam itself, you need to ensure that the needle catches only a few threads along the ironed fold. Otherwise, the thread will appear in the front part of the product.
READ How to cut laminate flooring when installing
Fabric laying scheme
To make this option for connecting parts on a sewing machine, you can use other options for feet. There are even universal designs of this type.
Naturally, the time spent on forming hidden stitches on a machine is significantly reduced compared to doing the work manually. At the same time, the result looks more aesthetically pleasing - the stitching is uniform and the stitches are of the same length. But not every needlewoman has such a device in her arsenal, so mastering the manual type is also necessary.
Hidden seam
To repair clothes, connect parts or hem parts, you need to use a unique stitch option. This is a hidden stitch that can be formed by hand or on a sewing machine. A hidden stitch is made manually and using a machine in accordance with a certain algorithm-scheme.