It’s not difficult to make a pattern for an eight-piece cap; you just need to more or less accurately calculate the shape of one wedge and draw the visor of your baseball cap on paper. It is much more difficult to sew a cap, since the technology of sewing any cap (men's or women's), including a children's model for a boy, is quite complex and requires not only knowledge and experience, but sometimes also a special machine.
In this master class you can download a pattern for a gavroche (hooligan) type cap, as well as find a detailed description of the process of sewing a women's cap from eight wedges.
What types of caps are there?
The appearance of caps was not explained by the influence of fashion, but by necessity. This headdress first appeared as part of the military uniform of British and French troops in the 19th century. At first their visors were round, then they began to be made square in order to improve protection from rain.
When the use of automobiles became widespread, it was considered fashionable for drivers to wear this headdress. At first, only men wore caps. Over time, women began to use this headdress.
Several main types of caps are now common:
- The classic variety is characterized by the following features. Natural materials are used for production. The cut does not contain frills. There is a large visor with a curved shape.
- Five-panel caps fit your head softly and comfortably. To make the main part, five rectangular pieces of fabric of different sizes are used: two on top, two on the sides and one in front.
- A variety characterized by a shortened visor is called bicycle. The short visor allows for increased visibility.
- NEEDLE HAT models are made from wedges, the sharp sides of which are sewn at one point. The visor in such caps is always curved.
- Trucker baseball caps have mesh front and sides. They use a large visor. A clasp is used with which you can adjust the volume of the headdress.
- Military caps use a flat top. The side part is located vertically along its entire length.
- German caps have a flat top. They are distinguished by a deep fit.
This is interesting: Pattern for children's and women's denim
What is a cap?
A cap is a headdress made of textile, sheepskin, leather or suede, the distinctive feature of which is the presence of a visor of various sizes.
The most common types of caps:
- The eight-blade cap, also known as the “hooligan”, got its name from the number of parts from which the top of the headdress is made. Well, the nickname is because in post-revolutionary Russia such a cap was loved by hooligans of all stripes. Suitable for everyone, has long been considered a classic. A distinctive feature, along with wedges, is considered to be a button - a button made of cap fabric.
- “Duck” is suitable primarily for men. The peculiar name is a tribute to the shape, similar to the beak of a duck. The visor, as a rule, does not stand out.
- “Airdrome” became popular in the USSR after the release of the film “Mimino”; it got its name for its flat top part.
- “German” or “cadet” came to us from the military parade ground. It’s hard to imagine a military style without such an accessory.
- The prototype of the “Cap” is a cap, which was very popular in Russia in the 19th century. Belts and embroidered cockades serve as decoration.
- “Gavroche” differs from other styles in volume and softness of folds. At the peak of fashion for several decades.
Required materials and tools
To sew a cap you will need the following materials and tools:
- Sewing machine. It is advisable to use a model that can make overlock seams.
- An awl is necessary because you have to work with thick fabric.
- You need strong threads that match the color of the fabric and thick needles. For sewing baseball caps, you can use No. 100–120.
Cut out a denim baseball cap
These hats get their name because they are part of the uniform worn by baseball players. However, they gradually became popular far beyond the sports sphere. Baseball caps are stylish and comfortable headwear, popular all over the world.
You might be interested in Features of patterns from Anastasia Korfiati: how to learn cutting and sewing
The cap pattern is made as follows:
- You need to measure the circumference of your head. In order to ensure a more comfortable fit to the head, you need to add 2 cm to the obtained value.
- The life-size baseball cap pattern for men implies that to determine the length of the base of the wedges, you need to divide the previously obtained value by 6. In order to calculate the height of the wedge, it is recommended to divide the head circumference by 4.
- In order to construct a wedge pattern, first draw a triangle with a given base and height. Now we need to make the side extensions. To do this, place a mark in the middle of the sides. 9–13 mm are laid perpendicularly, depending on the circumference of the head. The resulting points, the top and the edge of the base are connected by a smooth rounded line. After cutting out the wedge pattern, you need to make sure it is symmetrical.
- To sew a summer cap with your own hands, the pattern must include a large visor. To construct it, it must be taken into account that the length of the visor can be equal to or slightly more than two wedges. Another way to determine the length is to find out the distance from temple to temple. To make a pattern, draw a horizontal line on paper. A perpendicular is drawn from its middle and a mark is placed at a distance of 3 and 9 centimeters. Smooth rounded lines are drawn through these points and the edges of the segments. There should be two such details. In their manufacture, the main fabric is used.
Note! To finish, you need to prepare a shelf for the drawstring.
After this, the baseball cap pattern is ready.
LiveInternetLiveInternet
VELVET BERET (SIZE 58-60)
You will need:
Fabric: velvet - 30 cm with a width of 150 cm, lining fabric - 30 cm with a width of 90 cm.
Details:
1. Bottom - 1 piece;
2. Crown - 2 parts;
3. Band - 1 piece.
Job:
First, sew the sides of the wall parts together using a 0.7 cm seam. Press the seams. After this, stitch the walls to the bottom. Iron the seam towards the walls, stitch to the edge or press it. Treat the lining in the same way. Fold the parts from the main and lining fabrics with the wrong sides inward, aligning the lower sections. Sew the narrow sides of the band (it will take the shape of a ring), and press the seam. Sew the band to the bottom edge of the beret, folding it right side together with the lining. Turn the band onto the front side of the beret and stitch it onto the wall, covering the stitching seam. If the band is made of leather, make its inner side from the main fabric (cut the part according to the shape of the leather band and stitch it to it along the longitudinal side, folding the right sides inward). Steam the beret carefully and attach the finishing parts.
Black velvet beret with a bow, secured with a brooch. It is recommended to sew such a beret from soft pile fabrics that drape well - velvet, loose drape. The bow is made of grosgrain ribbon in a contrasting color. The leather band also serves as a decorative function. The lining is best made from a thin lining or voile-type fabric.
BERET FROM CLOTH (SIZE 56-58)
You will need:
Fabric: cloth - 30 cm with a width of 150 cm, lining fabric - 30 cm with a width of 90 cm.
Details:
1. Bottom - 1 piece;
2. Crown - 2 parts;
3. Band - 2 parts;
4. Bow - 1 piece.
Job:
First, sew the sides of the wall parts together using a 0.7 cm seam. Press the seams. After this, stitch the walls to the bottom. Press the seam towards the walls, stitch to the edge or press it. Treat the lining in the same way. Fold the parts from the main and lining fabrics with the wrong sides inward, aligning the lower sections. Sew the narrow sides of the band (it will take the shape of a ring), and press the seam. Sew the band to the bottom edge of the beret, folding it right side together with the lining. Turn the band onto the front side of the beret and stitch it onto the wall, covering the stitching seam. If the band is made of leather, make its inner side from the main fabric (cut the part according to the shape of the leather band and stitch it to it along the longitudinal side, folding the right sides inward). Steam the beret carefully and attach the finishing parts. An unusual decoration is a large decorative bow, which can be made from bright drape or velor. Along the middle line marked on the pattern, pull the bow detail with a thread or fold it with several soft folds and attach it to the beret with a brooch. Since it is recommended to make the bow from non-fraying fabrics, there is no need to process the edge. The band is made of artificial leather.
BERET FROM DRAPE
You will need:
Fabric: drape - 30 cm with a width of 150 cm, lining fabric - 30 cm with a width of 90 cm.
Details:
1. Bottom - 1 piece;
2. Crown - 2 parts;
3. Band - 1 piece.
Job:
First, sew the sides of the wall parts together using a 0.7 cm seam. Press the seams. After this, stitch the walls to the bottom. Press the seam towards the walls, stitch to the edge or press it. Treat the lining in the same way. Fold the parts from the main and lining fabrics with the wrong sides inward, aligning the lower sections. Sew the narrow sides of the band (it will take the shape of a ring), and press the seam. Sew the band to the bottom edge of the beret, folding it right side together with the lining. Turn the band onto the front side of the beret and stitch it onto the wall, covering the stitching seam. If the band is made of leather, make its inner side from the main fabric (cut the part according to the shape of the leather band and stitch it to it along the longitudinal side, folding the right sides inward). Steam the beret carefully and attach the finishing parts. The rigid beret is made of drape, backed with two layers of adhesive padding. The gasket is necessary in order to clearly fix the cone-shaped shape of the beret. The adhesive pad can be replaced with a regular linen border, but in this case the fabric parts must be carefully quilted with the border using oblique stitches in a circle so that the stitches are not visible from the front side. When stitching, do not tighten the thread too much. The seam on the bottom of the beret should be covered with a decorative piece made of drape or leather. The band is made from the main fabric. The lining is normal.
GAVROCHE CAP (SIZE 54-55)
You will need:
Fabric: spandex - 50 sq. dm, lining fabric - 50 sq. dm.
Details:
1. Wedge - 6 parts;
2. Visor - 2 parts;
3. Band - 2 parts.
Job:
1) Having made a pattern from paper, apply it to the fabric.
2) Sew the wedges on the wrong side.
3) We cut out the lining according to the patterns, stitch it and sew it to the cap on the wrong side.
Sew the visor along the outer contour and stitch at a distance of 0.75 cm. Sew it to the crown. Sew the band to the crown.
CAPE (SIZE 56-58)
You will need:
Fabric: 50 cm of any fabric with a width of 80 cm, lining 50 cm with a width of 80 cm.
Details:
1. Middle part - 2 parts;
2. Side part - 2 parts;
3. Visor - 2 parts.
Job:
We make a pattern on paper, transfer it to fabric, cut out and sew first the two middle parts, and then the two side ones. Let's connect them together. We make the lining according to the same pattern as for the main parts. We sew the lining and sew it to the cap. Then we sew together the two parts of the visor and sew it to the cap. The visor is reinforced with cardboard or plastic spacer. The lower edge of the cap is finished with grosgrain ribbon.
BLOCK HAT (size 56)
You will need:
Fabric: cloth - 25 cm wide 140 cm, lining fabric - 25 cm wide 90 cm.
1. Bottom - 1 piece;
2. Fields - 1 detail;
3. Side part of the crown with a bend - 1 piece.
Job:
Reinforce all parts of the top with a thick adhesive pad. Sew the wall parts together, press the seams up. Sew the bottom to the top of the wall, stitch the lining and sew to the facing. Lay out the lining parts along the top parts, connecting the wall parts. Stitch the fields, right side to right side.
HAT WITH SOFT DOWN BRIMS
You will need:
Fabric: any 25 cm wide 140 cm, lining 25 cm wide 90 cm.
1. Bottom - 1 piece;
2. Crown - 2 parts;
3. Fields - 2 details.
Job:
All parts are lined with thick fabric. Line the margins. Cut out the lining according to the same patterns, but with an oblique placement of the grain thread. First, the parts of the crown are sewn together, then they are sewn to the bottom. The fields are sewn to the finished head.
PRINTED FABRIC HAT
You will need:
Fabric: printed 25 cm wide 140 cm, lining 25 cm wide 90 cm.
1. Wedge - 6 parts;
2. Fields - 2 details.
Job:
Make a pattern on paper and transfer it to fabric. Sew the wedges first. From the lining fabric, make a pattern using the same patterns and sew to the crown of the hat. But first sew on the brim. Line up the margins and lining. You can raise the brim both at the front and at the back.
The material is compiled from the book by L. Stoykova “Hats. We sew. We knit” by Galina Dozhdeva (Lina)
source: https://www.lulucha.season.ru/slyapa.html
How to make a cap pattern
You can find files on the Internet containing patterns for various models of hats, hats and caps. But they are not always accurate, much less modern. Therefore, copy these two photos with the pattern of the wedge and the visor with the band and print it in full size.
The photo size must correspond to the size of an A4 sheet of paper. There is a ruler in the photo for control. Check the width of the pattern piece with a measuring tape; if it matches the ruler scale value in the photo, it means the cap pattern was printed correctly. Remember that using the printer settings, you can change the size of the printed image.
The numbers indicate the number of parts, and the arrows indicate the fractional direction of the cut. All pattern pieces are without seam allowances. The size of this pattern corresponds to sizes 56-57. Check the diameter of the band circumference.
This is interesting: Children's sweater pattern
Beret pattern
Patterning a beret is not a tricky business, but sewing it will require great care from you. The choice of material must also be approached with full responsibility. The beret can be sewn from leather, suede, artificial or natural, knitwear, loden, coat fabric, bouclé... I would advise you to make a trial version from an unnecessary piece of fabric before sewing in order to determine the volume and adjust the shape.
So, let's begin. The selected beret model consists of:
- beret bottom,
- beret side,
- band.
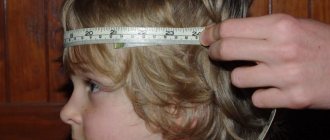
First, draw a circle with a diameter equal to 1/2 the circumference of the head. The head circumference is measured horizontally across the forehead, above the eyebrows, into the circumference of the head, closing the measuring tape at the back of the head.
Now, inside the resulting circle we draw another one, with a smaller diameter. Its diameter can be easily calculated using the school formula L = 2Pr, where L is the circumference of the head plus a small allowance for the thickness of the seams (about 1-2 cm, depending on the properties of the fabric).
Look at the picture, we have the sides of the beret, the bottom of the beret, and the band is a straight strip of fabric, folded in half (therefore its width is 5-6 cm), with a length equal to the circumference of the head plus a seam allowance.
We crochet an openwork cap with a description and work diagrams
An openwork summer cap can not only be sewn, but also crocheted. In this case, you can apply almost any scheme, adjusting it to the shape of your head. Below is a description of the process of knitting a headdress for a girl using a simple mesh pattern.
Necessary materials:
- white cotton yarn;
- remnants of cotton yarn in pink, blue and green colors;
- hook No. 3;
- fishing line 0.3 mm and 1 mm thick;
- beads for decoration;
- wide elastic band;
- needle, thread.
Operating procedure.
We start knitting a cap from the top of the head. We make an amigurumi ring, tie it with 7 single crochets and tighten the ring. In the second row we knit 13 single crochets. In the third row we alternate 13 double crochets and one chain stitch. In the fourth row we alternate 13 times 4 double crochets in a row and 4 chain stitches. We tie the fifth row with double crochets (14 times 5 dc). In the sixth row we alternate double crochets 13 times and 3 chain stitches. We tie the seventh row with arches of 5 air loops. Throughout the entire work, do not forget to perform lifting air loops.
In the eighth row we alternate 6 dc and 1 sc in the central loop of the adjacent arch. In the ninth row we alternate 2 dc, 6 ch, 2 dc. In the tenth row we knit 8 DCs into each arch of 6 air loops. In the eleventh row we alternate 2 dc, 8 ch and 2 dc.
In this way we knit the product until the required depth is achieved. We periodically try the cap on the child and make sure that it fits snugly enough on the head.
We got 19 rows. We make the last row leveling: we alternate 2 dc, 2 half-columns, sc, 2 sc together, 2 half-dcs, 2 dc, 1 dc2n.
Next, we knit several rows with single crochets: 20 and 21 rows in white, 22 and 23 in blue, 23 and 24 in white, 25 and 26 in pink, 27 and 28 in blue, 29 in white. At the same time, we leave a free space of 15 columns wide for the elastic band.
Let's start knitting the visor. To do this, divide the number of all the columns around the perimeter of the cap into 5 parts and select 2 parts on which we will work. We got about 35 columns. We knit the first row with white thread in single crochets behind the back half-loop. From the second row we attach a thin 0.3 mm fishing line for rigidity. We knit the visor with single crochets, gradually rounding it on both sides. To make it easier to navigate with decreases, you can make a paper pattern of the visor of the required shape and size.
In the penultimate row we knit a fishing line 1 mm thick, having previously bent and fixed its ends so that they do not interfere when worn. We tie the visor in a crab step, hiding all the threads. We sew a wide elastic band into the notch at the back, after trying the headdress on the child.
Let's start decorating the cap. From blue and pink yarn we crochet large voluminous flowers, the diagram of which is given below.
We sew flowers onto the side of the cap and decorate their middle with beads. If desired, you can additionally decorate the product with knitted leaves, curly cords and small flowers. The knitted cap for the girl is ready!
How to sew a women's cap with a visor with wedges
Women's caps combine comfort and impressive appearance. They are made from thick fabric. To make a headdress, you can use tweed, drape or other similar fabrics.
Important! When choosing colors, one usually takes into account the fact that caps are often used as part of an ensemble. It should be harmoniously combined with its other elements.
Before sewing a cap with a visor, you need to prepare the following:
- Sewing machine. It is advisable to use one that can make an overlock stitch.
- You need to prepare needles No. 100–120. They should be thick so that you can easily sew a cap from several layers of fabric.
- Chalk for marking.
- Awl.
- For the visor of the hooligan cap, you will need to prepare cardboard or plastic.
- You need to prepare the necessary accessories.
Before making a cap pattern, take the necessary measurements.
Pattern
To make a cap in exact accordance with the dimensions, you must take the necessary measurements correctly. To do this you need to do the following:
- Measure the head circumference where the bottom of the cap will be located.
- The height of the cap should be equal to the distance from the bottom of the headdress to its top point.
Gavroche with six wedges will be produced. The peculiarity of this style is that here the upper part is made more voluminous than usual.
Note! For sewing you will need 0.5 sq. m of main fabric and the same amount of fabric for lining. You also need to stock up on hard material for the visor.
It should be taken into account that the design of the gavroche cap will have a soft structure. Therefore, it is allowed to make visors without a rigid base.
Uncover
The pattern is made as follows:
- The previously determined circumference of the bottom of the cap is divided into six equal parts. The result will be the length of the bottom of the wedges.
- Mark the length of each wedge in the center. It is equal to the previously measured height of the cap.
- The side of the cap is positioned vertically up to a certain level. Then the wedges converge towards the center. You need to determine what the height of the side part is. From the base to this level the wedges will expand, after which they will converge in a triangle to the top.
- The band of a cap is made from a narrow strip of fabric. It will consist of two parts. The length of the band should correspond to the circumference of the head. In this case, you can add another 1 cm to the fit.
- You need to decide what width of the visor is required and prepare the appropriate pattern. At the same time, it is taken into account that its inner part of the circumference is one third of the circumference of the head.
You might be interested in this: The procedure for sewing a tablecloth yourself
For your information! Thus, to pattern a women’s cap with a visor, you need to make 6 patterns for the wedges that make up the top of the cap, 2 patterns for the band and 2 for the visor.
The patterns are placed on the fabric and outlined with chalk. The allowances are usually 0.5–1.5 cm. After this, pieces of fabric are cut out to sew the product. These operations are performed in the same way for the main and sewing fabric, with the exception of the visor. No lining fabric is used for it.
Sewing
Manufacturing of the product takes place in several steps. Sewing is performed in the following sequence:
- First you need to grind the wedges. To do this, it is convenient to first sew three wedges into one piece, then the other three into another one. After this, the workpieces are connected to each other.
- In the central part, the tips of the wedges need to be cut off a little so that thickening does not occur.
- Now you need to sew wedges from lining material in the same way.
- The wedge blank is turned inside out, then the lining is placed on it with the front part facing up. They are sewn together.
- Connect both blanks for the visor to each other.
- If necessary, a seal must be inserted into the visor. Its size should be half a centimeter smaller compared to the fabric for the visor.
- Now you need to sew the parts of the band for the cap.
- Mark the middles of the band and visor. Then the band is sewn so that they match.
- The band with the visor is sewn to the top of the cap. In this case, it is sewn between the outer part and the lining.
Important! It is recommended to use inexpensive material for sewing for the first time.
This will help you get better at sewing such products.
How to sew an eight-piece cap?
The classic eight-piece is easy to sew, but requires precise cutting and careful work.
Required:
- Drape, cloth, jacquard, wool - 0.4-0.5 meters, with a width of 1.5 meters.
- Fabric for lining - 0.5 meters, with a width of 1.5 meters.
- Non-woven fabric - 1 meter, width 0.8 meters.
- Button with foot.
- Dense material for the visor, for example, thermal cloth, thick oilcloth, cardboard, and so on.
- Threads to match.
- Sewing machine.
- Tailor's chalk and scissors.
Advice! If you choose a checkered fabric, and this is certainly a classic, make sure that the patterns of all the details of the wedges match.
Step-by-step pattern of an eight-piece cap
The pattern consists of the following parts:
- Wedge – 8 parts.
- Visor – 2 parts. We choose the width of the visor as desired, the length is equal to half the circumference of the head, minus 1-2 centimeters as desired.
- Band - 2 parts. The length of this part is 2 centimeters greater than the circumference of the head.
Advice! You can make the crown wedges not rounded, but with corners from the widest part. On top, in this case, your headdress will be octagonal.
Progress:
- We are creating a pattern for the band.
- We chalk the details of the pattern, pay attention to the direction of the grain and the pattern of the fabric. Seam allowances 0.7-1 cm.
- Cut it out.
- Cut 8 wedges from the lining fabric.
Making the top of the cap
It is customary to sew the upper part in two stages: in the first we get two blanks of four wedges each, in the second we sew these blanks together.
Progress:
- We glue the wedges with interlining or other adhesive pad.
- We sew two wedges in pairs. Make sure that the drawing, if there is one, matches completely!
- We sew two pairs together, we have two blanks with four wedges in each.
- At the tops of the wedges we cut off the corners of the seam allowances, then the center of our product will not puff up.
- We sew the resulting semicircles in a straight line.
Making a visor
Progress:
- We make the visor part from durable material without allowances.
- We also cut out a part from non-woven fabric.
- Glue the interlining.
- We assemble the “sandwich”: the parts of the visor are glued with non-woven fabric face to face, on top there is a gasket made of dense material.
- We sew along the long side of the visor.
- Cut the seam allowance to 0.3-0.5 cm, depending on the material.
- Turn it inside out.
- We sew along the short part of the visor.
Connecting the visor to the cap band
- We cut out the part of the band, allowances are 0.7-1 cm.
- Sew the short sides together, this seam will mark the middle along the back.
- We put the visor between the parts of the band.
- We adjust the band onto the visor.
- Sew the outer part of the band to the top of the cap.
- We attach the inner part of the band to the crown.
Cap lining
The lining is made of non-staining, wrinkle-resistant, preferably breathable material.
Progress:
- We cut out 8 wedge parts.
- We sew the crown according to the principle described earlier. We leave 10-12 cm unsewn in one seam; we need them to turn the product inside out.
- Turn the cap inside out and place the lining face up.
- We attach the lining to the product.
Advice! If you don't go basting, use pins.
- We turn the product inside out through the hole we left.
- Carefully sew the lining on the arms.
Cap button
Button - a button is necessary to close the junction of all the wedges; in addition, when sewing on a button, we attach the lining with several stitches:
- We wrap a small piece of main fabric around a button with a stem.
- Smooth out the wrinkles.
- Sew it on so that the resulting button is smooth and neat.
- Tighten the fabric and threads on the leg.
- Carefully sew the button onto the middle of the crown.
An eight-piece cap suits even small children, not to mention men and women of any age. Face type, hair color is not important - everyone will find a headdress to their liking.
What to wear with women's slip-ons?
How to close loops on a hat
Technology of sewing a cap from or 8 wedges
The peculiarity of assembling a cap from six or eight wedges is that you first need to sew two ladles from three or four parts.
It is easier to sew two halves of a four-piece cap together later than one wedge at a time. And most importantly, this technique will allow you to assemble all the wedges together, without distortions and symmetrically.
But first, before sewing both halves of the cap together, you need to cut off the corners of the allowances of the cap wedges at the top. This will avoid excessive thickening of the top of the cap and allow for better placement of ironed seam allowances.
It is best to iron the seams of the wedges assembled together on a special block for ironing sleeves.
How to make a cap lining
When making the top of the cap, each part is sewn from the inside with the same lining fabric. Using a lining makes the hat not only warmer, but also more comfortable.
The skill of making a beautiful and original headdress on your own will allow you to feel comfortable at any time of the year. To make a cap, you need to know how to sew a cap, make a pattern and sew the finished product in accordance with the rules.
How to connect a visor to the top of a cap
All previous operations for assembling the cap with eight blades were difficult to do neatly and beautifully, but sewing the band to the top of the cap will be even more difficult. First you need to sew the outer part of the band to the top of the cap.
In this form, the cap already has an almost completed appearance, but the lining still needs to be attached.
How to cut out the details of a women's cap pattern
Before cutting out the cap pieces from fabric, you must consider the directional direction of each piece. Do not forget to add allowances to the contours of these parts within 1cm.
The underside of each cap wedge needs to be glued with adhesive fabric. The upper corners need to be cut off by the amount of allowance, as shown in this photo.
How to connect a visor to a cap band
Please note that the outer band must be glued with adhesive fabric, as well as all other parts of the cap, except for the inner band. It will fit close to the head and therefore does not need to be duplicated. Before you stitch the visor to the top of the cap, you need to mark the center of the band and visor as shown in this photo.
Align the marks of the band and the visor together and connect both of these parts on the sewing machine and machine.
Those areas of the seams that will turn out, it is advisable to cut off the corners of the allowances.
Now you need to sew the second part of the band to the visor in a circle, as shown in the photo.
Lay out this seam as shown in this photo and secure it with a bias hand stitch.
Panama hat pattern
We will sew a Panama hat from fabric that is soft, but still holds its shape. For example, corduroy, faux fur (short pile), boiled knitwear, loden. Choose your option, and don’t forget to make a preliminary sample. A hat is a delicate matter, all proportions must be clearly adjusted and suit you.
The pattern is not complicated. Let's go step by step:
- The bottom - its circumference is slightly less than the circumference of the head, to which an allowance of 1-2 cm has been added (I suggest making the bottom circumference 4 cm smaller).
- The crown is 9-12 cm high. Form in accordance with the diagram.
- The brim of the Panama hat is cut out into 4 pieces, as they are processed in double pieces.
Step-by-step construction of a baseball cap pattern
So that you can make this wonderful headdress with your own hands, we have prepared instructions for preparing the pattern:
- To measure, you need only 2 parameters: head circumference and the height of the cap itself.
- Make drawings on paper. You will need to draw a “petal” and a visor. The petal is a component of the crown, which divides the cap into 6 sectors. For convenience, you can take the elements of an old baseball cap and trace them.
- Transfer the resulting drawings onto the fabric.
The pattern is ready, it's time to proceed to the next stage.
Cap pattern
A little difficulty is what to make the visor from so that it holds its shape. There are several options:
- buy a blank at a craft store,
- take from an old cap,
- cut from a plastic stationery folder. Why not?
So, let's begin:
- The bottom of the cap is 20 cm in diameter (you can take your value and then adjust it on a calico sampler)
- The crown is low - 9 cm. Shape according to the diagram.
- Check the length of the lower and upper cut of the crown.
- Visor - according to the diagram.
Well, now we are armed - we can welcome spring! Don't forget to show us your creations. We are waiting for your photos on our photo forum. Come in, it’s very friendly here, and you can also win a prize!
How to sew a baseball cap with your own hands?
In addition to the fabric, you will need a thick, curved visor. If your favorite cap has lost its attractive appearance, you can rip it open and immediately get double benefits: a ready-made visor and details for a pattern. You can also buy a visor at fabric and sewing accessories stores.
Almost any medium-weight fabric can be used as the main fabric for a baseball cap: cotton, linen, denim. The front of the crown is often reinforced with adhesive interlining material of a suitable color.
To make the inside of the baseball cap look neat, we suggest covering the seam allowances with bias tape. You can buy ready-made trim (1.5-2 cm wide) or cut it yourself from thin fabric at an angle of 45 degrees. From the same fabric, you can cut out the facing of a baseball cap or use a wide bias tape (3-4 cm), additionally glued with double or non-woven fabric.
Depending on the type of fabric, you may need textile glue to glue the bottom of the visor piece to the piece. Use a waterproof clear adhesive whose instructions mention gluing fabrics together.
For the fastener, with which you can adjust the width of the baseball cap, you will need Velcro 1-2 cm wide and 5-7 cm long. The junction of the wedges on the top of the head is covered with a flat button covered with the main fabric.
So, let's learn how to sew a baseball cap with your own hands!
Constructing a pattern
To create a pattern you will need measurements
- head circumference
- height of the baseball cap (from the bottom edge to the top of the head, can be measured on the finished cap)
Prepare the canopy base.
To pattern the visor, straighten the visor base on paper and trace its outline.
Uncover
All seam allowance is 1 cm, allowance along the inner edge of the visor (where it is sewn to the crown) is 2.5 cm.
Made from main fabric
- 4 parts A (wedges)
- 2 parts A with cut out sectors: on one part in the lower left corner, on the other – in the lower right corner. The radius of the cutout is 6 cm. Lying side by side, the cut out parts are folded into a semicircle.
- 2 parts B – visor
- Two rectangles for Velcro 10x4 cm (twice the width of the Velcro plus 0.5 cm)
- Square 3x3 cm for covering a button
Made from extra fabric
- Tape 7 cm wide and length equal to head circumference
- 3 bias bindings 3-4 cm wide and a length equal to twice the length of the side of part A
- Bias binding 20 cm long
Additionally:
- Visor, Velcro, button
Progress
Sew the visor pieces along the outer edge, placing them right sides together. Cut allowances to 5 mm and cut into triangles in the rounded areas or cut with zigzag scissors.
Turn the visor inside out, straighten the seam allowances and iron. Insert the rigid base, pull it well, and if necessary, fix the underside of the visor with textile glue. Baste along the inside edge.
Sew three wedges, each half containing one piece with a cut out sector. Press the seam allowances to the sides and cut towards the center at the top corner to make the seam allowances flatter.
Sew the halves of the crown with one seam, aligning the center.
Iron the bias bindings: a small strip for processing the sector in half, and then tuck the edges to the central fold, and bend the 3 long pieces 0.5-0.7 mm inward on each side.
Baste long bias tape to the crown, covering the seam allowances.
First, baste one of the diagonal seams, sew close to the edges of the fold of the binding. Then sew the second diagonal seam as well. Sew the center seam last.
Apply bias tape to the sector neckline by stitching the tape right side to the right side of the cutout, and then turning it to the wrong side and basting it to the seam allowances.
Postpone.
Sew the visor, aligning its center with the center of the crown. Use a zipper foot to stitch as close to the rigid base of the visor as possible.
Fold a 7 cm wide ribbon in half and iron it.
Topstitch three times along the entire length.
Stitch the ribbon to the edge of the cap. There should be a free section about 1 cm long on each edge.
Baste and iron the Velcro blanks. Sew Velcro onto the wrong side of the pieces.
Fold the tape to the wrong side and iron. Baste the tape to the cap by tucking the side edges inward and inserting the Velcro pieces as shown in the photo. Sew along the bottom edge and sides, stitching the Velcro.
Cover the button with fabric. First, cut a circle from the prepared square, then baste along its edge and tighten, placing the button in the center.
Sew the button to the junction of the wedges by hand, using a blind stitch.
The baseball cap is ready!
Sewing a baseball cap
This headdress has its own important features. A baseball cap can be sewn for an adult, a baby or a doll. In all these cases, work occurs according to the following rules, they are described below.
Processing the visor
In order to give the visor its shape, a plastic part is inserted into it. It should be a little narrower than the material.
Processing the upper part (crown)
Each of the wedges is sewn to the lining part. Small darts are made on the upper part. A 4–5 millimeter long incision is left at the tops. After the wedges are sewn, the seams are ironed.
Making wedges
To hide the seams, bias tape is sewn onto them. The seams securing the trim are placed on the front side of the baseball cap.
Machining the rear notch
A semicircular notch is made at the base of the rear wedges. To finish the edge, take a strip of fabric, place it on the outside and sew it along the edge. Then the strip is turned inside out and the second side edge of the strip is secured.
Connecting the visor with the crown
First you need to stitch both parts along the outside. The inner one remains open. The part is turned inside out and a hard plate is inserted inside.
Important! The visor is attached to the cap so that the inside of it faces up.
Processing the bottom cut with facing
A facing is sewn along the entire bottom edge of the baseball cap, except for the hole. It is a strip 7 cm wide. It is folded in half and secured.
You might be interested in this. Patterns for dresses and kimono robe: sewing with your own hands
Sewing on elastic
For the elastic, you must use a drawstring. It is a strip of fabric 3 cm wide, folded in half. An elastic band is sewn inside. The drawstring is sewn along the underside of the back notch.
Final finishing
A button wrapped in fabric is sewn to the top point of the headdress. If necessary, a strap is attached to the cap above the visor, embroidery or a design is made in accordance with the author's intention.
German cap
If the cap is made for a boy, additional decorations can be provided.
Components of a baseball cap
In our article we will teach you how to make caps with your own hands and describe the entire manufacturing process step by step. First you need to understand the technical part of the future product. What is a baseball cap made of?
- The back of the cap in the classic version is made of mesh. But now thick fabric is usually used.
- The front petals must be made of dense material.
- Visor. Perhaps the main distinguishing element. Protects from sun rays and gives a beautiful shape.
- Clasp. It allows you to adjust the circumference of the cap, which undoubtedly makes it easier to wear.
REFERENCE. Previously, a mandatory element was the logo or label of the players' team. Now companies that produce baseball caps use their own “signatures”. You can sew something too. Create a brand of your own handicraft.