What is a differential rack
The flat seam is inextricably linked with another obscure term - differential. If a flat seam can somehow be imagined, for example, in the form of a flattened flounder. How do you understand what a differential is?
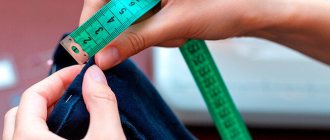
So as not to bore you with technical details, let me explain it to you simply. If you sew knitted fabric tightly on a regular sewing machine, you can stretch it while sewing with your hands, or you can, on the contrary, “drive” it under the foot with a fingernail or an awl. This is how the differential works, that is, a rack with teeth (under the foot). Only in this case, the lath consists of two parts and, depending on the need, these ladle ladles either stretch the fabric during sewing or, on the contrary, compress it.
What is it for? Squeezing under the foot increases the stretchability of the seam and its strength.
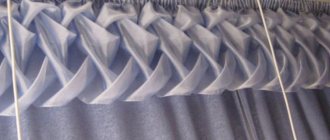
This quality is important for sports knitted clothing, clothing for active recreation, etc. And stretching of knitted fabric leads to the appearance of a wavy edge (overlock) or a wavy seam (covering stitch)
This effect is mainly used as a decorative element for finishing clothes.
This handle (photo) regulates the operation of the differential. N is the normal position, that is, the rack works as one whole. Numbers higher than one means the strip will stretch the fabric; numbers lower than one means it will compress it.
Simple slice processing options
Burning
If the fabric contains artificial fibers, it is possible to process the sections by firing. Under the influence of fire, the edges of the product melt and will not crumble in the future. There are several features to remember when choosing this method.
- It only works for fabrics mixed with synthetics.
- Before using it on a finished product, it is necessary to do a test on a small piece of the material from which the product is made - there is a possibility that the fabric can quickly ignite.
- When melted, a hard edge is formed on the sections, which can rub the skin during wear.
Gluing
It is necessary to trim the edges of the products. Then apply a special colorless fabric liquid on them and glue the fabrics together. When dry, the fabric becomes rigid, the threads do not fray.
Pinking shears
Finishing the edges of products with zigzag scissors is one of the easiest methods for beginning tailors. This option works well on fabrics that are not very prone to fraying, with tightly woven threads.
- The edge of the product is trimmed with scissors, the material is straightened in different directions, and the fabric is ironed.
- Before using zigzag scissors on the seam allowances, you can do a simple stitch on a sewing machine for a more reliable result.
How to process a seam without an overlocker
Basic hand stitches
Using hand stitches, you can not only repair the place where the machine stitching has come apart, but also hem the bottom of trousers or skirts, baste a torn lining, or finish the edge of fraying fabric. For each of these operations a specific suture is used.
Basting stitch
The simplest of all seams is basting. But you can’t do without it, even if you have a sewing machine, because... he connects the parts for fitting. It is most often used by tailors. This seam is also used to tighten the fabric, make tucks and darn holes.
This stitch is easy to do: evenly insert the needle into and out of the fabric before pulling the thread through. This seam is easy to sew and also easy to pull out. You can also make a hidden stitch with it if the machine seam has come apart.
Back stitch
The back stitch resembles a machine stitch. It is considered one of the strongest of hand stitches, especially when sewn with two threads. It is also called stitching and is used in hard-to-reach places where it is impossible to sew on a sewing machine, as well as for securing stitches. It is also suitable for replacing zippers.
The backstitch technique is quite simple, but requires experience to get even stitches and an even stitch.
Pierce the fabric from the wrong side in the place where you want to make a stitch (don't forget to tie a knot at the end of the thread). Then make a small stitch back 2-3 mm and bring the needle to the front side by the same 2-3 mm, but before the stitch. Continuing to insert the needle at the end of the last stitch and out in front of it, sew a stitch of the required length.
On the back side the stitches will be twice as long as on the front side.
Goat seam
The goat seam is used mainly to secure the hem of garments, sleeves and lining, and is also used for finishing clothes. It is performed from left to right.
Step back a little from the edge and make a small horizontal stitch in the hem fabric. Then sew a diagonal stitch to the right on the fabric you are sewing the hem to. Make the next stitch the same way diagonally, but on the hem.
When making a goat seam, do not tighten the thread too much so that small stitches on the front side of the product are invisible.
Overlock or buttonhole stitch
An overlock stitch is used to prevent fraying of the fabric at the edges of the garment. There are several types of it: oblique, cross-shaped and looped. Oblique and cross stitch are performed almost identically: stitches are made across the edge from left to right. In the cross stitch, another stitch is then sewn in the opposite direction.
A buttonhole stitch is used to sew over sections on loose fabrics, and also to process holes and loops. It is also suitable for decorating felt and fleece products.
Secure the needle to the edge of the product. Make the stitches towards you, throwing the thread onto the needle coming out under the fabric. The distance from the edge and the length of the stitch depend on your idea. To process loops, perform 6-10 stitches per 1 cm, 2-3 cm wide.
Elizabethan seam
To fasten parts made of wool, drape and other dense fabrics joint to joint, a stucco seam is used. Previously it was called Elizabethan. Outerwear was sewn for them.
To get a strong seam, the threads need to be lubricated with beeswax. Lay out each piece separately and fold their edges. Sew this fold with a regular basting stitch. Try to make stitches neatly and as small as possible so that the fabric fits snugly.
When both parts are hemmed, place them side by side and connect the edges with a stitching stitch, making 6-10 stitches for every centimeter. Then move the pieces apart in different directions until the seam is flat.
This seam is not only durable, but also looks original.
There are, of course, much more hand stitches, but they to some extent repeat the ones mentioned above. They are useful both for repairing things and for handicrafts.
Stitches with threads
When we talk about embroidery, the first thing that comes to mind is cross stitch. But there are a huge number of other decorative stitches and embroidery techniques in the world. Decorative seams do not mean complicated ones. It is often easier to embroider with them than with a cross. Many hand-made decorative seams do not require such scrupulous calculations as a cross and “forgive” the mistakes of inexperienced fingers. There is one more plus. With simple stitches you can do embroidery not on canvas, but on regular fabric. Embroider directly on the corner of the tablecloth, or decorate jeans with decorative stitches. There are many options! And no outline. You can even make spectacular embroideries using a “forward needle” stitch. How much easier can it be? What can we say about the potential of a chain stitch or “French knots”.
The simple stitches that we are going to talk about will become excellent embroidery material for beginning needlewomen.
Table of contents
- Straight stitch
- Seam "forward needle"
- Surface
- Stitch or stitch back with a needle
- Stem seam
- Fern seam
- Chain stitch
- Loop stitch
- Tambour loop
- Open decorative loop
- Velvet seam
- Herringbone stitch
- Stitch “Chicken trail” or “Fish skeleton”
- French knot
- Sheaf seam
- Spider seam
- Seam "flooring"
- Coil or Rococo knots
- Decorative mesh
Straight stitch.
This is the most basic stitch. You can use it to embroider anything. It can be laid in any direction, of any length.
Snowflake with straight stitches.
Draw a circle and mark the middle. We mark the circle with the required number of petal points. We bring the needle out from the center and make stitches, all the time returning the needle to the center. V-A; S-A; DA and so on.
Seam "forward needle"
Perhaps the most famous simplest seam. To decorate it, you can change the length of the stitches: for example, 2 short, 1 long, etc.
Read more about this simple seam: options, re-leaves, needle-forward seam samples.
Surface
Satin stitch is a very beautiful independent embroidery. It was especially widespread in the middle of the last century. Perhaps someone at home still has their grandmother’s satin stitch embroidery – pillowcases, napkins. You can use the satin stitch as an element for filling. The stitches in this technique are placed neatly parallel to each other along the entire shape that needs to be filled.
How to sew with satin stitch: First, draw the desired shape on the fabric. We start from the edge of the drawing. We bring the needle out from the wrong side at point A. We stick it in at point B, and then we bring it out to the face at point C, next to point A. We continue to embroider tightly, placing stitches one next to the other.
Back stitch or stitch
The backstitch with a needle is often used: it is used to embroider stems, inscriptions, and make an outline (for example, in cross stitch). Sew by hand when you need to sew two parts together tightly.
How to sew with a backstitch: Draw a line on the fabric. We bring the needle out from the wrong side at point A. We stick it in at point B, it is located behind point A. And then we bring it out to the face at point C, it is in front of point A. We make the next stitch by sticking the needle into point A and bring it out in front of point C.
Stem seam
Like the backstitch stitch, stem stitch embroidery is used for stems, inscriptions, and outline designs.
How to sew with a stem stitch: Draw a line on the fabric. We bring the needle out from the wrong side at point A at the beginning of the line. We make stitch B-C, point C is in the middle between A and B. The following stitches: D - B, E - Di.etc. The thread should always remain on one side when making stitches. When bending the line, the stitches may fall apart; to prevent this from happening, the stitches can be made smaller.
You can see how this line looks on the finished product, for example, on the cover with felt embroidery. It is completely made with this seam.
Fern seam
Decorative seam. The fern stitch looks like a stem with leaves. To make the design look more natural, you can change the angle and length of the leaves.
Cleaning and lubricating the overlocker
After prolonged operation of the overlocker, the looper compartment and other accessible places should be cleaned of trimmings, lint and other contaminants (oil stains). It is advisable to clean with a stiff hair brush (for glue). By the way, excess oil in the needle area can ruin the fabric being processed. Try to be more careful in lubricating the parts in contact with the fabric.
Overlockers should be lubricated at least once every six months, and with intensive use, once a month. Instead of an oil can, it is convenient to use a medical syringe for lubrication. With a long needle you can always get into hard-to-reach places, and less oil is consumed.
The instructions provide a lubrication diagram, but you can follow a simple rule - lubricate any accessible places where there is friction of metal parts, even if they are not indicated by the factory in the instructions.
In order to “thoroughly” lubricate all overlocker components, it is sometimes necessary to remove the protective housing covers, but if they are difficult to remove, you can get by with factory-made lubrication marks.
More attention should be paid to lubrication of an overlocker than a sewing machine, since the overlocker operates at higher speeds and the lack of lubrication in some components leads to their overheating and even jamming.
Video on how to replace and properly tension the overlock belt.
Other articles:
What is the difference between a carpet locker and an overlocker and an overlocker? An overlocker is practically no different from a coverlocker. It can also sew an overlock stitch. But thanks to the special design, in addition to the overcast seam, the carpet locker can also perform a flat seam and even a seam seam. Since a carpet lock is much more complex than an overlocker, repairs can only be performed in a specialized service center.
Inexpensive sewing machine: “Pros and cons”
For many who are planning to learn to sew, the question often arises: “Which sewing machine to buy,” preferably an inexpensive and good one. In this article we will figure out whether such a combination is possible - “inexpensive and good machine” and how an inexpensive sewing machine worth 3-4 thousand rubles differs from a machine costing 30 thousand.
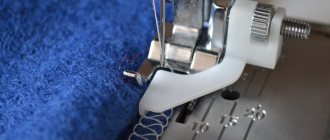
We sew knitwear without skipping or looping
Many who have tried to sew knitwear on a regular sewing machine have noticed that the machine often refuses to make a beautiful and even stitch. Gaps form in the knitted stitching, the bottom thread loops, and sometimes breaks. Why does this happen and how can I fix it?
Overlock 51 class
Overlock 51 class is perhaps the most common brand of industrial sewing machine used in everyday life and in small studios. Although this technique is morally outdated and many modern fabrics simply cannot be processed efficiently using it, nevertheless, its use is sometimes justified, especially for processing coarse and thick fabrics.
How to sew curtain tape
To save money, many people try to sew curtains with their own hands, and have to learn how to sew curtain tape on their own. However, often the result turns out to be unimportant because there is not enough experience or a completely unsuitable sewing machine.
How to sew curtains with your own hands
Processing a simple model of organza curtains for a kitchen window is indeed accessible to many who have a little experience and a sewing machine. But sewing curtains for a living room or hall with a lambrequin is the job of professionals who have not only knowledge, but also experience.
How to hem jeans How to cut jeans that are too long and use a household sewing machine to sew a finishing hem stitch consisting of several layers of rough denim.
How I process seams - or what the client pays for
Haute Couture seam processing.
So, I decided to write this post for my clients - both current and future.
Firstly, to answer many of your questions, to show you the inside of our work, so that you are 100% sure that you are getting a quality item.
Secondly, the back of the product says more about the Master than even the front side. I am responsible for every seam in my product, and I am pleased to show you my work.
Thirdly...and this is actually a piece of the history of my activities. I started sewing linen a year and a half ago, and during this time I have come a long, interesting way. And I also grew professionally. In my home collection there are three negligees that I wear with great pleasure - a red one with black lace, a lilac long set and a white satin kimono with lace. At the initial stage, it seemed to me that simply processing seam cuts with an overlocker would be sufficient. Imagine my surprise when, after several washes, I discovered that even under the overlocker the seam on the chiffon was “fluffy”!!!
And despite the fact that this did not have any effect on the appearance of the product, I began to think about how to improve the processing in order to avoid such behavior of the seams when washing. After all, I want my clients to show off my products for as long as possible!!!
And so now I use the “French seam” technique, which allows me to close all open and even processed cuts.
In the photographs I tried to show in as much detail as possible how the seam is processed. The processing of satin and chiffon is identical.
So, the first stage is that the two parts are sewn together (folded with their right sides facing out), and the cut is processed with a special machine - an overlocker - to cut off excess fabric and make the cuts neat.
Stage 2 - the seam is smoothed out and ironed on one side. Previously, seam processing ended at this stage. Next, the parts are turned over with the right sides inward, like a book, and ironed again.
Stage 3 - and now the final seam is made, which hides the overlock processing inside.
This is what a French seam looks like on satin.
This is what a French seam looks like on chiffon.
As you can see, this treatment allows you to hide all the edges inside, and when washed, the product will not “fluff” at the seams.
The darts are processed in the same way.
My products often contain lace, which is natural for beautiful, delicate and sexy lingerie.
When sewing lace end-to-end, you cannot use a French seam, as this will significantly make the product heavier. Therefore, the lace and the main fabric are sewn together, the cut is processed with an overlocker (I set the overlocker to the smallest step possible to reduce the likelihood of “frizz”), ironed to the side of the fabric, and stitched at a distance of 2 mm from the edge. This secures the seam and increases wear resistance.
Photo of lace with stitching, front side.
The connection between the lace and the fabric is the wrong side.
The next time I sew a product with lace joining using the overlay method, I will add photos to this post.
Hemming the bottom is also an important step. To hem, the cut is first processed with an overlocker, then ironed once - the overlocker is folded, and a second time - the overlocker is folded inwards. And the cut is cut at a distance of 1-2 mm from the fold. Thus, again, the cut gets inside.
Bottom hem on satin.
Bottom hem on chiffon.
The edges of the shelves and lowered sleeves are processed in the same way.
In addition, there are places in the product where it will not be possible to use both of the previous methods.
This is the seam connecting the sleeve to the product, and processing the cuts on the bodice of the shirt. These seams are curved. But even here I can't leave the cut open. For places like this I use bias tape. This allows you to repeat the shape of the seam, and at the same time neatly hide it. I use this treatment only on chiffons, since on satin it will make the product too heavy.
When processing the seam of the sleeve connection of a product in shirts, or in satin negligees, I still use an overlocker, but I set it to the smallest step possible to increase the wear resistance and neatness of the seam. Next time I sew a shirt, I’ll add photos again.
And finally, processing the bottom of thin chiffon, if the bottom has a curved shape and maximum lightness is required. To do this, I use the so-called rolled seam of an overlocker, when the fabric is folded inward by 2 mm, and at the same time processed with an overlocker at a minimum step. It turns out very neatly and the cut is hidden inside.
So now you know how I process my products. I'm not saying it's Haute Couture, but I'm happy with the neatest processing possible!!! And I continue to improve to make the processing even better.
And even though for this I have to spend one and a half to two times more time at the machine, even if I jump like crazy from the machine to the ironing board (the cat looks at this “ballet” in surprise) - but I feel great moral satisfaction when I see the final result !!!
I hope that I have answered your questions - those expressed and not those that have been sitting in your head for a long time.
If you have any more questions, write to me and I will try to answer!
With love to you, beautiful Women,
Lyudmila Manina.
Flat
To sew flat stitches you will most likely need a flat stitcher. This is a sewing machine that has flat line overlay modes. The flat stitch comes in a completely different variety than most of the simpler and more common types used by beginning tailors. Compared to overlock seams, it is laid in a completely different way. The number of needles is 2 or 3, resulting in a double and triple line, respectively. From the inside it is completely intertwined, from the outside it looks like a simple seam with equal stitches, sewn with one thread on each of the lines. The use of flat stitching began with knitwear, but today any fabric is suitable: the delicacy and precision of the “flat” sewing technology has been honed to perfection. An example is a flat seam on sweatpants, shorts, a T-shirt, overalls or a sweatshirt.
For sewing with a flat seam at home, bobbins with one side are used, and at the factory bobbins that resemble an inverted bucket are used. A “flat stitch” thread should be thin, but strong enough and slightly stretchable. A multi-needle machine must be carefully adjusted: a sudden change in the tension of one of the threads will lead to the fact that their weaving together will deteriorate, and the productivity and quality of your work will immediately decrease sharply.
Types of seams and their application
A seam is the joining of two or more layers of fabric by hand or machine stitching in a certain position.
There are many different types of seams, and each of them has its own purpose. The parts of the product are swept away with one seam, with another - they are firmly connected, with a third - the bottom of the product is hemmed, etc.
All seams according to the method of their execution are divided into two groups - manual and machine. Some work can only be done manually, for example, basting, laying copy stitches - snares, etc., others can be done either by machine or by hand.
Let's look at the types and uses of hand stitches.
Interlining seam
Padding seam (Fig. 11). Performed with regular stitches. The needle is inserted from right to left, the thread is tensioned evenly. The distance between the stitches and their length are 2-3 millimeters
Rice. 11. Interlining seam.
The spacer stitch is used to mark the middle of the product and lines corrected with pins during fitting, as well as for making gathers.
Copy stitches - snares
Copy stitches - snares are used to transfer lines to identical, paired parts after cutting a product or to transfer symmetrical lines changed during fitting from the right side to the left.
Snare stitches are a type of slip stitch. The needle is injected from right to left. The length of the stitches and the distance between them should not exceed 0.5 centimeters. However, the stitches are not tightened, but left in the form of a loop 1-1.5 centimeters long (Fig. 12a).
Rice. 12a. Copy stitches (snares).
The snares are laid with a double thread having a length of no more than 90 centimeters. Threads used for this purpose must be soft, non-mercerized.
Rice. 12b. Copy stitches (snares).
After applying the snare, the parts are moved apart, the threads between the parts are pulled and cut (Fig. 126). In this way, the same pattern outline is obtained on the right and left sides of the product.
Running stitch
Running stitch (Fig. 13). It is used in all cases of temporary fastening of parts together to prepare the product for fitting or ironing.
Rice. 13. Running stitch.
Stitches are performed from right to left at intervals, combining short stitches with long ones. The length of the running seam depends on its purpose and the density of the fabric.
Overlock stitch
Overlock stitch (Fig. 14). Used to permanently secure and seal the cut edge to prevent fabric from fraying. The stitches are kept small. The needle is inserted from right to left over the edge.
Rice. 14. Overlock stitch.
Blind seam
Blind seam. Used to secure the folded edges of the fabric at the bottom of a blouse, skirt, dress, jacket, sleeve, etc.
When making a blind seam, the needle is inserted from right to left, grabbing no more than one thread of the upper fabric, and then grabbing the edge of the top fold of the hem. The thread is not stretched too much (Fig. 15a).
Rice. 15a. Blind seam.
The blind seam is made with silk thread of the same color as the main fabric. On thick fabrics, the hem can be cut with toes and hemmed with a hidden seam (Fig. 15b).
Rice. 15b. Blind seam.
Loop stitch
Loop stitch. It is mainly used for sewing buttonholes and seams on loose fabrics.
The loops are made as follows.
A thick thread is laid around the frame (slot) and then sewn with a buttonhole stitch. To do this, the thread is placed in a loop around the needle or the thread loop is grabbed with the needle after it comes out of the fabric. The stitches should be small and densely spaced.
At the beginning and at the end of the loop, tacks are made by laying 2-3 longitudinal threads, and then wrapping them closely in lobe turns so that 10-20 turns are obtained in 1 centimeter (Fig. 16a).
Rice. 16a. Loop stitch.
In cases where the seams of loose fabrics are overcast (Fig. 16b), the stitches can be larger and are not placed as densely as when processing loops.
Rice. 16b. Loop stitch.
Quilting bias stitch
Quilting bias stitch (Fig. 17). This seam is applied in separate rows with a slight slope, then a second parallel row is sewn, etc. The length of the stitches and the distance between them is 0.5-1 centimeter.
Rice. 17. Quilting bias stitch.
The quilting bias stitch is used to sew two layers of fabric together to fit a canvas interfacing (side, collar, etc.). The gasket is pierced through, and the upper fabric is grabbed so that the stitches are invisible from the front side of the product.
1 Next >>
Complex cutting options
Double (French) seam
Using a double seam, the edges of the product are simultaneously closed and the necessary seams are made. This seam is optimal for closing cuts on light, transparent or highly free-flowing materials.
- The two parts are folded inside out to each other. They need to be stitched on a typewriter. Allowances should be approximately 0.3-0.5 cm, while excess fabric is trimmed.
- The fragment is turned right side out and ironed.
- Machine stitching is done with an allowance slightly larger than the seam that ends up inside. At the end, the completed seam is smoothed to the side.
How to overcast the edges of a product with your own hands
Processing with bias tape
- Fold the bias tape in half, folding the edges inward.
- Then the binding is unrolled and pinned.
- After this, a stitch is laid along the fold close to the edge. And the raw cut is closed with bias tape, everything is sewn on a machine.
- The other side is processed similarly.
Seam for overcasting the edges of the product
Double thread overlock stitch
Modern models of overlockers are capable of performing many types of seams. For example, a seam with 3 or 4 threads is the best option for a home workshop. A 5-thread stitch is used when sewing thick fabrics or outerwear. For processing thin and light fabrics, it is customary to use a two-thread stitch. Seams with 3 threads will stretch thin fabric, and the product will ultimately look ugly. Double thread stitch is suitable for:
- chiffon scarves or blouses;
- processing the edges of flounces, ruffles, frills;
- sewing on guipure or mesh.
It is worth noting that now all overlock machines come with a thread of 3 threads or more. To set up a two-thread thread, you will have to remove one of the needles and set the lever to the correct position (on each machine this is done in accordance with the instructions). Next, you need to increase the thread tension in the lower looper and adjust the fabric feed so that punctures or “waves” do not form. Of course, setting up a three- or four-thread overlocker to a two-thread overlocker will take time. But the time spent is more than compensated by the money saved.
If you are an amateur in sewing, then it is not necessary to have both a sewing machine and an overlocker in your arsenal.
Just when buying a machine you need to pay attention to the fact whether it can do an overcast stitch. If so, then you can overcast the edge with an imitation overlock stitch
If you decide to sell your products or sew to order, then having an overlocker is a must. After all, with such a device the speed of fabric processing will increase, and the chance that the seam will fall apart will also decrease.
The video shows how to make overcast stitches on a household sewing machine.
«>
Processing Hong Kong seams
- This is a lightweight option for finishing the edge with bias tape. Cut a 2 cm wide trim from loose fabric. Fold the edges of the binding together so that the wrong side is on the outside, stitch it to the seam allowances at a distance of 5 mm from the edge.
- Fold the free edge of the bias tape under the seam allowance. Sew along the first seam along the right side of the allowance. Press the seam allowance on both sides of the seam along with the lightweight fabric binding.
In principle, the main methods for processing seams are described here. In the next article, see how to remove excess fabric from seam allowances.
Types of seams
There are dozens of types of working and decorative lines used in sewing. The most common are straight (regular) and zigzag seams. However, a modern electronic sewing machine is capable of making any of the following stitches (except for a simple zigzag and a straight seam without special features):
- left-shifted straight line;
- right straight;
- quilting (reminiscent of hand stitching);
- elastic for “grooving” knitwear;
- triple elastic fixing straight line;
- 5 types of lines for sewing buttonholes;
- zigzag three-stage for knitwear and “broken”;
- satin and triple knit zigzag;
- “house”, “double”, knitted and “thin” overlocks;
- hidden bottom seams for stretchy and rough fabrics;
- patchwork lines;
- double and triple herringbone.
This list is worthily crowned with 41 types of elaborate stitching.
Decorative
Decorative stitches include their more original varieties. More often they do not sew fabrics together, but serve as embroidery, like repeating fragments in the shape of a herringbone, spikelet, flower, leaves, etc.
Sewing decorative seams requires high-quality synthetic threads. If you use, for example, cotton threads, the stitched seams will quickly wear out, begin to tear, and the material sewn with any of these seams (or a single layer of fabric stitched in the form of a pattern) will lose its original appearance
It is important that the machine is set up optimally - skipping stitches is absolutely unacceptable here, as well as distortions. A factory item of clothing or accessory made on equipment that is not fully configured or out of tune will simply be returned by the buyer to the seller as defective
A decorative seam is applied mainly to the excess edge of the fabric one or several centimeters wide, turning it into a fashionable attribute. A well-made and neatly executed seam can make a masterpiece even from roughly cut and torn material. An example of such a design is a pocket sewn on the outside, a bow sewn in, or some kind of pattern in a visible place. An alternative is to embroider letters, initials, inscriptions, for example, on the back of a sweatshirt or windbreaker. An example of such a seam is the butt variety, which is in demand on knitwear. This variety is based on a zigzag stitch.
Hungarian seam
If you are interested in counted stitches for embroidery, then the Hungarian stitch is one of them. This is a pattern consisting of straight seams of different lengths. It is quite easy to do and can be used to fill large areas in drawings. This seam looks very impressive if it is made with threads of contrasting colors.
How to do it:
- The needle must be brought to the front side from the upper left corner of your drawing. The direction of embroidery is from left to right. Next, stitch a block of 3 vertical stitches in a diamond shape. Stitch lengths are 2, 4 and 2 strands of canvas. You've got a diamond. Continue embroidering a row at intervals of 2 strands of canvas. You will then fill them with other diamonds. The direction of movement is not important. You can start embroidering from the side that is most comfortable for you.
- To stitch the next row, reverse the needle at the end of the row. Continue embroidery in the opposite direction, from right to left. This way, your first stitch of the second row will be located under the first stitch of the top block. Embroider the next row with the same blocks using stitches of the same length (2-4-2). They need to be placed close to the previously embroidered blocks.
- To fill out your design, simply repeat rows.
Tips and tricks for beginners
For those who are just starting to learn how to sew with a needle and thread, it will be useful to familiarize yourself with the following recommendations:
- It is better to purchase only high-quality needles for hand stitches from manufacturers that have already proven themselves well. It is recommended to give preference to needles with a “golden eye”, which are coated with a special coating. This coating ensures easy threading of the needle and easy sliding of the needle through the fabric.
- It is necessary that the needle matches the thickness of the threads chosen for sewing. The thicker the needle, the more effort will have to be exerted when moving it through the fabric. For this reason, it is not recommended to select a thick needle for hand sewing with fine thread.
- Crooked, dull or rusty hand needles are unsuitable for use. In addition, embroidery needles with a blunt tip should not be used for hand sewing. Such needles are used exclusively for cross stitch on canvas.
- When making hand stitches, it is recommended to use a thimble. This will help protect your fingers and nails from accidental damage and will significantly speed up the process.
Hand stitches and seams are mostly used for embroidery and needlework. But sometimes they are used even when sewing clothes on a sewing machine. In addition, such seams cannot be dispensed with when trying on and basting clothing parts.
Options for processing slices of medium complexity
Hand stitches for overcasting edges
The cuts can be finished by hand using different types of stitches - bias stitches or stitches in the form of loops or crosses. To ensure accuracy in hand stitching, it is recommended to step back from the edge of the cut and machine stitch it, which will act as a guide seam. Subsequently, this line dissolves.
Processing using stitching on a sewing machine
Zigzag stitch
The option of laying a zigzag stitch is available in almost any modern sewing machine. It is necessary to make medium stitches along the edge of the seam. The fabric that extends beyond the edges of the zigzag seam can be trimmed later.
It is important to test the length and width of the zigzag seam before processing the edge in this way, and also trim the frayed material at the cut.
Processing hem cuts
To process hem sections, seam allowances of at least 2.5 cm are left. This method is optimal for thin fabrics and materials of medium density. At the same time, this option for processing sections is not used on transparent or, on the contrary, very dense materials.
- Fold the edges of both cuts inward and iron.
- The seam is then unrolled and the fabric is ironed with a hot iron.
- A machine stitch is laid along each folded edge.
Seam finishing by hand
Optimal processing of slices in this way is performed at the stage prior to stitching the parts.
Stitching with the overcasting foot
Many expensive sewing machines have a foot for overcasting as an additional option. This option cannot serve as a complete replacement for an overlock seam, but it works out the details quite well.
Before starting work, it is necessary to trim the cuts and cut off all frayed threads.
Sealing seams in apartments.
Sealing of interpanel seams in apartments above the 2nd floor is carried out using the industrial climbing method. This requires access to the roof. To gain access to the roof of the building, you must submit an application to the DEZ addressed to the chief engineer on behalf of the tenant of the apartment in which the seams will be sealed or the balcony joints will be sealed. This application is accompanied by a letter of guarantee from our company stating our guarantees not to damage the roof of the building during the work. As well as certificates for climbers who will seal interpanel seams. We ourselves will take these documents to the DEZ. The customer is only required to sign the application.
Necessary conditions for high-quality sealing of interpanel seams:
1.
Dry weather. (temperature can be any)
2.
High-quality and necessary materials depending on the type of building facade.
Types of seams
The seams are:
- simple;
- looped;
- embroidery
Simple seams
Similar types are used to connect parts and in cases where they will be visible on the finished product.
The stitch forward with the needle is the simplest, the needle goes forward, leaving behind an even line of thread.
Stitch back with a needle. The needle at work passes beyond the point where the thread exits from the wrong side. The stitch on the outside goes in the direction opposite to the direction of the seam. The result is a convex thin seam, double on the wrong side.
Stem seam. The technology is exactly the same as in the previous one, only the stitch comes out on the front side approximately at the middle of the height of the previous one. The front stitches are long, as if lying on top of each other, the purl stitches are also inclined, but short.
The zigzag seam is carried out using the technology back to the needle, but the entry to the wrong side is carried out alternately on two levels.
The corner seam is made in the same way as the previous one, but here the stitches are repeated twice, due to which the result is voluminous. Triangles are formed by passing through two different heights.
Padded eight. They are formed from two parallel lines of stitches. They are performed forward, but with a transition in height. On the reverse side we get schematic figure eights.
Blind seams, both machine and hand-made, are very often used; they are simply necessary for sewing parts, parts and parts of the product.
Looped
Chain stitch
Decorative seams of this type are formed thanks to convex loops. The loops cling to each other, to the working thread or to the warp in various ways, forming various patterns.
Chain stitch. A loop is embroidered, the ends of which are located close to each other. Along the back side we pull the thread to the edge of the loop, bring the thread out and form the next loop. As a result, we get wide decorative seams from loops extending from each other.
Loop seam
To create decorative elements, decorative stitches are used:
- a loop;
- half loop;
- eight on the vestibule;
- all kinds of buttonhole seams.
The loop stitch consists of separately lying large loops. The thread entry and exit points are located nearby. The body of the loop is attached to the base. The loops are empty and can be positioned as needed. With the help of such loops you can form various patterns.
Half-loop seam
A half-loop stitch is created from a semicircle from a loop. To do this, the entry and exit points are spaced to the desired width. Half of the loop remains, attached with a cross stitch.
If the tambour loop stitch is made in the form of a closed circle, then cross figure eights can be formed at the centers of the loops. It is carried out like a backing eight with the difference that the eights pass along the front side.
Palestrina loop stitch. First, an inclined long stitch is made, after which a loop is wrapped around the bottom. The second loop wraps around the top. The thread goes to the wrong side and the next inclined stitch is made at the same height as the previous one.
Another subtype of buttonhole stitches is the rare buttonhole stitch. The needle passes from top to bottom, exiting the front side just above the lying loop. Each next stitch holds the previous one.
The spine seam is made in the same way as the previous one. The difference is that the needle is inserted from different sides of the already created loop, creating stitches in different directions from it. Such spines can consist of two, three or more stitches. If there are a lot of them, the spines become like stars or snowflakes. If you perform it in 4 stitches and connect the stitches of adjacent spines together, you will get a pattern in the form of a row of diamonds, such a stitch is called a diamond.
The knot stitch is made by wrapping the working thread around the needle. The needle comes out to the front side and goes back at almost the same point, leaving behind a twisted bundle of thread. These types of them look like a sequence of nodules, hence the name.
Rococo seam. The needle makes a small stitch from the wrong side, remaining in the fabric. Several turns of thread are wound onto the tip of the needle. The working thread is pulled through these turns. A second pass of the thread through the turns, passing through the underside, secures the stitch.
The loop seam with the flooring is performed in 2 stages. The first step is to embroider 2 parallel stripes of the base. Embroidering occurs using the backward needle method. There should be no gap between the seams. The second stage involves laying the loops perpendicular to the strips. The needle goes along the wrong side, coming out under the base lines and securing the loop of the previous stitches. We get a convex strip of decorative trim.
Transfer the design to the fabric.
Method 1. If the fabric is thin enough, you can transfer the design with glass
. For this, use a backlit table or regular window glass. Glue the design to the glass with tape, place the fabric on top and also glue with tape. Trace the drawing with a pencil or water-soluble marker.
Method 2. You can transfer the design onto thick or dark fabric using carbon paper. We place the fabric on a flat surface, then carbon paper, the colored side to the fabric, then our drawing. We trace the drawing with a ballpoint pen. To prevent the lines from being erased, it is advisable to outline the design on the fabric with a water-soluble marker.
Method 3. We print the design we need on an inkjet printer. Place the fabric on the ironing board, with the design on top, printed side down, and iron it without steam. If the drawing is not bright, you can outline it with a marker. The resulting lines are not erased in this way and also: on the material your drawing will be mirror-like.
Types of hand-stitching products
There are several types of hand overcast stitches. They are used depending on which part of the product is processed with an overlock seam manually. And also on the thickness of the fabrics and the decorativeness of the overlock stitch. How to make an overcast seam by hand and where to start can be understood if you understand the classification of seams.
Bias overcasting or hemming is the most common type of seam used for overcasting edges and hemming items made of non-flowing fabrics. The stitches go from right to left. The length of the oblique stitch is about 3 - 5 mm, the loops are not tightened too much.
The density of the overlock seam is 3 – 4 stitches per 1 cm of fabric.
https://youtube.com/watch?v=IiLE1RdDrH0
Loop overcasting - perfectly protects fabric sections from fraying. These stitches can be made with double or single thread. The technology is similar to making a bias stitch, but the needle is threaded through the loop before tightening it. The stitches go from left to right. Stitch length 4 – 6 mm.
The seam density is 2 – 3 stitches per 1 cm of fabric.
Hemmed or “twisted” - this seam is suitable for processing open sections, in products made of transparent, slippery or pile fabrics. The edge is rolled into a roll and hemmed with a tight oblique twist stitch. The needle is inserted from bottom to top. The distance between the stitches and their length should be the same.
The stitch density depends on the degree of fraying of the fabric. The more free-flowing the fabric, the denser the overcasting line is made.
Blind hemming - used for hidden hemming of closed sections of the product. Punctures with a needle are made on the inner edge of the closed hem section. Then several warp threads are grabbed and the needle is reinserted into the inside of the hem. This stitch is absolutely not noticeable either from the front or from the back side. The stitches do not need to be tightened too much so as not to deform the product.
Materials and tools
For sewing, in addition to skills, you will also need a certain set of tools. It includes:
- Needles - they are numbered from 1 to 12 depending on the length and thickness. It is recommended not to skimp on needles; the accuracy and strength of a hand stitch directly depends on their quality.
- The threads also have their own numbering depending on the thickness. The choice of sewing thread colors is simply huge.
- Thimble - protects your finger from punctures while sewing and allows you to push the needle if you are working with very thick fabric.
- Scissors - you can use nail scissors with straight edges or special ones for cutting threads.
- Chalk or fabric marker - if you don’t have enough experience yet or you are doing a manual finishing stitch, it’s best to mark its line on the fabric.
Practical use
At school, during labor lessons, girls are taught to perform simple overlock stitches. This skill really has wide practical applications. The ability to make an overcast seam by hand, as on a machine, will be needed if:
Processing seams with a zigzag
Suitable for most types of fabrics. Sew along the edges of the seam allowances using a zigzag stitch with a medium stitch length for loose and medium weight fabrics. If the fabric is dense, then the stitch is made wider.
Zigzag processing of connected seam allowances
Used for products made from light fabrics, including translucent ones. Trim the excess seam allowance fabric to half the existing width. Sew them together using a zigzag stitch and press them to one side.
To make the seams beautiful
Each craftswoman has her own secrets and experience in performing neat and even stitches. Their hand-stitched seams look like they were machine-stitched. Tips that will be useful for beginners and experienced seamstresses:
- A needle with a “gold eye” is very convenient for performing hand finishing stitches. Special spraying makes threading easier and prevents damage to thin fabrics.
- The thimble should be of a suitable size, not squeezing the finger, but not dangling loosely on it. Then it will be convenient to work with the thimble.
- You should never tear off the end of the thread after finishing the work. This can break the stitch or unravel it completely. The thread can only be cut.
- You can secure a knot of working thread on loose fabrics if, after the first insertion and tightening of the thread, you re-thread the needle between the double thread and the knot.
- Before sewing the stitching, which connects two sections, it is better to pin the sections together with pins or baste them together. This overcasting stitch will be more accurate.
https://youtube.com/watch?v=hjeklRKaqTw
Good day, dear sewing lovers!
I won’t talk much about the manual “overlock” seam, but rather I’ll just show how it’s done.
It is best to start learning how to sew a hand overlock stitch on dense medium or heavy and thick fabrics.
How is an overlock stitch formed?
Perhaps at the moment you are wondering what kind of sewing machine to buy so that it can also overcast, but time will pass and you will need to buy an overlocker. That’s why we offer you brief information on how the overlock stitch of a “real” overlocker is formed.
A modern overlocker uses four threads at once. There are overlockers that only have two threads. There are overlockers that work on three and even five threads. But most often a household overlocker is four-thread. Instead of a bobbin, like a sewing machine, the lower threads of an overlocker are threaded directly from the bobbin into the loopers. It is the loopers that create a special type of weave, similar to a pigtail at the bottom, the so-called chain stitch.
Unlike a sewing machine, the thread consumption of an overlocker is significantly increased, not only due to the number of spools, but also due to the increase in the length of the threads to form one stitch. This is why it is better to buy threads for overlocking on large conical bobbins.
French knot
French knot is a decorative stitch often used to add volume to patterns. In order for the seam to come out even and neat, you need to carefully select a needle of thin sizes without a compacted eye. They also use it to create unique flowers - from lilacs to roses; they also use French knot to make eyes on embroidery and entire paintings.
The embroidery process is extremely simple. At the first stage, the thread or tape is attached and brought to the front of the fabric. We take it in our non-working hand and stretch sections whose length is no more than 1-1.5 cm.
Next, place it on the end of the needle and twist it three times in a counterclockwise direction. The needle is inserted at some distance from the point where it originally entered. The thread or tape is carefully pulled from the inside out so that a knot of the desired shape is formed.