What are grommets?
Eyelets are special fasteners that are fixed directly into the fabric. They are rings inserted into holes in the material. A cornice runs through them.
Eyelets are made from different materials:
- wood,
- plastics,
- metal
Eyelets can be round, but other geometries are also possible. The main thing is that it does not impede the movement of the canvas along the cornice.
Loops
Loops, like ties, are made from strips of fabric. However, the loops are usually wider than the ties (5-20 cm) and are sewn to the curtain at both ends; there is no need to tie anything. An alternative option is to have a Velcro, button or snap fastener.
Style.
The technique is universal and will suit both classic and modern styles, but mainly to “homey” and cozy interiors. For a solid living room or office, they are rustic. But in the Scandinavian style, this is the best choice.
Pros:
hang quickly; withstand heavy loads; silent; universal;
Minuses:
if there is no fastener on the hinges, you need to remove the curtain rod to hang the curtains; difficult to move along the cornice; difficult to distribute.
Advantages of eyelets
Fastening curtains with eyelets has many advantages:
- the curtains form a beautiful assembly, the folds are smooth from the ceiling to the floor surface,
- They are convenient to remove and easy to hang,
- the fabric does not stretch or deform at the attachment points,
- curtains move easily,
- The fastening is suitable for different types of fabrics.
Having assessed all the advantages of this type of fastening, it is logical to analyze their disadvantages.
- By using eyelets, it will no longer be possible to create a multi-layer composition.
- Very thin fabrics are not suitable for eyelets.
Photos of curtains with eyelets will help you weigh all the arguments and determine whether the grommets are suitable for a particular room.
LiveInternetLiveInternet
Quote from Oksana_Pilipenko's message
Read in full In your quotation book or community!
What you need to know before installing grommets.
What you need to know before installing grommets.
1. What types of eyelets are there and which ones are better to choose?
Eyelets differ: according to the material from which they are made (metal or plastic);
in shape (round, curly); by color (transparent, plain colors, imitating the color of metal, wood, leather and other materials); according to the diameter of the internal hole (from 10.5 to 50 mm). You need to choose eyelets depending on the curtain model you want to get as a result and the cornice on which it will be attached. Most often, round eyelets are installed to match the cornice, furniture fittings or curtain material. But if you want to focus on the eyelets themselves as a decorative element of the curtain, you can use curly eyelets. For example, grommets in the shape of a steering wheel or a dolphin for children's curtains in a marine style. The diameter of the grommet hole should be 1.5 cm larger than the diameter of the rod (pipe) of the cornice. Otherwise, the curtain will not move well along the cornice, because the eyelets will get stuck on the rod. As for the choice of grommet material, it is more practical to use plastic ones. They do not damage the curtain rod, move quietly along the curtain rod, and there is no risk that during washing the metal will oxidize and stain the curtain fabric with rust. Plastic eyelets can generally be removed for washing and then put back. In addition, plastic eyelets are cheaper than metal ones and do not require a special press to install them. 2. Where to buy eyelets and how much they cost.
The price of eyelets depends on their size, shape, material and quality.
The average price of round plastic eyelets in Moscow is 40-50 rubles. We do not recommend buying cheaper eyelets, as they are most likely of low quality. You probably don’t need eyelets from which the paint will rub off during the first wash. It also makes no sense to pay more for round eyelets, since this means that the seller simply made too much of a markup on his product. Curly eyelets are more expensive than round ones, the average price is 50-70 rubles. In Kyiv I saw eyelets in Leroy Merlin. Plastic, 7 hryvnia. there are different colors. Most likely, eyelets can also be found in Epicenter and other places where they sew curtains or sell fabric for them. 3. How many eyelets are needed.
When calculating the number of eyelets that will be required for a curtain, we proceed from the following: a) The number of eyelets on the curtain must be even (that is, 8, 10, 12, 16, and so on). This is necessary so that both side edges of the curtain are directed towards the window. If you install an odd number of eyelets, one edge will be directed towards the room. It doesn't look nice.
b) The optimal distance between the centers of the eyelets is 18 cm. If you don’t get exactly 18, don’t worry. You can do a little more or a little less. The main thing is that the distance between the centers of the eyelets is not more than 22 cm or less than 15 cm. Then the folds will be beautiful and even. c) From the side edge of the curtain to the center of the first grommet, the distance is 5 - 7 cm. This distance depends on how wide the side edge hem is and on the diameter of the grommet. You need to make it enough so that the eyelet does not get on the side hem. Otherwise, it will not close because the fabric is too thick. You should not make a very large distance, otherwise the free end of the curtain will bend unsightly.
Let's calculate the number of eyelets: 1) n1 = (L - 2a) : 18 + 1, where n1 is the estimated number of eyelets, L is the width of the finished curtain on which the eyelets will be installed, in centimeters, a is the distance from the side edge of the curtain to the center of the first grommet, in centimeters. 2) n2 is the even number closest to n1, that is, the very number of eyelets that we want to know.
Example: Your curtain is 2 meters wide (that is, 200 cm). The eyelets you will install have a hole diameter (inner diameter) of 45mm (4.5cm) and an outer diameter of 75mm (7.5cm). You want to make the hem of the side edge 2.2 cm. Then the distance from the side edge of the curtain to the center of the first grommet you need to take is: the width of the side hem + half the outer diameter of the grommet + the distance from the hem: 2.2 cm + 7.5 cm: 2 + 0.3 = 6.25 cm. Thus, L = 200 cm, a = 6.3 cm. Calculate the number of eyelets: n1 = (200 cm - 2 x 6.3 cm): 18 cm + 1 = 11, 4 things. But we need an even number of eyelets, so we round n1 to 12 or 10. Moreover, if we take 10 eyelets, then the distance between their centers will be: b = (200 cm - 2 x 6.3 cm) : (10 - 1 ) = 20.82 cm, and if we take 12 eyelets, then the distance between the centers of the eyelet holes will be: b = (200 cm - 2 x 6.3 cm): (12 - 1) = 17.04 cm. What is the best distance to make , you decide. But keep in mind that the greater the distance between the eyelets, the larger the folds. So proceed from what type of curtains suits you best. By the way, if you have two curtains, do not forget to multiply n2 by 2. top
4. What is needed to install eyelets
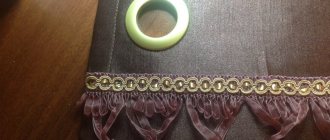
. In addition to the eyelets themselves, you will need duplicating material to strengthen the top of the curtain. It is necessary to strengthen the curtain fabric, otherwise the grommet will not hold due to the displacement of the material. In addition, the reinforced top of the curtain drapes more beautifully, and the folds are clearer.
The most convenient way to do this is to use a special grommet tape, which is a ready-made strip of hot-melt adhesive material. Grommet tape is produced in different widths: 5, 7, 10 and 12 cm. Choose a tape of a width that will be larger than the outer diameter of the grommet plus 2 cm. For example, if you install grommets with an outer diameter of 7.5 cm, then grommet tape will suit you 10 and 12 cm. And if you want to put small eyelets, with an outer diameter of 3.6 cm, then you can use 7 cm eyelet tape. Transparent eyelet tape is available for transparent fabrics. Eyelet tape is sold in specialized departments and stores. You can also order it from us, with delivery. To strengthen the top of the curtain under the eyelets, you can also use thick duplerin, but this is less convenient, since it will have to be cut, and due to the need to join the strips, the top will be less neat. If you still decide to use doublerin, place the joints of the strips of adhesive material between the places where the eyelets are installed, where the curtain will bend towards the wall. This will avoid excessive thickness of the fabric, due to which the eyelet may not close, and hide the joint. You will also need an iron for gluing the grommet tape or dublerin, a measuring tape and a pencil or marker for marking, scissors or a punch for cutting holes for the grommets. up
5. How to prepare a curtain for installing eyelets.
Eyelets are installed on a completely finished curtain. That is, all edges must be processed. If the curtain is lined, it must also be sewn on. The top of the curtain must be doubled with grommet tape or doubler tape. The drapery coefficient of curtains on eyelets is 2 - 2.5. Otherwise they look ugly. That is, in order for the finished draped curtain on the eaves to occupy 1 meter, when unfolded it should have a width of 2 - 2.5 meters. Take this into account when calculating the required amount of fabric. There are two main ways to finish the top of eyelet curtains. In the first case, the curtain fabric is a single whole. In the second, the upper part of the curtain is trimmed with a different type of fabric. Combining fabrics in eyelet curtains is used for both aesthetic and practical reasons. For example, if the curtain on which you are going to install grommets is made of light material (tulle, veil, organza, mesh), then it will be quite difficult to carefully process the top edge. This is due to the mobility of the fibers of these tissues and their transparency. The second common reason for finishing the top of curtains on eyelets with another type of fabric is the insufficient height of the curtain material. For example, if the height to the top of the rod of your curtain rod is 250 cm, then the height of the curtain material should be: 250 cm - 1-2 cm (distance from the floor to the bottom edge of the curtain) + 250 * 0.02 (for shrinkage) + 2-5 cm (curtain comb) + 20-24 cm (double hem of the top) + 4-15 cm (bottom processing) = 279-298 cm. And the height of curtain fabrics is most often 280 cm.
Therefore, you need to calculate in advance whether the height of the material is enough for you to process the top: 1. Decorate the material of the future curtain. To do this, the fabric must be wetted, dried until damp and gently ironed. This is done so that the curtain material shrinks before cutting and sewing, and not after the first wash, and the finished curtains do not unexpectedly become 5 cm shorter. This is especially important for natural fabrics: cotton, linen, wool, silk. Some synthetic fabrics do not shrink, but decatening is still worth doing because, as a rule, it is not known in advance whether the material will shrink and how much. After decaling, measure the height of the material again. 2. Decide what kind of hem and what kind of comb you want to make and calculate what height of material is required for your product. If after decorating you have enough fabric, you can start sewing curtains with eyelets made from solid fabric. If there is not enough, you will have to combine the curtain fabric. The sequence of sewing curtains on eyelets is as follows: Processing the top of the curtain on eyelets
.
1) Measure 2 times the width of the eyelet tape from the top edge (the edge of the fabric is not taken into account, it must be carefully cut off). Fold to the wrong side and iron. 2) Place the grommet tape into the fold, with the edge toward the fold of the fabric, departing from the side edge the width of the hem. Fold the fabric back over the grommet tape and iron it gently. Glue in small sections, as long as the iron platform can handle: level the section, place the iron, apply pressure, wait until it sticks and move on to the next section. There is no need to move the iron over the area to be glued, because the fabric may shift and stick unevenly. You need to glue the tape so that the hot melt adhesive melts, but does not seep through the curtain fabric to the outside. Therefore, you need to know how long and with what pressure to hold the iron on the treated area. To find out for sure, you need to experiment before you start processing the top of the curtain. Buy fabric and grommet tape with a small supply and practice. A small overpayment is compensated by the absence of the risk of damaging a large product. To avoid burning the curtain material, use an ironing iron (a thin cotton or linen material that is placed between the fabric being ironed and the iron during ironing). 3) When you have glued almost the entire top of the curtain and reached the second side edge, cut off the rest of the grommet tape, departing from the edge the width of the side hem. 4) Secure the top flap with a machine stitch, departing 1-2 mm from the edge of the fold. Processing the sides and bottom of the curtains with eyelets.
In general, the processing of the lower and side edges of the curtains with grommets does not differ from similar processing of other types of curtains.
There are various methods; the choice of one or another processing method depends on the type of fabric, your wishes for the appearance of the curtains and the level of your skill. 6. Mark the holes for the eyelets on the curtain.
1) Lay out the finished curtain on a flat surface. All measurements and markings must be made when the curtain is ironed and lies flat. 2) Mark the position of the outer eyelets. To do this, take the grommet and place it at the desired distance from the top and side edges of the curtain. Make sure that it does not go over the seams, otherwise the eyelet may not close due to the fabric being too thick. Make a dot exactly in the center of the grommet hole with a pencil or fabric marker. Do the same for the other side of the curtain. Please note: the distance that you stepped back from the top for the first eyelet must be maintained for all other eyelets so that all holes are at the same level. 3) Calculate the distance between the centers of the eyelets. To do this, measure the distance between the centers of the marked outer eyelets and divide it by the number of eyelets, reduced by 1. For example, if you get a distance of 187.4 cm, and the number of eyelets is 12, then the distance between their centers will be: 187.4: (12 -1) = 17 cm. 4) Mark the centers of all remaining eyelets, making dots with a simple pencil or fabric marker. 5) Mark the holes for the eyelets. To do this, you need to take the grommet and, placing it on the center marking, circle the inner hole. The previously marked point should be located exactly in the center of the grommet hole. up
7. Cut out the holes.
It is most convenient to cut out the grommet holes with a special punch. But you can also use regular scissors. You need to cut holes for the eyelets, retreating 1-1.5 mm from the markings. This is necessary so that the edge of the hole is completely hidden inside the grommet. You should not make a larger hole, otherwise the grommet will not hold firmly enough. Try to cut the holes carefully so that the edge does not fray or crumble. The holes in all layers of fabric should be the same. up
8. Install the eyelets.
Place the eyelet halves on the front and back sides of the curtain.
Make sure they are level and press until they click. No special equipment is required to install plastic eyelets; they are installed manually. Source MK
- https://www.decorare.ru
PS
With a fabric width for curtains of 2.5 meters and 14 eyelets, the ideal distance of 18 cm between eyelets is obtained: (
250 cm
-
3 cm
X
2
(for hemming on the sides) -
5 cm
X
2
(distance from the edge to the center of the first eyelets) / (
14
-
1
) =
18 cm. That is. the finished curtain will have a total width of 244 cm, 14 eyelets will be located at a distance of 18 cm from each other (between centers) and 5 cm is the distance from the center of the outer eyelets to the edge of the curtain.
Types of curtains
Conventionally, three options for using eyelets can be distinguished.
Types of Curtain Rings
We’ve already talked about cornices, now it’s time to look at the eyelets themselves, which also have some differences. Eyelets are classified depending on:
- material;
- quantities;
- forms;
- decorative finishing.
The material for making eyelets can be plastic, wood or metal. The range of their sizes is not too wide, usually the diameter is 5-6 cm. As for the shape, there is room for imagination. According to the configuration, the eyelets are:
- round;
- square;
- triangular;
- polygonal;
- in the shape of a flower, heart or fish.
The shapes of eyelets can be different: from traditional rings to stylish toads
In terms of decorative finishing, eyelets have no boundaries:
- matte or shiny finish;
- gilding; rings with a coating that imitates leather;
- with rhinestones and beads;
- with Swarovski stones.
Classic eyelets have the shape of rings, which can be chosen in the colors of the curtains
Tip: for plain curtains, eyelets with decorative ornaments are preferable, but for colorful fabrics it is better to choose simpler and more modest rings. There should be harmony in the style direction, not oversaturation.
Sophistication and simplicity: combine printed curtains with classic eyelets
Curtains
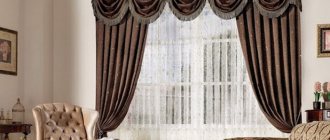
These are curtains made of thick fabric that does not allow light to pass through. Classic curtains made of thick fabrics look heavy and voluminous.
Attached to eyelets, they look less bulky and fall in beautiful folds.
Note!
Curtains with lambrequin - choice of colors and tones. Features of types of lambrequins. Instructions for sewing lambrequins with your own hands (photo + video)Greek curtains: TOP 140 photos and video reviews. Choice of material and colors. Features of Greek curtains for different rooms. Installation nuances
Green curtains: features of choosing colors and shades of green. A combination of interior styles with green curtains. Photo and video reviews from designers
What features do curtains with a ring have?
Using rings for hanging curtains (both grommets and curtain rods) has several significant advantages that other mounting options do not have.
Design advantages:
- The main advantage is its spring appearance. As mentioned above, rings are one of the favorite elements of room decoration for many designers.
- The main practical advantage is the ease of putting rings on the cornice (not only cornice rings, but also grommets are put on the cornice). This greatly simplifies the hanging of curtains, and also makes them easier to remove for washing and repair.
- Typically, rings are used that have a diameter larger than the diameter of the cornice, which ensures free movement of the curtain along the cornice, but at the same time ensures reliable fixation - the curtains do not “fall off” the curtain rods.
- Curtains hung with rings always have an attractive shape in the form of even wavy folds (with proper distribution of rings along the entire length of the curtain) without any additional devices.
- The sound of curtains moving is relatively weak (one might say that it is practically absent).
- When using high-quality materials, both clamps and grommet rings and fabric, long service life and reliable fastening are guaranteed.
- The fabric is adjusted quickly enough, which simplifies the process of sewing curtains.
It is worth highlighting another significant advantage - the ability to use almost any type of fabric - absolutely transparent, dense and opaque, etc. At the same time, some types of heavy fabrics can only withstand eyelets - their density is so great that even relatively small pieces turn out to be quite heavy.
However, even heavy curtains can look quite light - design compositions in which there are several types of curtains: from thick fabrics and from thin “light” ones help to “lighten” their appearance. The correct selection of fabrics allows you to give the room the look of a luxurious “mansion” or the look of some “cheap hole”
Therefore, it is important to choose the right design of cornices and curtains and fit them harmoniously into the room.
Kiseya
Universal curtains are used not only for window decoration, but also for dividing rooms and decorating doorways.
This type of curtains is difficult to confuse with others due to their original appearance. Kiseya is a bit like noodles. Beads or tiebacks are used for decoration.
Rail holder installation
This is the one that has sliding rollers in its design. Today there are many such models! They are usually made from three materials: plastic, aluminum, steel.
The former are the best option for light curtains. The latter are indispensable when decorating bay windows. Well, others are good under massive curtains.
Sawing off excess length
Rail holders are sold in standard lengths, but if necessary, they can be shortened with a hacksaw (when cutting the rail, place the flat side up). The kit includes screws, runner brackets, rollers, hooks and stops that prevent the runners and hooks from slipping.
You can mount such a cornice on a wall or ceiling, here are the instructions for each of these options:
| Stage number | Ceiling installation | Wall installation |
| 1. | Considering the presence of pipes or radiators, we retreat from the wall at least 10-15 cm. | The minimum height of the fastenings to the upper edge of the window opening should be at least 5-7 cm. Drill a hole in the place marked with a pencil for the first bracket. A 6mm drill and dowels will work here. |
| 2. | On the eaves itself, every 20 cm we mark with a pencil the locations of future holes for fasteners. | Place the bracket on the screws, but do not tighten it. |
| 3. | We attach the holder to the ceiling and drill holes. There is no way to do this without an assistant. | Mark the location of the second bracket. |
| 4. | Installation of the ceiling cornice is carried out using special screws that are included in the kit. But you can replace them with dowels and screws. | We insert the rail into the first bracket that is not fully tightened, we substitute the second one in place of the future fastener and, using a building level, we check whether the cornice will hang evenly. |
| 5. | We insert rollers, runners, hooks and a limiter into the gutters. | We mount the second bracket. |
| 6. | Tighten the screws thoroughly. | |
| 7. | First we insert the rollers, then the runners, then the hooks and finally the limiter. |
In the photo you can see the fixing screws that come with the curtain rod
For your information! Profile aluminum cornices, single-row and multi-row, are installed using the same technologies.
Installation of string curtain rods for light curtains
The string of these products is made of polymer cable or steel wire. It imparts lightness, subtlety, and grace to the entire structure, which, in fact, eliminates the need to hang heavy curtains on it. Even if you tighten the string well during installation, it will sag under the weight of massive theater-type curtains.
The string cornice can be installed both on the wall and on the ceiling. The procedure is as follows:
| Stage number | Actions |
| 1. | Having made the markings, we attach the base of the fastening to the ceiling and make marks with a pencil under the screws. When installing on a wall, above a window, you must first check with a level that the marks are correct. |
| 2. | We drill holes, drive in dowels and secure the fastenings with self-tapping screws. |
| 3. | We tighten the string using a special tensioning device, which is located on the mount. |
String holder
Installation of baguette holder
Absolutely any ceiling curtain holder can be upgraded to a baguette holder. To do this, you just need to attach a ceiling molding to the product, which will serve as an excellent decor that hides all the ugly hooks and fasteners.
The material, color schemes and design of the baguette cornices are impressive. You will certainly find what you need. And the installation will be like this:
| Stage number | Actions |
| 1. | Before installation, we assemble the cornice according to the manufacturer's instructions. |
| 2. | On the wall, in correctly measured and marked places for attaching the side brackets, we make holes for dowels. |
| 3. | We attach the side parts of the cornice to the wall with brackets. The front strip is screwed with its upper side to the ceiling. You can fix the bar immediately by screwing in the screws every 20 cm. |
| 4. | We put hooks on the runners, insert the runners on rollers into the gutters of the cornice, and close the product with plugs on the sides. |
| 5. | Installation is complete! You can move on to decorating with baguette. |
This is how you can decorate a window beautifully by mounting a baguette-type holder
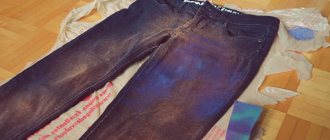
Metal eyelets
Metal elements are durable, but when the coating is abraded, they can become covered with a layer of rust. For this reason, it is recommended to remove them before washing and carefully inspect them periodically.
If the surface coating has worn off, the element can be coated with colorless varnish. This will help avoid rust stains on the curtain fabric.
Note!
Fashionable curtains: TOP-170 photos and video reviews of fashionable curtains. Selection of curtains for different rooms and styles. Fabric and color options- Beige curtains: features of beige shades, rules for color combinations. Choosing an interior style for beige curtains. Types of fabric materials (photo + video)
Brown curtains: varieties of curtains and curtains. Tips on choosing materials, colors, patterns and sizes of curtains. Brown curtains for different styles (photo + video)
Installation of cornices on suspended ceilings
In principle, the sequence of actions is almost no different from the previously discussed installation technologies. The main feature here is that the installation of the curtain holder is carried out parallel to the installation of the tension fabric. Therefore, it is important to carry out preliminary work carefully and accurately.
The cost of a mistake is the complete dismantling of both structures, which can lead to damage to the products. And if repairing curtain rods is quite a simple matter, then a suspended ceiling is more “capricious” in this regard.
Scheme for installing a cornice directly on a suspended ceiling
Installation can be done in two ways:
| Stage number | Installation in a hidden niche | Installation directly on the tension fabric |
| 1. | In a specially left niche, along the entire perimeter of the base ceiling, we fix the wooden beam with dowels. The timber and the cornice mounted on it should not protrude from the niche cavity. Pay attention to this. | We prepare in advance a wooden beam (one long or 2-3 short ones), which will serve as a support for the cornice. The thickness of the beam, as a rule, is slightly less than the distance by which the ceiling will be displaced. |
| 2. | Using a screwdriver and self-tapping screws, we attach the cornice to the beam. This can be done without preliminary marking, every 20 cm. | Using dowels, we fix the beam horizontally to the base ceiling, where the curtain holder is supposed to be hung. |
| 3. | We install the frame and canvas of the stretch ceiling. | |
| 4. | Already on the stretched canvas we mark the attachment points of the cornice. | |
| 5. | In places of future punctures, we attach fixing rings so that the fabric does not tear. | |
| 6. | We burn holes inside the rings. | |
| 7. | Through these holes we mount our holder to the beam using self-tapping screws. |
In a hidden niche
Materials for curtains with eyelets
Ready-made curtains with eyelets are made from different materials.
- Curtains made of a special dense material called blackout, produced using a special technology, have excellent performance characteristics. They are durable, resistant to damage and deformation, and do not transmit light.
- Linen curtains have an original texture, are safe for health, durable and do not absorb dust.
- Jacquard curtains have an original pattern, are practical and perfectly complement the interior.
- Silk curtains are popular because of their beautiful appearance.
- Velvet curtains are appropriate for classic interiors and large rooms.
- The matting does not wrinkle, looks practical and fits perfectly into a country or Scandinavian style interior.
- Tulle also looks unusual on eyelets.
Note!
Turquoise curtains: advantages and disadvantages of turquoise colors. Rules for combining turquoise curtains with interior elements. Selection of fabric materials (photo + video)Olive curtains: advantages and disadvantages of olive color for curtains. A range of combinations and varieties of shades. Types of olive curtain designs (photo + video)
Curtains for a small kitchen: TOP-140 photos and videos of curtain options for a small kitchen. Tips for choosing length, number of layers, fabric and colors
Fabric selection
The living room is the place where you receive your loved ones and friends, so everything in this room should be impeccable: from furniture to window design.
When choosing fabrics for curtains in the living room, pay attention to the following main points:
- it must be dense and wear-resistant;
- it should match the design and interior of the room (if your living room is designed in a high-tech style, then massive curtains with fringe will be inappropriate);
- the fabric should be dust-, dirt-, and light-repellent, then you will not have to wash the curtains often;
- It is better that the material from which they are made is washable;
- do not choose velvet and velor fabrics, they absorb all odors very easily, do not hold their shape well and wear out very quickly.
- if you have animals at home, it is better to choose a very dense material, you can even use stylish burlap or an awning for sewing curtains.
Chalet style curtains
Curtains with eyelets in the interior
The original fastening of curtains can be used in rooms for various purposes.
Curtains with eyelets with tulle are appropriate for decorating a living room. Especially if the room is located on the north side. It is recommended to match the eyelets to the tone of the cornice or fabric.
For the bedroom you should choose linen curtains. Preferably a neutral color or a pop art design.
In the kitchen, curtains with eyelets will help create a special atmosphere of home comfort and emphasize the style of decoration.
The nursery itself involves various unusual decor options. Therefore, eyelets are appropriate here too.
The idea of originally attaching curtains using eyelets is a very original option for decorating a room. You can buy ready-made curtains or sew them yourself.
To develop a preliminary sketch, it’s a good idea to look at the curtains on the eyelets, photos of new items in manufacturers’ catalogs.
Characteristics
The concept of “grommet” in the field of interior design was borrowed from the terminology of sailing. A grommet is a hole in the sail that is framed by a metal sleeve. Cables that tension the sails pass through this hole.
You will also be interested in reading behind the curtains in a boy’s nursery (with photo).
Today, eyelets are widely used in outdoor advertising, in the tourism sector (making awnings), in cargo transportation, in the shoe and parachute industries.
In a domestic context, a grommet has taken root as a designation for the concept of a hole in curtains with metal or plastic trim, through which a special crossbar passes, which is the cornice for such curtains.
They are always located at the very edge of the curtain, so that they are practically invisible.
Eyelets are:
- made of metal, made of plastic;
- round, triangular, square, in the form of stars, butterflies and other shapes;
- glossy, matte, wood, leather, inlaid with stones and even made of precious metals.
Curtains for a teenage girl's bedroom: specifics of application.
Curtains with eyelets yourself
Making curtains with eyelets yourself is not as difficult as it might seem at first glance.
To work you will need:
- fabric for curtains,
- eyelets,
- special adhesive tape,
- scissors,
- sewing machine,
- threads,
- meter tape.
Detailed instructions will tell you how to sew curtains with eyelets.
- For beautiful folds, the width of the canvas should be twice as large as the size of the window.
- You need to add 10 cm to the top bend, 2-3 cm to the bottom.
- Each curtain must have an even number of eyelets. Their diameter is chosen to be 1.5 cm larger than the cornice.
- The fabric is folded and all edges are machine stitched.
- The top edge from the inside is duplicated with adhesive tape, the distance between the fasteners is calculated and marked.
- The holes are cut to the diameter of the eyelets, they are inserted and secured.
The work is done. It is noteworthy that the eyelets are perfect for popular curtain rods and such fastening does not require additional costs for their replacement.
A modern option for attaching curtains using eyelets will help make the interior original and will become a real highlight of any room.
Room design. Choice of fabric.
Some buyers spend not just hours, but days in curtain sewing salons. This is not an exaggeration. The wealth of fabric choices is simply intimidating. And in our case, eyelets and cornices with all their elements also appear as decorative elements. However, we will try to help. If the choice takes a long time, try to trust the seller or designer of a specialized salon. If a salon has established itself, it means that people with a taste for beauty and vast experience work there. They will come to your home, see the interior, offer fabrics, take all the necessary measurements (and take them with a laser tape measure, and not with a fabric tailor’s meter, as the buyers themselves often do). In addition, they will make curtains for you, hang curtain rods, and then the curtains themselves, having previously ironed them. You will receive everything turnkey. But if you decide to do everything yourself, then read on. First, let's choose the fabric. By the way, when choosing, color of course comes first. However, touch the fabric with your hand; tactile sensations may prompt you to make a choice.
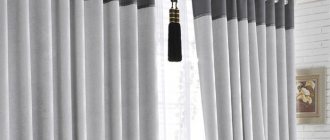
The room will be transformed if you choose the right fabric to match the color of the walls, furniture, floor and ceiling. Decorative elements - eyelets and cornices - will help you. For example, we will select the fabric to match the wallpaper, and the cornice and eyelets to match the color of the floor. Another option is dark curtains and shiny metal eyelets to give the room a modern look. For curtains with eyelets, any curtain and curtain fabric is used, from the heaviest - chenille, brocade, to the lightest, for example, organza. It should be taken into account that when using lightweight fabrics, they should be reinforced with a special, preferably transparent, tape. As an option, you can sew light fabric, heavier, reinforced with non-woven fabric. The eyelets will be installed on this fabric (cuff). The denser the fabric, the stronger the eyelets you will have to use. For light fabrics, plastic ones will suffice; for heavy ones, you will have to purchase metal ones. But be careful, metal eyelets can make squeaking noises when moving.
Did you know that the distance between grommets (pitch) can be uneven? If your curtain rod is located close to the wall, try making each even pitch smaller than the odd one. In this case, the curtain will not catch on the wall, and the appearance of the product will not be affected.
The cornice is selected long enough to at least exceed the length of the window opening by 20 centimeters on each side. Then the curtains will be evenly distributed along its length, forming even, smooth folds without kinks. A cornice equipped with finials visually appears longer.
If we hang two types of curtains, we use a double cornice. The second cornice will be further from the wall or higher than the first. In this case, the number of options for decorating the room increases.