Anyone who thinks that sewing a men's tie is a troublesome, time-consuming and simply thankless task is mistaken. In fact, 80% of success is the correct pattern of a men's tie, which you don't even need to do yourself. It is enough to use a ready-made pattern on the website, transfer it to paper, and then to fabric.
The result of simple manipulations is a beautiful, neat tie of the required length and width from the chosen fabric with minimal investment of time, effort and money. A man who receives such a job as a gift will be endlessly pleased and grateful for his efforts and efforts.
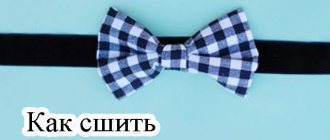
DIY children's tie with an elastic band
Necessary materials for sewing a tie:
Pattern and sewing of a tie with an elastic band:
We make a tie template and transfer the pattern to cardboard. According to this pattern, the tie turns out to be narrow; if you need a wide tie, the pattern needs to be increased accordingly by the required amount. Save the template - it may still be useful for sewing other ties.
We cut out a silk part according to the template, adding allowances of 0.7 cm on all sides, the same part from non-woven fabric, and the tip of the tie from the lining.
Glue the interlining to the back of the main part using an iron and a damp cloth.
We fold the tie and lining with the right sides inward and stitch at a distance of 0.7 cm, cutting off the allowances in the corners.
Fold the tie lengthwise and stitch along the long side at a distance of 0.7 cm.
We turn the tie inside out and iron it through a damp iron.
Making a knot for a tie. We cut out a strip of fabric with a length equal to double the length of the top of the tie + an allowance of 0.7 cm on both sides, a width of 7 cm, we cut out the same piece from non-woven fabric and glue it to the wrong side of the strip.
We fold the strip face down, stitch the edges, screw them in, the stitching seam should be in the middle. We cut the side sections of the strip at an angle.
Fold the strip again and stitch down the side edges.
We measure the elastic band along the child’s throat, make a small margin so that the elastic band does not press, and connect the ends of the elastic band into a ring.
We put a knot on the front side of the tie, attach an elastic band on top, as shown in the photo, and connect it with a single stitch. We pull the tie through the knot, straighten it, it’s ready.
Source
Children's tie with an elastic band: pattern and master class
To sew an accessory with your own hands you will need:
How to sew a children's tie
An approximate tie pattern is shown in the photo below. The finished product made from it will have a width of 7 cm and a length of 25.5 cm. You can change the dimensions as you wish.
We mark all the details on the main fabric. We cut out two of them, except for the rectangular one, taking into account an allowance of 10 mm, and cut out the rectangular one without an allowance.
We cut out similar parts from non-woven fabric.
We strengthen the blanks with non-woven fabric.
We fold the two main parts (the tie and its lower corner) right sides together and stitch them together.
We trim the corners, turn the tie inside out, straighten all the corners and iron.
Now we fold the part in half along the long side and grind down the vertical sections.
Turn it inside out, straighten it, placing the seam in the center, and iron it.
To create a knot, fold the rectangular piece in half lengthwise and stitch it into a pipe.
Turn it inside out, placing the seam in the center of one side. Iron it.
Fold the ironed part as shown in the photo and cut along the line.
We cut off the elastic band with a margin and fix it to the knot part with a few stitches. We fold the parts as shown in the following photo.
Sew without stretching the elastic.
Now we thread the tie into the knot.
Gently straightening and tightening. The tie is ready!
Accessory dimensions
To make the perfect bow tie with your own hands, it would be useful to clarify the optimal parameters of the future product. The size is influenced by the type of accessory. The length of classic models reaches 15 cm, mini - 10 cm, children's - 7 cm.
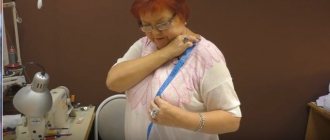
The width of a traditional tie is 5.5 or 6 cm, narrower models for adult men - 3 cm, for children - 2-3 cm. The length of the adjustable strap reaches 30-45 cm. To accurately determine the parameters, it is necessary to measure the circumference of the neck. Based on the data obtained, the future product is modeled. About 0.5 cm is added to the measurements obtained for an allowance, then the put on bowtie will fit freely without causing discomfort.
With a neck circumference of 36.5 cm + 0.5 cm allowance, the final result is 37 cm. The optimal strap length in this case will be 41 cm or more.
The appropriate size of the product is determined based on the principle: the tie should not be longer than the face. The width is selected in accordance with the parameters of the gate. A large butterfly on the neck is in harmony with a classic collar, a medium one - with soft semi-turndown options.
The bow tie
When choosing fabric for sewing a butterfly, preference should be given to cotton, satin, silk and jacquard. A boy's tie made of brocade looks very formal. Original accessories are made from leather or felt.
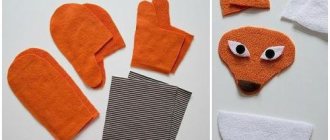
To sew a butterfly for a child over 7 years old you will need:
How to sew a tie with your own hands
We cut out the blanks according to the specified dimensions and iron them.
We fold the finished parts in half and stitch them with a zigzag stitch. The use of such a stitch is justified by the fact that it is guaranteed not to cause puffs and creases on satin fabric. As an alternative, you can replace this stitch with a hand-blind stitch made with a thin needle.
Turn the butterfly inside out and iron it.
To make a lintel, take a rectangular piece 80 by 120 mm, grind it along the long side, turn it inside out, and iron it. We put the jumper on the main part, fix it on the inside with hand-made blind stitches.
Leather bow tie for kids
The dimensions of a tie for a boy from three to ten years old are 5 by 10 cm.
To sew a butterfly for a little dude you will need:
How to sew a butterfly for a child
We cut out from leather:
Cut the elastic to fit around the neck.
We provide allowances of 5-7 mm on all parts.
Fold the main part with the wrong side outward, stitching, taking into account the allowance.
We turn it inside out, and the stitching seam should be in the center of one of the sides. We fold the piece into a bow and sew it with a machine stitch.
We repeat the process for the jumper part.
We tuck the bow into the jumper, controlling the symmetry, and fix this position with manual blind stitches. We thread an elastic band through the jumper.
Sew the ends of the elastic or sew on a fastener.
Cotton bow tie
For sewing you will need:
Description
We cut out a piece of fabric 20 by 60 cm, reinforce it with non-woven fabric.
Then we mark a rectangular piece 13 by 50 cm (allowances are taken into account) and cut it out.
Fold the piece in half and pin it together.
For the jumper, cut out a piece 6 by 7 cm.
We divide it widthwise into four equal parts. We reinforce the two middle ones with non-woven fabric.
Fold the jumper in half, wrong side out, and stitch along the long side. Turn it inside out and iron it.
We sew the finished main part in the center.
We form beautiful folds, put on a jumper, and secure it with hand stitches.
We insert Velcro or other fastener into the jumper for fastening.
but also a kind of zest in the image of young guys. There are special principles and rules
The fabric that was used in the master class has very frayed edges, so in some places we overcast the seam allowances. If your fabric does not fray too much, you can skip this operation.
Fold the main piece in half, stitch on the side, and press the seam allowances to the sides. If the fabric frays too much, overcast the seam allowances.
Bearded questions: How to wear a tie with a shirt
We sew a tie with an elastic band
Photo shoots, matinees, holidays are commonplace when it comes to preschool children. Quite often, parents have to rack their brains about what to dress their child in for the next event. And here a mother’s ability to sew, at least a little, can come to the rescue. Then the whole suit or even some accessory for it can be made with your own hands.
Firstly, this will help save time searching for it in stores and the family budget for a one-time purchase, and secondly, it will allow you to create an item of absolutely any design, and even from scrap materials.
A striking example of this is a children's tie with an elastic band. He can be strict, he can be humorous - it all depends on the suit he chooses to wear. Moreover, any model of such a tie is sewn the same way.
In order to sew a tie with an elastic band yourself, you need to create a life-size pattern for it. You can use the diagram or make it to your own size (photo 1).
Attention: the pattern is given without taking into account seam allowances!
They need to be added when cutting. The width of the allowance is 7 mm. According to the pattern, you should cut out 2 parts of the tie - the main one (made of thick fabric) and the lining (made of thin fabric) (photo 2).
Important: both parts of the tie are cut at an angle of 45 degrees to the direction of the warp thread.
The main part needs to be duplicated with an adhesive pad, cut in the same way, on an oblique. Then the top and lining of the tie must be placed on top of each other face to face and hemmed along the bottom corner, as shown in the photo. Seam allowances in the corners must be cut out, not reaching the line 2 mm (photo 3).
The tie must be turned out and ironed from the lining side (photo 4).
Then, on the main part of the tie, you need to mark and cut off the excess seam allowances (photo 5).
The tie needs to be folded in half lengthwise (facing inward), and stitched along the long edges. The seam must be carefully ironed with the tip of the iron (photo 6).
The hemmed tie must be turned inside out and ironed from the inside out (photo 7-8).
After this, you need to measure the width of the tie at the very top. This figure must be multiplied by 2 and added 2 cm for the seams.
From the main fabric, cut out the upper part of the tie in the form of a rectangle with dimensions equal to the calculated value of 7 cm (photo 9).
This detail also needs to be duplicated (photo 10).
Then it must be folded in half along the long side and hemmed, as shown in the photo (photo 11).
The seam allowance should be pressed using the tip of the iron. The part should be turned inside out and ironed, placing the seam in the middle at the back (photo 12).
The sides of the workpiece must be cut off with a corner (photo 13).
Knitted option
Knitted butterflies look very interesting, especially if they are made with your own hands. Such ties began to appear quite recently, and women wear them. After all, what a girl won’t do to look beautiful and stand out among others. Such decorations are crocheted, which allows you to make the accessory openwork and interesting.
In order to knit this butterfly, you need to take hebesh yarn, a small button and a hook number 2.
Now we knit air loops. You will need as many of them as the length of the butterfly, but keep in mind that the chain should fold into a ring. Therefore, the length of the butterfly is half the chain of air loops.
Next, in single crochet columns, we knit as many rows as the width of the product. When the part is knitted, we begin to knit the strip on which our butterfly should be attached. We collect a chain of air loops - the length of the strip. We begin to knit the first row without crochets. Knit to the width of the ribbon. When the ribbon is ready, on the last stitch of the row we cast on 20 chain stitches or less, and knit single crochet rows, while attaching everything to the base of the ribbon. We do this for the middle part of our butterfly. And symmetrically from this ring we knit the second side of the ribbon. Next, look at the photo and work according to the described scheme of this product.
On the second half of the ribbon we make loops - holes for the button. This is done by skipping buttonholes. Now we take our butterfly, select the middle and stretch the bow into a ring on a ribbon. This is how our bow tie turned out. Now we sew on the button, and you can glue some pebbles and beads onto the middle ring.
These knitted ties can be made for both children and adults. Of course, knitted butterflies are worn by women or crocheted for small children.
Bow tie with an elastic band: how to sew without a sewing machine
For several years now, “familylook” has not lost its relevance. It is very easy to choose the same dresses for mother and daughter. But for families with sons, choosing a stylish family look is much more difficult. This problem can be solved by one accessory that is easy to make with your own hands - a bow tie. Jeans, plain shirts and matching denim bow ties will help the whole family look stylish. This accessory can also be sewn from any trouser fabric, leather or satin.
Progress
Any type of bow tie can be made by hand. To create a traditional tying model, you will need the following materials:
There are three fundamentally different types of bow ties.
In appearance, the shape of the bow and loops, the butterfly has several generally accepted English names.
A bow tie is a men's accessory made of fabric that is tied in a special way around the neck on the collar of a shirt. The butterfly is a symmetrically folded bow, secured by a central bridge. A bow tie is a mandatory addition to a men's suit for celebrations and ceremonies, or a tuxedo.
Freckles are ideal for the image of this fairy-tale character. Draw them with a brown or orange makeup pencil on the nose and along the top of the cheeks.
If everything seems too complicated, you can make a Russian folk shirt - this option looks no worse than the classic one, but is much easier to make. To match the look, it would be appropriate to sew bright buttons onto the fabric down from the neckline.
How to sew a bow tie with an elastic band without a sewing machine
We sew the base piece “inside out” along its length, turn the sewn piece inside out, fold it so that the seam is in the middle and iron it.
The second step is to sew the workpiece along the width, while the previous seam should be on the outside.
When you have a ring, turn it inside out with all the seams. The “width” seam should be placed in the center of the product and ironed well.
Let's start making the bow tie jumper. We sew the corresponding piece of fabric with the seam facing outwards on the wrong side.
The workpiece should also be turned with the seam inside.
Note: This is easier to do with a pencil or pen. Place the sewn tube onto the base and carefully turn it inside out.
Place the jumper seam in the center and press it flat.
Attach the workpiece to the base and measure what diameter the ring needs and sew it so that the seam can be hidden inside. Then carefully fold the base and place it on the center of the jumper.
The elastic can be sewn directly to the back of the jumper or pulled through it.
Sew the elastic with the seam facing inward.
We hide the elastic seam under the jumper.
Author: Ekaterina Vishnevetskaya
Did you like the article? Share information on social networks:
Source
Minimum quantity 1 piece.
In this master class, I want to share with you my technique for making such a stylish accessory as a bow tie. It will take you very little time and you will be very pleased with the result of this wonderful tie. We will not sew a classic self-knitted butterfly, but a so-called “lazy” one, which is easy to use (you don’t need to carefully tie it), and at the same time it looks no worse than a self-knitted one, but on the contrary, many people like it precisely because of their correct neat forms.
Step 4
- a piece of fabric 4*7 cm for the jumper;
The next step is to fold the ironed part in half with the seam facing out and stitch it, retreating 5 mm from the edge.
Step 6
A two-layer butterfly is made, so the main part for the second (top) layer needs to be made smaller by 1-2 cm at the edges.
Bearded questions: How to choose a hairstyle to suit a man's face
A strap is inserted through the central jumper.
Pattern is the basis of a successful business
Regardless of your experience and skills, they start with preparation. To do this, create the correct tie pattern, taking into account the dimensions of the future product.
A regular tie with an elastic band is sewn together from four parts:
Craftswomen strongly recommend cutting exclusively on the bias, despite the noticeable increase in fabric consumption in this case. To do this, the base material is laid out on a flat surface, a guide is drawn diagonally and the patterns are oriented along it.
To sew a tie with your own hands, you will also need a spacer part, which is made from a lining, cutting out a part from adhesive onto the nodal part.
Cutting and sewing diagram: step-by-step instructions
To sew a tie for a boy with an elastic band, you need to roughly divide the work into three stages. The first stage is making a pattern. The second is preparing fabric parts. The third is stitching the finished product. Consider a bow tie option.
They start with a pattern. It will be enough to prepare rectangles with dimensions of 8 × 13 cm, 11.5 × 22 cm and 13 × 23.5 cm. It is most convenient to work with the pattern on an ironing board, to the surface of which you can attach patterns with pins.
So, the next stage - the pattern of a tie for a dude boy is attached to the surface of the board on the fabric and carefully cut out. The output should be fabric rectangles. They start working with the largest part. It is folded lengthwise, ironed with an iron, smoothing the fold, straightened and folded again across so that the edge and fold lines coincide.
Model selection
You can make various types of butterflies yourself. First of all, products are classified according to the method of tying:
- Samovyaz. The most creative option that allows you to experiment with knots. Single-color and double-sided models are available.
- On the clasp. To put it on, you just need to fasten the product - the bow tie in this case is already completely ready and does not need any additional manipulations.
- Attached. The model is fixed to the hem of the shirt, next to the top button, using a special clothespin.
The tying method is selected according to individual preferences. The easiest way to make a butterfly is the self-knitting type; making ready-made models is somewhat more difficult.
Self knitting
On the clasp
Sticky
Depending on the shape, products come in the following types:
- Classic or Butterfly. A traditional version, reminiscent of the wings of the insect of the same name. The width of the bow reaches 6.5 cm, suitable for a man of any build.
- Large Butterfly. The model is relevant for large men with full necks. On a thin figure it will look strange and even comical. Product width - up to 8.5 cm.
- Diamond Point. The bow tie resembles a diamond: the classic shape is in perfect harmony with the angular tips, similar to diamonds. The asymmetrical cut serves to create original looks.
- Rounded Club. A club version of a small size with rounded outlines, suitable for themed events and parties.
- Continental tie. It is a fabric strip with extensions along the edges, fixed with a clasp by placing one tip on top of the other.
The classic model and Large Butterfly are the easiest to sew yourself. The remaining options will be a little more difficult to make at home.
Classical
Large Butterfly
Diamond Point
Rounded Club
Continental tie
Plastron - how to sew for a schoolchild
Who said that school ties must necessarily be narrow, cut according to classic patterns? On special occasions, the child can be invited to add new notes to the image, for example, using an unusual model of a plastron tie. Just like a regular “herring” plastron, you can make it at home with your own hands.
The tie with Italian roots has an unusual shape, reminiscent of a breastplate that fencers once used. In combination with the right clothes, the accessory looks elegant, fashionable and noble, especially if you choose a classic fabric option - silk or satin - as the sewing material.
It is correct to wear a plastron in combination with a vest that matches the ends of the accessory. Decorative pins and clips are often used as an additional decorative element. There are two ways to make a plastron - ready-made with a knot and “self-knitting”. Since we are talking about a tie, the first option will be convenient for a child.
So, to sew an accessory you will need fabric 70 cm long and 80 cm wide. Silk or viscose are quite suitable as a base. It is not necessary to prepare patterns for this tie model, except in cases where you have to cut the product from leftover fabric.
A plastron tie consists of three main parts:
The stand with a width of 2.5-3 cm is equipped with a Velcro fastener. A roller is an element through which the ends of a product pass. The tie itself measures from 75 to 80 cm, is distinguished by sharp corners at the bottom and light voluminous padding. Part parameters: stand - 7×65 cm; roller - 13x13 cm, tie - 22x80 cm. The product is cut out in the same way as a herring tie on the bias.
The roller is folded in half, stitched, turned inside out and steamed. The same applies to the stand. From the lining fabric, following the direction of the lobar, prepare two parts with a height of up to 15 cm. Place it on the front side and sew the corners with slight tension. Turn it inside out and steam it so that the lining is invisible.
At the next stage, the tie is folded lengthwise, fastened with pins and stitched along the edges with an indentation of 1 cm, and steamed. The lining is cut out of thin woolen fabric, again on the bias, with dimensions: 9.5 cm - width and 78 cm - length. They put it inside.
All previously prepared parts are assembled like a construction set, pulling the stand and tie through the roller, forming beautiful folds, fixing them with stitches. The decorative pin can be replaced with a miniature Swarovski button. It is enough to sew it right through to the roller. The button will not only serve a decorative role, but will also be able to hold folds, giving the product a finished look.
Ideas
Set with frame wings
One option for a butterfly costume is a dress or set with frame wings on the back. The dress can be bright, rainbow or laconic, like the body of a butterfly, setting off multi-colored wings. In such a suit, the wings hold their shape well and have a wire or other frame.
Headband with mustache
Outfit with soft wings
Frameless soft wings in the form of a cloak look no less impressive. These wings are made of fabric and attached to the dress and sleeves. When a girl raises her arms or spins, her wings spread out, like those of a real butterfly.
Snow butterfly image
Butterflies are carefree summer creatures, but such a costume is also quite suitable for a New Year’s party. You can create an image of a “snow butterfly” that will echo the theme of the holiday.
Useful tips: what you need to know
Regardless of the chosen model of tie for a schoolchild, it is important to initially choose the right fabric for the base and maintain the shape. Only experienced craftswomen can do without patterns, but at the initial stage it is better to use paper patterns that are transferred to fabric. To cut out neat and correct parts, paper patterns are fixed on the fabric with pins, and chalk or pieces of soap are used to trace the contours.
You can also use an old ready-made tie as a pattern, which is ripped into pieces for convenience. The elastic band for fixing the tie can be either an ordinary underwear elastic band, or you can replace it with a special elastic band in the same color with convenient fasteners.
A variation of a convenient tie for quick attachment to a student’s shirt can be considered a model with a clothespin or a zipper. Such options are more suitable for primary school students when they need to quickly make changes to their everyday look. Kids can cope with both fastening options without the help of adults, however, boys will not have any difficulties wearing a tie with an elastic band.
Source